1
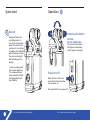
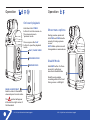
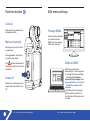
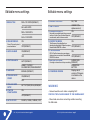
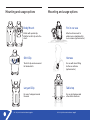
RS2 - X2
With you on the front line
Quick Start
and User Manual
REVEALMEDIA.COM
Quick start
Quick start
1
Charge
Charge the camera for
three hours or until the
charging light turns
green.
Introduction
Welcome to the next generation
of body worn cameras. For your
convenience, the camera is set
up and ready to go in three easy
steps.
2 Mount
Choose how to mount
your camera; you can
use either the Klickfast
attachments, clips or a
lanyard.
3 Record
Slide the red switch
down to start
recording. To stop
recording, slide the red
switch up.
RS2 - X2 Quick Start and User Manual - page 2
RS2 - X2 Quick Start and User Manual - page 3
Quick start
1 Charge
Open the cover on the
bottom of the camera
and insert into a RS2
docking station.
Alternatively, connect
to a USB cable.
Quick start
2 Mount
To use the Klickfast
mounting option:
• Unscrew the clip
• Align the Klickfast stud
• Use the screwdriver to
secure
RS2 - X2 Quick Start and User Manual - page 4
RS2 - X2 Quick Start and User Manual - page 5
Quick start
Operation
3 Record
Camera articulation
Simply pull down the
red sliding switch to
record. The camera will
beep three times to let
you know it is recording.
In addition, the LED light
will be flashing red, and
the red recording light
will be flashing on the
display.
To stop recording, slide
the red switch back up.
The camera will beep
twice and both the LED
and display lights will
stop flashing.
CAUTION:
DO NOT OVER ROTATE!
The camera head rotates
270 degrees horizontally
and 60 degrees vertically.
Power on/off
When the unit is off, press
and hold the function button
to turn power on.
Press and hold to turn power off.
RS2 - X2 Quick Start and User Manual - page 6
RS2 - X2 Quick Start and User Manual - page 7
Operation
Operation
On board playback
Hold down the POWER
button to turn the camera on.
The camera is now in
“preview” mode.
Once on, press the PLAY
button to open the playback
mode.
PLAY / PAUSE VIDEO
FORWARD VIDEO
REWIND VIDEO
Show menu options
During preview, press and
hold FWD and RWD simultaneously to bring up menu
screen.
NOTE: Menu options are not
changeable on camera alone.
Stealth Mode
Hold RWD button for three
seconds to activate or
deactivate Stealth Mode.
Stealth mode enables
recording without the front
facing screen or LED light.
MARK AS IMPORTANT
Select a video in thumbnail
view and press to mark video.
The
symbol will appear
in the bottom right corner of
the thumbnail
RS2 - X2 Quick Start and User Manual - page 8
RS2 - X2 Quick Start and User Manual - page 9
Function button
Edit menu settings
Go back
Short press to go back when
in playback mode.
Through DEMS
Mark as important
Open the auto-uploader
or camera interface.
Right click on a camera
and select “settings”.
During record, press to mark
as important.
During playback, short press
to mark as important.
The
symbol will appear in
the bottom right corner of the
thumbnail
Power off
When not recording, press for
longer than 2 seconds to turn
off.
RS2 - X2 Quick Start and User Manual - page 10
Without DEMS
NOTE: You must be the
administrator on the computer
to change the camera settings.
1) Download the Reveal
camera settings manager from
www.revealmedia.com/downloads
2) Run the program on the
computer
3) Select which camera you
want to edit from the list on
the left and edit the options on
the right.
RS2 - X2 Quick Start and User Manual - page 11
Editable menu settings
1. RESOLUTION
1280 x 720 30FPS (DEFAULT)
10. DEFAULT SETTINGS
NO / YES
848 x 480 60FPS
11. UNIT ID SETUP
USER SET (five
alphanumerics)
1920 x 1080 30FPS
12. PRE-RECORD MUTE
ON
13. PROTECTED MODE
ON
14. TRUSTED MODE
ON
1440 x 1080 30FPS
2. PRE-RECORDING
Stores 30 seconds prior to
record activation
3. AUDIO ALARMS
ON
OFF (DEFAULT)
ON (DEFAULT)
OFF
4. WHITE BALANCE
Editable menu settings
AUTO (DEFAULT)
SUNNY / CLOUDY /
FLUORESCENT/INCANDESCENT
5. LANGUAGE
ENGLISH (DEFAULT)
6. TIME AND DATE
STAMP
ON (DEFAULT)
No audio is recorded during the pre-record
section of video. Once the user slides into
OFF (DEFAULT)
record mode, audio is then recorded
The files cannot be played back on
standard media players. Playback requires
OFF (DEFAULT)
Reveal Media DEMS V3 or above
RS2 - X2 will not mount as mass storage
device unless connected to Reveal Media
DEMS V3 or above
15. RECORD OFF MODE
SLIDER ONLY
16. FIRMWARE VERSION
SLIDER PLUS
BUTTON
Displays what
version of firmware
is installed on the
device
For single or two actions to stop recording (DEFAULT)
OFF
7. TIME AND DATE
SETUP
8. START IN
STEALTH MODE
SET YYYY/MM/DD HR/MIN/SEC
WARNING!
ON
• Camera head does not rotate completely 360°.
FORCING IT WILL CAUSE DAMAGE TO THE CAMERA HEAD!
OFF (DEFAULT)
9. AUTO LCD OFF
OFF (DEFAULT)
30 SECS / 2 MIN / 5 MINS / OFF
RS2 - X2 Quick Start and User Manual - page 12
• Please take care when connecting and disconnecting
the USB cable.
RS2 - X2 Quick Start and User Manual - page 13
Mounting and usage options
Mounting and usage options
Body Mount
For in-car use
Attach with pocket clip,
klickfast or shirt clip onto the
chest.
Attach suction mount to
windscreen or dashboard for
in-car camera. (optional extra)
Shirt Clip
Harness
The shirt clip can be reversed
for female shirts.
For use with loose fitting
clothes or uniforms.
(optional extra)
Lanyard Clip
Table top
For use of a lanyard around
the neck.
For use in interviews and
other static situations.
RS2 - X2 Quick Start and User Manual - page 14
RS2 - X2 Quick Start and User Manual - page 15