1
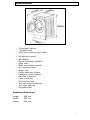
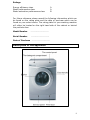
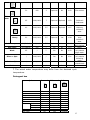
BWM1417W 60 cm 7
kg Washing Machine
1
USER MANUAL FOR YOUR BAUMATIC
BWM1417W
60 cm 7 kg
Washing machine
NOTE: This User Instruction Manual contains important
information, including safety & installation points, which will
enable you to get the most out of your appliance. Please keep it
in a safe place so that it is easily available for future reference; for
you or any person not familiar with the operation of the appliance.
GS 25/01/12
2
Contents
Environmental note
4
Important safety information
5–6
Specifications
7-8
Description of the appliance
Control panel
LCD display
Detergent drawer
8
9 - 10
10 - 11
11 - 12
Preparing the wash cycle
Preparing your garments for washing
A selection of wash care symbols
Detergents and conditioners
Wash program table
12 - 16
12
13
13 – 14
14 – 16
Wash program guidance
16 - 17
Selecting a wash program
End of cycle
Adding a garment
Manual soaking
Delay start feature
Child lock
Power off memory
17 - 19
17 - 18
18
18
18 - 19
19
19
Maintenance and cleaning
In daily use
Control panel and washing machine cabinet
Detergent drawer
The washing machine drum
Door
Cleaning the drain pump filter
Cleaning the water inlet filter
Winter storage
Removing stains
Stain removal rules
Stain removal guide
Poor wash results
19 - 25
19
20
20
20 – 21
21
21
22
22
23
23
23 - 24
25
Installation
Washing machine accessories
Removing the transit bolts
Locating your washing machine
Adjusting the height of the appliance
Connecting to the mains water supply
Connecting to the water outlet
Power supply
Before first use maintenance wash
26 – 32
26
26 - 27
27
28
29
30 - 31
32
32
Error code failure system
General troubleshooting
Baumatic consumables
Technical data
33
34 – 35
36
37
Contact details
38
3
Environmental note
4
Important safety information
Your safety is of the utmost importance to
Baumatic. Please make sure that you read this
instruction booklet before attempting to install or
use the appliance. If you are unsure of any of the
information contained in this booklet, please
contact the Baumatic Advice Line.
General Safety
o Repairs to your appliance must only be carried out by a
Baumatic engineer or one of its authorised service agents. Any
attempt by an inexperienced person to repair the appliance,
could result in injury or damage to your washing machine.
o If you notice that the mains cable is damaged. The appliance
must not be used. The same applies if you notice that the
worktop, control panel or base area is damaged. As this could
allow access to the internal components of the machine.
o The appliance should be turned off and isolated from the mains
supply, before either cleaning or maintenance work is attempted.
o The mains cable must not be used to pull the plug out of the
electrical socket.
o The machine should not be sprayed with water.
o The glass of the porthole door may become hot during the higher
temperature wash programs.
o The machine should be allowed to cool before carrying out an
emergency drain or cleaning the drain filter.
o It is possible for small animals to chew either the mains cable or
water hoses, which could cause an electric shock hazard.
Installation
o The installation instructions contained within this user manual
should be followed.
o It is obligatory for the completed installation to comply with all
relevant building regulations and local water authority
requirements.
5
o Before the first use of the appliance, we advise that a 95
degree self-clean cycle is completed. No garments should
be placed inside the machine; however a small amount of
detergent must be used.
During Use
o It is recommended that the appliance is unplugged and the
water supply is turned off after the machine is used.
o This appliance is only designed to wash normal domestic wash
loads. If you use your washing machine in any other way or it is
incorrectly used, then Baumatic accepts no liability for any
damage that might be caused and any guarantee will be void.
o No attempt should be made to alter or modify the specifications
of this appliance.
o The detergents that you place in this appliance should be
suitable for automatic washing machines. With regards to dosage
levels, the detergent manufacturer’s recommendations should be
followed.
o You should not wash garments that have been in contact with
flammable materials.
o Your washing machine should not be used for dry cleaning.
o If you use either dyes or bleaching agents inside this machine,
then you should consult with the manufacturer of these products
to make sure they are suitable for use in your washing machine.
Baumatic cannot be held responsible for any damage that may
result.
Child Safety
o Your washing machine should only be used by adults. You should
not allow children in the area of the machine unsupervised. You
should not let them touch the controls or play with the appliance.
o It could be possible for a child or pet to gain access to the
washing machine through the porthole door. Therefore please
check the drum before using the appliance.
o Any packaging that is removed from the machine should be kept
away from children.
o All detergents should be kept out of a child’s reach and in a safe
place.
6
Specifications
o 15 program options
o 7 kg wash load
o 1400 rpm maximum spin speed
o
o
o
o
o
o
o
o
o
o
o
o
o
o
o
Variable spin speed
LED display
Digital countdown indicator
Delay start
Wash temperature control
Anti-crease function
Safety lock
Failure detection system
Imbalance control system
Overflow protection
Foam protection
54 litre drum size
300 mm porthole diameter
180° door opening
Adjustable feet
Appliance dimensions
Height:
Width :
Depth:
855 mm
595 mm
565 mm
7
Ratings
Energy efficiency class
Wash performance class
Water extraction performance class
A
A
B
For future reference please record the following information which can
be found on the rating plate and the date of purchase which can be
found on your sales invoice. The rating plate for your washing machine
will either be located on the right hand side of the cabinet or behind
the porthole door.
Model Number
……………………………….
Serial Number
……………………………….
Date of Purchase
……………………………….
Description of the appliance
8
Control panel
1) Program selection dial. This dial can be rotated to select the
appropriate wash program for your wash load.
2) Start/pause button. This button can be pressed
to start a wash program and again to temporarily
pause the cycle.
3) Extra function button. You can select either or both of
the extra wash functions, extra rinse or pre-wash, by
pressing this button.
4) Add garment button. When this button is pushed, the
wash program will pause to allow more clothes to be
added.
9
5) Water level selection button. You can adjust the
water level for the washing and rinsing programs according
to the amount of laundry. Press the button repeatedly to
choose from the following options:
Tiny Æ Low Æ Mid Æ High
6) Water temperature selection button. This button can
be used to adjust the washing temperature. Press the button
repeatedly to select from the following options:
30°C Æ 40°C Æ 60°C Æ 95°C
7) Spin speed selection button. This button can be used
to adjust the spin speed of the cycle. Press the button
repeatedly to select from the following options:
No Spin Æ 600rpm Æ 800/900rpm Æ 1000/1400rpm
8) Delay start button. This button is used to program a
delayed start to the cycle. See the “Delay start” section of
this manual.
LCD display
A) Water level display. These LEDs indicate the water level set
for the wash cycle.
B) Temperature display. These LEDs indicate the water
temperature set for the wash cycle.
C) Spin speed display. These LEDs indicate the spin speed set for
the wash cycle.
D) Extra rinse LED. This light will come on when an extra rinse is
set for a wash program.
10
E) Pre-wash LED. This light will come on when a pre-wash is set
for a wash program.
F) Delay start light. This light will flash to indicate that a delayed
start has been programmed. The LED display will also show the
time left until the cycle begins.
G) Child locked light. This icon will light when the child lock
feature is activated. See the “Child lock” section of this manual.
H) Door locked light. This icon will light when the door is in the
locked state during a cycle. The door can only be opened after
the light has turned off.
I) Wash phase indicator. The relevant icon will light to show the
current phase of the wash program, from pre-wash, wash, rinse
and spin.
J) LED display. After a wash cycle begins, this display will show
the remaining time until the cycle ends. The display also shows
the time left before a delayed start when this function is set.
Detergent drawer
Main wash section
This compartment should have detergent placed in it (you should also
put a water softening agent in this section, if you use one). The
detergent will be added to the drum at the start of the main wash
program.
Conditioner section
This compartment should be used for liquid conditioners (fabric
softener, starch). They will be added to the wash load during the final
rinse.
11
Pre wash section
This compartment should have detergent placed in it, if you are going
to select a pre-wash before the main wash cycle.
Preparing the wash cycle
Preparing your garments for washing
o Your washing should be sorted out, according to
the fabric type and the wash care symbol that is
printed on the garment’s wash care label (see
separate section on wash care symbols).
o Your washing should also be sorted out
according to the degree of soiling.
o Check all pockets on a garment to make sure
that they are empty.
o Remove any detachable metal items (badges,
paperclips, safety pins etc).
o Zips should be closed, duvet covers and
pillow cases should be buttoned up and any loose straps should
be tied up. This will help to prevent other garments from getting
damaged during the wash.
o Woollens and knitted coloured fabrics should be turned inside out
before being washed in the appliance.
o Small delicate items (tights, baby socks) should be placed in
either a washing net or a zipped pillow case.
o Curtains should be handled with particular care. All plastic hooks
or metal strips must be removed before being washed in the
appliance.
o Coloured items and whites should be washed
in separate wash cycles.
o New garments often contain an excess of
dye, therefore it is advisable to wash them separately for their
first wash.
o Garments should be unfolded and shook out before being placed
inside the machine.
12
A selection of wash care symbols
Washing
Boiling
temp
95°C
Normal
temp
60°C
Normal
temp
40°C
Do not
wash!
Bleachable
in cold
water
Do not
bleach!
Wool
seal
Delicate
temp
30°C
Delicate
temp
40°C
Hand
wash
only
All
solvents
All but TRI
Benzine
only
Do not
clean!
Normal
Low
High
Hang to
dry
Drip dry
Dry
flat
110°C
150°C
200°C
Dry
cleaning
Spin
dryer
Do not
dry!
Ironing
Do not
iron!
o The wash care symbols should be used to help you to select the
most suitable wash program. They will also help you to sort your
laundry into different loads, depending on the fabric type and the
highest temperature which the garment can be washed at.
Detergents and conditioners
IMPORTANT: Only detergents suitable for use in washing
machines should be used.
The amount of detergent that you need to use in your appliance, will
depend on
o The degree of soiling. Lightly soiled garments in general
require less detergent.
o The size of the wash load. A smaller wash load will require a
reduction in the amount of detergent.
o The hardness of your tap water. The harder your water is,
then the more detergent you will need to use. The detergent
manufacturers normally give guidance as to how much extra
detergent should be used, depending on the hardness of the
water.
13
Liquid detergent
If you are using liquid detergent, then in the majority of cases the
liquid should be placed inside the dosing device supplied by the
detergent manufacturer and placed inside the drum. All instructions on
the detergent packaging should be followed.
Low temperatures
o The enzymes in biological washing detergents work best at low
temperatures to provide excellent cleaning and stain removal
results, but not as low as 20°C.
o Liquid or gel detergents are particularly suitable for low
temperature washing as they dissolve easier and quicker than
powders or tablets.
Water softening agents
If your tap water is hard, then it may be prudent to utilise a water
softening agent. This will help to ensure that the appliance does not
become clogged with hard water deposits. You may also find that it will
allow you to lessen the amount of detergent that you are using.
When using any detergent or water softening
agent,
the
recommendations
of
the
manufacturers should be followed.
Wash program table
Cycle
MAX
temperature
(°C)*
MAX spin
speed
(rpm)
MAX
wash
capacity
(kg)
Extra
rinse
Prewash
Default
wash
time
Suggestions
for laundry
95
1000/1400
7
Optional
Optional
1:37
40
1000/1400
3.5
Optional
No
0:28
Ordinary
clothes.
Not so dirty
clothes.
95
1000/1400
7
Optional
Optional
2:47
Comparatively
thick clothes.
40
800/900
2.5
Optional
No
0:58
Wool / fleece
clothes.
60
800/900
3.5
Optional
Optional
1:11
Chemical fibre
Cotton
Quick wash
Jeans
Wool
Synthetics
14
clothes.
Silk
30
600
2
Optional
No
0:42
Silk clothes.
95
1000/1400
7
Optional
Optional
1:52
Children’s
underwear.
40
1000/1400
3.5
Optional
Optional
1:07
Ordinary
children’s
wear.
60
1000/1400
3.5
Optional
Yes
1:38
Active enzyme
60 (Default)
1000/1400
3.5
Optional
Yes
2:16
Self-clean
95 (Default)
600
/
No
No
1:12
Wash
95
/
7
No
No
0:32
Rinse + Spin
/
1000/1400
/
Yes
No
0:21
Drain + Spin
/
1000/1400
/
No
No
0:12
Drain
/
/
/
No
No
0:01
Kids
wear
Underwear
Colour
Heavy
Comparatively
dirty
children’s
wear.
Comparatively
dirty clothes.
None.
Clothes that
only need a
single wash.
Clothes that
only need a
bleaching
wash.
Clothes after
a hand wash.
None.
* The actual water temperature may differ from the declared cycle
temperature.
Detergent box
Cycle
Pre-wash
Main wash
Cotton
Quick wash
Jeans
Wool
Synthetics
Silk
Kids wear Underwear
Colour
Heavy
Active enzyme
Self-clean
If needed
No
If needed
No
If needed
No
If needed
If needed
If needed
Yes
No
Yes
Yes
Yes
Yes
Yes
Yes
Yes
Yes
Yes
Yes
Yes
Softener
If
If
If
If
If
If
If
If
If
If
If
needed
needed
needed
needed
needed
needed
needed
needed
needed
needed
needed
15
Wash
Rinse + Spin
Drain + Spin
Drain
If needed
No
No
No
Yes
No
No
No
No
If needed
No
No
Pre Wash: If the laundry is heavily soiled, the pre-wash option is
recommended. This option is available for cotton, jeans, synthetics,
kids wear and wash programs. You should place detergent in the prewash compartment of the detergent drawer, as well as in the main
wash compartment.
Rinse+: Will introduce an additional rinse, which will help to remove
traces of detergent residue.
Active enzyme: This program makes optimum use of the active
enzyme of detergent powder by utilising a 40°C pre-wash followed by
a 60°C main wash. It is ideally suited to clothes that are hard to wash.
High temperature self-clean: This cycle is specially designed to
clean the drum and tube. It uses a 95°C high temperature sterilization
to make sure the wash cycles are more effective. When the proper
amount of chlorine bleaching agent is used, the cleaning effect will be
better. Use this cycle approximately once a month depending on
usage. No clothes should be added during this procedure.
Wash program guidance
o A wash program option can only be selected if the program table
advises that it is possible with the wash cycle you have selected.
o The washing machine automatically selects a temperature for a
particular wash program. However it is possible to alter the
temperature by using the temperature selection button. All
temperatures will not be available on certain wash programs.
o The washing machine automatically selects a spin speed for a
particular wash program. However it is possible to alter the spin
speed by using the spin button. All spin speeds will not be available
on certain wash cycles.
o Important: You should make sure that the selected spin speed is
appropriate for the garments that you are washing.
o Important: Before opening the door of the appliance, you MUST
spin the clothes and drain the water.
o The active phases will appear at the top of the LED display, as the
wash program progresses.
16
o The LED display shows an approximate time for the selected wash
cycle. Please note that factors external to the machine, e.g. the
temperature of your water supply, your water pressure etc. can
affect the time it takes for a wash cycle to complete.
Selecting a wash program
o Put the laundry into the drum and then close the door. The
maximum load size according to the “Wash program table” should
be observed.
o In the detergent drawer, put detergent into the main wash and prewash compartments.
o Put detergent into the pre wash compartment only if you want to
use the pre-wash option.
o Softener should be poured into the middle compartment of the
detergent drawer; the level should be below the ‘MAX’ level.
o If you want to use bleach, then you should put it into the main
wash compartment with your detergent.
o Use the wash program selection knob (1) to select the required
program which is most suitable for the clothes being washed.
o You can use the temperature selection button (6) to adjust the
wash temperature.
o You can use the spin speed selection button (7) to adjust the spin
speed.
o You can use the water level selection button (5) to set the amount
of water according to the amount of laundry.
o You can use the extra function button (3) to add a pre-wash or
extra rinse to a cycle.
o Press the start/pause button (2), the door will lock and after a few
seconds you will hear the machine start to fill with water.
End of cycle
o At the end of a wash cycle, an acoustic signal will sound from the
machine.
o IMPORTANT: You should not attempt to open the porthole door
until the door lock light has gone out.
17
o When the door lock light has gone out you can open the porthole
door and remove the laundry.
Adding a garment
o To add an additional item of clothing, press the add garment
button (4). Wait until the machine stops and the door lock
releases.
o Add the extra clothes and close the machine door. Press the
start/pause button (2) and the cycle will continue.
IMPORTANT: The washing machine does not respond to the add
garment function if it is in a high water level or high
temperature stage of the cycle.
Manual soaking
o Set the desired washing program as outlined in the above
section.
o Press the start/pause button (2) and after 10 minutes, press it
again. This will pause the program after water has been
introduced into the tub.
o You can leave the machine, with the clothes soaking in the water
for however long you desire. When this time has elapsed, just
press the start/pause button again (2) and the cycle will
continue.
Delay start feature
Your appliance has a delay start feature, which allows you to delay the
start of a wash cycle until a later time.
o Put the laundry into the drum and close the door.
o Put the detergent into the main wash compartment and prewash
compartment in the detergent drawer. Softener should be below
the ‘MAX’ level. Only put detergent into the prewash
compartment if you want to add a prewash to your cycle.
o When you want to use bleach put this in the main wash
compartment with the detergent.
o You can select a program using the wash program selection dial
(1) and you can also alter the temperature (6), spin speed (7),
water level (5) and add an extra function by pressing the
relevant buttons.
18
o Press the delay start button (8) repeatedly to select the required
delay time, as shown on the LED display.
o Press the start/pause button (2). The time delay LED should
light.
o After the set delay time has elapsed, the machine will begin
automatically.
Child lock
Your appliance has a child lock option, if this is set, it will mean that
nobody can affect the operation of the wash program once it has
started.
o When the machine is in use, press the delay start button (8) and
the spin speed selection button (7) simultaneously for about 3
seconds. The child locked icon will light to show the feature has
been activated.
o Follow the same procedure to release the child lock.
Power off memory
o If the power supply to the machine is cut off while it is in the
middle of a cycle, you do not need to do anything.
o The machine will continue the wash cycle when the power supply
returns.
IMPORTANT: DO NOT open the door by force when the power is
off. If you need to open the door as a matter of urgency, please
contact the Customer Care Advice Line.
Maintenance and cleaning
In daily use
o Once a wash cycle has completed, you should pull out the
detergent drawer slightly, so it can dry out.
o Leave the porthole door ajar for a short while after a wash cycle
has completed. This should help to prevent stagnant smells and
to protect the door seal.
o Close the water tap.
o We suggest that you disconnect the appliance from your mains
supply, when it is not in use.
19
Control panel and washing machine cabinet.
IMPORTANT: Do not use any abrasive cleaner or household polish on
either the control panel or operating parts.
o Wipe over the control panel and the external surface of the
machine using a brand new damp cloth with warm water.
o If you ever spill any liquid detergent or conditioner from the
detergent drawer onto the washing machine cabinet, then these
should be cleaned up immediately as they could be corrosive.
Detergent drawer
Occasionally the detergent drawer should be cleaned, to remove any
detergent residue that has built up.
o Pull the detergent drawer out as far as it
will go, press down the catch in the
middle section of the drawer (1) and then
pull the drawer out (2).
o Wash the detergent drawer in warm,
soapy water (3). For ease of cleaning,
you can remove the upper part of the
fabric softener compartment.
o Detergent can also accumulate inside the
detergent drawer recess, so you should
also clean this out using a brush
o Once you have finished cleaning the detergent drawer and
recess, you should slide the drawer back into its original
position.
The washing machine drum
The drum of your washing machine is constructed from stainless steel.
However if there are objects that can rust placed inside the drum, then
it is possible for the drum to become stained.
IMPORTANT: Do not use a descaling agent, iron/steel wool or
scouring agents to clean the drum of your appliance.
20
o Remove any rust stains on the drum with an appropriate
stainless steel cleaning agent.
Door
o You should regularly check to see if any deposits have formed,
or there are any foreign bodies inside or underneath the rubber
door gasket. This sits inside the opening of the porthole door.
Cleaning the drain pump filter
IMPORTANT: Switch off your washing machine and disconnect the
plug from your mains supply.
You should clean out the filter approximately every ten washes.
If the drain pump filter is not cleaned regularly, then your
appliance may find it difficult to pump out water efficiently.
o You should regularly check to see if any deposits have formed,
or there are any foreign bodies in the drain pump filter.
o Locate the drain pump filter flap that is on the base of the
appliance in the front right hand corner.
o Empty the water from the pump to a
container cautiously. If necessary
wait for the water to cool down first.
o Rotate the pump cover anticlockwise
to release it.
o Screw the pump cover
out and clean the filter
before reinstalling the
pump cover.
IMPORTANT: If you are draining water from the bail hose and drain
pump filter in an emergency. You should take care as the water
coming from the machine mid-cycle could be hot. Especially if the
water is being drained in the middle of one of the hotter wash cycles.
21
Cleaning the water inlet filter
o Clean the filter when water leaks from the water inlet.
o Always pull the power plug out before cleaning.
o Turn off the water supply to the washer and separate the inlet
hose.
o Rotate the inlet water pipe anticlockwise to
release.
o Remove the dirt from the inlet filter with a
brush before replacing it.
Winter storage
o You should install your appliance in a location where it will not be
subjected to freezing temperatures.
o If you are going to store your appliance in a location where the
temperature will drop below freezing in winter, then you should
follow the table below.
To winterize the washer
• Turn off the water supply.
• Disconnect and drain the water
inlet hoses.
• Run the washer on a drain and
spin setting for one minute.
• Unplug the power supply cord.
To use the washer again
• Flush the water pies
and hoses.
• Reconnect the water
inlet hoses.
• Turn on the water
supply.
• Reconnect the power
supply cord.
22
Removing stains
Garments that are covered in stains, grease or are heavily soiled may
need to be pre-washed or soaked before being placed inside of the
washing machine.
o Soaking helps to remove protein-type stains, like blood, milk or
grass.
o Pre-washing helps to loosen soil before the main wash.
Stain removal rules
o Use warm water for soaking or pre-washing stained laundry. Hot
water can set stains.
o Most stains are easier to remove when they are fresh.
o Before treating any stain try to establish; what kind of stain it is,
how old the stain is, what the fabric type is and whether the
fabric is colourfast (check the care label to find this out).
o Washing and drying can fix some stains.
o When bleach is recommended, use a mild fabric bleach that is
safe for the fabric.
o If you need to use a stain remover, put the stained area face
down on a paper towel or white cloth. Apply the stain remover to
the back of the stain. This forces the stain off the fabric, instead
of through it.
Stain removal guide
Stain
Alcoholic
beverages
Shoe polish
Tea and
coffee
Chocolate
and cocoa
Removal Method
The stain should be first washed with cold water, then
wiped with glycerine and water and rinsed with water
mixed with vinegar.
The stain should be softly scratched without ruining the
material, then rubbed with detergent and rinsed. In case
it is not eliminated, rub with 1 unit of pure alcohol (96
degrees) mixed in 2 units of water and then washed with
lukewarm water.
Stretch the stained area of material on the top of a
container and pour water as hot as the material can
endure on it. If the type of material is suitable, wash it
with lye.
Leave your clothes in cold water and rub with soap or
detergent, wash it in the highest temperature that the
material type can endure. If there is still a stain of oil left,
wipe with oxygenated water (in proportion of 3%).
23
Tomato
paste
Scrape the dried pieces without ruining the material, then
leave in cold water for about 30 minutes and wash by
rubbing with detergent.
Meat broth/
egg
Eliminate the dried stain residues and wipe with a sponge
or soft cloth wetted in cold water. Rub with detergent and
wash with diluted lye.
Grease and
oil stains
First wipe the residues. Rub the stain with detergent and
then wash with lukewarm soapy water.
Mustard
First apply glycerine to the stained area. Rub with
detergent and then wash. If the stain still does not
disappear, wipe with alcohol (on synthetic and coloured
cloth, a mixture of 1 unit alcohol, 2 units water should be
used).
Lay your clothes in cold water for 30 minutes. If the stain
still does not disappear, lay in mixture of water and
ammonia (3 table-spoons of ammonia in 4 litres of water)
for 30 minutes.
Lay your clothes in cold water and rub the stained area
with detergent. If the stain has still not disappeared,
apply lye on the fabric of your clothes in proper
proportion. (Do not use lye on coloured clothes).
Mould stains should be cleaned as soon as possible. The
stain should be washed with detergent, and if it does not
disappear, it should be wiped with oxygenated water (in
proportion of 3%).
Hold the stained area under cold water and wait until the
inky water completely runs off. Then rub with water
diluted with lemon juice and detergent. Wait five minutes
and then wash.
Stretch the stained area of your clothes on the top part of
a container and pour cold water on it. Do not pour hot
water on the stain. Wipe with cold water and apply
glycerine. Wait for 1-2 hours and rinse after wiping with a
few drops of white vinegar.
Rub the stained part with detergent. If the type of fabric
is suitable for use of lye, wash it with lye. Rub your
woollen clothes with alcohol (for coloured one, a mixture
of 1 unit pure alcohol and 2 units of water).
The stain should be eliminated before it dries by applying
thinner on it. Then it should be rubbed with detergent and
washed.
Blood stain
Cream, icecream and
milk
Mould
Ink
Fruit
Grass stain
Oil paint
Burnt stain
If your fabric is suitable for use of lye, you can add lye
into your washing water. For woollen fabric, a cloth
dampened in oxygenated water should be pressed on the
stain and it should be ironed with a dry cloth on it. It
should be washed after rinsing well.
24
Poor wash results
My garments are looking grey and there are limescale
deposits present in the drum of my washing machine.
o
o
o
o
There is not enough detergent being added.
The incorrect detergent is being used.
Stains are not being pre-treated.
The correct wash program or wash temperature was not
selected.
I have followed the advice given above, but my
garments are still coming out with grey stains on them.
o The garments are soiled with oils, ointments or grease and were
washed without enough detergent.
o The wash temperature selected was too low.
o Fabric conditioner has come into contact with the garments. If
this happens try to wash out these stains as quickly as you can
and try to avoid getting conditioner on the garments in future.
After the final rinse, I can still see foam.
o Modern detergents can result in there still being foam in the final
rinse, this does not mean that the washing is not being rinsed
properly.
There is white residue on my garments when I remove
them from the appliance.
o Modern detergents can contain insoluble contents; white residue
after a wash cycle is not necessarily a sign of the garments being
insufficiently rinsed by the washing machine.
o You should shake out the garment or brush it off. In future possibly
turn the garment inside out before it is washed. You may wish to
move from a powder detergent and switch to a liquid detergent
instead.
25
Installation
IMPORTANT:
THIS
INSTALLATION
MUST
BE
COMPLETED BY A SUITABLY QUALIFIED PERSON.
BAUMATIC ONLY SANCTION THE INSTALLATION
GIVEN IN THIS INSTRUCTION MANUAL. YOU
SHOULD KEEP THE TRANSIT PACKAGING, IN CASE
YOU NEED TO TRANSPORT THE MACHINE IN THE
FUTURE.
Washing machine accessories
Removing the transit bolts
IMPORTANT: Before installing or operating the washing machine,
YOU MUST remove the transit bolts that hold the drum in position
whilst the appliance is being transported.
o On the rear of the
appliance, identify the 4
transit bolts.
o Using a spanner, unscrew
the 4 transit bolts.
o You should keep the 4 transit bolts, in case you need to
transport the appliance elsewhere in future.
o Cover the holes that you removed the transit bolts from, using
the 4 transit hole covers supplied.
26
Locating your washing machine
o Before commencing installation, check
the location where you intend to install
the appliance. You should make sure that
you have everything in place that is
necessary for the correct installation.
o Do not place or store your washing machine in a location where
the ambient temperature could fall below 0°C, otherwise the
water in it could freeze up.
o Never place or store laundry products on top of the appliance.
o Install the washer on a flat, solid floor. If the washer is installed
on an uneven or suspended floor, it could cause excessive noise
and severe vibration, which may result in the malfunction of the
appliance.
9 DO NOT PLACE THE WASHING MACHINE ON A CARPET
OR A SUSPENDED FLOOR.
o You should also level off the washing machine, using the
adjustable feet on the base of the appliance.
o There should be a gap of 2 cm either side of the washing
machine; a 10 cm gap should be left behind the appliance.
27
Adjusting the height of the appliance
o Place the machine on a solid and level floor surface.
o If the floor is uneven, the appliance should be adjusted
otherwise the washing machine will not function properly. The
uneven surface also vibrates the machine and causes it to move
from its original position while in use.
o The adjustable feet of the
washing machine allow you
to correct the levelness of
the appliance.
o First unscrew the adjusting
nut (1) using a spanner.
o Adjust the height of the legs
by rotating the foot (2).
o When the appliance is set to
the correct height, screw the
nut (1) back tightly to lock
into position.
o Make sure that the washing
machine does not move
when you press down the
four corners of the machine’s
top plate.
IMPORTANT: There should be no instability of the machine when the
adjustable legs have been set to the correct level.
28
Connecting to the mains water supply
IMPORTANT: The washing machine should never be connected to the
water mains using an existing inlet hose, YOU MUST utilise the inlet
hose that is provided with the appliance.
Your appliance should only be connected to a cold water supply.
o Take out the supplied inlet hose.
o Fix one end of the inlet hose vertically to the
spiral tap which has been assigned to the
appliance.
o Screw the inlet hose tightly onto the tap in the
direction of the screw thread, taking care not
to wear it down. If secured incorrectly, the
thread will wear or leak.
o Connect the hose to the water
inlet at the back of the washing
machine. Make sure the inlet
hose is not over-bent as this can
damage the hose.
29
Connecting to the water outlet
o Secure the drain hose, so that it cannot move whilst the washing
machine is in use.
o Place the end of the drain hose on your drain pipe. Push it a
short way down into your drain pipe.
o IMPORTANT: Do not insert the drain hose too deeply into the
water pipe, as this may cause siphoning.
o The diagrams below show the ways that the drain hose can be
installed.
o ALWAYS use an elbow to bend the drain hose at a proper
bending angle. Fix it well when using the elbow.
30
o NEVER EXTEND THE DRAINAGE HOSE FROM ITS ORIGINAL
LENGTH.
31
Power supply
o IMPORTANT: The
electrical socket
must
still
be
accessible once
the appliance is
installed.
o Consult the rating plate BEFORE making the electrical
connections. Ensure that the voltage reaching the plug, is the
same as that on the rating plate.
o DO NOT REMOVE THE RATING
INFORMATION ON IT IS IMPORTANT.
PLATE
AS
THE
o The moulded plug that is supplied with the appliance must be
placed into an earthed and insulated socket.
o Broken or damaged power leads must only be replaced by a
suitably qualified person. A power lead of a similar type must be
used in replacement.
o IMPORTANT: We do not recommend that this appliance is
connected to an extension lead.
Before first use maintenance wash
o When your washing machine has been correctly installed, we
recommend that you perform a maintenance wash cycle, without
any clothing being placed inside of the drum.
o This will check that all aspects of the installation are correct; it will
also remove any deposits that may have been left on the drum by
the manufacturing process.
o Select the 95°C self-clean program (see the program table and
“Setting a wash program” sections).
32
Error code failure system
If your appliance senses that it is not operating correctly, then an error
code may appear on the LED display.
The following error codes can possibly be remedied by the customer
and the steps outlined below should be followed.
BEFORE
COMPLETING
ANY
MAINTAINEANCE
ON
APPLIANCE, IT SHOULD BE DISCONNECTED FROM YOUR
POWER SUPPLY.
Display
Reason
Inlet water
overtime.
Overtime of the
drainage.
THE
Solutions
Open the water tap to check if the inlet hose is
squashed or kinked. Check the filter in the inlet valve
is blocked or not. Check if the water pressure is too
low.
Check if the drain pump is blocked.
The door has
not been
closed.
Voltage is too
high.
Check if the door of the washing machine is closed.
Check if the clothes are pinned by the door.
Others.
Try again. Please contact the Customer Care Advice
Line is the problem persists.
Check if the voltage is too high. If it is, you need to
add a constant voltage device.
If a fault code reappears after following the
above advice and clearing the fault code. You
should turn the washing machine off using
the POWER button. Disconnect the appliance
from your mains supply. Then arrange for an
engineer to attend the appliance. You should
contact
the
Baumatic
Customer
Care
Department on (0118) 933 6911.
IF
AN
ENGINEER
ATTENDS
DURING
THE
GUARANTEE PERIOD AND FINDS THAT A FAULT
HAS BEEN CAUSED BY AN ITEM ON THE ERROR
CODE LIST, WHICH COULD HAVE BEEN CLEARED
BY THE CUSTOMER. THEN YOU MAY BE LIABLE
FOR THE COST OF THE SERVICE CALL.
33
General troubleshooting
Problem
The washing machine does
not work.
There is a peculiar smell in
the washing machine.
No water is visible in the
drum.
There is remaining water in
the softener box.
Remaining detergent is left
on the clothes.
o
Possible Solution
Close the washing machine’s door.
Confirm the wash cycle and press the start /
pause button.
Correctly connect the inlet water pipe.
Reload and distribute the laundry evenly in the
drum.
The imbalance control system has activated
because the laundry is unevenly distributed in
the drum.
The appliance will redistribute the laundry by
reversing the drum rotation. This may take
several attempts before the laundry is evenly
distributed and normal spinning can resume.
If the laundry is still not evenly distributed
after 10 minutes, the machine will not spin. In
the event of this, redistribute the load
manually and select the program again.
Run a self-clean cycle without any clothes.
o
No fault – the water is under the visible area.
o
The washing machine does
not fill.
o
o
o
o
No fault – the effect of the softener will not be
impaired.
Select the Rinse & Spin program or brush away
the flecks of detergent when the clothes are
dry.
Open the water tap.
Check the program selection.
Check the water pressure to see if it is
sufficient.
Close the washing machine door.
Check if the inlet pipe is bent or blocked.
Make sure the end of the drainage pipe is
higher than the water level of the inside of the
machine.
Check if the drainage pipe and sewage have
been sealed. If so, there will be poor
ventilation to cause the siphoning effect.
Check if the drainage pump is blocked.
Check if the drainage pipe is bent or blocked.
Check the height of the drainage nozzle to
make sure it is 0.6-1 metre from the bottom of
the washing machine.
Level the washing machine.
Fasten the footing.
Check if the internal packing for the
transportation has all been removed.
Check if the detergent use is excessive.
Put one scoop of softener mixed with ½ litre of
water into the detergent drawer.
Reduce the usage amount of detergent in the
next wash cycle.
Power failure or water supply cut off.
o
The inner barrel water of the washing machine
Water leakage.
The spin of the clothes is
abnormal.
Spinning starts late or the
machine does not spin.
o
o
o
o
o
o
o
The washing machine fills
and empties at the same
time.
o
o
o
o
o
The washing machine does
not drain.
o
o
o
Vibration of the washing
machine.
o
o
o
Bubbles spill from the
detergent drawer.
o
o
o
The machine stops when the
cycle has not finished.
The drainage pump makes a
34
noise during operation when
the water has just been
drained.
o
The machine stops for some
time during operation.
o
has been drained but there is still a small
amount of water in the drainage pump and
pipe.
The drainage pump continuously operates and
takes in the air which makes the noise which is
normal.
The washing machine adds water
automatically. If there are too many bubbles in
the tub, the washing machine cleans the
bubbles away before continuing with the cycle.
IMPORTANT: If your appliance appears not to be
operating correctly, then you should disconnect it
from your mains supply and then contact the
Customer Care Department on telephone number
(0118) 933 6911.
DO NOT ATTEMPT TO REPAIR THE APPLIANCE
YOURSELF.
Please note that if an engineer is asked to attend whilst the product is
under guarantee and finds that the problem is not the result of an
appliance fault, then you may be liable for the cost of the call out
charge.
The appliance must be accessible for the engineer to perform
any necessary repair. If your appliance is installed in such a
way that an engineer is concerned that damage will be caused
to the appliance or your kitchen, then he will not complete a
repair.
This includes situations where appliances have been tiled in,
sealed in with sealant, have wooden obstructions placed in
front of the appliance, like plinths. Or any installation other
than the one specified by Baumatic Ltd. has been completed.
Please refer to the conditions of guarantee that appear on the
warranty card that you receive with the appliance.
IMPORTANT: Baumatic Ltd. operates a policy of continuous
improvement and reserves the right to adjust and modify its
products without prior notification.
35
Baumatic Consumables
o BC001 Degreaser for Dishwashers (200 g)
o BC002 Descaler for Washing Machines and Dishwashers (200 g)
o BC003 Ceramic Hob Cleaner (250 ml)
o BC004 Oven Cleaner (250 ml)
o BC005 Stainless Steel Cleaner and Protector (250 ml)
o BC007 E-Cloth – General Purpose Cloth
o BC008 Microwave Cover
To order a Baumatic consumable product please call 0123 5437 244
and quote the product code. You can also order online from
eshop.baumatic.co.uk
36
Technical Data
Manufacturer
Model Number
Rated Capacity of Standard Cotton
Program
Energy Efficiency Class
Annual Energy Consumption (1)
Energy Consumption of the Standard
60°C Cotton Program at Full Load
Energy Consumption of the Standard
60°C Cotton Program at Partial Load
Energy Consumption of the Standard
40°C Cotton Program at Partial Load
Power Consumption of Off Mode
Power Consumption of Left-On Mode
Annual Water Consumption (2)
Spin-drying Efficiency Class (3)
Maximum Spin Speed of Standard
Cotton Program
Remaining Moisture Content of
Standard Cotton Program
Standard Cleaning Cycle (4)
Program Duration of Standard 60°C
Cotton Cycle at Full Load
Program Duration of Standard 60°C
Cotton Cycle at Partial Load
Program Duration of Standard 40°C
Cotton Cycle at Partial Load
Noise Level
Installation Type
BAUMATIC LTD
BWM1417W
7 kg
A
208.10 kWh
0.98 kWh
0.98 kWh
0.68 kWh
0.42 W
2.88 W
11220 litres
B
1400 rpm
58 %
Cotton 60°C/40°C
178 mins
177 mins
154 mins
60 db washing / 70db spinning
Freestanding
1) Energy consumption is based on 220 standard washing cycles for
cotton programmes at 60°C and 40°C at full and partial load,
and the consumption of the low-power modes. The actual energy
consumption will depend on how the appliance is used.
2) Water consumption is based on 220 standard washing cycles for
cotton programmes at 60°C and 40°C at full and partial load.
The actual water consumption will depend on how the appliance
is used.
3) Spin-drying efficiency is on a scale from G (least efficient) to A
(most efficient).
4) These programmes are suitable to clean normally soiled cotton
laundry and they are the most efficient programmes in terms of
combined energy and water consumption.
37
United Kingdom
Baumatic Ltd.,
Baumatic Buildings,
6 Bennet Road,
Reading, Berkshire
RG2 0QX
United Kingdom
Czech Republic
Baumatic CR s.r.o.
Lípová 665
460 01 Liberec 4
Czech Republic
+420 483 577 200
Sales Telephone
(0118) 933 6900
Sales Fax
(0118) 931 0035
Customer Care Telephone
(0118) 933 6911
Customer Care Fax
(0118) 986 9124
Spares Telephone
(01235) 437244
Advice Line Telephone
(0118) 933 6933
E-mail:
[email protected]
[email protected]
[email protected]
[email protected]
www.baumatic.cz
Slovakia
Baumatic Slovakia, s.r.o.
Galvániho 7/D
Slovakia
+421 255 640 618
Germany
Baumatic Gmbh
Bachstr.10-12
D-32 257 Bünde
Deutschland
+49 (0) 5223 99408 0
www.baumatic.de
Website:
www.baumatic.co.uk
Facebook:
www.facebook.com/baumatic.uk
Italy
Baumatic Italia S.R.L.
Via Galvani N.3
35011 Campodarsego (PD)
Republic of Ireland
+3904 9920 2297
Service Telephone
1-890 812 724
www.baumatic.it
Spares Telephone
091 756 771
Holland
Baumatic Benelux B.V.
Dukdalfweg 15d
1332 BH ALMERE
Nederland
+31(0)36 549 1553
www.baumatic.nl
39
40