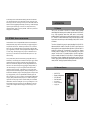
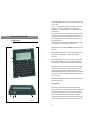
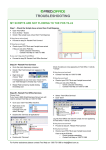
1
4.7
WARRANTY REGISTRATION
Please complete and mail this card to be eligible for updates and to review new product
information.
QuickPAD Pro Technology Corporation
Name:
_______________________________________________________________________
Company:
_______________________________________________________________________
Mailing Address:
_______________________________________________________________________
City: ____________________________ State: ______ Zip: ______________
Email Address:
__________________________________
Number of Units:
__________________________________
Model:
__________________________________
Purchase Date:
__________________________________
Purchased From:
__________________________________
Or complete warranty registration online at www.quickpad.com.
36
June
2004
1.
INTRODUCTION ..................................................................................................... 3
1.1. OVERVIEW .................................................................................................................... 3
1.2. UNPACKING CHECKLIST ................................................................................................. 3
1.3. GETTING TO KNOW YOUR QUICKPAD .......................................................................... 4
1.3.1. Physical Layout .................................................................................................. 4
1.3.2. Menu System ..................................................................................................... 5
1.3.3. User Modes ....................................................................................................... 6
1.4. QUICK START CHECKLIST ............................................................................................. 6
2.
USING QUICKPAD PRO ......................................................................................... 7
2.1. FILE MANAGER ............................................................................................................ 7
2.1.1. Getting Started ................................................................................................... 7
2.1.2. Using the File Manager ....................................................................................... 7
2.2. SETUP ......................................................................................................................... 8
2.2.1. Changing Settings ............................................................................................... 8
2.3. COMMUNICATE WITH PC (iMAC OR IBM PC) ........................................................... 10
2.3.1. Connecting to a Computer ................................................................................ 10
2.3.2. Uploading Single Word Processor and Spreadsheet Files .................................. 11
2.3.3. Transferring Files, Folders and Large Amounts of Data ...................................... 12
2.3.4. Using Flash Cards ............................................................................................ 13
2.3.5. Common Problems with Connecting to PC ........................................................ 13
2.4. UPGRADING THE QUICKPAD PRO ................................................................................ 14
3.
APPLICATIONS ..................................................................................................... 14
3.1. WORD PROCESSOR ....................................................................................................... 14
3.1.1. Getting Started ................................................................................................. 14
3.1.2. Using the Word Processor ................................................................................ 15
3.2. CALCULATOR ............................................................................................................. 16
3.2.1. Getting Started ................................................................................................. 16
3.2.2. Calculate Expressions ....................................................................................... 17
3.2.3. Plotting Graphs ................................................................................................. 18
3.3. SPREADSHEET ............................................................................................................. 20
3.3.1. Getting Started ................................................................................................. 20
3.3.2. Using the Spreadsheet ...................................................................................... 21
3.4. PERSONAL ORGANIZER ................................................................................................ 24
3.4.1. Getting Started ................................................................................................. 24
3.4.2. Using the Contact Database .............................................................................. 25
3.4.3. Using the Scheduler .......................................................................................... 26
3.4.4. Option Settings and File Transfers ..................................................................... 27
4.
4.6
QUICKPAD PRO ONE-YEAR LIMITED WARRANTY
QuickPAD Technology warrants your product against defects in materials and
workmanship under normal use from the confirmed date of purchase by the original
purchaser. Upon written notice of any defects, QuickPAD Technology will either repair
or replace the faulty product or components thereof. Any warranty stated hereunder is
extended to the original purchaser and is not transferable.
QuickPAD Technology does not assume liability for consequential damages or liability
as a result of our product's use. QuickPAD Technology's liability extends, but does not
exceed, the original selling price of the equipment. In addition to, there is no assumption
of liability as a consequence of any such events under the terms of this warranty, in the
following:
•
•
•
•
•
CONTACT & SUPPORT ........................................................................................ 28
4.1. TECHNICAL SUPPORT .................................................................................................. 28
4.2. FREQUENTLY ASKED QUESTIONS .................................................................................. 28
4.3. OPTIONAL TYPING TUTOR ........................................................................................... 30
4.4. OPTIONAL QUICKPAD PRO WITH MODEM ................................................................... 31
4.5. OPTIONAL BATTERY CHARGER .................................................................................... 34
4.6. QUICKPAD PRO ONE-YEAR LIMITED WARRANTY ....................................................... 35
4.7. WARRANTY REGISTRATION .......................................................................................... 36
2
General advice regarding batteries:
• Keep batteries in sets of 4 and don’t mix them. As batteries age their internal
resistance increases. Putting in an old battery with 3 new ones will severely limit the
life of the new ones.
• Discard batteries that are leaking. Leaking can be detected by a build up of a white
powdery (possibly greasy) deposit around the ends of the batteries. Leaking batteries
will permanently damage the QuickPAD PRO.
• Don’t attempt to charge alkaline batteries! The PRO will operate very well with these
batteries, but using external power (which activates the charger) can cause alkaline
batteries to leak.
• Don’t use other rechargeable types such as Lithium Ion, Nickel Cadmium, or
rechargeable alkaline. You can use any AA size battery to operate the QuickPAD
PRO, but you can only recharge NiMh!!
Shipment to or from QuickPAD Technology or the customer.
Improper environment, temperature extremes, electrical power surges or failure or
other misuse or negligence.
Adjustment or repair by personnel not authorized by QuickPAD Technology.
Improper installations or failure to follow installation instructions.
Forces beyond the control of QuickPAD Technology, including but not
limited to an act of God, war, insurrection, civil disturbance, natural disasters, labor
disputes or government regulations.
In order to obtain service under this warranty, you must first call QuickPAD Technology,
Technical Support department 1 (800) 373-8181 and obtain an Return Authorization
number (RMA) before shipping the product to QuickPAD Technology, or it's authorized
agent.
35
Pro will attempt to detect the first attachment and display the name of the attachment
only. Most email messages are sent in a dual format even when you have only typed a
short message to someone. The messages are sent as pure text and as HTML, which will
include font selection, highlighting and formatting of the message. The PRO will display
only the text portion of the message. In some rare cases, messages that are sent by
automated advertising “engines” are sent only in HTML. In those cases you will receive
what appears to be a blank message.
4.5. OPTIONAL. BATTERY CHARGER OPERATION.
The latest hardware revision of the QuickPAD PRO includes a built in NiMh (Nickel
Metal Hydride) battery charger with an external 12VDC power supply that plugs into a
small jack at the back of the unit. The PRO accepts 4 batteries of AA size, and while
there are many types of rechargeable batteries, it is designed only to charge the NiMh
types, in approximately 8 or 9 hours. When fully charged, the PRO charger then switches
to “trickle” charge. When fully charged you may expect to use the PRO for at least 2
days of heavy use. With moderate or occasional use the PRO may run for 6 or 7 days
without re-charge.
You may monitor battery status from the main menu by pressing SHIFT and F1 keys
simultaneously. The status display shows whether the external power supply is attached,
and whether the batteries are charging or being trickle charged, which indicates the
batteries have reached the fully charged state. New fully charged NiMh batteries will
read about 5.7 volts with the external power supply plugged in, and approximately 5.5
volts without external power. No power is being drawn from the batteries with the
external power supply is plugged in. As the batteries age you can expect the voltage
readings to become lower in the fully charged state, and they will discharge faster. You
should check the NiMh battery voltage occasionally and plug in the external power when
they reach approximately 4.5 volts. The QuickPAD PRO will actually operate with
battery voltage down to 4.1 volts or less, but this is not recommended for NiMh batteries
as they may develop an internal short if they drop too low. The PRO was designed to
operate at this low battery voltage in order to extract all available power from standard
alkaline batteries, which are not rechargeable. If you ever get a reading below 4.1 volts
the built in battery charger may not be able to revive the NiMh batteries. In that case,
you may be able to recharge the batteries in a high power one-hour charger, if one is
available.
34
1. INTRODUCTION
1.1. OVERVIEW
Thank you for your purchase of QuickPAD Pro, a durable, compact, lightweight
notebook designed to enable easy access to notebook applications and e-mail for those on
the go. Simple plug-and-play features allow instant access to word processing,
spreadsheet, data entry, personal organizer, scheduler and calculator functions – no need
for IT resources. This manual has been written to help you become familiar with these
functions and to make sure that you can take full advantage of the QuickPAD Pro and all
of its features.
This section is designed to help you gain a general knowledge of the QuickPAD Pro
hardware and software. Included is an overview of QuickPAD’s physical layout and a
reference guide to the menu system and software applications. A quick start checklist is
provided for the first-time user. The second section, Using QuickPAD Pro, discusses
information related to managing your files, setup communicating with a personal
computer. The third section is a comprehensive guide to QuickPAD’s applications,
functions, commands and features. Refer to this section for information regarding the
Word Processor, Calculator, Spreadsheet, and Personal Organizer functions. Finally, the
Contact & Support section provides necessary support telephone numbers, other ways to
contact QuickPAD Technology Corporation and warranty information.
1.2. UNPACKING CHECKLIST
•
•
•
•
•
•
•
3
QuickPAD PRO
Warranty Card Registration
USB Cable (black)
Serial Cable (white)
User’s Manual
Four (4) AA Batteries
Carrying Case
SET ISP PHONE NUMBER: Once you get your access number you need to determine if
you will be dialing an alternate area code, and if you wish to disable “call waiting”. Here
are some examples:
543-3256
Local number dialing. You may enter the hyphen or not. The modem
ignores hyphens. The number is usually a little easier to read with the hyphen.
1-408-543-3256
Alternate area code dialing. The 1 is almost always required by
most phone systems.
70#, 543-3256 The sequence 70#, causes the modem to dial the number 70# first and the
comma causes about a 5 second wait before dialing the remainder of the number. The
70# sequence in many areas will disable any “call waiting” feature you may have. If you
have call waiting and you don’t disable it while sending and receiving email you may
lose your dial up connection.
*70, 543-3256 This shows an alternate sequence for disabling call waiting. Check with
your local phone provider to verify which sequence works in your area.
1.3. GETTING TO KNOW YOUR QUICKPAD
1.3.1. Physical Layout
SET MAIL DOMAIN: An actual example is earthlink.net. Enter the name of your ISPs
domain name.
SET NAME SERVER: The name server is a group of 4 numbers separated by periods.
Each group can be 1 to 3 digits in length. An actual example for earthlink is
207.217.126.81
1
8
9
SET NAME SERVER2: Similar to above, but is usually different by a couple of digits.
An actual example for earthlink is 207.217.120.83. You must enter the appropriate
numbers for your ISP. The numbers shown for earthlink will only work for earthlink!!
2
LEAVE MSGS ON POP: This is a “toggle” setting. If you select it and press ENTER it
will change to “Remove msgs on POP”. We recommend leaving it set to the default
setting “Leave msgs on pop”. Since the QuickPAD PRO can only receive text
attachments and all others are filtered out you probably will want to leave these messages
on your server so you can retrieve the complete message with all attachments once you
return to your “home PC”.
7
SET NET MASK: Enter 255.255.0.0 in most cases. This may change with some ISPs so
please check with your provider.
General information:
5
4
3
6
Email messages take on many forms with an incredibly wide variation of message
formats that continues to evolve. The header information in an email is different for each
type of email program that generates it. The “body” of the email can be comprised of
text, HTML, web pages, attachments, and in some cases includes java or other types of
scripting. The QuickPAD PRO email software attempts to filter the superfluous
information and only display the text portion of the email. Since the Pro cannot display
images or run scripts or programs from other computers these are filtered as well. The
(bottom side)
4
33
[ F1 ] Help file is displayed.
1
2
3
4
5
6
7
8
9
[ A ] Reply all. Select the desired email from the inbox you wish to reply to. Press A
to automatically add all recipients as addressees.
[ R ] Reply. Select the desired email you wish to reply to and press R. The originator
of the email will be added to the “To:” line of your outgoing email.
[ ESC ] Quit the current function. If you are in the main email screen, the program will
return to the QuickPAD main menu.
[F]
Power ON/OFF Key………………………….
Reset Button…………………………………..
USB Port……………………………………...
Serial Port……………………………………..
Infrared Port…………………………………..
Battery Door…………………………………..
‘Spell Check’ Key………..…………………...
‘Send File’ Key...……………………………..
Flash Card Slot………………………………..
You may forward the contents of an email.
1.3.2. Menu System
[ ↑↓ ] Up and down arrow keys are used to select a desire email.
[ F10 ] The F10 function will appear as an available command at different times. When
preparing an email [ N ] and if there are any available email addresses in the Personal
Organizer address book, they can be accessed via F10. If there are no addresses in the
organizer, then the F10 function will not be shown. F10 also appears when you are on
the “attachment line” if there are any text files in your editor folder. Pressing F10 will
show a list of text files you can choose from.
6LQJOH8VHU0RGH
:RUG
3URFHVVRU
Configuration: You must enter 12 sets of data to complete the configuration setup. It
sounds a little intimidating, but is really quite easy and must only be done once.
SET ISP USER ID: Usually this is the same as the mail user ID (below) although
sometimes there will by various characters and symbols that precede the user name,
depending on what company is actually providing the dial up service. Often a national
ISP will utilize dial up services from many smaller individual companies.
6SUHDG
6KHHW
&DOFXODWRU
)
3HUVRQDO
2UJDQL]HU
F2
F5
)LOH
0DQDJHU
F3
1
2
3
4
5
6
7
SET ISP PASSWORD: This is almost always the same as your mail password. Check
with your ISP provider if you have problems.
SET MAIL PASSWORD: This is whatever you have chosen for access to your mail
account. If you have forgotten your existing password (since your PC remembers it for
you!) you may contact your ISP provider for this information.
SET SMTP SERVER: If for example your ISP was called access.com, then your SMTP
server entry would typically be smtp.access.com. Another typical entry would be
mail.access.com. Your ISP will provide you with the exact server name.
SET POP3 SERVER: This is very similar to the SMTP server name and using the
example show above, would typically be either pop.access.com or mail.access.com.
5
&RPPXQLFDWH
ZLWK3&
F4
6HWXS
F6
F7
5HY)
8VHU$UURZNH\VWRVHOHFW(QWHU!WRH[HFXWH
SET MAIL USER ID: Example: rickyX. If your email address is [email protected],
then enter the portion before the “@” symbol.
32
Pg. 6
Pg. 6
Pg. 11
Pg. 12
Pg. 12
Pg. 6
Pg. 17
Pg. 12
Pg. 14
[F1] Word Processor.……...………………….
[F2] Calculator………………………………..
[F3] Spread Sheet...…………………………...
[F4] Communicate with PC…………………..
[F5] Personal Organizer..……………………..
[F6] File Manager……...……………………..
[F7] Setup………...…………………………...
Pg. 13
Pg. 15
Pg. 19
Pg. 10
Pg. 23
Pg. 7
Pg. 8
1.3.3. User Modes
There are two user modes supported by QuickPAD Pro: single-user mode and multi-user
mode. If multiple individuals are using the QuickPAD, the most effective choice will
typically be to use the QuickPAD in multi-user mode. In this mode, each user can have
his/her own login name, passwords and file folder. This can be beneficial not only for
protective purposes, but also as an aid in keeping one user’s files separate from another’s.
There are circumstances in which multi-user mode could be beneficial for an individual
user; however, more often than not, an individual user will want to use single-user mode.
For information on changing the user mode, see section 2.2.1(“Change User Mode”).
When you switch into multi-user mode, the SELECT QUICKPAD USER window will
pop up. Initially, all users will be available. Select the desired user folder by entering the
F# key corresponding to the open slot. For instance, to select user F2, press the F2 key. At
the prompt, type in a user name and press ENTER. If you wish to have a password for this
user, press Y and enter a password at the prompt. Re-enter the password to complete the
new user process.
1.4. QUICK START CHECKLIST
á Open the battery-chamber door and insert the batteries.
o Turn QuickPAD to its back side and locate the battery chamber in the
upper-right corner.
o Lift the cover off the chamber.
o Insert the four AA batteries provided with your QuickPAD.
o Close battery chamber.
á Turn QuickPAD Pro on by pressing the Power ON/OFF key located on the top row
of keys toward the right hand side of your keyboard. You can also turn
QuickPAD on and off by pressing the RESET button.
á Select a function.
o At the main menu, select a function box using the arrow keys and press
ENTER, or press the function key (F1 to F7) labeled in the bottom right
corner of each box.
á Follow the options given onscreen or refer to the section in the user’s manual for
the function you would like to use.
4.4. OPTIONAL. QUICKPAD PRO WITH MODEM: EMAIL
OPERATION
The internal modem and email software is capable of connecting via dialup ISP services
to any standard POP3 mail server. Certain types of ISP providers however require
proprietary software (such as AOL, JUNO and NETZERO) and it is not currently
possible to connect to these services.
The first step to use your Pro for email services is the configuration setup. You may use
the PRO with email in single user mode, or in multi-user mode. In multi-user mode you
may have completely different email configurations (different ISPs, user names,
passwords, etc) for each user. In any case, the setup for either method is exactly the
same.
To begin, select EMAIL from the main menu and press ENTER. You will see the
INBOX screen, with a list of functions listed at the bottom. If you have used email
programs previously you will recognize most or all of the functions.
Email function summary:
[ C ] Configure email. This is where you enter information about your ISP, user name
etc. This must be completed before you can send and receive email. This is described in
detail below.
[ N ] New message: Press N to create a new outgoing message. A blinking cursor will
appear on the “TO:” line. You may manually type in an email address, or if you have
entered email addresses in the Personal Organizer, you may press F10 to show a list of
addresses you can choose from. Multiple addresses must be separated by a comma. You
may proceed to the “CC:” line by pressing ENTER, or TAB. You may go back by
pressing SHIFT-TAB. When you reach the attachment line, and if you have text files in
your editor folder you may add one or more text files as attachments by pressing the F10
key. The F10 key will not be available if there is no text files available. The ability to
send and receive other types of files may be added in the future. Once you reach the
body of the text simply type your message. When complete press ESC and answer Y
(yes) to add this to the output que (Unsent folder). Answering N (no) will delete any
message you have started. When you have completed all emails you wish to send simply
press T to connect and send.
[ T ] Press T to send / receive email. Email in the QuickPAD is prepared while offline.
When you press T, the QuickPAD will then connect, then send any emails that are in the
“Unsent” folder followed by retreiving emails that may be on your POP server. The
QuickPAD must have been configured [ C ] prior to sending and receiving email.
[ D ] Delete email: The inbox (as well as the Unsent / Sent screen) will show a list of
emails. These may be deleted by selecting (highlighting) with the up and down arrow
keys, then pressing D. You may also press the “Delete File” key if you wish.
[ SU ] You may switch to the Sent or Unsent folder by pressing S or U. When in either
the Sent or Unsent folder you may press I to get back to the inbox folder.
6
31
A. Besides being a low cost, lightweight notebook, QuickPAD Pro offers many
advantages such as more comprehensive word processing features, spreadsheet and
data processing applications a scientific graphing calculator, personal organizer, a
larger screen, more internal memory and unlimited expandable data storage, and 2way communication.
4.3. OPTIONAL. TYPING TUTOR
The typing tutor is easy to use and is suitable for many different levels of typing skills
from beginner to advanced. The typing tutor can also be used with many different
students, keeping track of each simply be entering their names.
You may begin using the typing tutor without entering a name. You will be shown your
score at the end of each lesson but the results won’t be saved. If you want to save your
results so you can see your progress then you must enter your name or nickname.
Entering your name:
Choose function 5 at the main menu. You’ll be prompted, are you a new student? If
you’ve already entered your name, you can then search for yours or find it in a list. If
you are new, go ahead and enter your name. Entering your name, or selecting it if
already in the list allows you to keep track of your scores.
The typing tutor has four levels you may choose from. The first level, “Finger
Placement” is for users new to keyboards, and may not know which fingers go on which
key. Once Finger placement has been mastered, the user may simply progress through
the various levels as he or she makes progress. Each level has many different lessons,
and if you achieve a certain performance level, which is shown on the screen, you will
automatically progress to the next lesson. If you achieve a “failed” level, the same lesson
simply repeats.
Under Setup, you may choose functions 5 through 9.
Function 5: Described above, you may enter your name or nickname. This allows the
typing tutor to track your progress and keep a record of your performance.
Function 6: At any time, you may enter a students’ name to view the test scores.
Function 7: If you have entered your name you may view the results of the last test you
took. This is useful for a teacher or instructor to see what a student may have just
completed.
Function 8: Keyboard Display: This may be set to “ON” or “OFF”. If set to “OFF” and
if the student is in the Advanced level, the keyboard display will be turned off.
Function 9: Print a report: This function does not actually print a report; it creates a text
file (the name of the file will be shown on the screen) that may be downloaded using the
file manager to the user’s PC.
30
2. USING QUICKPAD PRO
2.1. FILE MANAGER
Much like a standard personal computer, the file manager acts as your central source for
locating, moving, deleting, accessing, copying and transferring files among folders
and drives. You can access, open and edit any file on the QuickPAD Pro directly from the
file manager. In addition, storage utilities allow you to back up files and folders to
external flash cards and, likewise, to restore files and folders as needed.
2.1.1. Getting Started
The file manager can be accessed from the main QuickPAD Pro menu screen by either
highlighting the FILE MANAGER box or by pressing the F6 key. Once in the file
manager, you will notice that the screen is divided into two large boxes and an area
across the bottom displaying quick commands. The box at the left side of the screen
contains folders, while the box at the right contains files. When you first open the file
manager, the cursor will be highlighting the open directory symbol “\” in the upper left
corner. If you are in single-user mode, you will see the MYFILES folder directly below
the open directory symbol and if in multi-user mode, you will see the F# representing the
current user. In addition, there are three subfolders named EDITOR, PERSORG and
SPSHEET which correspond to the files created by the Word Processor, Personal
Organizer and Spreadsheet, respectively.
2.1.2. Using the File Manager
QuickPAD QuickKEYS
[X]
[B]
[S]
[P]
[T]
[U]
[A]
[N]
[R]
[C]
[D]
Up and down
arrows
Left and
right arrows
7
Exchange drive
Backup a folder
Restore a folder
Protect a folder
Tag file
Untag file
Tag all files
Untag all files
Rename a file
Copy and paste a file
Delete a file
Highlight specific files and folders
Switch between folder list and file list
4.2. FREQUENTLY ASKED QUESTIONS
How To
Select a file – When you first open the file manager, your cursor will be in the folder box
highlighting the open directory symbol \. Notice that when you use the up and down
arrow keys, you can move through the folder list. After selecting the appropriate folder in
which the desired file is contained, press the right arrow key to move the cursor to the file
list on the right side of the screen. Now, use the up and down arrow keys again to
navigate through the file list until you have highlighted the specific file you want. Once
the file is highlighted, you can use the file commands listed at the bottom of the screen to:
• Tag/Untag a file: Tagging a file will put a star next to the file name. You have the
option to tag/untag a single file or tag/untag all files in a folder. Tagged files are
looked at as a group and can be copied and pasted as such. For example, if you have
three files you want to paste to the same location, you can tag the three files and press
C. Once you have selected the desired location, you can press ENTER and all of the
tagged files will be pasted.
• Rename a file: If you want to rename a file, press R and you will be prompted to enter
a new name for the currently selected file. Once you have entered a new name, press
ENTER to return to the file list.
• Copy a file: The copy function, C, works to copy a file and paste it in a desired
location. When you press C, you will be prompted to select the folder in which you
wish to paste the file. Use the up and down arrow keys to select the desired folder and
press ENTER.
Protect a folder – You can put a password on a folder by highlighting a folder and
pressing P. You will be prompted to enter a password 5 –8 characters long. Once you
have entered a password, press ENTER and then re-enter it at the next prompt.
2.2. SETUP
The majority of the default settings can be changed to meet a user’s specific needs. The
setup menu allows easy access to these settings and allows you to change such options as
external connection speeds, passwords, user mode, keyboard settings and idle times.
Except for the date and time, all settings will remain saved until modified by the user. In
other words, when batteries are replaced, all options will remain intact, except for the
date and time which will need to be re-entered.
2.2.1. Changing Settings
Set date – To set the date, select the SET DATE box from the options main menu using
the arrow keys or by pressing F1. Enter the current date in month/day/year form and press
ENTER.
Set time – After selecting the SET TIME box, enter the current time and press A for A.M.
or P for P.M. Press ENTER to finish and return to the options menu.
8
Q. Can I transfer data from QuickPAD Pro to my computer and, visa versa, from
my computer to the QuickPAD Pro?
A. Yes. You can transfer data from QuickPAD Pro by using our proprietary Infrared
receiver or by using a USB or Serial direct cable connection. To transfer data from
your computer to QuickPAD Pro, you must use a direct cable connection and the
communication software provided. For more information on transferring data
between QuickPAD and a computer see section 2.3 on communicating with a PC.
NOTE: Presently, you can only use unidirectional transfer to a Mac.
Q. Can you adjust the screen contrast and is the screen backlit?
A. You can adjust the contrast by pressing the FN key and the up/down arrow keys. The
screen, however, is not backlit due to power consumption. This is why you are able to
get up to 100 hours of power.
Q. Does QuickPAD Pro have an enlarged font option?
A. Yes. Press the FN key and the right-click menu key (the key to the left of the righthand CTRL button). Note that the standard font size of approximately 12 point will
change to approximately 18 point which means you will now have less than 8 lines of
display.
Q. How much text can I store on the QuickPAD Pro?
A. You can store approximately 500 pages of text on the internal memory (2K per page
64K per file – equivalent to 35 pages.). By using compact flash cards, however, the
amount of data you can store is practically unlimited.
Q. Is QuickPAD Pro compatible with a Windows XP operating system?
A. Yes. QuickPAD Pro is compatible with any Windows operating systems including
XP.
Q. Is the QuickPAD PRO durable?
A. Yes. QuickPAD Pro is not as fragile as a typical laptop or PDA, and will certainly
withstand the demands of mobile computing. Out of all the components of the
QuickPAD, the LCD screen is the most sensitive, but it is well protected by the
encasing. QuickPAD has been designed with your transportation and storage needs in
mind.
Q. Which is more appropriate for business use, QuickPAD IR or Pro?
29
startup program to either the scheduler screen. The second setting refers to
the display format of the date and time. For example, if you want time displayed
in military time, select “24 hour” for the time format.
*Features apply to QuickPAD PRO with Modem option:
Export files to Microsoft Outlook – You can transfer personal organizer files to
Microsoft Outlook by pressing "E" from any main screen in the personal organizer.
Export files – The export function will convert your files to (.csv) format
and save them in the "...\PERSORG" directory. You can then access these files through
file transfer (see section 2.3.3) and import them into MS Outlook using “ Comma
Separated (DOS) or (Windows) Format”. Export files to the CALENDAR folder
for appointments and the CONTACTS folder for contacts in the Microsoft Outlook directory.
Set IR speed – The speed utility allows you to slow down the upload rate when sending
data from the QuickPAD Pro to your PC or Mac. Depending on the speed of your
computer and software, QuickPAD may transmit data too quickly and, as a result, some
characters may be lost in the transfer. If you notice that you are losing characters when
transferring data, lower the transmission rate by selecting a lower number in the IR speed
field.
• PC/MAC mode – Using the up and down arrow keys, you can toggle between PC
mode and Macintosh mode. Select the mode corresponding to the type of computer
you are using. NOTE: Macintosh mode will work with PC’s as well, but transmission
speed will be 50% slower.
• USB Delay – The second changeable field corresponds to the delay for initializing the
USB interface on your computer. On some computers, it takes up to 10 seconds to
load the USB software drivers. If your USB connection is not activating or if it misses
the beginning of the data transfer, set the USB delay to a higher value.
View version specifications – To view the current version information, select the GET
VERSION box or press F3. The current specifications will be listed at the very bottom of
the screen.
Change user name – After selecting the CHANGE USER NAME box, enter a new
name (up to 24 characters) and press ENTER to save changes and return to the options
menu. NOTE: This setting will not change user mode. It only changes the actual name
corresponding to the current user.
4. CONTACT & SUPPORT
4.1. TECHNICAL SUPPORT
Technical support is available at no charge with the purchase of your QuickPAD Pro.
Hours are 9:00A.M. to 5:30P.M. Monday – Friday Pacific Standard Time.
HOW TO CONTACT US
Toll Free
(800) 373-8181
Technical Support
(650) 961-9114
FAX
(650) 964-2426
Website
www.quickpad.com
Email
[email protected]
Sales
[email protected]
Mailing Address
QuickPAD Technology Corporation
465 Fairchild Drive, Suite #103
Mountain View, CA 94043
28
Change or enter a password – To change an existing password or enter a new password
corresponding to the current user, select the CHANGE PASSWORD box from the
options menu. You will be prompted to enter a password 5 –8 characters long. Once you
have entered a password, press ENTER and then re-enter it at the next prompt.
Change user mode – There are two user modes supported by QuickPAD Pro: single-user
and multi-user. To determine which mode is best for your needs, see section 1.3.3 on user
modes. To change the mode, select the CHANGE USER MODE box from the options
menu and refer to the prompt at the bottom of the screen. Press Y if you wish to change
the mode. NOTE: You can switch back and forth between single-user and multi-user
modes without discarding user profiles. Files created by a user in multi-user mode will be
accessible only to that user, and will not be available in single-user mode. In other words,
if user F4 creates a spreadsheet file and saves it to his/her personal directory, the only
way to access that file is in multi-user mode signed in as user F4.
Set idle time – The idle timeout refers to the number of minutes QuickPAD will wait
before powering down. The minimum time is 1 minute and the maximum time is 75
minutes. From the main options menu, select F8 or highlight the box labeled MORE
SETUP. This will bring up the second setup screen. Now select the box labeled SET
IDLE TIMEOUT. At the prompt, enter the desired idle timeout and press ENTER to exit
and save changes.
9
Change sticky keys – Sticky keys refer to the use of the SHIFT and CTRL keys. Without
the sticky keys feature enabled, you must hold down SHIFT or CTRL in conjunction with
another key. For example, to capitalize the letter a, you would hold down SHIFT and press
a simultaneously. With the sticky key enabled, you can simply press SHIFT and release,
and the next letter you press will be capitalized. The same applies to the CTRL key. To
change this setting, press F2 or highlight the box labeled CHANGE STICKY from the
second options menu. Toggle between (Sticky Keys) ON and (Sticky Keys) OFF with the
SPACEBAR, and press ENTER when you have finished.
Change keyboard settings -- There are two settings that apply to the keyboard: key
delay and key repeat. “Key delay” refers to the response speed from when you type a key
to when it appears on the screen (1 being the fastest and 4 being the slowest). “Key
repeat” refers to the speed of repetition when you hold down a key (1 being the slowest
and 32 being the fastest). For example, if you have key repeat set to one and you hold
down the letter a in a text field, subsequent a’s will appear rather slowly. To change these
settings, open the second options menu screen and press F3 or select the box labeled SET
KEY SPEED. Use the left and right arrow keys to navigate the window and numerically
type in your desired speeds. When finished press ENTER to exit and save changes.
2.3. COMMUNICATE WITH PC (MAC OR IBM PC)
QuickPAD Pro offers multiple methods of communicating with Macintosh and
Windows-based computers. Depending on the direction of the data transfer, the size of
the file to be transferred and the available interfaces on your computer, you can
determine the method that is best for you. The following information in this section
discusses these different methods, as well as general know-how for transferring files and
setting up the communication links.
[Home]
Up and down
arrow keys
[Enter]
Move cursor to first page
Scroll through appointments in a time slot
[D]
[V]
Set duration of an appointment
View details of appointment
Edit text
How To
Enter appointments on a particular day – In the calendar view, use calendar
navigation keys ( P, N, PgUp, PgDn) to select the calendar month and year you want to
edit. Once you have the correct calendar on-screen, highlight a day using the arrow keys
and press ENTER. This will bring you to the appointment screen. Using the navigation
keys for the appointment view, you can move the cursor to the time slot you want to edit.
Press ENTER to begin typing. When you have finished typing the appointment text, press
ENTER again to complete the entry.
Set date/time duration – From the appointment view, press D to access the SET
DATE/TIME DURATION window. Using the left and right arrow keys, highlight the
number you want to change. You can either type in the desired changes or use the up and
down arrow keys to select the appropriate dates and times. When finished, press ESC and
follow the prompt to save or discard your changes.
3.4.4. Option Settings and File Transfers
How To
Connect using a USB cable – Using any standard USB cable (the one included is black),
insert the square-shaped end into the back of the QuickPAD and the thin rectangular end
into the back of your computer. Connect the cable only after QuickPAD is turned on.
Since USB is plug-and-play, you should not need to manually install any drivers on your
computer. However, if there is no response or activity from your computer when you
insert the USB cable you may need to manually install a USB driver or adjust the USB
transfer speed. If this is the case, please refer to the troubleshooting guide at the end of
this section.
Change settings – From any main screen in the personal organizer (the four primary
functions will be listed at the top), you can press O to enter the options window. Once in
the options window, you can use the arrows, TAB key or ENTER key to switch between
information fields. If a box appears around the field value, you can use the SPACEBAR to
toggle between options. Otherwise, simply type the desired value at the blinking cursor.
When you have finished changing the settings, press ESC to save and exit.
• Dialer settings for host region* – The first area of options refers to your personal
phone settings. Enter the appropriate values corresponding to the country, area and
specific location in which you currently reside. The DIAL AREA CODE WITHIN SAME
AREA field is for those areas that require 10-digit dialing. If you must dial the area
code within your own area for local calls, switch this setting to YES.
• Modem settings* – The Modem port identifies the communications port as COM1.
The Baud rate identifies the transfer speed rate.
• General settings – You can change three settings in the general settings field. The
first setting is the startup program. By default, when the personal organizer is selected
from the QuickPAD Pro main menu, the contact screen opens. You can change this
10
27
2.3.1. Connecting to a Computer
There are three ways to directly connect QuickPAD Pro to a personal computer: USB,
Serial, and Infrared (IR). Both of the physical cables, USB and Serial, come standard in
the QuickPAD Pro package. The IR receiver, however, is an optional purchase and can
be obtained by contacting QuickPAD Technology Corporation.
How To
works identical to the ADD CONTACT screen. Therefore, you can navigate through
fields using the same keys and edit existing text simply by typing the desired information.
Press ESC when you have finished viewing or editing the contact information. If you have
made changes, you will be prompted to save or discard upon exit.
Connect using a Serial cable – Using any standard Serial cable (the one included is
white), insert the circular end into the back of the QuickPAD and the rectangular 9-pin
connector into the back of your computer. Connect the cable only after QuickPAD is
turned on. You do not need to install any drivers or software for the serial cable to work.
Find a contact – You can search for a contact by first name, last name, company or by
“anything”. From the main contact screen press F to access the find box located in the
lower left corner on the screen. When the box is highlighted, you can press the SPACEBAR
to toggle between find functions. After selecting the desired find function (e.g. company,
last name, first name, anything), type the name, letter(s) or character(s) you want to
search for and press ENTER. If a match is found, the contact will be highlighted.
• Find by anything function: The find by anything function works differently from the
other find functions. In this mode, you can find contacts without specific attributes.
Any contacts that contain the search text in any of their attributes will be displayed in
the contact list above. Contacts not containing the search text will not appear on the
screen. NOTE: You cannot modify the contacts from the find by “anything” mode.
Connect using the Infrared receiver – There are two ways you can connect the IR
receiver: USB cable and keyboard cable. Your desktop does not have to be off to perform
the following steps.
• Using a keyboard cable – The IR receiver is used as a “pass through” device when
connecting to the keyboard port on your computer. In other words, you can use the IR
receiver and your keyboard at the same time without affecting performance. First,
remove the keyboard cable from the back of your computer and plug this end into the
IR receiver. Next, attach the supplied cable to the open port on the IR receiver and the
other end to the keyboard port on the back of your computer. The IR receiver should
now be the intermediary between your keyboard and your computer, and the LED
light on the receiver should be ON. NOTE: If there is no keyboard attached to your
computer (i.e. laptops), you can directly connect the IR receiver to your computer
using the supplied keyboard cable.
• Using a USB cable – You can connect the IR receiver directly to your computer using
a USB cable. Simply attach the square-shaped end of the cable to the IR receiver and
the thin rectangular end to your computer. Your computer should automatically detect
the connection. If it does not, refer to the troubleshooting guide at the end of this
section. NOTE: The USB connection will work only with Windows 98 or later (not
compatible with WIN 3.1, DOS, WIN 95 or WIN NT).
Sort contacts – From the main contact screen, you can either use the TAB key or the left
and right arrow keys to toggle between the four information fields (for example, last
name, first name, company, and phone) displayed as column headings. The program will
automatically sort by the field that is highlighted. For example, if the COMPANY heading
is highlighted, the contacts will be sorted alphabetically by company name.
3.4.3. Using the Scheduler
Scheduler QuickKEYS
CALENDAR SCREEN
[P]
Previous month
[N]
Next month
[PgUp]
Previous year
[PgDn]
Next year
[Space]
Set highlighted date as today’s date
[Arrow keys] Navigate calendar days
[Tab]
Highlights the next appointment day
[Shift – Tab]
Highlights the previous appointment day
[Enter]
View appointments for highlighted day
[D]
Delete all appointments for selected day
[B]
Delete all appointments before the
selected day
APPOINTMENT SCREEN
[Tab]
Move cursor to the next hour
[Shift – Tab]
Move cursor to the previous hour
[End]
Move cursor to last page
26
2.3.2. Uploading Single Word Processor and Spreadsheet Files
QuickPAD Pro offers a direct and easy way to transfer data from a word processor or
spreadsheet file to your computer. Using either a USB or an IR connection (Serial will
not work for this method), you can send text directly into an open file on your computer
without having to copy, paste, save or edit. Once you have physically enabled the USB or
IR connection, follow the steps below to successfully transmit data.
• Select a word processor or spreadsheet file on QuickPAD – You can locate a file
by either finding it in the file manager or obtaining it directly from the word
processor and spreadsheet main menu screens. Once you have located the file,
highlight it but do not open it.
•
Open a word processor or spreadsheet file on computer – Open any word
processor or spreadsheet file on your computer and place the cursor where you wish
the QuickPAD data to be inserted. The file can be an already existing file or a new
file.
•
Send data -- Once you have selected the place for the text to be inserted, press the
SEND FILE key on the QuickPAD located in the upper right corner of the keyboard.
You should see the text appear in the opened file on your computer. If parts of the
11
data are lost in the transaction or the data does not transmit at all, see the
troubleshooting guide at the end of this section for possible explanations.
2.3.3. Transferring Files, Folders and Large Amounts of Data
If you are transferring multiple files, folders or large amounts of data, it is recommended
that you use either a USB or Serial connection. This method can be used for backing up
or restoring entire directories to QuickPAD as well. After establishing a physical
connection, follow the steps below to begin your file transfer.
• Install QuickPAD Pro file transfer software – First, insert the disk provided
(QuickPAD Pro Communication Software) into your computer and view the contents
of the disk by selecting the 3 ½ floppy drive. If you are using WIN 95, WIN NT or an
early version of WIN 98, select the file labeled “QPADfiles95”. If you have a later
version of Windows, select “QPADfiles98”. To install, copy or drag the program to
your desktop or any file folder on your hard drive. NOTE: If you are using an
operating system that is not supported by the software provided, you can access other
versions from the QuickPAD website at www.quickpad.com.
•
Open “Communicate with PC” setup window -- From the QuickPAD main menu
screen, highlight COMMUNICATE WITH PC or press F4. Select the method of
transfer you are using by typing the letter corresponding to the connection (e.g. U for
USB or S for Serial).
o Failed connection -- If the connection is not successful, a pop-up message will
appear in the middle of the QuickPAD screen informing you that there is no
response. First, double-check your physical connection to make sure that it is
intact. If this does not help, see the troubleshooting guide at the end of this
section.
o Successful connection – If no messages appear and the phrase “Press <Esc> to
Exit” is displayed at the bottom of your screen, the connection was successful.
NOTE: Do not press ESC until you want the connection to be terminated.
•
Open QuickPAD Pro file transfer software – Open the file transfer software that is
now installed on your computer by double-clicking the icon. When the program
opens, you must first set up a connection port. Click the SETUP PORT button and
locate the port that is being used. If you are using USB, select the USB port. If you
are using a serial connection, select the COMM port that is in use. This will most
likely be COMM 1. Next, press the CONNECT PORT button. After a few seconds,
you should see all the folders and files on the QuickPAD internal drive appear on the
right side of the screen.
•
Transfer file(s) from QuickPAD to computer – The upper-right box contains all
internal QuickPAD directories and folders. If you wish to locate a folder on an
external memory card, select the EXTERNAL drive tag in the upper-right corner of the
file transfer window. To expand a folder, click the + sign corresponding to the folder
name and view the files directly below. Highlight the file(s) you wish to transfer and
then, using the same techniques, select a folder on your computer from the left
12
3.4.1. Getting Started
The personal organizer can be accessed from the QuickPAD Pro main menu by
highlighting the PERSONAL ORGANIZER box, or by pressing the F5 key. By default,
the program opens to the contact database. You will notice that at the top of the screen
there are four main selections; (C)ontacts, (S)cheduler, (E)xport, and (O)ptions. You can
access these selections by typing the letter associated with the function desired (i.e. C for
contact list, S for scheduler). Default settings such as the startup program can be changed
option menu.
3.4.2. Using the Contact Database
Contact QuickKEYS
MAIN CONTACT SCREEN
[N]
Add a new contact
[D]
Dial a contact
[Del]
Delete a contact
[Enter]
View/Modify a contact
Up and Down
Switch between contacts
arrow keys
Left and Right Switch between column headings
arrow keys,
[Tab]
[F]
Find contact
How To
Enter new contacts – From the main contact screen, press N to add a new contact. The
program will open the ADD CONTACT screen where you can enter the desired
information for the new contact. You can use either the up and down arrow keys, the
ENTER key or the TAB key to navigate through information fields. When the cursor is on
the desired field, simply type the information you want to be displayed in that field. Upon
completion, press ESC and follow the prompt for saving or discarding your changes.
• Notes on entering contact information:
o You must enter either a first name or a last name to save the contact
information.
o Make sure to enter area code in the area code field (i.e., do not include the
area code with the phone number in the PHONE field).
o At the save screen, press Y to save your changes or N to discard the
changes and return to the main contact screen.
Modify/view existing contacts – Using the up and down arrow keys in the main contact
screen, select the contact you want to view. When you have highlighted the correct
contact name, press ENTER to access the VIEW/MODIFY CONTACT screen. This screen
25
•
o Example 1: Type “=sqrt(9)” in cell A1. The command line at the very top
should now read “i> let A1 = sqrt(9)”. If you press ENTER, the square root
of 9 will be calculated and the result, 3, will be displayed in cell A1.
o Example 2: Type 65 in cell B6 and 260 in cell C6. Now, highlight cell D7
and type “=min(b6,c6)” and press ENTER. The program will determine the
minimum value of the values contained in cells B6 and C6 and give the
answer 65 in cell D7.
Entering expressions – Expressions work very similarly to functions except that you
can simply type the expression in full without the use of parentheses or function
commands. As noted above, if the first character of the expression is a number, there
is no need to use an equal sign first (see example 1). However, if the expression you
are typing begins with a letter, you must use an equal sign prior to typing the
expression (see example 2).
o Example 1: If you wanted to multiply 35, 2, and 16, type “35*2*16” and
press ENTER. The answer 1120 should appear in the highlighted cell.
o Example 2: If you wanted to add E6 and 130 you must type “=e6+130”.
Use range commands – Range operations can apply to horizontal (B1:F1), vertical
(B1:B9) or rectangular regions (B1:F6), using a colon to separate end cells. The upper left
cell and the lower right cell in the specified area define rectangular regions. To select a
range function, press the / key and select the function you want to use; X(erase), V(value),
C(copy), or F(fill). To copy and paste a range, enter the paste range first and the copy
range last, separated by a space. To fill a range, enter a specified range first, followed by
a starting value and an incremental value (all separated by spaces).
• Example (copy & paste): To copy the rectangular range from A1 to B5 and paste it in
the range from C2 to D6, press the / key followed by C. At the prompt type “c2:d6
a1:b5” and press ENTER.
• Example (fill): To fill the vertical range from B1 to B7 with the number 5, press the /
key followed by F. At the prompt type “b1:b7 5 0” and press ENTER.
• Example (erase): To erase the horizontal range from A1 to E1, press the / key
followed by X. At the prompt type “a1:a1” and press ENTER.
directory box. This will be the folder into which the files will be transferred. Now
press COPY TO PC to complete the transfer.
•
Transfer file(s) from computer to QuickPAD – You can use the same method to
download files to the QuickPAD. Simply start with selecting the file(s) from the
computer files box, locate a folder in the QuickPAD folder box and press COPY TO
QUICKPAD to complete the transfer.
•
Backup an entire drive -- You can back up an entire QuickPAD drive (internal or
external) by pressing the BACKUP button. You will be prompted to enter a directory
name on your computer in which to save the files. Once you have selected the
directory, press OK to continue. To restore, select the drive in which you initially
stored the backup files, and press the RESTORE button.
2.3.4. Using Flash Cards
Compact flash cards can be used for additional storage space and as a method for
transferring data between the QuickPAD and a computer. Typically available from the
8MB to 128MB range, flash cards can store a large amount of data and are compatible
with virtually any computer system. Using flash cards as a transfer device between a
computer and QuickPAD allows you to swap files without using a physical/IR
connection.
To save files onto a flash card, insert the card into the card slot located on the left side of
the QuickPAD. Using File Manager, press X to access the flash card drive. To transfer
files to the flash card, simply select the file(s) you want to transfer and press C to copy.
Open the flash card drive by pressing X and paste the files by pressing ENTER. If you want
to backup the entire internal drive, simply press B and the files will be automatically
copied. You can also use a flash card for the creation of new files. For example, if you
want to create a new word processor file, open the word processor application and press
X. You can now create a new file on the flash card by pressing N.
2.3.5. Common Problems with Connecting to PC
3.4. PERSONAL ORGANIZER
The two primary functions of the QuickPAD Pro personal organizer are contact and
schedule management. With the contact organizer, you can create and store a wide
variety of information about individual contacts, direct dial numbers from the database
and sort and search through your complete contact list. The scheduler function, in
addition to allowing you to schedule appointments acts as a general resource for date,
time and calendar issues. As with the other QuickPAD Pro functions, the size of your
contact database and schedule files can be virtually unlimited with external memory
card options.
24
Troubleshooting Guide
USB connection does not automatically register – Most likely, if your USB connection
does not register automatically, it is because the correct driver did not load on your
computer.
For Windows 98, second edition, you may be asked to load the driver. You will find the
driver for HID (Human Interface Device) on the original Microsoft Installation Disk for
Windows 98. For later edition of Windows (ME, 2000 & XP) the driver should install
automatically. Installation may take a few seconds.
13
If it does not install automatically, please follow the steps:
1. Go to Start, Setting, then Control panel, and then Add New Hardware.
2. Click: No, the device isn’t in the list.
3. Click: No, I want to select the hardware from a list.
4. Click: Human Interface Device.
5. Please insert disk labeled ‘Windows 98 Second Edition’ CD-ROM,
and then click ‘OK’.
You have to have original CD-ROM Windows 98 SE to install the driver manually.
The data was transferred incorrectly or was missing -- If during the transfer some
characters are missing or are transferred incorrectly, the most likely cause is that the
transfer speed is too high. You can set a lower transfer rate by changing the SET IR
SPEED setting in the Setup menu. For an explanation of these settings, see section 2.2.1.
2.4. UPGRADING THE QUICKPAD PRO
Upgrading to new software versions on the QuickPAD Pro is quick and easy and can
be done using Compact Flash Card or Serial/USB cable.
To upgrade software go to: www.quickpad.com, then downloads, and then
QuickPAD Pro.
The upgrade will not delete any of your data, but as always, we still strongly
recommend backing up your data before doing an upgrade.
3. APPLICATIONS
3.1. WORD PROCESSOR
The Word Processor application allows you to create new documents, edit existing
documents, save files and import/export files to and from a personal computer (PC or
MAC). The only limitation to the size and number of files the QuickPAD can handle is
the amount of memory the machine contains. While the internal memory on the
QuickPAD Pro can hold approximately 500 pages of text, a standard 16MB flash card
can hold up to 8000 page files. In other words, with additional flash card memory
capacity, you can store as much data as you need.
3.1.1. Getting Started
The word processor can be accessed from the QuickPAD Pro main menu screen by
highlighting the WORD PROCESSOR box, or by pressing the F1 key. Once inside the
14
decimal point), and format (0=standard, 1=scientific, 2=engineering, 3=date). At the
prompt, enter the desired settings separated by spaces.
• Example – To change the width to 16, precision to 3 and format to “engineering”,
type “16 3 2” and press ENTER.
Enter basic text in a cell – Use the arrow keys to move from cell to cell until you have
highlighted the cell you want to edit. When the cell is highlighted, begin typing. You will
notice that the text does not appear in the actual cell, but instead appear in the command
line at the very top of your screen. When you have finished typing, press ENTER and the
typed string will appear in the cell that you have highlighted.
• Justifying text: By default, the new text will appear centered in the cell. You can
justify text to the right or left by using > or < respectively before typing a text/number
string.
o Try this: Type “>quickpad” in cell A2. Notice that the command string
reads, “i> rightstring A2 = ‘quickpad”. Now press ENTER. The word
“quickpad” should appear in cell A2 justified to the right.
• Automatic recognition of text: If a letter is entered first in a cell, the program will
automatically assume that the context for the cell will be entirely text-based. For
example, if you entered “e3+e5”, the program will assume that you want this to be a
simple text string and the result is “e3+e5” in the highlighted cell.
• Using numbers as basic text: If you want to use numbers as text labels instead of
values, you must enter a justification symbol (>, < or ‘) in front of the first number.
For example, if you want 35 to appear centered in a cell as a basic text label, you
must type “35.
Enter basic numbers in a cell – When you enter a number as the first character in a cell,
the program will automatically establish the cell as number-based, and will, by default,
right justify the number(s). Once a cell has been established as number-based, the cell is
ready for calculating expressions. If you enter text immediately following a number, the
text and any other characters after the text, will be disregarded. You must enter a
justification symbol (>, < or “) first if you wish the number to be text-based.
• Example: If you are calculating a basic expression such as five plus nine, you can
simply type “5+9” without first entering an equal sign.
Enter simple expressions and functions – By typing = in a cell before any other
characters have been entered, you have readied the cell for an expression or function.
Without using any spaces after the equal sign, type the expression or function you want to
calculate or program.
• Entering functions – After keying in the equal sign, type the function you want to use
(i.e. cos, sqrt, sum, etc.) followed by the number(s) to be calculated enclosed in
parentheses (see example 1 below). If you want to perform a function on data
contained in another cell, simply type the cell address within parentheses instead of a
number (see example 2 below).
23
Count(r)
Max(r)
Min(r)
Stddev(r)
Atan2(e1,e2)
Ceil(e)
Exp(e)
Abs(e), fabs(e)
Floor(e)
Hypot(x,y)
Max(e1,e2,…)
Min(e1,e2,…)
Md(e)
Round(e,n)
Sqrt(e)
Ston(se)
Ln(e), Log(e)
Dtr(e) / Rtd(e)
Cos(e), Sin(e),
Tan(e)
Asin(e),
Acos(e),
Atan(e)
Pi
Pow(e1,e2)
Count all valid cells in a range
Return the maximum value in a range
Return the minimum value in a range
Return the sample standard deviation of
the cells in a range
Arc tangent of e1/e2
Smallest integer not less than e
Exponential function of e
Absolute value of e
Largest integer not greater than e
Square root of (x*x+y*y)
The maximum of the values e1, e2, e…
The minimum of the values e1, e2, e…
Round e to the nearest integer
Round e to n decimal places
Square root of e
Convert string expression ‘se’ to a
numeric
Natural/base 10 logarithm of e
Convert degrees to/from radians
Cosine, sine, and tangent functions
application, you will notice a box on the left labeled “Internal Drive”, and a list of
choices on the right corresponding to file options. The box contains all text (.txt) files
stored in the word processor folder (“\myfiles\EDITOR” or “\F#\EDITOR”) located on
the internal drive. To access files on an external drive (i.e. flash card), press the X key.
3.1.2. Using the Word Processor
QuickPAD QuickKEYS
GENERAL COMMANDS
[F1]
Help
[F2]
Character & word count
[Esc]
Opens the save and exit screen
[CTRL – S]
Save file without exiting
[ALT – F]
Opens the file menu
EDITING COMMANDS
[CTRL – C]
Copy selected text
[CTRL – X]
Cut selected text
[CTRL – V]
Paste selected text
[CTRL – F]
Find a text string
[Delete]
Delete character at cursor
[Backspace]
Delete character before the cursor
Up/down arrow
Move cursor to previous/next line
keys
Left/right arrow Move cursor to previous/next character
keys
[PgUp]
Move cursor to previous page
[PgDn]
Move cursor to next page
[Home]
Move cursor to beginning of line
[End]
Move cursor to end of line
[CTRL – Home] Move cursor to beginning of file
[CTRL – End]
Move cursor to end of file
Inverse trig functions
Predefined constant quite close to pi
E1 raised to the power of e2
FINANCIAL FUNCTIONS [ = ]
Pmt(e1,e2,e3)
Computes monthly payments for an
amount (e1) with (e2) interest per month
for (e3) months.
Fv(e1,e2,e3)
Computes the future value for (e3)
monthly payments of (e1) dollars with
(e2) interest per month.
Pv(e1,e2,e3)
Computes the present value of an ordinary
annuity of (e3) monthly payments of (e1)
dollars at (e2) annual interest.
How To
Change the size and format of a cell – Select a cell using the arrow keys and press CTRL
- C. There are three settings: width (of column), precision (number of digits after a
22
How To
Create a new file – To create a new file, press the N key at the main word processor
menu and enter a file name when prompted. The file will be saved in a text only format
15
(.txt) and will automatically be accessible in the “…\EDITOR” folder. Once you have
entered a file name, press ENTER and you are ready to begin.
Edit an existing file – To edit an existing file that is located on the internal drive, select
the file name from the box on the left side of the screen using the arrow keys. When you
have highlighted the correct file, press ENTER to open the saved document. If the file is
not located on the internal drive, you can press the X key to switch drives.
Save and Exit – When you finish working with a document, press the ESC key. You will
then be prompted with these options: to save your file under the current file name by
pressing Y; to save the file under a new file name by pressing F; or to exit the program
without saving changes by pressing N.
Select text – To select a line or multiple lines of text, hold down SHIFT while pressing an
arrow key. The left/right arrows select one letter at a time and the up/down arrows select
full lines. Once the text is selected, you can cut, copy or paste by keying in the
appropriate editing command.
Cut, Copy and Paste – Once a section of text is highlighted, you can cut, copy or paste
by keying in the appropriate editing command. For example, to copy and paste, highlight
the text that you want to edit and press CTRL - C. Then, move the cursor to the desired
position and press CTRL - V to paste the copied text. To cut, just press CTRL X once the
text selection is highlighted.
Spell Check – Press the SPELL CHECK key located at the bottom left on the keyboard.
Misspelled words will appear in the top box and suggested spellings will be displayed in
the bottom box. Use the appropriate commands noted in the QuickKEYS section above to
edit and select words.
3.2. CALCULATOR
The QuickPAD Pro calculator can be used for expressions and functions or for plotting
graphs. The expressions program is similar to a regular hand-held calculator and can be
used to solve very basic as well as more complicated arithmetic functions. The plotter
program is based on a two-dimensional coordinate plane and can be used to represent
equations and functions graphically.
3.2.1. Getting Started
The calculator can be accessed from the QuickPAD Pro main menu by highlighting the
CALCULATOR box, or by pressing the F2 key. Once inside the calculator application,
you will notice three main choices at the top of your screen: (E)xpressions, (P)lotter and
(S)ettings. Press E to begin the expression calculator, P to enter the graphing calculator, or
S to adjust general settings.
16
As in a standard spreadsheet, the columns and rows are labeled with letters and numbers;
letters are used for the columns and numbers for the rows. These labels are directly
correlated to the cell addresses so that if you were editing the cell in column C, row 10,
the cell address C10 would appear in the upper left corner of the screen. The large open
area within the blue border contains the user cells. You can use the arrow keys to move
from cell to cell to navigate the spreadsheet. Directly above the blue border are two
command lines. Whenever you enter a value (i.e. text, number, symbol, etc.), the typed
string will appear in the very top line on your screen. In addition, this line will display the
cell address, as mentioned above, and will also display any value previously appearing in
the selected cell. The second command line is for messages from the program. This line
will display error messages and responses to values entered by the user.
3.3.2. Using the Spreadsheet
QuickKEYS & Function Commands
CELL ENTRY & EDITING COMMANDS
[=]
Enter an expression
[<]
Enter a left-justified string
[>]
Enter a right-justified string
[CTRL – X]
Clear the selected cell
[ESC]
Abort entry of the current command
GENERAL COMMANDS
[CTRL – S]
Save file option menu
[ESC]
Exit menu
[F1]
Help
ROW & COLUMN COMMANDS
[CTRL – I]
Insert a row or column
[CTRL – A]
Add a duplicate row (below) or column
(to the right)
[CTRL – D]
Delete a row or column
[CTRL – C]
Change size and format of cell
RANGE COMMANDS [ / ]
[/X]
Clear a range
[/V]
Remove an expression from a range
[/C]
Copy a source range to a destination range
[/F]
Fill a range with constant values
RANGE & NUMERIC FUNCTIONS [ = ]
Sum(r)
Add all valid cells in a range
Prod(r)
Multiply together all valid cells in a range
Avg(r)
Average all valid cells in a range
21
•
3.2.2. Calculate Expressions
Notes on graphing:
o No variables can be used in an equation except for X.
o Special functions such as sine and log are supported. (Refer to section 3.2.2
for complete description of special functions)
Change the graph view – The default settings place the center of the graph in the middle
of the screen with the command box and coordinate grid showing. These settings can be
changed in several ways.
• Zoom in/out – Use quick keys to enlarge and shrink the viewable graph area
o [CTRL + Z] – Zoom in
o [CTRL + S] – Zoom out (shrink)
• Move – Use quick keys to move the graph view up, down, left or right
o [CTRL + L] – Scroll left
o [CTRL + R] – Scroll right
o [CTRL + U] – Scroll up
o [CTRL + D] – Scroll down
• Hide command box – Use quick keys to remove or replace the command box in the
viewable screen.
o [F9] – Show command box
o [F10] – Hide command box
• Hide grid – Remove the grid lines from the graph by accessing the graph settings
screen (F5).
• Note: If graphed equations are already on the screen when a viewing feature is
selected, the program must re-graph the equations under the new view. The more
graphs there are, the longer the program will need to re-draw them.
Operation Symbols and Special Functions
OPERATION AND EQUATION SYMBOLS
[+]
Add
[-]
Subtract
[*]
Multiply
[/]
Divide
[;]
Enter multiple expressions on a line
[%]
Divides operand by 100
[F2]
Clear
SPECIAL FUNCTIONS
sin
Sine
cos
Cosine
Tan
Tangent
asin
Arc sine
acos
Arc cosine
atan
Arc tangent
log
Logarithm
log10
Logarithm base 10
exp
Exponential
sqrt
Square root
abs
Absolute Value
How To
3.3. SPREADSHEET
The QuickPAD Pro Spreadsheet functions much like a spreadsheet program on a standard
PC. You can use text strings and numeric strings to create a wide variety of files
including financial calculators, data lists, mathematical models and so on. The primary
limit to the size and complexity of the spreadsheet is the actual memory being used. Of
course, with external memory cards the potential size of a file is practically unlimited.
3.3.1. Getting Started
The start-up screen for the spreadsheet is identical to that of the word processor. Simply
select a saved file from the box at the left or create a new file by pressing N. If the file
you wish to access is on another drive, attach the drive (flash card) to the QuickPAD Pro
and press X to access the external files. When a new file is selected, you will be prompted
to enter a file name for your new spreadsheet. Type the desired name for the new file and
press ENTER to begin working. The file will automatically be saved as an ‘.sc’ file by
default and will be immediately accessible in the “…\SPSHEET” folder.
20
Adjust calculator settings – From the calculator main menu, press S to select (S)ettings.
You will be given a choice of either calculator settings or graph settings. Choose the first
option by pressing C. There are two settings you can now adjust: precision and mode.
“Precision” refers to the number of digits that will be displayed after a decimal point
when rounding an answer. Use the TAB key to switch between fields and enter your
desired settings. “Mode” refers to either radians or degrees.
Calculate a basic expression without variables – In the COMMAND box, enter the
function to be calculated (without spaces), and press the ENTER key. The result will
appear in the RESULT box at the bottom of the screen.
• Example: If you type, “13+6+18+1” and press ENTER, the calculator will add those
four numbers and place the result, “38” in the RESULT box.
Use the result in the next equation – The result appearing in the RESULT box is
automatically assigned the variable R. Therefore, if you want to use this number in the
next equation, simply type R in the equation you want to calculate.
• Example: Continuing from the previous example, if you then type “r*2” in the
COMMAND box and press ENTER, the calculator will display “76” in the RESULT
box (38x2). The new value of R is now 76.
17
3.2.3. Plotting Graphs
Assign variables – A variable can be specified by setting a definition equal to it in the
COMMAND box and pressing ENTER.
• Example: If you type “X=5” and press ENTER, the letter x will represent 5 until the
program is ended or the variable is redefined.
• Notes on Variables:
o All variables must begin with a letter.
o Variables do not have to be defined before using.
o If a variable is not declared before it is used, the default setting of the variable
will be equal to zero.
Use predefined constants – PI, E and R are predefined by default and cannot be assigned
new values. You can use these constants in the same way you would use variables.
• PI = 3.1415926535897932385
• E = 2.7182818184590453254
• R = the value of the previous result
Use memory variables – On the right side of the calculator screen are four memory
variables (mem1 – mem4). The only differences between these variables and other
undefined variables is that these will remain displayed for easy recall, and will not be
erased when the program is ended. You can assign the memory variables just as you
would other variables.
• Example: If you type “mem1=1203” and press ENTER, then the value for MEM1 will
be 1203 until the variable is redefined.
Write multiple expressions on one line – You can use the semi-colon to enter more than
one item per line.
• Example: If you type “x=10;y=2;x*y” and press ENTER, the calculator will assign the
value of 10 to X, the value of 2 to Y, and will then calculate 10 times 2 to give the
result of 20.
• NOTE: You cannot put two different calculations on one line (i.e. 4+7;6*19). In this
case, the calculator will look at the last expression and disregard any other
calculations before it.
Use special functions – To use the special functions (for example, sin, sqrt, and so on),
type the function and the number separated by a space.
• Example: If you type “sin 45” and press ENTER, 0.85 (the sine of 45) will appear in
the result box.
QuickPAD QuickKEYS
[ALT + V]
[ALT + O]
[ALT + Z]
[ALT +H]
[F1]
[F2]
[F3]
[F4]
[F5]
[F9]
[F10]
[CTRL – L]
[CTRL – R]
[CTRL – U]
[CTRL – D]
[CTRL – Z]
[CTRL – S]
How To
Adjust graph settings – The settings screen can be accessed from the options menu or
by pressing F5 at any time. Once inside the settings screen, you can specify vertical and
horizontal attributes, maximum and minimum points, and the actual size and look of the
coordinate grid. Use the TAB key to toggle between setting boxes. When you are finished
adjusting the settings, press ENTER to return to the graph screen.
• Xmin – smallest number on the x-axis
• Ymin – smallest number on the y-axis
• Xmax – largest number on the x-axis
• Ymax – largest number on the y-axis
• Xstep – distance between vertical grid lines
• Ystep – distance between horizontal grid lines
• Show grid – coordinate grid on/off
• Abort plot on esc – ???
• Pixel x – width of graph
• Pixel y – height of graph
Graph an equation – Enter the right side of an equation in the command box located at
the bottom of the graphing screen. Do not use spaces between numbers and symbols.
When you have finished keying in the equation, press ENTER to plot the graph.
•
18
View menu
Options menu
Zoom menu
Help menu
Help
Clear graph
Reset graph
Shortcut key-mappings
Settings
Show command box
Hide command box
Scroll left
Scroll right
Scroll right
Scroll down
Zoom in
Zoom out (shrink)
19
Example: y = 4x^2+18
, ENTER.