1
QUICK REFERENCE GUIDE – EX4 ELECTROTHERAPY
PAGE 2
3
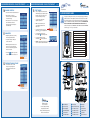
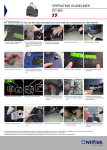
MAIN THERAPY DISPLAY
After navigating from the Home menu,
the screen on the right will be the main
therapy display (content subject to
change).
QUICK REFERENCE GUIDE – EX4 ELECTROTHERAPY
1
This display is organized in three (3)
sections with information relating to
the therapy selected for intended use:
2
1 Navigation Bar
2 Selected Parameters
3 Channel Tab Information
3
{
ELECTROTHERAPY — CLINICAL PROTOCOLS
• U
se the central control dial to
scroll through the pages, then select
the desired clinical protocol button.
PAGE 3
QUICK REFERENCE GUIDE – EX4 ELECTROTHERAPY
6
• F
or more information about the
clinical protocol, press the
button next to the desired protocol.
NOTE: If using IF-4P or High Volt
current, please consult pages 14 &
18 (respectively) for use of proper
electrode size and placement prior to
administering therapy.
{
• U
se the central control dial to scroll
through the information. The last
page will show suggested electrode
placement.
Never remove the self-adhesive electrodes from the skin while
the device is turned on!
7
WARNING: If the electrodes are not placed firmly on the skin or the device
IMPORTANT!
TREATMENT TIME ADJUSTMENT
• T
ouch the timer. The color will
change to orange. Adjust the
treatment time with the central
control dial.
has not connected with the lead wires securely, and the output intensity level
is equal or greater than 10mA, the intensity will stop automatically.
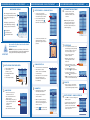
START THERAPY
• O
nce your parameters & timers are set,
start the therapy by touching the output
intensity on the bottom of the screen.
The color will change to orange.
• U
se the central control dial to
adjust the output level.
• N
ote: The current intensity can
only be adjusted after the timer
has been set.
1
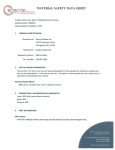
4
ELECTROTHERAPY TREATMENT SCREEN
1.
2.
3.
4.
5.
Electrode Output Indicator
Channel Indicator
(Channel 1, 2, 3 or 4)
Remaining Treatment Time
Output Value
Unit of Output Value (mA)
2
• T
he Home menu gives access
to all functions of the unit.
• Select the desired button for the
therapy to be used.
• The Electrotherapy menu gives you
access to the following functions:
1. Clinical Protocols
2. Favorites
3. Manual Operation
• Select Clinical Protocols button.
• T
o pause the treatment, touch the
pause button
in the navigation bar.
• Select the channels for desired treatment.
• T
o continue the treatment touch
the run button
in the navigation bar.
• W
hen channel 1 is selected,
channel 2, 3 and 4 are still available
for another therapy.
1
3
4
• T
o Stop the treatment touch the
STOP button
in the navigation bar.
• W
hen Channel 1+2 or 3+4 are selected
both channels have the same
parameters. Only the intensity can
be set differently
5
HOME SCREEN
CHANNEL SELECTION
• N
OTE: To restart after pressing stop, you will
need to re-enter the treatment time first.
8
2
5
PARAMETERS
FAVORITES
• P
lease see page 35 of the instruction
manual for full details on how to store
your personal therapy settings as favorites.
• A
djust the parameters by touching
the desired parameter button.
• C
hange the value by rotating the
central control dial.
• Note: Some parameters have more
options to choose from and in the
next screen another list appears from
which to chose from
• Touch the
button if you want to
switch to parameters of channel 3 & 4.
Chronic Pain
(2 Electrodes)
9
ELECTROTHERAPY — MANUAL OPERATION
• See STEP 2 — Select Electrotherapy then
Manual Operation.
• Select the desired current waveform.
• Note: Some selections have more
options to choose from and in the
next screen another list appears from
which to choose from.
PAGE 4
QUICK REFERENCE GUIDE – EX4 ELECTROTHERAPY
PAGE 5
QUICK REFERENCE GUIDE – EX4 ELECTROTHERAPY
13 START THERAPY
10 CHANNEL SELECTION
• O
nce your parameters & timers are set,
start the therapy by touching the output
intensity on the bottom of the screen.
The color will change to orange.
• Select the channels for desired treatment.
• W
hen channel 1 is selected,
channel 2, 3 and 4 are still available
for another therapy.
PAGE 6
CX4 / CX4
EX4 / EX4
Model: DQ7000
CX4 / CX4
EX4 GUIDE
/ EX4
QUICK REFERENCE
The purpose of this guide is to assist you in correctly operating your InTENSity™
EX4 Professional Series Device (DQ7000). This device should only be used under
the continued supervision of a licensed physician. This guide is not intended to
replace or substitute the InTENSity™ EX4 Instruction Manual. PLEASE READ THE
INSTRUCTION MANUAL COMPLETELY BEFORE USING THIS DEVICE. Read,
understand and practice the IMPORTANT SAFETY PRECAUTIONS AND WARNINGS
found on pages 5 — 12 of your user manual.
CX4 / CX4
EX4 / EX4
• U
se the central control dial to
adjust the output level.
• W
hen Channel 1+2 or 3+4 are selected
both channels have the same
parameters. Only the intensity can
be set differently
• N
ote: The current intensity can
only be adjusted after the timer
has been set.
• T
o pause the treatment, touch the
pause button
in the navigation bar.
11
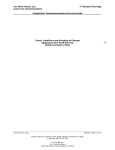
PAGE 1
2" x 2" Electrodes (4/pk)
2
• T
o continue the treatment touch
the run button
in the navigation bar.
2" x 3.5" Electrodes (4/pk)
2
3" x 5" Dispersive Electrode (2/pk)
1
• T
o Stop the treatment touch the
STOP button
in the navigation bar.
2.5" x 3.5" Rubber Electrode (4/pk)
1
2.75" x 4.3" Rubber Electrode (4/pk)
1
• N
OTE: To restart after pressing stop, you will
need to re-enter the treatment time first.
3" x 47" Strap for Rubber Electrodes
2
3" x 23.5" Strap for Rubber Electrodes
2
• Note: Some parameters have more
options to choose from and in the
next screen another list appears from
which to chose from
78" Lead Wires (2/bag)
2
Medical Grade Power Cord
1
Patient Kill Switch
1
Manual
1
• Touch the
button if you want to
switch to parameters of channel 3 & 4.
Quick Start Guide
1
CD with Electronic Manual
1
PARAMETERS
• A
djust the parameters by touching
the desired parameter button.
• C
hange the value by rotating the
central control dial.
Chronic Pain
(2 Electrodes)
12 TREATMENT TIME ADJUSTMENT
• T
ouch the timer. The color will
change to orange. Adjust the
treatment time with the central
control dial.
1
2
3
6
4
7
5
Manufactured for:
Roscoe Medical
21973 Commerce Parkway
Strongsville, Ohio 44149
Ph: (800) 3-ROSCOE (376-7263)
www.roscoemedical.com
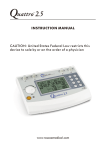
1
2
3
4
5
6
Power LED Indicator
Touch Screen Display
Electrotherapy Button
Patient Kill Switch Button
Central Control Dial
Clinical Protocols Button
7
8
9
10
11
12
8
9
10
11
12
13
14
15
17
16
18
Favorites Button
Remote Kill Switch Connection
Ch. 1 Lead Wire Connection
Ch. 2 Lead Wire Connection
Ch. 3 Lead Wire Connection
Ch. 4 Lead Wire Connection
13
14
15
16
17
18
Power Button
Carry Handle
Grounding Test Post
USB Diagnostics Port*
On/Off Switch
Power Cord Connection