1
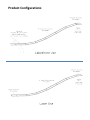
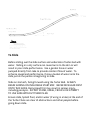
Turbo Chute™ Owner’s Manual Introduction Please take a few minutes to read this manual before assembling and using the product. Although the product is simple to use, this manual contains important safety information that you and all users must understand to safely enjoy the Turbo Chute. ! WARNING UNSAFE USE OF THE TURBO CHUTE CAN RESULT IN PERSONAL INJURY OR DEATH. To reduce the risk of injury, read and follow all instructions and warnings in this manual. Do not use this product unless you understand and accept the risk of injury involved with this activity. Safety Rules and Information • Make sure that everyone who uses the product is provided with and understands these safety rules and information. • NEVER DIVE HEAD FIRST ONTO THIS SLIDE. Diving headfirst may result in serious injury, including paralysis. • Not for children under 6 years of age or by anyone weighing over 250 pounds. • Because of their larger size, older children and adults risk spine, neck, head or other life-threatening injuries when using this slide. • The Turbo Chute is designed to be used only on grass or into a lake that allows for safe usage and with sufficient water depth to ensure safety. • Avoid installing slide near any hazards such as buildings, fences, trees, dock posts, benches, boatlifts or other obstructions. • Use on smooth grass or sand only, not on pavement or other hard surface. Surface beneath and around slide must be free of rocks, bumps, depressions, sticks, etc. • Never use the product after sunset, before dawn, or any other time in poor lighting conditions. • Wet entire slide, turbo sled and swimwear before use. • Allow only one person to slide at a time. Ensure entire length of sliding run is clear of other sliders before attempting to slide. • No pushing or shoving persons while on the Turbo Chute. • Never use the product while tired or fatigued. • Before use, ensure ALL sections of slide are properly staked down and junctions between sections are overlapping in the proper direction and securely fastened together. • Do not use Turbo Chute in close proximity to moving boats or other watercraft in operation. • DO NOT use while under the influence of drugs or alcohol, which may impair balance and proper judgment. • Use the Turbo Chute only under mature, knowledgeable adult supervision. • Proper setup by an adult is required. • DO NOT use if any part of slide is damaged or incorrectly attached. • When not in use, deflate Turbo Chute and store in a secure area. Never leave slide inflated and unattended. -----------------LAKE USAGE----------------• Always make sure water at end of slide is clear of swimmers or other obstructions for at least 50 feet beyond end of slide and water is at least 24 inches deep at point of slide exit. • Slide on stomach, facing forward, using inflatable Turbo Sled ONLY. DO NOT stand, kneel, crouch or attempt to use slide without Turbo Sled. • DO NOT use any other sled, mat or device not specifically designed for use with the Turbo Chute. • Always slide from a stationary position when using in a lake. NEVER run and dive onto slide. • Ensure slide is supported by firm ground over the entire length of the slide prior to entry into the lake. • Always wear a U.S. Coast Guard approved Type III personal floatation device (PFD) when sliding into a lake or deep water. -----------------LAWN USAGE----------------• DO NOT attempt to use slide without inflated start mat. • Slide on stomach, facing forward, using inflatable Turbo Sled ONLY. DO NOT stand, kneel, crouch or attempt to use slide without Turbo Sled. • DO NOT attempt to use slide without pool reservoir attachment. • Ensure pool reservoir attachment is situated on flat ground. NEVER place reservoir on a downward slope. • Over running the pool reservoir may result in injury. Adjust location, if necessary, and maintain proper water depth in pool in order to avoid over running the pool. Product Configurations Assembling your Turbo Chute Step 1: Setup Make sure the slope and surrounding area are free from obstructions. If using into a lake, ensure lakeshore and planned entry area into the water are free from obstructions as well. Ensure that the entire length of the chosen slide path is free of rocks, bumps, depressions, sticks, etc., and the surface beneath the Turbo Chute is either smooth grass or sand. A minimum of 7° slope angle is suggested for sliding (approx. 5 ft drop in 40 ft of length). DO NOT exceed 40° slope angle. ! CAUTION THE STEEPER THE SLOPE, THE FASTER AND FURTHER YOU WILL SLIDE DO NOT use on slopes that create danger to the user as a result of excess speed. Do not use if your hill or lakeshore does not meet these requirements. Place deflated slide sections on the shore or similar firm surface with sufficient clearance to inflate and transport the inflated section to the location you intend to use it. Make sure the area is free of all sharp sticks, rocks or other objects that could puncture the product. Step 2: Inflate To inflate, use either the RAVE High Speed Inflator (#01083) or the RAVE 120v Canister Inflator (#02342). Locate the valves on each side rail of the slide straight sections and Splash Pool (if using on Lawn). Align valve with hole in the cover of the side rail. Inflate bladder 50% full and check to ensure bladder is not twisted and valve is properly aligned with the hole in the cover. Adjust the bladder if necessary. Inflate side rails to firm but not hard. Inflating the product too firm initially can make it difficult to join the sections together. Assemble slide with sections partially full and top off inflation pressure in side rail tubes once entire slide is set up. A special inflation adaptor (included with the High Speed Inflator) is needed for the Inflatable Start Mat. Simply lock the adaptor onto the end of the inflation hose and insert into the valve body. Turn ¼ turn to lock in place. NOTE: This inflation adaptor will automatically open the valve when inserted and will close the valve when removed. You do not need to manually open/close the valve when using this special adaptor. Inflate mat section so when kneeling on it with one knee, it does not allow contact with the ground. CAUTION: Do not fill until hard or the mat will not provide proper cushioning. To manually open valve, depress the stem and rotate clockwise. To close valve, depress the stem and rotate counter-clockwise. Note: It is normal for the air pressure within the tube to fluctuate depending on air and water temperatures. It may be necessary to increase or decrease the air pressure in your product accordingly. To avoid damage on extremely hot days it may be necessary to check and release the air pressure from your product throughout the day. ! CAUTION DO NOT OVER-INFLATE. Do not exceed 1 PSI if filling with compressed air. Excessive pressure can cause the tube to rupture with potentially damaging force to eyes, ears, skin and limbs. Use of an air compressor or over-inflation can rupture the tube beyond repair, thus voiding the warranty. Step 3: Lake Assembly & Positioning Begin by positioning the end of a straight Turbo Chute section in the water at a depth of 24 inches or more and at least 10 feet from shore. This will be the end of your slide. If one section isn’t long enough to reach the shore, attach additional sections until the slide reaches the shore. Use the staking loops to attach anchor lines and anchor weights to help prevent movement in windy conditions. Attach each straight Turbo Chute section so that the warning label is positioned on the lead (uphill) end of the slide. Ensure all Velcro® strips are securely fastened together and there is a smooth transition from section to section without gaps. For Turbo Chute sections that are on solid ground, ensure that each section is properly staked down using the provided stakes and straps that are attached to each section. Straps should be staked 45 degrees uphill to prevent downhill movement of the Turbo Chute during use. The Inflatable Start Mat should be at the top of the hill and the last section to be attached to the slide and staked down. To correctly position your slide: 1. Output end of slide must extend at least 10 feet out from the waters edge (shoreline) and be floating. 2. Water depth at the end of the slide should be a minimum of 24 inches deep and should be free of rocks and other obstructions. 3. The Inflatable Start Mat should be situated at the beginning of the slide, on a level or slightly downward sloping surface of no more than 10 degrees in slope. 4. Ensure there is a smooth transition from land to water. Excavate, use fill sand or other means of creating this smooth transition. 5. Add additional Turbo Chute sections if slide is too short to meet the criteria above. Step 3: Lawn Assembly & Positioning Begin by positioning the Splash Pool at the bottom of the hill where there is level ground. This will be the end of your slide. Attach each straight Turbo Chute section so that the warning label is positioned on the lead (uphill) end of the slide. Ensure all Velcro® strips are securely fastened together and there is a smooth transition from section to section without gaps. As you attach each section of your Turbo Chute, ensure that it is properly staked down using the provided stakes and straps that are attached to each section. Straps should be staked 45 degrees uphill to prevent downhill movement of the Turbo Chute during use. The Inflatable Start Mat should be at the top of the hill and should be the last section to be attached to the slide and staked down. Before sliding, fill Splash Pool to the top with water and check to make sure all stakes are secure. To correctly position your slide: 1. Inflatable Splash Pool should be placed on level ground and never on a downslope. Water in pool should be a minimum of 4 inches deep. 2. The Inflatable Start Mat should be situated at the beginning of the slide on a level or slightly downward sloping surface of no more than 10 degrees in slope. 3. Add additional Turbo Chute sections if slide is too short to meet the criteria above. To Slide Before sliding, wet the slide surface and underside of turbo sled with water. Sliding on a dry surface can cause burns to the skin or will result in poor slide performance. Use a garden hose or water pumped directly from lake to provide constant flow of water. To enhance speed and performance, throw a bucket of water onto the slide just as the person is beginning to slide. Slide on stomach, facing forward using the Turbo Sled. ALWAYS BEGIN SLIDING ON INFLATABLE START MAT. NEVER DIVE HEAD FIRST ONTO THIS SLIDE. Diving Head first may result in serious injury, including paralysis. DO NOT STAND, KNEEL, CROUCH OR ATTEMPT TO USE SLIDE WITHOUT TURBO SLED. Ensure slide, Splash Pool, and/or water (if using in a lake) at the end of the Turbo Chute are clear of obstructions and other people before going down slide. NOTE: Sliding performance on any slope can be enhanced with the following techniques: 1. Increase the volume of water being applied at the top of the slide. 2. Use environmentally friendly liquid dish soap. Squirt soap onto top of slide and bottom of sled periodically as needed. 3. Apply car wax to surface of dry slide. Hand buff excess wax to create a slick surface. Cleaning and Storage When the product is not being used, store it in a covered, shaded area. This will help protect it against ultraviolet (UV) rays and extend the life of the product. Clean the slide completely with a mild soap and fresh water. NEVER USE PETROLEUM BASED PRODUCTS OR SOLVENTS FOR CLEANING. NEVER USE A POWER WASHER SINCE THE HIGH PRESSURE WATER WILL DAMAGE THE TUBE BEYOND REPAIR. Ensure product is completely dry before storing For storage, roll the product loosely and place in a container, preferably one that rodents can’t chew through. Secure against unauthorized and unsupervised use. Store in a cool, dry location. Do not store product directly on concrete surface. Place mothballs around stored inflatable to keep mice and insects away. Troubleshooting Air chambers won’t hold air: • Check to make sure all valves are completely closed. • Check for holes in the slide following the procedures in the “Repairs” section. Repairs For Minor Holes or Punctures: Remove the bladder from cover Inflate the slide and locate the leak by spraying the tube with soapy water. Bubbles will appear where there is a leak. Mark location of hole. Determine the hole size and cut a circular patch ½ - 1 inch wider than the hole with repair kit included with the product. Remove air from the tube and dry tube completely where the patch is to be applied. Peel off paper back from patch, apply repair patch to area and work out any air bubbles from beneath the patch. Apply weight to the patched area for one hour before reinflating. RAVE Sports Raft Water Sports