1
Part Number: PR14037000 2 Contents Section 1 - Machine Specifications .......................................................... 6 Section 2 - Installation (Engineer’s Procedure) ....................................... 9 Section 3 - How To Vend A Drink ........................................................... 14 Section 4 - Service Keypad Functions .................................................... 19 Section 5 - Programming Mode ............................................................. 22 Section 6 – Engineer Program................................................................ 30 Section 7 - Technical Information ........................................................... 81 Section 8 - B2C (Espresso) System .......................................................... 88 Section 9 - Diagnostics and Maintenance Procedures ............................ 91 Section 10 – Electrical/Electronics Information................................... 102 Section 11 - Dispense Pipe Lengths ..................................................... 104 Section 12 – Spare Parts ...................................................................... 105 3 EC Declaration of Conformity We Crane Merchandising Systems (UK), of Pipsmore Park, Bumpers Farm Industrial Estate, Chippenham, Wiltshire, UK, Declare that: Type of Equipment: Model Name: SN14 6NQ Beverage Vending Machine VOCE Has been designed and manufactured to comply with all essential requirements of the following Regulations/Directives: 73/23/EEC ⇒93/68/EEC⇒ The Low Voltage Directive 2006/95/EEC and its amending directives 89/336/EEC ⇒ 91/263/EEC⇒ 92/31/EEC ⇒ 93/68/EEC ⇒ 2004/108/EEC The Electromagnetic Compatibility Directive and its amending directives on materials and articles intended to come into contact with food REG. (EC) 1895/2005 on the restriction of use of certain epoxy derivatives in materials and articles intended to come into contact with food relating to plastic materials and articles intended to come into contact with foodstuffs. Tests have been performed by accredited certification bodies in accordance to the following specifications: EN 60335-1: 2002 + A1+ A11, EN 60335-2-75: 2004+ A1 EN ISO 11201 + EN ISO 3744 EN 55014-1:2000+A1+A2, EN 55014-2:1997+A1, EN 61000-3-2: 2000+A2, EN 61000-3-3:1995+A1+A2,EN 61000-4-4, EN 61000-4-5, EN 61000-4-6, EN 61000-4-11, EN 61000-4-2, EN 50366:2003 +A1 Contribution of heavy metal migrants from different parts of the circuits of machine under in use conditions according to EU directives and guidelines. With regard to hygiene for foodstuffs in location, the operator must comply with 852/2004/EEC which lays out the general and specific hygiene rules to ensure a high level of consumer protection with regard to food safety. Date: 03 January 2012 Legal Representative Signature: 4 The following Symbol is used throughout this Manual: Safety First! Take care, risk of personal injury. Crane Merchandising Systems accepts no responsibility for damage caused to the equipment through misinterpretation or misuse of the information contained in this manual. © Copyright 2012 Crane Merchandising Systems Introduction This manual provides you with guidance on the installation, daily operation and basic maintenance of your VOCE freestanding vending machine. Crane Merchandising Systems always recommend that a trained technician service its equipment. Crane Merchandising Systems is committed to continuous product improvement. This means that the information within this document, although correct at time of publication, is for guidance only and may be subject to change without prior notice. Important Safeguards Always follow these basic safety precautions when operating or maintaining your machine: 1. Ensure that you and anyone who will operate or maintain your machine have this manual available for quick and easy reference, and read all instructions carefully before commencing work. 2. Beware of Electricity Certain maintenance operations require your machine to remain connected and switched on. Only trained personnel should carry out these routines, and independently of all other operations. Observation of safe working practices in accordance with current regulations is necessary at all times. Important! Unless otherwise specified, always disconnect your machine from the electricity supply before commencing work. 3. Servicing the Heater Tank/Espresso pressurised water system Important! Water in this machine can exceed 99°C. Water at this temperature can cause severe injury. Espresso machines may be fitted with a pressurised water system, under no circumstance should this be dismantled other than by a full trained engineer. 4. Do not operate your machine if any part is damaged until a service technician has carried out necessary repairs and ensured that it is safe. 5. Beware of moving components when servicing the machine. 6. Allow your machine to cool before handling or moving. 7. Never immerse your machine in water or any other liquid and never clean it with a water jet. 8. In machines fitted with carbonator units the CO2 bottle is filled with gas at up to 800psi and MUST be secured in an upright position. In the event of a leak, ventilate the area in the vicinity 9. Ensure that you are familiar and adhere to the most recent Health and Safety at Work and Electricity at Work Regulations. 5 Important! This appliance is not intended for use by persons (including children and the infirm) with reduced physical, sensory or metal capabilities, or lack of experience and knowledge, unless they have been given supervision or instruction concerning use of the appliance by a person responsible for their safety. Children should be supervised to ensure that they do not play with the appliance. Your VOCE machine is for indoor use only and because it is a beverage machine, should be sited in a clean and hygienic area. 6 Section 1 - Machine Specifications 1.1 Specifications General Height . . . . . . . . . .1830 mm Width . . . . . . . . . . .705 mm Depth . . . . . . . . . . .790 mm Weight . . . . . . . . . .184 kg Cup Capacity * . . . .600 7-9oz (340 12oz) *Approximate and are for guidance only. Electrical Services Voltage . . . . . . . . ..220 - 240 Volts AC Current . . . . …13 Amp Fused Frequency . . . . . . ..50 Hz Water Services Pressure . . . . . . . .200 Kpa (2 Bar) - 600 Kpa (6 Bar) Stopcock . . . . . . . 15 mm BSP from rising main All weights and dimensions are approximate and are for guidance only. 1.2 Water Filter If your VOCE machine is fitted with a CoEx® B2C brewer, then it must be connected to the water supply via a scale inhibiting water filter. Crane Merchandising Systems recommend and supply the Brita AquaQuell, and Cuno range of water filters. 7 1.3 External Features Key: 1 Upper Graphic Panel 2 Selection Decals 3 Door Lock 4 SureVend™ Sensor 5 Kickplate 6 Adjustable Foot 7 LCD Display 8 Selection Button 9 Coin Return Button 10 Coin Entry 11 Coin Return 12 Lower Graphic Panel 1 7 2 8 9 3 10 4 11 12 5 6 8 1.4 Internal Features Key: 1 2 3 4 5 6 7 8 Main Switch Spray Head Oltre Brewer (Coffee) Oltre Brewer (Tea) Mixing Station Brewer Waste Container Waste Bucket Kick Plate 9 10 11 12 13 14 Service Keypad Cup Turret Door Locking Mechanism Cup Catcher Surevend Sensor Drip Catcher Bracket 1 2 9 10 3 4 11 5 12 13 6 14 7 8 9 Section 2 - Installation (Engineer’s Procedure) Important! It is essential that the personnel responsible for installing and servicing your machine, understand the following: 1. The installation and commissioning of your machine should only be carried out by a trained and authorised service technician. 2. All water and electrical services must be correctly and safely connected. 3. All covers must be replaced correctly and securely and your machine left in a safe condition. 2.1 Siting your Machine 1. Your machine is only suitable for indoor use, we recommend that it be situated in an area with an ambient temperature not below 10º C and not exceeding 30º C. Your machine should be located near the appropriate water and electrical services as detailed in 1.1 Specifications. 2. Prior to placing your machine in its final location, ensure that there is sufficient access space available via passageways, stairs, lifts, etc. 3. To ensure adequate ventilation, 100 - 150 mm (4 - 6 inches) clearance must be allowed between the back of the cabinet and the wall. 4. Open the door using the key provided. Remove transit packing and installation kit. Check for visual signs of damage which may have occurred during transit. If your machine is damaged or any parts are missing, you must contact the supplier immediately. 5. Level your machine in both the front-to-back and side-to-side planes by adjusting the feet. Ensure that the door opens and closes easily and the lock operates correctly. 2.2 Connecting the Water Supply 1. Your machine should be situated within 1 metre of a drinking water supply from a rising main, terminating with a W.R.C. approved 15mm compression stop-tap. N.B. The water supply should comply with both the Statutory Instrument No.1147 - “Water, England and Wales” and The Water Supply (Water Quality) Regulations 1989. Water pressure at the stop-tap must be within the limits 2 - 6 Bar (200 Kpa 600 Kpa). 2. Freshbrew & B2C Machines: If your VOCE machine is fitted with an Oltre brewer, or CoEx® B2C brewer, then it must be connected to the water supply via a water filter. This filter must be of food grade quality and able to remove temporary hardness (scale), heavy metals (lead, copper, iron, and cadmium), chlorine and any organic pollutants/discolouration. Crane Merchandising Systems recommend and supply the Brita AquaQuell water filter. Warning! If your Freshbrew or B2C machine is connected to a water supply and used without a water filter as specified above, your warranty will be void. 10 3. Connect the flexi-hose supplied with your machine to the stopcock ensuring that the seal is fitted correctly. Flush the water supply before connecting the machine. N.B. When connecting your machine to a water supply always use a new flexi-hose (such as the one supplied). Never re-use an existing hose. 4. Connect the hose to the inlet valve located on the rear of your machine. Ensure that the seal is correctly fitted. Ensure that all water supply fittings are tight. 5. Turn on the water supply at the stop tap and check for leaks. Prime the water filter (where fitted) following the instructions supplied by the filter manufacturer. 2.3 Connecting the Electrical Supply Safety First! The electrical safety of this appliance can only be guaranteed if it is correctly and efficiently earthed, in compliance with National and local regulations on electrical safety. Always ensure that the earthing is efficient. If you have any doubts, contact a qualified electrician to check the system. The manufacturer declines all liability for damage resulting from a system which has not been earthed. On no account should it be earthed only to the water supply pipe. The appliance must be connected to mains protected by a certified safety switch (double pole) with a capacity appropriate for the application and in compliance with National and local regulations on electrical safety. In the UK this appliance must be connected to a 230 Volt 50Hz 13 amp fused switched socket outlet, installed to the latest edition of the IEE regulations, using a 3 pin BS approved 13 amp fused plug and in compliance with National and local regulations on electrical safety in other countries Important: If any internal fuses become damaged or fail in any way they must be replaced by the correct fuse available from the manufacturer quoting the information written on the label adjacent to the relevant fuse-holder. Important: If the mains lead becomes damaged in any way it must be replaced by a lead available from the manufacturer. 2.4 Commissioning Procedure A trained installation engineer must carry out the following procedure before your machine can be used for the first time. Ensure that the electrical and water services to the machine are connected correctly. Check for leaks in the water supply. 1. Open the front door of your machine. 2. Ensure that the waste bucket is fitted correctly. Clip the level detector and overflow pipes correctly onto the rim of the bucket. 3. Cup Turret. Remove the lid and fill the tubes with the correct size cups for the cup catcher type fitted to your machine. Allow the cups to drop into the tubes directly from the packaging. DO NOT touch the cups with your hands. Important: Do not fill the tube directly above the cup dispense position. Allow the cup turret motor to rotate a full tube to the cup dispense position when the machine is powered up. Rotating the cup turret by hand will damage the mechanism. 11 Note: If you are loading paper cups, first inspect each pack for damage to the cup rims. Damaged cups must not be used. 4. Turn the machine on with the main switch on the back panel. The cup turret mechanism will index the first available cups to the dispense position and drop the cup stack into the cup drop mechanism. Fill the remaining empty cup stack with cups and replace the lid. 5. All Models: The water inlet valve will open and the heater tank will start to fill. As the water heats, ensure that no water overflows from the heater tank overflow pipe into the waste bucket. When the machine has powered up, the LCD will display the message as shown opposite. Check the system for leaks. Note! The machine has a safety cut-out which will only allow the heater tank to fill for a maximum of two minutes. If after power-up the heater tank has not filled within this time, the mains power supply should be switched off and then on again to reset the heater tank time-out. After the above message the ”Sorry Out Of Service Water Tank Heating” message is displayed. 6. B2C Models: While the machine is powering up, the LCD will display the “Initialising” message. As the machine initialises a small amount of water is pumped through the system and is discharged into the waste bucket. 7. Before using the B2C machine for the first time it is necessary to purge the water system to ensure any water left in the system during transport is purged. When the machine enters standby press button 9 on the Service Keypad fitted inside the door. The machine will pump approximately 400ml of water through the system, discharging it into the waste bucket. Ensure the Time and Date are set correctly. Perform Co-Ex Clean Once the cleaning cycle is complete power cycle the machine Important: Should the machine fail to fill correctly or leak, turn off the stopcock and the power to the machine before investigating the fault. 8. Check the LCD display on the front of the machine to ensure that the water has heated to the correct temperature and that the machine is in standby mode. A machine set to free vend mode will alternate the messages: N.B. Messages displayed in standby mode will change depending upon the monetary device fitted and how the machine is set up during programming. 12 9. All Models: Rotate soluble/freshbrew ingredient canister outlets to upright position. Remove each canister in turn and fill with the correct ingredient DO NOT place the canister on the floor or overfill with ingredient. 10. B2C Models: Close the outlet slide to seal the fresh beans canister outlet before removing the canister from the machine. DO NOT place the canister on the floor. Fill the canister with fresh coffee beans. Refit the canister lid and fit the canister into the machine, ensuring that it is located correctly. Open the outlet slide to ensure correct operation. N.B. To maintain optimum drink quality, Crane Merchandising Systems recommend that the bean canister is replenished on a daily basis. 11. Press the Cup Test button (7), located in the Service Keypad on the rear of the door and ensure that a cup is ejected cleanly from the cup drop unit. 12. Press the Park Head button (8), located in the Service Keypad on the rear of the door and ensure that the dispense head moves to its fully extended position. Press the button again to return the dispense head to its correct (homed) position. 13. Freshbrew Models: Ensure the brewer guard and brewer waste container are fitted correctly. Slide the container into position directly under the brewer. 14. B2C Models: Ensure that the brewer waste container is fitted correctly beneath the CoEx® brewer unit and tea brewer unit (if fitted). 15. Referring to the section: Programming Mode, use the menu selections available to programme the required settings for correct machine operation e.g. drink prices, disable selections, time and date etc. 16. If fitted, check that the coin mechanism and cash box operate correctly. Fill the coin tubes with correct coinage. Ensure coin return mechanism functions correctly. 17. Operate the machine through its complete range of selections to ensure that each vend is correctly dispensed. 18. Close the cabinet door. Ensure that the machine is left in a clean and safe condition. 2.5 Setting Up the Carbonator Unit (Where Fitted) 1. Open the cabinet door. Fit the seal (1), provided in the installation kit, to the regulator as shown in the photograph. Connect the regulator to the gas bottle. 2. Tighten the locknut. Carefully lift the cylinder into the machine ensuring that the gas supply pipe is not trapped or obstructed in any way. 1 13 Safety First! The cylinder may be heavy. Always follow the correct procedure when lifting heavy objects. 3. Secure the gas bottle with the safety chain. Turn on the gas supply from the bottle and ensure that the regulator (2) is indicating a gas pressure of 35 PSI. 4. Place the carbonator overflow pipe into the waste bucket. Fill the carbonator water bath with clean cold water until it starts to flow from the overflow pipe. Switch on the carbonator unit using the Cold Unit switch located near the power supply. 5. 6. Place the syrup containers in the bottom right-hand side of the cabinet and insert the dip tubes into the containers ensuring that the correct flavours correspond to the drinks displayed on the selection decals. 7. Prime the syrup selections ready for use by pressing button 13 on the service keypad. The LCD will display the screen opposite. 2 N.B. Ensure that the waste bucket is empty and in place before priming the pumps. 8. To prime syrup pump 1, press and hold button 1 on the drink selection keypad until the syrup appears from the dispense head. Repeat for syrup pump 2 by pressing and holding button 2 on the drink selection keypad. Press the X (Exit) key to return the machine to standby mode. Empty the waste bucket and refit to the machine. 9. Test vend the carbonated drinks to ensure correct operation of carbonator unit. Check for leaks and ensure that the machine is left in a clean and safe condition. Close the door. N.B. If a still unit is fitted ensure that the ingredient timers for syrup drink 1 and 2 are set to 6 seconds (recommended). 2.6 Warranty Card Please complete and return the warranty card that comes with the machine. Use the card to note any problems you encountered during installation, your feedback helps us to improve our products and services. Return the warranty card, whether problems were encountered or not, failure to do so may invalidate your warranty. 14 Section 3 - How To Vend A Drink VOCE machines are available with an intuitive build a drink interface or can be used with a numeric selection menu. Both selection methods allow the user to produce a drink to their preferred taste and strength. 3.1 Selecting A Drink - Build A Drink Drink selections are made by pressing the appropriate selection buttons on the keypad and then utilising the keypad strength selection buttons and the LCD display to alter the drink strength and to add milk/sugar to suit the customer’s personal preference. When in standby mode, all available drink selection buttons will be lit indicating that the drink is able to be selected. At this time the Milk, Sugar and Start buttons are not lit. The following example describes how to vend a Freshbrew Tea selection from a freshbrew machine set to “Free Vend” 1. Press selection for Freshbrew Tea on the keypad. All of the other selections buttons will be extinguished, the Milk, Sugar and Start buttons will light up and the machine exits from standby mode. The LCD will display the screen as shown opposite. N.B. The default strength setting for this drink selection is Normal as shown. 2. To obtain a Strong or Mild beverage it is necessary to press the current drink selection button. Pressing will step through the Strong and then Mild selections. 3. If the customer requires milk it is necessary to press the milk button. 15 4. If Extra Milk is required the customer presses the milk button a second time. A third press will enable the minimum amount of Milk selection. 5. If the customer requires sugar it is necessary to press the sugar button. 6. If Extra Sugar is required the customer presses the sugar button a second time. A third press will enable the minimum amount of Sugar selection. 7. Once the required drink has been selected, press the Start button on the keypad. All lit buttons will be extinguished apart from the drink selection button which flashes indicating that the drink is being vended. Unless the customer has placed their own cup into the dispense area, a cup will automatically be ejected from the cup drop unit into the dispense area and the drink selection will be delivered into the cup. Whilst this operation is in progress the LCD will display the screen shown opposite. 8. After the beverage has been dispensed the LCD will display the message Thank You and the machine will beep once. The message on the display will change to read Please remove cup. The drink can then be carefully removed from the dispense area and the machine will return to standby mode. 16 9. Certain drink selections do not allow the strength option to be selected or milk added. For example, if the customer presses the Cappuccino selection button, all of the other selection buttons will be extinguished, the Sugar and START buttons will light up and the LCD will display the screen opposite. The customer can either press the START button to vend the drink or first press the sugar button in order to add sugar to their taste as described previously. 10. Other drink choices do not allow the strength option or milk/sugar to be selected. For example, if the customer presses the Chocolate selection button, all of the other selection buttons will be extinguished, the START buttons will light up and the LCD will display the screen opposite. The customer simply presses the START button and the machine will vend the drink as described above. 3.2 Selecting A Drink - Cold Drink Selections VOCE machines may be fitted with either a chiller or carbonator unit allowing cold water and flavoured drinks to be vended, either still or both still and sparkling. The following example describes how to vend a cold flavoured drink from a VOCE machine fitted with a carbonator unit. 1. Press the selection button for the cold flavoured drink required on the keypad. All of the other drink selection buttons will be extinguished, the START button will light up and the machine exits from standby mode. The LCD will display the screen as shown opposite. N.B. The default setting for cold drink selections is still. 1. To obtain a Sparkling drink press the current drink selection button. Pressing the button again will revert back to the Still setting. 2. Once the drink has been selected, press the START button on the keypad. The drink selection button will flash indicating that the drink is being vended. Unless the customer has placed their own cup into the dispense area, a cup will automatically be ejected from the cup drop unit into the dispense area and the drink selection will be delivered into the cup. Whilst this operation is in progress the LCD will display the “Serving” screen 17 3. After the cold drink has been dispensed the LCD will display the message Thank You and the machine will beep once. The message on the display will change to read Please remove cup. The drink can then be removed from the dispense area and the machine will return to standby mode. 3.3 Selecting A Drink – Keyless Jug/Free Vend Transition This feature mimics the activity of a Jug/Free vend key. The feature usage is as follows: 1. Press 'Start' + '2' to enter Jug mode (via password screen) Password: 1432 2. Press 'Start' + '3' to enter Free vend mode (via password screen) Password: 4321 3. Press 'Start' + '4' to enter Normal mode As visible from the state transition diagram, in order to use this feature on idle screen press ‘Start’ and then press the relevant short key (‘2’ or ‘3’). This will take you to pin entry screen. You will need to enter the correct pin which will enable the corresponding mode. Once in Jug/Free vend mode, by default, machine will revert back to normal mode if there is no activity for 30 seconds. However, it is possible to move transition to Normal mode by pressing ‘Start’ + ‘4’. The following settings are configurable for this feature: a. b1. b2. System Settings > Key-Less Transitions - Turns the feature ON or OFF Security Codes > Enter Jug Vend PIN - Modify existing PIN* Security Codes > Enter Free Vend PIN - Modify existing PIN* * Only available in Engineer's menu Important note: If you intend to use this feature you MUST change the password to one of your own choosing. 3.3 Replacing/Updating Drink Selection Decals 3.3.1 Self-adhesive drink selection and pricing decals are mounted onto a decal carriers located behind the main panel. To update drink pricing or replace drink description decals, proceed as follows: 1. Open the front door of the machine. 2. Carefully remove the decal carrier from the machine. Place the decal carrier face-up on a clean, flat surface. 3. Updating drink pricing: Carefully remove the previous price decals from the drink selection decals. Update the prices where necessary using new self-adhesive decals. These are available as spares from the manufacturer. 4. Updating drink selections and pricing: When updating selection decals and prices it may be necessary to use a new decal carrier. These are available as spares from the manufacturer. Peel the relevant drink selection decals from their backing sheet and apply to the decal carrier using the printed guides. Important: Ensure that drink selections used relate to drink choices programmed into the machine software. Apply price decals as described above. 5. Place the decal carrier ensuring that the drink selections are visible through the pre-cut viewing area. 6. Close the front door and ensure that the machine returns to standby mode. Section 4 - Service Keypad Functions VOCE machines are fitted with a service keypad mounted on the rear of the door. This keypad contains the Program entry key and also allows the operator to carry out specific functions during routine cleaning and maintenance. N.B. During certain operations e.g. View Counters it is necessary for the operator to utilise the selection keypad and LCD mounted on the front of the door to access data. Please refer to Section 6 Programming Mode for details of selection keypad layouts and functions. 4.1 Button - Program Entry This button enables the operator to access the Engineer Program (Section 7). 4.2 Button - Brewer Open (Oltre Brewer) The brewer should return to its fully open position at the end of the vend cycle. In the unlikely event that the brewer chamber is closed Press ‘2’ on the service keypad, the brewer will start to move & will stop at the open position. 4.3 Button - Rinse/Flush The flush sequence rinses the mixing bowls. Before the sequence begins, the system waits until the water in the boiler is at the set temperature. In order to guarantee the highest standards of cleanliness, the boiler fill valve is disabled, ensuring that the water used in the sequence is delivered at the optimum temperature to kill any micro-organisms. Each hot water valve and the corresponding whipper are switched on in sequence. Once the flush cycle is complete the machine returns to standby mode. 1. To flush the machine: a. Press and release the Flush button (3). The flush sequence begins. b. Empty the waste water container when complete Caution: Ensure that a suitable container is placed under the dispense position. Keep hands away from the dispense area whilst the flushing cycle is in operation. 4.4 Button 4.4.1 4.4.2 4.4.3 - Brewer Clean (Oltre Brewers only) The brewer clean button rinses the Oltre brewer/s. During the cleaning cycle the LCD shows the message shown. Once the cleaning cycle is complete, the boiler refills and when the water is at the required temperature the machine returns to standby mode ready to vend 4.5 Button - View Counters The View Counters button (5) enables the operator to access the Data Recall Menu. Entry into this menu allows the operator to view Non-Resettable and Resettable Sales Data, view data relating to Timed Events and Identification Numbers of installed components and (if the feature is enabled) view SureVend™ assisted vend data. The Resettable Sales Data and SureVend™ Data menus contain an extra sub-menu which allows the operator to delete the current data from the machines memory. Full details relating to this menu and its contents can be found in 7.1 Data Recall Menu. 4.6 Button - Test Vend The Test Vend button (6) enables the operator to vend a drink from the machine to ensure correct operation after cleaning or maintenance. 1. When the button is pressed and released the LCD will display the screen as shown opposite. Press a drink selection button followed by the START/? button to begin the vend sequence. 2. Ensure that the selection is correct, has not under/overfilled the cup and most importantly, tastes good! 3. Press the X (Exit) key on the drink selection keypad to exit from the Test menu and return to stand-by mode. 4.7 Button - Cup Test This button enables the operator to test the operation of the cup drop unit after refilling the cup stacks. When the button is pressed the cup drop motor is operated and a cup is ejected from the cup drop unit. This function ensures that the mechanism is working correctly. 4.8 Button - Park Head When this button is pressed, the dispense head moves to its fully extended position and stops. Press the button again to return the dispense head to its correct (homed) position. 4.9 Button - Boiler Fill (B2C Machines) When this button is pressed, the machine pumps a measured amount of water through the system - approximately 400ml, heating it as it does so. This ensures that heated water is immediately available when a drink is selected. This button should also be used to purge any water left in the system after the machine has been moved or shut down for any length of time. 4.10 Button - Machine Cool Down (B2C Machines) This button enables an engineer to work safely on the B2C module. When this button is pressed the hot water in the pressure system 370ml of cold water is passed through the system to remove the hot water which is there at standby. When complete the Message “Machine Cooled” is displayed and all outputs disabled, at this stage once the power to the machine has been disconnected the engineer can work safely on the B2C modul e. 4.11 Button - CoEx® Tablet Clean (B2C Machines) This button when pressed, initiates the CoEx® brewer tablet cleaning routine. Crane Merchandising Systems recommends that this brewer cleaning routine should be carried out on a weekly basis (see 4.7 CoEx® B2C Brewer Unit for full details). 4.12 Button Machines) - Reset Waste Counter (F/Brew & B2C This is only relevant if the feature is turned on during installation Every time that the waste container is emptied the waste counter must be reset. Press button 12 on the service keypad. Two audible bleeps confirm that the counter has been reset to zero. 4.13 Button - Syrup Prime (Still/Carbonated Machines) This button enables the operator to prime the syrup selections after replacing a syrup container. For full details of this operation, please see 2.5 Setting Up The Carbonator Unit. 4.14 Button - Clear SureVend Error TM This button enables the operator to simply and quickly clear SureVendTM errors caused by cup drop failures. 4.15 Button - Start This button has the same functions as the START key on the drink selection keypad. Section 5 - Programming Mode 5.1 Drink Selection Keypad Programming mode utilises the drink selection keypad and allows the operator to view and alter stored data within the machines memory. VOCE machines are fitted with a build a drink style and numeric selection interface. 1 6 2 7 3 8 4 9 5 0 X ? During programming the keys are used as follows: Keys 0-9 Used for entering text and numerical data ▲ For indexing up in a program, or incrementing data ▼ For indexing down in a program, or incrementing data ↵ Edit key. Used to select and enter the highlighted menu and to save data to machines memory X Exit key. Press to return to the previous menu screen START/? Press to “set all” or “clear all” data or begin a test sequence. 5.2 Menu Display The VOCE range of freestanding drinks vending machines feature Crane Merchandising Systems interactive menu display. The multi line LCD display helps to make navigating the programming menu structure easy and intuitive. It is used to display programming information and will change according to the type of data being updated. 1. The top line of the screen is the Menu title. 2. Selected items are highlighted in white. Press the ▲(up) or ▼(down) keys on the drink selection keypad to highlight an item. 3. Press the ↵ (Edit) key to select the item. In this example, pressing the ↵ (Edit) key will display the Mug Discount screen. 4. The bottom line of the screen will often show important information. In certain configuration menus it will display the current value for the selected item. This is a useful way to quickly check stored settings and also confirm that a value has been altered correctly. 5. To return to the Main Menu from any screen, simply press the X (Exit) key until you reach the Main Menu. 5.3 Accessing the Programming Mode 1. Open the front door of the machine. 2. Press the Program Entry key (1) on the service keypad, located inside the door. The LCD will display the screen as shown opposite. Enter the 4 digit engineer entry pin code. 3. Press the ↵ (Edit) key. Providing the operator has entered the code correctly, the LCD will display the screen as shown opposite. Press the ↵ (Edit) key to access the Engineer Program or X (Exit) key to return the machine to standby mode. 4. The LCD on the front of the machine will display the top level programming menu screen - Main Menu. The first available menu Data Recall is highlighted indicating that it can be selected. To move to a different menu press the ▲(up) or ▼ (down) keys on the drink selection keypad until the required menu is highlighted. N.B. Coins In/Out will only be displayed on machines fitted with an MDB coin mech. 5. With the required menu highlighted, press the ↵ (Edit) key to select it. Using the Price menu as an example, the LCD will display the sub menus as shown opposite. 6. Using the ▲(up) or ▼(down) keys, the ↵ (Edit) key and the X (Exit) key it is possible to easily navigate through all of the menus contained within the Engineer Program. 8. To update parameters, key in the actual digits of the number required using the selection keys 0-9. Once the correct parameter has been entered, press the ↵ (Edit) key to overwrite the previous value and save the new parameter in the machines memory. Pressing the X (Exit) key will move back to the previous screen. Certain programming functions require that the engineer chooses either one or multiple parameters within a sub program. These can take the form of either check boxes or radio buttons. 8. Check Boxes: The example opposite shows the Days of Week screen accessed via the Sanitation Events Menu which allows the engineer to choose multiple days of the week on which a specific function will take place. 9. Using the ▲(up) or ▼(down) keys, scroll through until the required day is highlighted as shown. Pressing the ↵ (Edit) key will select the day, indicated by an X appearing in its adjacent box. Continue until all required days have been selected. Pressing the X (Exit) key will move back to the previous screen and save the new settings to the machines memory. N.B. Pressing the START/? key on the drink selection keypad will check all boxes if empty or clear all boxes if checked. 10. Radio Buttons: The example opposite shows the State screen accessed via the Timed Events Menu which requires the engineer to select one of the options shown. Use the ▲(up) or ▼(down) keys to set the required option followed by the ↵ (Edit) key to store/save it (indicated by the filled radio button). All engineer programming for the VOCE range follows the procedures as described above. Specific program actions are described fully in the following section. 5.4 View Diagnostics Using the Drink Selection keypad, and without opening the machine door, it is possible to quickly view the Diagnostic screen and any faults that may have occurred within the machine. 1. Press and hold the X (Exit) key and then press 1 on the main keypad to display the Diagnostic Menu. 2. Press the ↵ (Edit) key to enter the menu. Use the ▼ (down) key to scroll down any faults listed and press the ↵ (Edit) key to view details of the fault. 3. Use the X (Exit) key to exit the menu. described in Section 6. All Data-# Displays the total number of machine vends. Section 6 – Engineer Program To access the Engineer Program, enter the programming mode as described in section 6. Once in the Engineers Program the LCD on the front of the machine will display the top level programming menu screen - Main Menu. N.B. Coins In/Out will only be displayed on machines fitted with an MDB coin mech. Using the ▲(up) or ▼(down) keys, ↵ (Edit) key and X (Exit) key on the drink selection keypad the engineer can navigate quickly and easily through the Engineer Program menus as Free Vend Coins In/Out System Settings Security Codes Timed Events 6.1 Data Recall Menu Entry into this menu allows the engineer to view NonResettable and Resettable Sales Data, view data relating to Events and Identification Numbers of installed components and (if feature enabled) view SureVend™ assisted vend information. The Re-settable Sales Data and SureVend™ data menus contain an extra sub-menu which allows the engineer to delete the current data from the machines memory. 6.1.1 Non Resettable Sales Data This menu allows the engineer to view and record monetary and sales values. This data cannot be reset and will remain intact for the service life of the controller board (unless the back-up battery is removed). 1. From the Data Recall screen highlight Non Resettable Sales Data and press the ↵ (Edit) key. The LCD will display the screen as shown opposite. From this menu the engineer can view data for the Overall Totals (highlighted), By Product, along with data relating to Cash, Cashless and Token Vends. 2. To view the Overall Totals screen, press the ↵ (Edit) key on the drink selection keypad. This menu displays both the total £ amount and total vend counts for the following data: Sales-£ Displays the total machine sales in £ except free and test vends Sales-# Displays the total number of machine vends. Including normal, discount and surcharge vend totals but not free and test vends. Discount-£ Discount-# Displays the total monetary value of all discounts in £ . Displays the total number of discounted vends Test Vend-£ Displays the total monetary value of all test vends in £ Test Vend-# Displays the total number of test vends Surcharge-£ Displays the total monetary value of all surcharges in £ Surcharge-# Displays the total number of surcharge vends Free Vend-£ Displays the total monetary value of all free vends in £ Free Vend-# Displays the total number of free vends All Data-£ Displays the total machine sales in £ N.B. All sales data is presented in a format required by the latest European Vending Association Data Transfer Standards (EVA DTS). Surcharge data fields are not supported by VOCE machines. 3. Scroll through the list displayed using the▲(up) or ▼(down) keys on the front panel and record the audit data. When complete, press the X (Exit) key on the drink selection keypad to return to the Non Resettable Sales Data menu screen. 4. The engineer can also view data by individual product. Press the ▼(down) key on the drink selection keypad to highlight By Product on the Non Resettable Sales Data menu screen. 5. Press the ↵ (Edit) key on the keypad to enter the By Product menu screen. This menu contains all of the drink selections available from the machine. Use the ▲(up) or ▼(down) keys on the drink selection keypad to scroll through the menu until the required selection is highlighted. 6. Press the ↵ (Edit) key on the keypad to enter the highlighted selection e.g. Instant Coffee. The LCD will display the screen as shown opposite. The engineer can then scroll through the list displayed using the ▲(up) or ▼(down) keys on the drink selection keypad and view the audit data. Surcharge-# Test Vend-£ Test Vend-# Free Vend-£ Free Vend-# N.B. Individual By Product screens also display the price set for the selection as shown 7. When complete, press the X (Exit) key on the drink selection keypad to return the machine to the previous screen. The engineer can then view data for more selections using the procedure described above and also access further menus via the Non Resettable Sales Data menu relating to Cash, Cashless and Token audit data. 9. To return the machine to standby mode, press the X (Exit) key repeatedly until the LCD displays the standby screen. 6.1.2 Resettable Sales Data This menu contains similar data to that available from the Non Resettable Sales Data menu. However, once viewed data from this menu can be cleared from the machines memory. 1. From the Data Recall screen, highlight Resettable Sales Data and press the ↵ (Edit) key. The LCD will display the screen as shown opposite and allow the engineer to view data for all parameters as described for NonResettable Sales Data. Additionally the menu allows the engineer to delete all resettable data via the Clear Data menu. 2. To view the Overall Totals screen, press the ↵ (Edit) key on the drink selection keypad. This menu displays both the total £ amount and total vend count (since the last time it was cleared) for the data fields shown. N.B. Please see 7.1 Data Recall Menu for detailed descriptions of these data fields. 3. Scroll through the list displayed using the ▲(up) or▼(down) keys on the front panel to view the audit data. When complete, press the X (Exit) key on the drink selection keypad to return to the Resettable Sales Data menu screen. 4. The engineer can also view the resettable monetary and vend data for individual product by entering the By Product menu, and also view data relating to Cash, Cashless and Token vends using their relevant sub-menus. Once the engineer has viewed the required information from these sub-menus, the data can be deleted via the Clear Data sub menu. 5. From the Resettable Sales Data screen, highlight the Clear Data sub menu using the ▼(down) key and press the ↵ (Edit) key. The LCD on the front of the machine will display the screen as shown opposite, warning the engineer that all data will be deleted. Either press the ↵ (Edit) key to clear the data or press the X (Exit) key to exit the menu without clearing the data. 6.1.3 Events 1. From the Data Recall menu scroll down and highlight Events then press the ↵ (Edit) key. The LCD will display the screen as shown opposite. From this menu screen the engineer can access and view information relating to the four events as shown. 2. To view the Power Losses screen, press the ↵ (Edit) key. The screen displays a list of the 10 most recent occasions when power to the machine has been interrupted in date, time of day and period format. Press the X (Exit) key to return to the Events menu. 3. Press the ▼(down) key to highlight Last Data Clear, Last Vend and Last Clock Set. Information for these events is displayed along the bottom of the screen. 6.1.4 Identification Numbers From the Data Recall menu scroll down and highlight Identification Numbers then press the ↵ (Edit) key. The LCD will display the screen as shown opposite. From this menu the engineer can access and then view serial number, part number and version type information relating to the main PCB and any MDB coin/card mechanism fitted to the machine. N.B. Coin Mechanism, Bill Validator and Card Reader will only be displayed if an MDB device is fitted to the machine. 6.1.5 SureVend TM This menu becomes available when SureVend is enabled via the Product Configuration menu (see 6.4.3 SureVendTM). 1. From the Data Recall menu scroll down and highlight SureVendTM then press the ↵ (Edit) key. The LCD will display the screen as shown opposite. From this menu screen the engineer can view and record the number of cup drop failures that SureVendTM has logged and also the number of SureVendTM assisted vends. 2. Once the engineer has viewed the data it can be cleared via the Clear Data menu as described previously. 6.1.6 Mug Vends This menu displays the number of vends that the machine has made without dropping a cup. The data can be cleared via the Clear Data menu as described previously. 6.1.7 Cup Vends This menu displays the number of cup drop vends that the machine has made. The data can be cleared via the Clear Data menu as described previously. 6.1.8 Print Data This menu displays the data that can be extracted from the machine when a printer is connected and the corresponding keypad number which needs to be pressed to send the data to the printer. 6.2 Diagnostic Menu 1. Should a fault occur within the machine, the LCD will display a fault message and in some cases the machine may become inoperable. By accessing the Diagnostic menu and viewing the fault description the engineer can in most cases clear the fault and quickly bring the machine back into service. 2. When the fault cannot be remedied by the engineer and requires the services of an approved engineer, the diagnostics screen text displayed enables the engineer to quickly and easily locate and repair the problem, reducing machine down time. 6.3 Test This menu allows the Engineer to test most of the components in the machine and also view various switch and sensor inputs to ensure correct operation. On entry to the Test menu The LCD will display the screen as shown. Test Vend Without Cups Test Vend Door Lighting Display Keypad Test 6.3.1 Cup mechanism This menu allows the engineer to test the operation of the cup drop unit 6.3.2 Hot Vend This menu allows the engineer to test the operation of the ingredient motors, whipper motors and main heater tank valves. 6.3.2.1 Auger This menu allows the engineer to select and run the individual ingredient motors (once selected a motor will run for three seconds) 6.3.2.2 Auger This menu allows the engineer to select and run the individual whipper motors (once selected a motor will run for three seconds) 6.3.2.3 Valve This menu allows the engineer to select and run the individual hot water dispense valves on the main heater tank (once selected a valve will open for four seconds) NB. This feature should be used to set up valves when they are repaired or replaced. As all flow rates should be set to 20ml per second each actuation of a valve should dispense 80ml with the restrictor screw on the valve being adjusted to achieve this. Important: Do NOT use this feature to test the valves feeding any Oltre brewers as they will not be in the sealed position and hot water will not be directed into the waste bucket. 6.3.3 Cold Vend This menu allows the engineer to test the operation of the syrup pumps and the cold water and carbonated water dispense valves 6.3.3.1 Syrup Pumps This menu allows the engineer to select and run the individual syrup pumps. 6.3.3.2 Cold Dispense - Still This menu allows the engineer to select and run the cold still water dispense valve (once selected the valve will open for four seconds) 6.3.3.2 Cold Dispense - Still This menu allows the engineer to select and run the cold carbonated water dispense valve (once selected the valve will open for four seconds) 6.3.4 Test Dispense Head This menu allows the engineer to test the dispense head motor, opto sensor and home switch. The correct operation is to move forward (Moving) three times before reversing direction (Initialising) and stop when the home switch is seen (Idle) 6.3.5 Switches & Sensors This menu allows the engineer to view and test the operation of the switches and sensors within the machine 6.3.5.1 Waste Tray Sensor This indicates the status of the waste bucket. 6.3.5.2 Cup Turret Switch This indicates the status of the index switch on the CDU, Open indicates that the cup sleeve is aligned with the throat. 6.3.5.3 Cup Turret Sensor This indicates the status of the sensor within the cup throat. 6.3.5.4 Cup Dispense Switch This indicates the status of the home switch on the cup splitter motor. Open indicates that it is in the home/start position. 6.3.5.5 Mug Sensor - Current This indicates the status of the Mug Sensor (SureVend sensor) 0 indicates beam not obstructed, 1 indicates the beam is broken. 6.3.5.6 Heater Tank Level This indicates the water level in the Main Heater Tank. 6.3.5.7 Tank Temp & Heater This indicates the current temperature in the Main Heater Tank and also if the signal to turn the solid state relay is turned On or Off 6.3.5.8 Brewer Switch 1-2 This indicates the status of the brewer switch and therefore the position of the brewer. Note: At standby i.e. in the open position an Oltre Brewer the switch should At Home. At standby a CoEx brewer the switch should be Off Home. The brewers are numbered from left to right. 6.3.5.9 Cold Fill This indicates when the carbonator is Full. 6.3.6 Test Vend Without Cups This allows drinks to be taken without the machine dropping cups 6.3.7 Test Vend This allows drinks to be taken. 6.3.8 Door Lighting This allows the Selection and Reject button lights to be tested. 6.3.9 Display This allows the LCD to be tested, pressing the Edit button will illuminate the various test screens. 6.3.10 Keypad Test This allows the selection and service keypads to be tested. 6.4 Price Menu Entry into this menu allows the engineer to enter individual prices for each drink selection available, one price for all drink selections and set a discount to be applied for customers who use their own cup/mug. The menu also contains a sub menu which allows the engineer to view the highest and lowest price set in the machines memory. N.B. Values entered via this menu are only applicable to machines fitted with a monetary system. 6.4.1 Individual Prices This sub menu allows the engineer to set an individual price for each drink selection available from the machine. 1. With Individual Prices highlighted as shown opposite, press the ↵ (Edit) key to access the menu. 2. Upon entry into this sub menu, all drink selections available from the machine are listed along with the current drink price for the highlighted selection. The example shown illustrates an Instant Coffee selection with a price set currently at 35p. 3. To change the price of the highlighted selection, press the ↵ (Edit) key. The LCD will change and display the screen as shown. 4. To update the price, e.g. increase to 45p, press the sequence 0-0-0-4-5 using the appropriate number keys on the drink selection keypad. 5. Press the ↵ (Edit) key to return to the Individual Prices screen and verify that the new price displays in the status line along the bottom of the display. Use the ▲(up) or ▼(down) keys to highlight further selections. 6.4.2 Entire Machine This sub menu allows the engineer to set a single price for all selections available from the machine. 1. When highlighted from within the Price menu, the LCD will display the screen, with the current value (e.g. 40p), as shown. 2. Press the ↵ (Edit) key to access the Entire Machine sub menu. To update the value, e.g. set a price of 50p, press the sequence 0-0-0-5-0 using the appropriate number keys on the drink selection keypad. 3. Press the ↵ (Edit) key to return to the Price menu screen and verify that the new price displays in the status line along the bottom of the display. Tip: If most selections are to be sold at the same price, use this menu to quickly set the entire machine to this price and then access the Individual Prices menu to adjust prices for individual selections. Entering a single price for the entire machine will over-ride any individual prices previously programmed. 6.4.3 Mug Discount This sub menu allows the engineer to program a discount value against all drink selections for customers who use their own cup/mug. When a customer places their own cup into the dispense area and selects a drink, the SureVend™ sensors will detect the cup and disable the cup drop mechanism. The price set for Mug Discount is then subtracted from the price of the drink selected and the appropriate change/credit returned to the customer. N.B. It is important to ensure that any value entered for a mug discount is supported by the coin mechanism fitted to the machine, e.g. if a mug discount is set at 2p but the lowest coin available from the coin mechanism is 5p, the machine will not return the discount to the customer. 1. Highlight the Mug Discount sub menu from within the Price menu. The LCD will display the screen, with a current value in the status line (e.g. 5p), as shown. Press the ↵ (Edit) key to access the Mug Discount sub menu. 2. To enter a discount value, e.g. 6p, press the sequence 0-0-0-0-6 using the appropriate number keys on the drink selection keypad. 3. The LCD will change and display the screen as shown. Press the ↵ (Edit) key to return to the Price menu screen and verify that the new price displays in the status line along the bottom of the display. 6.4.4 View High/Low Price This sub menu allows the engineer to view the highest and lowest values in force, programmed via the Individual Prices sub menu. N.B. If a single price is currently in force, this value will be displayed in both fields. 6.5 Product Configuration Menu Entry into this menu allows the engineer to disable drink selections and turn SureVend™ on or off. Upon entry into the Product Configuration menu the LCD will display the screen as shown. Water Only No Cup Cup Size Selection Cup mechanism Water Module Low Water Reset Water Compensation Heater Tank Set-Up Syrup Cleaning Brewer Setup Brewer Waste Management 6.5.1 Configuration Version This displays the manufacturer configuration code for the machine and is for information purposes only. 6.5.2 Selection Timers This menu allow the recipes to adjusted to suit individual preferences The way these drinks are set up depends on whether the machine is being used in Numeric or Build a Drink configuration Example screens are from an Instant Coffee Numeric Machine. This is the length of time in seconds that the valve will remain open and can be changed by entering a new value and saving the new setting by pressing the Edit button This is the length of time in seconds that the milk motor will run and can be changed by entering a new value and saving the new setting by pressing the Edit button Post Dispense delay is the time the head remains in the extended position and should be set for the last ingredient to be vended. NB. Ingredient - 1 is the normal throw of milk; Ingredient - 2 is the extra throw of milk. NB. When the screen is showing the ingredient run time for any of the dry ingredients pressing button 15 on the service keypad will run the appropriate ingredient motor for the displayed time. The sugar throw is set in exactly the same way NB. Ingredient - 1 is the normal throw of coffee Ingredient - 2 is the extra throw of coffee and Ingredient - 3 is the minimum throw of coffee Example screens are from an Instant Coffee Build a Drink Machine. This is the length of time in seconds that the valve will remain open and can be changed by entering a new value and saving the new setting by pressing the Edit button This is the length of time in seconds that the milk motor will run and can be changed by entering a new value and saving the new setting by pressing the Edit button NB. Ingredient - 1 is the minimum throw of milk; Ingredient - 2 is the normal throw of milk and Ingredient - 3 is the maximum throw of milk NB. When the screen is showing the ingredient run time for any of the dry ingredients pressing button 15 on the service keypad will run the appropriate ingredient motor for the displayed time. The sugar throw is set in exactly the same way NB. Ingredient - 1 is the minimum throw of coffee; Ingredient - 3 is the normal throw of coffee and Ingredient - 5 is the maximum throw of coffee 6.5.3 Disable Selections This sub menu allows the engineer to disable individual or all drink selections if necessary. With Disable Selections highlighted; press the ↵ (Edit) key to access the menu. Upon entry into the menu the LCD will display the screen as shown. Using the ▲(up) or ▼(down) keys, scroll through the menu until the required drink selection is highlighted. Pressing the ↵ (Edit) key will select the drink, indicated by an X appearing in its adjacent box. 1. If necessary continue until all required drink selections have been checked. Pressing the X (Exit) key will move back to the Product Configuration screen and save the new parameters to the machines memory. N.B. Pressing the START/? key on the drink selection keypad will check all boxes if empty, disabling all drink selections or clear all boxes if previously checked. 2. On returning to standby mode the selection button light will be extinguished next to any drink selections that have been disabled, indicating to the customer that the drink choice is un-available. For machines fitted with a carbonator it is also possible to disable either the still or sparkling option for cold drinks. 3. Enter the disable selections sub-menu as previously described and using the ▼ (down) key scroll down until the required cold drink option is highlighted. Pressing the ↵ (Edit) key will disable the option, indicated by an X appearing in the box. To completely disable the selection enter an X into both the Still and Sparkling boxes. 6.5.4 SureVend™ Entry into this menu allows the engineer to turn the SureVend™ product delivery sensor on or off. SureVend™ Overview: 1. SureVend™ ensures that a cup is always available in the cup station before any money is collected or product delivered. The sensing system is a beam of infra-red light across the cup station that is broken by a cup as it falls into position from the cup drop unit, or by a customer placing his own mug in the dispense area. 2. The SureVend™ software monitors the cup station sensor during the time that the cup ring is operated and for three seconds afterwards. If a cup is not detected the software will then attempt to drop a cup a second and if necessary, a third time. After three sets of three failed vend attempts the cup ring is placed temporarily out of service. The machine will beep once and the LCD will display the Vend Failed message (if set to Pay Vend mode). 3. Customers can now get their money back by pressing the coin return button or removing their card. The LCD will change and display the message Out of Cups Please Insert Mug. The machine remains in service but will not vend a cup from the cup drop unit. 4. To clear the message and return to standby mode; open the door and press button 14 on the Service keypad. Check and if necessary, clear the cup drop unit and ensure correct operation before leaving the machine. To configure SureVend™ proceed as follows: 1. From the Product Configuration menu highlight SureVendTM and press the ↵ (Edit) key. By default SureVend™ is factory set to On as indicated by the status line at the bottom of the screen. 5. To disable SureVend™, press the ↵ (Edit) key to enter the SureVendTM On/Off screen. Use the ▲(up) key to select Off (indicated by the filled radio button). 6. Press the ↵ (Edit) key to confirm the selection and return to the SureVendTM screen. Verify that the status line at the bottom of the screen displays Off when SureVendTM is highlighted. 7. Pressing the X (Exit) key will move back to the Product Configuration screen and save the new parameter to the machines memory. 6.5.5 Dry test vend This menu enables the machine to be tested/configured without the need to be connected to the water supply 6.5.6 Water Only – No Cup This menu enables the customer to receive Hot and Cold Water selections without the machine dropping a cup (the Surevend Sensor must be blocked with the customer’s mug to allow the vend to take place) 6.5.7 Cup Size Selection This menu allows a preset set of values to be loaded for 7oz, 9oz or 12oz drinks. 6.5.8 Cup Mechanism This menu enables the cup drop unit to be switched on or off, the default is On. This is for users who wish to vend drinks into their own cups. SureVendTM still monitors the cup station and will not dispense drinks without a cup in the dispense area. 6.5.9 Water Module This menu enables a slave water module to be switched on or off, the default is Off. 6.5.10 Low Water Reset In normal operation a machine will only allow the boiler to fill for two minutes after which the inlet valve will be closed and the machine turned off until the machine is power cycled. If this feature is turned on the machine will allow the inlet valves to be opened every thirty minutes for a further two minutes as required without it being power cycled. 6.5.11 Water Compensation (CoEx machines only) This sub menu allows the engineer to set the B2C water system to vend the correct amount of water for individual site operating conditions. Important: the Grinder Calibration must be carried out before setting the Water Compensation. The goal is to vend the programmed amount of water (in Selection Timers) during a vend, more or less will be vended by increasing or decreasing the numeric value. FB Compensation relates to low pressure drinks, Esp Compensation relates to high pressure drinks and is set in exactly the same way. 6.5.12 Heater Tank Set-Up This allows the heater tank target temperature and minimum vend temperature to be set. (The Minimum Vend Temperature can be increased but not reduced below the default of 75 degrees.) 6.5.13 Syrup Cleaning This will flush the syrup system. (follow on screen prompts) 6.5.14 Brewer Setup (CoEx Machines only) This sub menu is used to set up the various features used on a CoEx brewer 6.5.14.1 Grinder Calibration This needs to be set so that the gram throw set in selection timers is delivered. Follow the on screen instructions. 6.5.14.2 Auger Calibration This needs to be set so that the gram throw set in selection timers is delivered. Follow on screen instructions. 6.5.14.3 Co-Ex Cleaning This menu allows the cleaning options for the CoEx system to be set. 6.5.14.3.1 Perform Co-Ex Clean This performs the same function as pressing button 11 on the Service Keypad ie performs a CoEx clean routine. This initial clean starts the cleaning routine 10 day cycle. After 7 days a warning message is displayed, if this is ignored for a further 3 days the B2C and freshbrew coffee drinks will be disabled. It is important that the time and date have been set correctly. 6.5.14.3.2 Enable/Disable This can disable the 10 day cycle meaning the brewer does not have to be cleaned every 10 days resulting in a poor quality drink and possible failures the brewer system. 6.5.14.3.3 Last Co-Ex Clean This shows the time and date of the last successful CoEx cleaning cycle 6.5.14.4 FB Pump Control If set to Low will prevent premature switching of the filter head 6.5.15 Brewer Waste Management If this feature is turned On this will disable the fresh brew drinks after a predetermined number of brewer vends. If this feature is turned on the operator must press button 12 on the service keypad every time they empty the brewer waste bucket. 6.5.15.1 Brewer Waste Management 6.5.15.2 Brewer Waste Capacity The number of vends before the brewer waste bucket needs to be emptied can be changed at this time. 6.5.15.3 Current Waste Counter The current waste counter can be seen at the bottom of this screen. 6.6 Free Vend Here the Free Vend feature can be turned On or Off 6.7 Coins In/Out Menu (Only seen when machine set for use with MDB coin mech) This option is where coins must be loaded and ejected from the coin mech. it will also show the current level and value of coins in each of the tubes 6.8 System Settings Menu This menu allows the engineer to set information relevant to the machine and its location, the current time and date, DTS information, backup and restore machine software, view the machine and I/O board software versions installed and set temperature and idle screen display options. N.B. Custom Messages is not supported at this time. Serial Flash Backup/Restore Data IO Board Software Temperature Units Idle Screen Options Custom Messages Service-mode Timeout 6.8.1 Machine Information This sub-menu allows the engineer to set an identification for the machine and its location. 1. From the Systems Settings menu highlight Machine Information and press the ↵ (Edit) key. The LCD will display the screen as shown opposite. To view the Machine ID press the ↵ (Edit) key. This information is only seen on data printouts. 2. When complete, press the X (Exit) key to return to the Machine Information menu screen. If necessary press the ▼(down) then ↵ (Edit) keys to highlight then enter the Machine Location screen. When complete press the X (Exit) key. The keys are configured as follows: 1 = ,.?;:“1 3 = def3 5 = jkl5 7 = pqrs7 9 = wxyz9 2 4 6 8 0 = = = = = abc2 ghi4 mno6 tuv8 -\$@%#&0 To change between lower and upper case press the START/? 6.8.2 Clock The machine displays the current time in either 12 or 24 hour format. Upon entry to the System Settings menu, the Clock sub menu is highlighted. Press the ↵ (Edit) key to access the Clock sub menu screen. This menu allows the engineer to set the date, time and daylight saving via 3 separate sub menus. N.B. The current date, time and daylight saving (when highlighted) held in the machines memory are displayed in the status line at the bottom of the screen. 1. Date: Press the ↵ (Edit) key to enter the Date menu. The date is displayed in day, month, year format. To set the date, e.g. 27th January 2013, press the sequence 2-7-0-1-1-3 using the appropriate number keys on the drink selection keypad. Pressing the ↵ (Edit) key will move back to the Clock menu screen and save the date to the machines memory. Confirm that the status line at the bottom of the screen displays the correct date when Date is highlighted. 0-9 to Edit Value N.B. Press Start To Change Mode. Pressing the START/? key on the drink selection keypad allows the date to be displayed in mm – dd – yy format. 2. Time: From the Clock menu screen press the ▼(down) key to highlight the Time menu followed by the ↵ (Edit) key. The LCD will display the screen as shown opposite. By default the time is displayed in 24 hour format. To enter a time of 10:30 PM press the sequence 2-2-3-0 on the drink selection keypad. Press the ↵ (Edit) key to return to the Clock menu and save the new time. Confirm that the status line at the bottom of the screen displays the correct time when Time is highlighted. N.B. When set to 12 hour format, the program enables the engineer to set the numbers 0 or 1 in the first field. Once the number 24 has been entered to indicate 24 hour format, he engineer can reset the first two values to reflect 10:30 PM in 24 hour format e.g. 22:30. 1. Daylight Saving: From the Clock menu screen press the ▼(down) key to highlight the Daylight Saving menu followed by the ↵ (Edit) key. The LCD will display the screen as shown opposite. By default daylight savings time is set to Off. To choose one of the available options, press the ▲(up) or ▼(down) key until selected (indicated by the filled radio button) followed by the ↵ (Edit) key. Ensure that the required setting is displayed in the status line at the bottom of the screen. Press the X (Exit) key to return to the main menu. 6.8.3 Language This menu allows the language for the text to be chosen. 6.8.4 Monetary This allows the setting relating to the coin card and note reader to be setup. 6.8.4.1 Coin Mechanism Select the version of coin mechanism used. 6.8.4.2 Bill Validator Select the version of bill validator used. 6.8.4.3 Card Reader Select the version of card reader used. 6.8.4.4 Bill Stack Option If set to Escrow and the vend fails the note will be returned, if set to Stack and the vend fails the credit will be returned where possible as coins. 6.8.4.5 Multiple Vend Mode (MDB only) If set to Single Vend, change will be given after the vend, if set to Multi Vend, additional vends can be selected until there is insufficient credit, the reject button must be pressed to obtain change. 6.8.4.6 Change Without Purchase (MDB only) The value of change which will be given without a selection being made. 6.8.4.6 Low Change Message (MDB only) When this value of coins in the change tubes is reached a Use Exact Change message is displayed and coins higher than the value set in Accept on Low Change are rejected. 6.8.4.7Accept on Low Change (MDB only) The value of the highest coin to be accepted when the Use Exact Change message is being displayed 6.8.4.8 Credit for Failed Vend (MDB only) If the vend fails the machine can Hold Credit or Return Change. 6.8.4.9 Display Coin Set The standby screen will display a message requesting the coins preferred for use in the machine. 50p to £1 Card Key Money Token 6.8.5 Data Transfer Entry into this menu allows the engineer to configure the machine in order to send audit data relating to sales and events stored in the machines memory to a data carrier or other device. Data Transfer Standard (EVA-DTS) - Overview: The standard makes it possible to transfer information from vending machines/payment systems to PC-based accounting/management systems and/or the opposite way. It is important that all suppliers of vending machines and payment systems agree to a common standard for the Electronic Data Transfer, because only this way the engineer can be sure that all his equipment can be read out and programmed by means of the same handheld terminal. 1. DTS Standby Mode: Scroll down and highlight DTS from the System Settings menu. Press the ↵ (Edit) key to access the menu. The LCD will display the screen as shown. The first sub-menu DTS Standby Mode is highlighted with its current state (DDCMP) shown in the bottom line. Printer Baud Rate Security Codes The machine is factory set to enable data transfer via the optical DDCMP link. To change this to the DEX setting, press the ↵ (Edit) key to access the menu and the ▲(up) key to select DEX (indicated by the filled radio button. Press the ↵ (Edit) key to save the selection. N.B. Even if the default is set to DDCMP, once the controller detects a DEX activity, it will automatically switch to the other mode. However, setting the default to the correct protocol will speed up response time. The engineer can now download data from the machine by plugging a DEX enabled device into the DEX port (J36) on the I/O board, located on the rear of the door. 2. DTS Audit List: From this sub-menu the engineer can select which data is transferred from the machine to a DEX/DDCMP data carrier. Scroll down and highlight DTS Audit Data. Press the ↵(Edit) key to access the menu. The LCD will display the screen as shown. All data and events fields within a vending machine are assigned a unique code determined by the Standard. From this sub-menu the operator can choose to allow all fields to be available for download by pressing the START/? key or scrolling through the list and adding an X to the required fields. 3. CA304 Data Type: This sub-menu determines whether the the data will be displayed as currency or numerical, for example, assuming that the value of pound coins in the machine is £3.00, when set to currency CA304 will read 300 in the DEX/DDCMP report. When set to numeric it will read 3. 4. Data Reset Mode: This field can be set to either AUTO or SAVE from within the submenu. When set to AUTO, all resettable data will be reset after a successful read. 5. Event Reset Mode: This field can be set to either AUTO or SAVE from within the submenu. When set to AUTO, all event data will be reset after a successful read. 6. Printer Baud Rate: This allows the operator to set the correct baud rate for a serial printer if one is to be used. It is important for this to be set correctly to ensure successful data transfer. 6.8.7 Serial Flash This menu is only available when a Data Key is plugged onto J9. It allows the engineer to save and load: Firmware – operating system and factory default settings. Default Data – factory default settings. Configuration Data – all settings changed during programming by the engineer. Configuration and Sales Data – all settings changed during programming by the engineer plus sales data. Language Data – not used on the VOCE When saving Configuration Data it is also possible to edit the filename. 6.8.8 Backup/Restore This menu allows the operator to manually backup information stored in the machines memory to the controller board. N.B. It is also possible for the operator to programme Backup as a timed event, thus ensuring even greater security for the information stored in memory. This ensures that the machine can easily be restored to its last operational state should the information be lost through corruption or power failure. 1. Scroll down and highlight Backup/Restore from the System Settings menu. Press the ↵ (Edit) key to access the menu. If this is the first time that a backup has been selected the LCD will display the screen as shown. 2. Press the ↵ (Edit) key to access the menu. The LCD will display the screen as shown. To backup the memory press the ↵ (Edit) key. After a few seconds the machine will beep once and the Initialising screen will be displayed before the machine returns to standby mode, ready to vend. 3. When accessing the Backup/Restore submenu after backups of the memory have been made, the information changes and the operator is presented with the screen shown. The first sub-menu, Last Backup is highlighted with the date and time this occurred displayed at the bottom of the screen. 4. as To restore the machines memory to the last available backup, scroll down using the ▼ (down) key, highlight Restore Data and press the ↵ (Edit) key to access the menu. The LCD will display the screen as shown. Press the ↵ (Edit) key to restore the backed up data. After a few seconds the machine will beep once and the Initialising screen will be displayed before the machine returns to standby mode, ready to vend. 6.8.9 RAM Clear This will delete all data and return the machine to its default settings. 6.8.10 Screen Contrast Allows the brightness of the screen to be adjusted 6.8.11 Software Version The Software version menu displays the version number of the software installed and is for information only. The menu also displays the current time and date. 6.8.12 I/O Board Software This menu displays the version number of the I/O board software installed and is for information only. 6.8.13 Temperature Units Allows the choice between Celsius and Fahrenheit. 6.8.14 Idle Screen Options This menu allows the operator to configure the LCD so that it displays either the time or the time and water temperature with the standby message when idle. To configure the idle screen options, proceed as follows: 1. From the System Settings menu press the ▼(down) key to highlight Idle Screen Options and press the ↵ (Edit) key to access the menu. 2. Press the ▼(down) key to highlight the required option, eg Time and Temp (indicated by the filled radio button). The LCD will display the screen as shown opposite. Press the ↵ (Edit) key to return to the System Settings screen. With Idle Screen Options highlighted, verify that the status line confirms the option is set to Time and Temp. 3. Press the X (Exit) key until the machine exits the engineers program into standby mode. The LCD will display the standby message with the time and temp as shown. 6.8.15 Custom Messages Allows the Ready, Temporarily Out of Service, No Money Required and Please Make a Selection messages to be replaced. 6.8.16 Service Mode Timeout This menu allows the operator to set the time after which the machine will automatically switch from service mode to standby Select as required Enter time in minutes after which the machine will automatically switch from service mode to standby 6.8.17 Key-less Transitions This menu allows the operator to turn On/Off the feature whereby entering a code enables the Free and Jug Vend features Vend 6.9 Security Codes Menu The Engineer, Operator, Free Vend and Jug Vend PIN codes can and SHOULD be changed on installations. 6.9.1 Time of Day Events From this menu the operator can set up inhibited vend periods, free vend periods and discounted vend periods. The following example describes how the operator can program the machine to free vend Instant Coffee, Cappuccino and Caffe Latte drink selections between 10:30 am and 02:30 pm on week days. 1. From the Main Menu press the ▼(down) key until Timed Events is highlighted then press the ↵ (Edit) key twice to access the Time of Day menu screen. The LCD will display the screen as shown. N.B. Although event 1 is shown as Inhibit, it is possible for the operator to set event 1 as the first Free Vend or Discounted Vend period. 2. Press the ↵ (Edit) key to access the menu. The LCD will display the screen as shown. By default the current State is set to Off as indicated by the status line at the bottom of the screen. 3. Press the ↵ (Edit) key to access the State sub menu. Using the ▼(down) key, set the state to On (indicated by the filled radio button). Press the ↵ (Edit) key to return to the Event 1 screen. Verify that the status line confirms the State is set to On. 4. Press the ▼(down) key to highlight Event Type and press the ↵ (Edit) key to access the menu. Using the ▼(down) key, set the Event Type to Free Vend (indicated by the filled radio button). Press the ↵ (Edit) key to return to the Event 1 screen. Verify that the status line confirms the Event Type is set to Free Vend. Press the ▼(down) key to highlight Start Time and press the ↵ (Edit) key. From this menu the operator sets the time at which the free vend period will start. Press the sequence 1-0-3-0, using the drink selection keypad, to set the time. If necessary use the ▲(up) or ▼(down) key until AM 5. appears in the dotted box. Press the ↵ (Edit) key to return to the Event 1 screen. Verify that the correct start time is displayed in the status line at the bottom of the screen. 6. Press the ▼(down) key to highlight Stop Time press the ↵ (Edit) key. From this menu the operator sets the time at which the free vend period will end. Press the sequence 1-4-3-0, using the drink selection keypad, to set the time. and 7. Press the ↵ (Edit) key to return to the Event 1 screen. Verify that the correct stop time is displayed in the status line at the bottom of the screen. 8. Press the ▼(down) key to highlight Days Of Week and press the ↵ (Edit) key. The operator can now set the days on which the free vend period will take place. Upon entry to the sub menu, the first day, Monday will be highlighted with an empty box. Pressing the ↵ (Edit) key will select the day, indicated by an X appearing in its adjacent box. Using the ▼(down) key and the ↵ (Edit) key, highlight and select additional days of the week that the free vend period will take place. When complete press the X (Exit) key to return to the Event 1 screen. 9. Press the ▼(down) key to highlight Selections and press the ↵ (Edit) key. The operator can now set the drink selections that will be available during the free vend period. Upon entry to the sub menu, the Freshbrew Coffee selection will be highlighted with an empty box. Pressing the ↵ (Edit) key will select the drink, indicated by an X appearing in its adjacent box. Using the ▼(down) key and the ↵ (Edit) key, highlight and select additional drink selections that will be available during the free vend period. 10. Press the X (Exit) key three times to return to the Timed Events Menu. Using the previous sequence the operator can quickly and easily set up additional free vend periods, inhibit vend or discount vend periods if required. 11. When setting up a discount price period it is necessary for the operator to enter a value for the discount. Follow the procedure as described previously to enter a discount vend period and set the state, start time, stop time and days of the week that the event will occur. 12. The operator can now enter a Discount menu in order to enter a discount value as a percentage (%). The LCD will display a screen similar to the one shown opposite. With Discount highlighted, press the ↵ (Edit) key to access the Discount screen. 13. To enter the discount value, e.g. 50%, press sequence 5-0 using the appropriate number keys on the drink selection keypad. Press the (Edit) key to return to the 11 (Discount) screen and verify that the status line displays the discount percentage value entered. 14. Press the X (Exit) key three times to return to the Main Menu screen. N.B. When machine is fitted with a coin mechanism, please ensure that discount value entered can be supported by the coin tubes. 6.9.2 Sanitation Events Menu This sub menu allows the operator to select periods when the machine will automatically flush through the water system via the 12 flush periods available. The default setting for all flush periods is Off. 1. From the Main Menu press the ▼(down) key until Timed Events is highlighted then press the ↵ (Edit) key. 2. Once in the Timed Events menu press the ▼(down) key to highlight Sanitation Events Menu then press the ↵ (Edit) key. The LCD will display the screen as shown. The following example describes how the operator can program a timed event to flush the water system at 07:00 am every day. 1. To set up the first timed flush, press the ↵ (Edit) key to access the 1 Timed sub menu. The LCD will change and display the screen as shown. By default the current State is set to Off as indicated by the status line at the bottom of the screen. 2. Press the ↵ (Edit) key to access the State sub menu. Using the ▼(down) key, set the state to On (indicated by the filled radio button). Press the ↵ (Edit) key to return to the 1 (Timed) screen. Verify that the status line confirms the State is set to On. the ↵ 3. Press the ▼(down) key to highlight Event Type. By default the event is set to Timed as indicated by the text displayed in the status line at the bottom of the screen. Therefore it is not necessary for the operator to enter this sub menu. 4. Press the ▼(down) key to highlight Start Time press the ↵ (Edit) key. From this menu the operator sets the time at which the sanitation event will start. Using the drink selection keypad, press the sequence 0-7-0-0 to set the time. If necessary use the ▲(up) or ▼(down) key until appears in the dotted box. and AM 5. Press the ↵ (Edit) key to return to the 1 (Timed) screen. Verify that the correct start time is displayed in the status line at the bottom of the screen. 6. Press the ▼(down) key to highlight Days Of Week and press the ↵ (Edit) key. From this menu the operator can set the days on which the sanitation event will take place. To select every day (Monday - Sunday), press the START/? key on the drink selection keypad. The program automatically places an X in every box indicating that each day is selected. N.B. To select individual days, scroll through the menu using the ▲(up) or ▼(down) keys until the required day is highlighted. Press the ↵ (Edit) key to select the day, indicated by an X appearing in its adjacent box. 7. Press the X (Exit) key three times to return to the Timed Events Menu. Using the sequence described above the operator can quickly and easily set up additional sanitation event periods for the machine. It is also possible for the operator to program up a post vend sanitation event. The following example describes how the operator can program a post vend event to flush the water system 12 minutes after each vend. 1. From the Main Menu press the ▼ (down) key until Timed Events is highlighted then press the ↵ (Edit) key. Once in the Timed Events menu press the ▼(down) key to highlight Sanitation Events Menu then press the ↵ (Edit) key. Press the ▼(down) key until the first Post Vend event is highlighted. The LCD will display the screen as shown. 2. With Post Vend highlighted, press the ↵ (Edit) key to access the 7 Post Vend sub menu. The LCD will change and display the screen as shown. By default the current State is set to Off as indicated by the status line at the bottom of the screen. 3. Press the ↵ (Edit) key to access the State sub menu. Using the ▼(down) key, set the state to On (indicated by the filled radio button). Press the ↵ (Edit) key to return to the 7 (Post Vend) screen. Verify that the status line confirms the State is set to On. 4. Press the ▼(down) key to highlight Event type. By default the event is set to Timed as indicated by the text displayed in the status line at the bottom of the screen. Therefore it is not necessary for the operator to enter this sub menu. 5. Press the ▼(down) key to highlight Delay. The status line indicates the factory default delay which is set to 0.1hrs (6 minutes). To change the value so that the machine will self clean 12 minutes after a drink is vended press the ↵ (Edit) key to access the Delay sub menu. The LCD will display the screen as shown. Using the drink selection keypad, press the sequence 0-0-2 to set the new delay. Press the ↵ (Edit) key and verify that the status line confirms that Delay (when highlighted) is set to 0.2hrs. 6. Press the X (Exit) key three times to return to the Timed Events Menu. Using the sequence described above the operator can quickly and easily set up additional post vend sanitation event periods for the machine if required. N.B. A sanitation event, either timed or post vend, dispenses water into the waste bucket. If the waste bucket reaches its full limit the machine will be “Out Of Service” 6.9.3 Backup Events Menu This sub menu allows the operator to program the machine to perform an automatic backup of all user configurable settings and sales data stored in its memory. The default setting for Backup Events is Off. 1. From the Main Menu press the ▼(down) key until Timed Events is highlighted then press the ↵ (Edit) key. 2. Once in the Timed Events menu press the ▼(down) key twice to highlight Backup Events Menu then press the ↵ (Edit) key. The LCD will display the screen as shown. 3. Press the ↵ (Edit) key to access the 1 Backup Data sub menu. The LCD will change and display the screen as shown. By default the current State is set to Off as indicated by the status line at the bottom of the screen. 4. Press the ↵ (Edit) key to access the State sub menu. Using the ▼(down) key, set the state to On (indicated by the filled radio button).Press the ↵ (Edit) key and verify that the status line confirms the State is set to On. 5. Press the ▼(down) key to highlight Start Time and press the ↵ (Edit) key. Using the drink selection keypad, set the time at which the Backup event will start. 6. Press the ↵ (Edit) key and verify that the correct start time is displayed in the status line at the bottom of the screen. 7. Press the ▼(down) key to highlight Days Of Week and press the ↵ (Edit) key. From this menu the operator can set the days on which the Backup event will take place. To select everyday (Monday - Sunday), press the START/? key on the drink selection keypad. The program automatically places an X in every box indicating that each day is selected. N.B. To select individual days, scroll through the menu using the ▲(up) or ▼(down) keys until the required day is highlighted. 8. Press the ↵ (Edit) key to select the day, indicated by an X appearing in its adjacent box. 6.9.4 Energy Saving Events Menu This sub menu enables the Operator to program in periods when the machine can be in an energy saving mode. In this mode the water in the boiler is not maintained at the normal vend temperature, but at a lower temperature of 68°C. During the Energy Saving periods programmed into the machine, vends can still be dispensed, although none of the drink section buttons are illuminated and the message “Power Saving Mode” is displayed on the LCD. By pressing any one of the buttons on the keypad the LCD message changes to “Water Tank Heating”. The machine reverts back to “Power Saving Mode” ten minutes after the last vend, if still within the Energy Saving Events period. The default setting for these Events is Off. 1. From the Main Menu press the ▼(down) key until Timed Events is highlighted then press the ↵ (Edit). Press the ▼(down) key three times to access the Energy Saving Events menu screen. The LCD will display the screen as shown. 2. Press the ↵ (Edit) key to access the menu. The LCD will display the screen as shown. By default the current State is set to Off as indicated by the status line at the bottom of the screen. 3. Press the ↵ (Edit) key to access the State sub menu. Using the ▼(down) key, set the State to On (indicated by the filled radio button). Press the ↵ (Edit) key to return to the Event 1 screen. Verify that the status line confirms the State is set to On. 4. Press the ▼(down) key to highlight Start Time and press the ↵ (Edit) key. From this menu the operator sets the time at which the Energy Saving period will start. Enter the start time in the sequence 1-73-0, using the drink selection keypad 5. Press the ↵ (Edit) key to return to the Event 1 screen. Verify that the correct start time is displayed in the status line at the bottom of the screen. 6. Press the ▼(down) key to highlight Stop Time and press the ↵ (Edit) key. From this menu the operator sets the time at which the Energy Saving period will end. Enter the time using the drink selection keypad. If necessary use the ▲ (up) or ▼(down) key to display AM or PM as required. 7. 8. Press the ↵ (Edit) key to return to the Event 1 screen. Verify that the correct stop time is displayed in the status line at the bottom of the screen. Select Press the ▼(down) key to highlight Days Of Week and press the ↵ (Edit) key. The operator can now set the days on which the Energy Saving period will take place. Upon entry to the sub menu, the first day, Monday will be highlighted with an empty box. Pressing the ↵ (Edit) key will select the day, indicated by an X appearing in its adjacent box. Using the ▼(down) key and the ↵ (Edit) key, highlight and select additional days of the week that the Energy Saving period will take place. When complete press the X (Exit) key to return to the Event 1 screen. Tip: To set the required days/selections quickly, press the START key to check all boxes, then using the ▼(down) key, scroll and highlight the days/selections not required and press the ↵ (Edit) key to remove the X from the corresponding box. 9. Press the X (Exit) key three times to return to the Timed Events Menu. Section 7 - Technical Information 7.1 Water Services The mains water supply provides water for the heater tank and the pressure system fitted to Espresso (B2C) machines. Water enters at the rear of the machine through a solenoid operated inlet valve operating at 24v DC, which opens or closes the water supply as required. 7.2 Hot Water System 7.2.1 General 1. Water is heated in the heater tank to the required temperature by a heating element rated at 2.4 Kilowatts. The mains voltage required for the element is switched by a solid state relay, controlled by the vending machine controller via an analogue signal transmitted by the thermistor probe. 2. The water level inside the heater tank is controlled by a water level probe. When the water drops below the required level, the controller board operates the mains water inlet valve until the required water level is restored. 3. A series of 24v DC control valves are mounted on the outside of the heater tank. These supply heated water to each of the mixing stations where ingredients are added to make the drink. The “hot water” valve dispenses straight into the cup. 4. Should the inlet valve fail (or mains water supply be disabled), the controller board will detect a fault after the inlet valve ‘open’ signal has been active for 2 minutes and the required water level has not been reached. 5. At this point the keypad will be disabled, all outputs from the controller board (including the heater element) will be switched off. 7.2.3 B2C Machines The water system fitted to B2C machines is described in detail in Section 8 of this manual (8.2 - System Overview). 7.3 Ingredient Dispense 1. The ingredients required for making up either an instant or freshbrew drink are contained in ingredient canisters and are dispensed by means of an auger located in the base of each canister. Each auger is driven by a 24v DC motor. 2. The amount of product dispensed by each canister is controlled by the vending machine controller and may be adjusted via the Selection Timers menu in the engineers program – See section 6.5.2 for further details. 3. The required ingredients for each vend are delivered to a mixing bowl, where they are blended with hot water by a high speed whipper prior to discharge at the dispense head. 4. To ensure a free flow of ingredient powder and granules, it is essential that they are kept completely dry. This is achieved by extracting steam from the mixing system using an extract fan. The electrical supply for the extract fan is 230v AC. N.B. The fan runs continuously whilst the cabinet door switch is in the on position. 5. B2C machines: Coffee beans are stored in a bean container and are dispensed into the CoEx® Brewer via a 230v AC grinder located under the bean container outlet. The amount of beans dispensed from the container is controlled by the vending machine controller and may be adjusted via timing constraints set in the Engineers Program. 7.4 Mixing System 1. The mixing system utilises a 24v DC 13,000 RPM motor assembly and mixes ingredient with hot water from the heater tank to make a drink. 2. The mixing units are front mounted and secured by a single fixing screw. For servicing, the complete unit can be quickly and easily removed from the front of the machine. 7.5 Moving Dispense Head 1. Voce machines are fitted with a moving dispense head mechanism. This allows for a quicker and more direct cup drop and also helps to prevent cross contamination of drinks. The head features two separate dispense positions depending upon the drink being dispensed. 2. The mechanism is operated by a 24v DC 50 RPM motor. The motor is connected to a pinion which engages with a rack on the dispense arm. This mechanism is used to move the dispense head backwards and forwards. 3. A micro switch, fitted to the rear of the dispense head chassis detects the home position (head withdrawn/not dispensing). An optical sensor is also fitted and this works in conjunction with a decoder bracket attached to the rack to determine the position of the dispense head. 4. A moulded dispense head mounted at the front of the unit connects the tubes from the various mixing systems, brewers and hot water, to separate dispense nozzles. N.B. Dispense pipe lengths are shown on pages 89 to 95. 7.6 Cup Dispense Unit 1. Cups (either paper or plastic) are stored in tubes which are located above the cup dispense unit. The unit incorporates a 24v DC, motor for Indexing the correct turret over the cup drop unit as required. 2. The cups are separated and ‘dropped’ by a cup ring. The cup ring comprises six separator cams operated by a 24v DC motor, which is controlled by the vending machine controller. 3. The cup level is monitored by an electronic system. An infrared LED (cup sensor transmitter) is positioned in the cup assembly above the cup splitter, with an infrared detector (cup sensor receiver) mounted directly opposite. 4. The light emitted by the LED is detected when NO CUPS are present. With a stack of cups present, the beam is broken. As the cups drop below the LED, transmitted light is detected. If this is the case, the controller will index the cup tubes until a full stack is located. A turret location micro- switch ensures that the cup tubes stop centrally over the cup ring. N.B. The turret motor will run until the next stack is deposited into the cup splitter, which breaks the LED beam, and the cup stack micro switch returns to its normally open state. The motor will run until it either finds the next stack or all the turret extrusions have been checked. If no cups are present the “Out of Cups Please Insert Mug” message is displayed on the LCD. 5. The cup stack index motor is protected by a time-out feature. The motor will rotate for a maximum period of 60 seconds. If at the end of this period no cups have been detected the LCD will display the “Out of Cups” message. 7.7 Waste Level Probes 1. The waste level probes, positioned in the waste bucket, detect the water level in the bucket. 2. The system consists of two probes in a moulded body. When the water level is high enough that both of the probes are immersed in the water a message is displayed on the LCD indicating the waste bucket is full and the machine is disabled. The machine will remain in this state until the waste bucket has been emptied. 7.8 Oltre Brewer 1. 2. Machines may be fitted with either one or two continuous belt Oltre brewers. The chamber, base plate, filter belt and outlet elbows are different depending on whether you are vending leaf tea or ground coffee. Two 24v DC 30rpm motors are used on each of these brewers, one to raise and lower the brewer chamber the other to advance the filter belt. A cam operated micro switch signals to the Main Controller whether the chamber is open or closed. Coffee Brewing 1. 2. The coffee outlet elbow and baseplate are colour coded yellow and the belt is tan. The chamber clamps down onto the base plate and filter, water and coffee is then dispensed. After the brew time (set in program) has elapsed a 24v DC peristaltic pump draws the coffee liquor through the filter and is pumped to a whipper chamber where it can be whipped if required before being delivered into the cup. The chamber now lifts and the second motor drives the filter belt and the waste is scraped into the waste bucket. Tea Brewing 1. 2. 3. The tea outlet elbow and baseplate are colour coded blue and the belt is white. The chamber clamps down onto the base plate and filter, water and tea leaves are then dispensed. Gravity draws the tea through the filter and it is delivered into the cup. The chamber now lifts and the second motor drives the filter belt and the waste is scraped into the waste bucket. 7.9 CoEx® Brewer (B2C Machines) The unique CoEx® combined coffee and espresso brewer provides both freshly brewed coffee along with fresh coffee from beans through the same unit. The unit is driven by a 24v DC, 13 RPM motor, controlled by a micro switch. The switch sends logic signals to the controller during vend and initialise operations, indicating its position. Please refer to Section 9 for full details of the CoEx® brewer and its operation. 7.10 Power Supply Unit 1. The power supply unit (PSU) provides power to the machine. It is mounted in the top right hand side of the machine and can be accessed by removing the top RH panel. 2. The PSU converts 230v AC to 24v DC to run the valves, whipper motors, ingredient motors, brewers, etc. fitted to the machine. The solid state relay, mounted on the PSU chassis, uses a 24v DC switching circuit to provide 230v AC for the heater element. 3. The Input/Output (I/O) board, mounted on the PSU chassis, utilises signals from the main controller in order to operate valves, whipper motors, the dispense head motor, ingredient motors, brewer motors, etc 4. The PSU houses 2 fuses (3 for machines with refrigeration units fitted). Heater, 12 amp (T) (ceramic) - Heater Tank, Pressure Boiler, B2C Models Auxiliary components and PSU, 4 amp (glass) 240v Cold Unit, 4 amp (T) (glass) Early machines had separate fuses for the Pressure Boiler (12A T) and also for the PSU (4A T) 7.11 Mains Filter A mains filter, mounted on the rear panel, prevents spurious voltages generated by the machine from reaching the mains supply. 7.12 Coin Mechanism Transformer (Optional Extra) The coin mechanism transformer converts 230v AC to 24v AC for Executive protocol (A) type monetary systems. 7.13 Coin and Card/Key Systems The VOCE may be equipped with coin or card/key validation systems using either protocol ‘A’ or an MDB system. The coin or card/key system informs the vending machine controller of the amount of credit which has been deposited into the vending machine. 7.14 Change Giver 1. The Change Giver communicates with the vending machine controller. It will validate a coin and if accepted, send a signal indicating the amount value which has been tendered. 2. Once sufficient credit has been accumulated a vend will be permitted. Where possible the change giver will return the appropriate amount of change to the customer. 7.15 Card/Key System 1. The card system fitted to the machine communicates with the vending machine controller using the same principle as the change giver. 2. The card system informs the vending machine controller of the amount of credit on the customer's card. If there is sufficient credit for the selected drink, the vending machine controller permits a vend and informs the card system of the amount of credit to be taken from the card. The new balance will then be re-written onto the customer's card. N.B. For full information and programming instructions for all of these systems, please refer to the user manual supplied with the validation system. Section 8 - B2C (Espresso) System Voce B2C machines are capable of producing high quality espresso based drinks through the unique CoEx® brewer unit either independently (Espresso, Americano), or in conjunction with soluble product (Cappuccino, Caffe Mocha etc). The machine will also vend high quality freshbrew coffee from pre-ground product. 8.1 Example Vend When an Espresso drink is selected the following sequence occurs:1. The customer selects an espresso drink. Fresh beans are delivered into the grinder and the grinder is operated for a pre-determined time. Ground coffee is deposited into the CoEx® brewer. 2. The brewer moves to the vend position. The brewer motor starts running clockwise, causing the filter assembly to cover the piston chamber and the piston to move upwards, forming the ground coffee into a compressed pellet as it does so. 3. When the heater reaches the correct temperature the inlet valve is opened and the 3 bar pressure relief valve closed. At the same time the pumps will start pumping water through the system and into the brewer. 4. Whilst water is passing through the system a water flow meter will send pulses back to the main controller and the espresso selection will be delivered into the cup. 5. Once the required amount of water has been pumped through the system, the inlet valve closes and the pumps stop pumping water through the system. The brewer compresses the used coffee pellet, the pressure relief valve is opened and the espresso valve switched off. 6. The brewer motor reverses and drives the piston back up to the top of the chamber. The wiper mechanism ejects the used coffee pellet into the dry waste container and the brewer piston moves back to the stand-by position. 8.2 System Overview Important: The machine must be operated in conjunction with a water filter of food grade quality, capable of removing temporary hardness (scale), heavy metals (lead, copper, iron, cadmium), chlorine and any organic pollutants/discolouration. Crane Merchandising Systems recommend the Brita AquaQuell water filter for use with Voce B2C machines. Voce B2C Water Flow Diagram Diagram 11 Level Probe Key: 1. 2. 3. 4. 5. 6. 8. 9. 10. 11. Element Thermistor Valve 1 Valve 2 Valve 3 Valve 4 Valve 5 Valve 6 10 High Temperature Cut-Out 9 8 To Mixing Station No. 1 7 To Mixing Station No. 2 To Mixing Station No. 3 To Mixing Station No. 4 Module Inlet Valve Pressure Regulator Flow Meter Pumps Pressure Boiler Espresso Valve - 3 Way Pressure Valve - 2 Way Relief Valve - 3 Bar Dispense Valve Heater Tank 12. Water Inlet Valve 13. Water Filter Hot Water Dispense Point To Tea Pot Dispense Point 12 14. Shut-Off Valve Note: System shown in idle state. 6 To CoEx® Brewer Bulkhead Adaptor Temperature Cut-Out B2C MODULE 2 PUMP 2 1 Water Supply 3 Element Thermistor PUMP 1 Waste Bucket 5 4 13 1. Water Inlet Valve A 24V dc single solenoid water inlet valve. When a drink is selected the inlet valve is opened. At the same time the pumps are operated, pumping water through the system. 2. Reducing Valve An inline reducing valve that maintains water pressure entering the system at 0.5 bar. 3. Flow Meter As water flows through the system, the flow meter sends pulses back to the control board. 4. Vibration Pumps - 230V ac When a drink is selected the pumps switch on at the appropriate moment until the required amount of water has been pumped through the system. 5. Pressure Boiler The pressure boiler has a capacity of 350ml and is fitted with a 2kW heating element. Cold water is diffused as it enters the boiler through the lower coupling. Heated water exits the boiler through the top coupling. A resettable temperature cut-out is mounted externally near the top of the boiler as a safety feature. A thermistor is mounted in the front of the boiler to measure water temperature. 6. Espresso Valve Supplies heated water to the CoEx® brewer when an espresso or freshbrew drink has been selected. 8. Pressure Valve This valve is normally open exposing the system to the 3 bar mechanical relief valve. It is closed during vends to allow higher pressures to be achieved within the system. 9. Relief Valve - 3 Bar (Mechanical) The 3 bar pressure valve is a mechanical safety valve. The valve allows for heat expansion while the machine is in stand-by mode. 10. Grinder Mechanism (Not Shown On Water Flow Diagram) The grind mechanism consists of a 230V ac conical grinder with a manual adjustment. When an espresso based drink is selected the grinder will run for the programmed time, grinding beans and feeding the brewer at the same time. The grinder is fitted with a manual adjusting mechanism which allows the engineer to vary the size of the ground coffee in order to satisfy customers’ taste preferences. 11. CoEx® Brewer (Not Shown On Water Flow Diagram) The brewer unit is capable of receiving between 5 and 9 grams of ground coffee. Once the coffee has been ground and dispensed into the brewer unit, the 24V dc brewer motor drives the brewer to the vend position using the current sensing as control. The coffee is compressed into a round ‘cake’ and water is pumped through the brewer. When the required amount of water has passed through the brewer, the now wet coffee ‘cake’ is squeezed, removing most of the water from the ‘cake’, preventing the brewer becoming unnecessarily dirty. After the ‘cake’ has been squeezed the brewer will deposit the cake into the dry waste container and return to the stand-by position. Section 9 - Diagnostics and Maintenance Procedures 9.1 Diagnostics The following pages list the error messages that may be displayed, diagnostics messages accessed via the engineers program and fault descriptions. For further help and advice please contact the Crane Merchandising Systems Technical Support Helpline on 01249 667323. Error Message Diagnostics Screen Text Fault Description Sorry Out of Service Head Not Homed Head not homed Dispense head has not returned to home position in expected time Sorry Out of Service Head Not Extended Head not extended Dispense head has not fully extended in the expected time Sorry Out of Service Waste Bucket Full Waste bucket full Waste bucket full Temporarily Out of Service Init failed restart Machine failed on initialisation Sorry Out of Service No I/O Comm No I/O comm. Initialising Comms error detected between mpu and I/O board CoEx® brewer not situated correctly in the machine Temporarily Out Of Service All selections disabled All drink selections have been disabled Sorry Out of Service Rinsing Rinsing Automatic or manual rinse cycle in progress Out Of Cups Please Insert Mug Cup turret/no cups/ no cups Unable to find cup stack. Cup turret has timed-out on initialisation Sorry Out of Service No Cups No cups and mug sensor failure Machine is out of cups and mug sensor is faulty Out Of Cups Please Insert Mug No cups/no cups No cups are available but the mug sensor is working Out Of Cups Please Insert Mug No cup delivered ring 1 SV on Non fatal error detected with SureVend cup mechanism Please Remove Cup Mug sensor error/ please remove cup An error has occurred with the SureVend sensor during a vend Sorry Out of Service Mug Sensor Error SureVend error and must SureVend No cups remaining and fault with mug sensor Error Message Diagnostics Screen Text Fault Description Please Remove Cup Mug sensor error Cup not removed from dispense area after vend completed or faulty mug sensor Sorry Out of Service Please Insert Mug No cup delivered ring 1 SureVend on/ SureVend error and must SureVend Problem with CDU (cup jam) No more cups being dispensed Sorry Out of Service Low water Sorry Out of Service Water Tank Heating Sorry Out of Service Fill Timeout Low Water Low water level in heater tank Water tank heating Water in the heater tank is below the minimum vend temperature Fill timeout/ low water Machine has been filling for 2 minutes and not reached optimum level Sorry Out of Service Invalid Temp Invalid temp 1. Comms error between I/O & MPU 2. Machine has exceeded optimum boiler temp 3. Temperature probe fault Sorry Out of Service Brewer Jam Brewer jam Brewer has not moved from its home position and may be jammed Sorry Out of Service Brewer Not Homed Brewer not homed Brewer has not returned to its home position and may be jammed Sorry Out of Service No Monetary Device Coin mech comm Communication error detected between monetary device and machine Sorry Out of Service No Monetary Device No monetary devicefatal/No monetary device Machine is configured for an incorrect monetary device, or the device is not responding Temporarily Out Of Service Coin mech ROM MDB coin mech ROM checksum test failed (fatal error) Temporarily Out Of Service Coin mech accept unplugged MDB coin mech is unplugged or faulty Temporarily Out Of Service Coin mech accept jam Coin jam detected in coin acceptor Temporarily Out Of Service Coin mech payout jam Coin jam detected in coin tube Temporarily Out Of Service Coin mech tube sensor Coin tube sensor fault detected Temporarily Out Of Service Coin mech all tubes error No useable coin tubes. Machine unable to pay out Temporarily Out Of Service Coin mech tube error Problem with coin tube. Tube indicates full, but coin count is zero Error Message Diagnostics Screen Text Temporarily Out Of Service Card reader comm Fatal error. Cannot communicate with the card reader Temporarily Out Of Service Single card reader error Transient error with card reader, but card reader in service. Unable to communicate with the card reader Temporarily Out Of Service Card reader reports a comm error Repeatable error with card reader, but card reader in service. Unable to communicate with card reader Temporarily Out Of Service Card reader error Problem with card reader. Manufacturing error detected Temporarily Out Of Service Card reader failed OOS error Temporarily Out Of Service Card reader reports comm error & is OOS Temporarily Out Of Service Card jammed in card reader Card jam Temporarily Out Of Service Card reader failure Problem with card reader. Manufacturing error detected Temporarily Out Of Service Card reader requests servicing Card reader needs servicing An Error has occurred Card reader is out of service Comm error with card reader. Out of service Low water during a CoEx® brewer clean Sorry Out Of Service No Water Available No Water Available Sorry Out of Service Water Tank Leak Water tank leak 9.2 Fault Description No Water Available (B2C Machines Only) The dispense valve is leaking Heater Tank De-Scale Procedure To maintain correct water levels and water temperature the heater tank must be inspected regularly and, if necessary, be de-scaled. To ensure long and trouble-free operation, Crane Merchandising Systems recommend that all machines have a water filter fitted. We recommend and supply the Brita AquaQuell Compact water filter. There are a number of ways of de-scaling the heater tank. The tank can be removed and scraped out with a blunt tool but it can also be left inside the machine and a de- scaling agent introduced into the tank. Always remember to fit a new water filter and boiler seal after de-scaling. Use the following steps as a guideline only and always refer to the instructions supplied with the de-scaling agents regarding dosage and de-scaling time. 1. Switch off the machine and open the door. Remove all canisters and back covers. 2. Using the drain hose fitted to the tank, remove the bung and drain the water from the heater. Safety First! Allow the water in the tank to cool before draining. 3. Once all of the water has drained from the tank, replace the bung into the drain hose. Introduce the de-scaling solution in the recommended dosage into the heater tank. on the machine and allow the heater tank to fill. 4. Turn off the machine and leave for approximately 40 minutes before draining the tank again following the sequence described above. 5. Fit a new water filter and switch on the machine. Fill the tank and drain again until all traces of the de-scaler are removed (at least 3 times). 6. Switch on the machine and allow the heater tank to fill and to heat up. Drain and fill one more time. The machine is now ready to be put back in service. 9.4 B2C System Drain Down - B2C Machines Only Should it become necessary for the engineer to do any work on the B2C water system it is very important that the following sequence is followed to ensure safe working as well as correct system fill and heating when the machine is powered up. 9.4.1 Cooling down the B2C system 1. Open the front door of the machine. Using the service keypad located in the rear of the door, press the ‘Machine Cool Down’ button (10) to ensure the system is cooled. Approximately 400ml of cold water is flushed through the system and out to the waste bucket. Important: Pressing button 10 also informs the machine software that the B2C system has been drained ensuring that the B2C system will automatically fill before heating on power up. This is very important and must not be overlooked. 2. Once the B2C system has been cooled the LCD will display the message ‘Machine cooled’ and water will stop pumping through the system. Remove the waste bucket and empty the contents before re-fitting to the machine. Ensure all pipes etc are refitted correctly into the bucket. 3. Turn off the power to the machine. 9.4.2 Removing the module for maintenance N.B. It is not necessary to remove the module to drain the system down. To remove the module for maintenance, proceed as follows: 1. 2. Close the fresh beans outlet slide and remove the fresh beans container along with the fresh ground coffee canister. Loosen the screws securing the RH boiler cover and remove. Unclip the two loom connectors to the B2C module. Remove the brewer waste bucket from the machine. Turn off the water supply to the module using the cut off (1) located in water pipe situated under the module. Un-screw and remove the water inlet hose (2) to the module. 2 1 3. Loosen the two lower B2C module retaining screws. Carefully lift the module up and out of the machine. 9.4.3 Draining down the module Draining down the module allows the engineer to safely work on system components. It may also be necessary to do this for transit purposes. NB A cool down cycle MUST be carried out before draining the module. 1. Remove the lower cover from the module to expose the boiler blanking plug (3). Hold the collar and remove the plug. Attach a length of silicone pipe to the outlet to act as a drain tube. Place the other end into a bucket. 3 4 4 5 6 2. Remove the air intake cover (5) exposing the blanking plug. Access to this cover is made easier by first removing the B2C chute & cover (4). Remove the air intake blanking plug (6). Any remaining water will be ejected from the system. 3. Remove the drain tube from the outlet. Replace the blanking plug and lower cover. Refit the air intake blanking plug and cover. Replace the B2C chute and cover to the module. 9.4.4 Refitting the module and refilling the system To refit the module and refill the system, proceed as follows: 1. Carefully re-install the module into the machine. Tighten the 2 lower module fixing screws and refit the top LH retaining screw, plug the two loom connectors into the module connectors and re-fit the water inlet hose. 2. Refit the RH boiler cover, fresh ground coffee canister and fresh beans container. Ensure fresh beans outlet slide is opened. 3. Before the machine is powered up it is important that any air is expelled from the system ensuring that the system is fully primed and free of any air pockets. Remove the water tray from the B2C module in order to gain access to the 3 bar valve shut off lever. Pull the lever down to open the valve. 4. Turn the power on to the machine, it will initialise, priming the system with 400ml of water before returning to standby. Hold a suitable container under the valve outlet during machine power up to collect any water ejected from the valve. Once in standby mode the valve shut-off lever should be closed. Place the brewer waste bucket into the machine and re-fit the water tray to the B2C module. Remove the safety key and close the door. 9.5 CoEx® Brewer/Bean Grinder Maintenance - B2C Machines Only Espresso machines are fitted with the unique CoEx® brewer unit which produces both fresh coffee and espresso based drinks from ground beans and freshbrew pre- ground coffee from the same unit. Routine cleaning and maintenance instructions for this unit can be found in the Voce Operators Manual - Part No. PR10908000. 9.5.1 CoEx® Brewer/Grinder Blades - 50,000 Vend Service Crane Merchandising Systems recommends that the brewer unit and bean grinder is serviced by an authorised engineer after every 50,000 vends. A CoEx® service kit (part no. PH11705000, shown opposite) is available from the manufacturer and contains all of the components required to ensure the machine continues to give trouble-free service. The service kit contains the following components (with part nos.): 1. Lower piston and cylinder assembly – Pt. No. ME10592000 2. Filter head assembly - Pt. No. ME11703000 3. 4. Grinder blades - Pt. No. ME07308000 ‘O’ ring - water inlet (not shown) Pt. No. ME10595000 1 2 3 To carry out the 50,000 vend service, proceed as follows: 1. Disconnect the machine from the mains electricity. Open the front door of the machine. Remove the coffee dispense pipe from the brewer outlet. Holding the unit as shown in the photograph, lift the green lever (a) and carefully pull the brewer unit out of the machine. 2. Carefully unclip the wiper arm from the brewer unit and place to one side. Remove the filter assembly from the brewer. Holding the filter assembly as shown, turn the locking ring anti-clockwise to its open position, indicated by the two arrows. Carefully remove the old filter unit down and out of the CoEx® brewer unit. Discard the used filter unit. 3. Remove the bolt securing the brewer drive coupling to the input shaft. Pull the coupling off of the shaft and place to one side. Ensure that the captive lock nut is retained in the drive coupling moulding. 4. Working from the front of the brewer, unscrew and remove the three retaining screws which secure the brewer unit together. Carefully ease both the front and rear brewer panels away from the central piston chamber/swing arms assembly. a 5. Holding the unit as shown in the photograph, rotate the lower piston and cylinder assembly clockwise and then remove it up and out of the swing arms/filter holder assembly. Discard the used lower piston and cylinder assembly. Clean all of the dismantled brewer components thoroughly to remove all traces of waste coffee product. 6. Take the new lower piston and cylinder assembly from the service a Before assembling the unit to the swing arms/filter holder assembly, ensure that the lower piston (a) is at the top of its stroke as shown in the photograph. 7. Ensure that the piston drive cam (b) is positioned as shown. If necessary, push the piston drive cam anti- clockwise until it reaches its stop position. 8. Holding the lower piston and cylinder assembly as shown, guide the assembly into the swing arms/filter holder assembly. b 9. Check and ensure that the lower piston guide block (c) locates with the piston drive cam (d) as shown in the photograph. c d 10. Ensure the plastic washer (a) if fitted is placed correctly over the input shaft (long side) as shown. Re-assemble the front and rear brewer panels to the central piston chamber/swing arms assembly using the three retaining screws/locknuts. Check and ensure that the brewer release lever mechanism operates correctly. 11. Re-fit the brewer drive coupling to the input shaft ensuring that the raised ‘pip’ (b) lines up with its locating dimple (c) on the input shaft. Ensure that the captive lock nut is retained in the plastic drive coupling moulding. Refit the bolt to secure the brewer drive coupling to the input shaft. 12. Take the new filter head assembly from the service kit. Holding the new filter assembly as shown, turn the locking ring anticlockwise to its open position, indicated by the two arrows. Place the filter unit up into the filter holder and turn the green locking ring clockwise to lock it into place. a c b 13. Re-assemble the wiper arm (d) to the filter holder assembly d e Ensure that the wiper arm is located under the coffee outlet pipes as shown (e). 14. Moving to the machine, remove the ‘O’ ring (a) from the water inlet pipe and discard. Fit a the ‘O’ ring included in the service kit onto the inlet pipe. Ensure that the new ‘O’ ring is seated correctly. Refit the CoEx® brewer unit into the machine. Slide the unit into place until it ‘clicks’ into position. Refit the coffee dispense pipe to the brewer outlet. 9.5.2. Replacing the Grinder Blades. 1. Isolate the machine from the Mains power supply. Push in the bean canister shut-off to close the fresh beans outlet. Carefully remove the fresh beans canister from the machine and place it to one side. Pull up and remove the grinder adjusting wheel assembly (b) from the rear of the grinder body. Unscrew the grinder body (c) anticlockwise and remove it from the blade housing. Note: Grinder mechanism removed from the machine for clarity c b 2. Unscrew and remove the nut, star washer and agitator (d) from the drive shaft. Note: Nut is fitted with a left hand thread. Remove the Grinder blade block (e) and discard. Replace with the new grinder blade block included with the service kit. e Refit the agitator, star washer and nut. Ensure that the nut is tightened securely. 3. Take the new grinder body complete with inner grinder ring from the service kit. Screw the grinder body clockwise into the blade housing until it stops. Re-set the grinder blades. An approximate starting position is achieved by turning the grinder body back one full turn anti-clockwise. Re-assemble the grinder adjuster wheel assembly to the grinder unit. 4. Refit the fresh beans container to the machine. Pull the bean canister shut- off to its fully extended position. 5. Turn on the electricity supply to the machine. Important! Before returning the machine to service, the engineer must carry out the Grinder Calibration routine (See 6.5.14.1) to ensure correct operation of the grinder with the type of beans used in the machine. Use the grinder adjuster wheel to fine tune the blade settings in order to obtain the desired grind quality d Section 10 – Electrical/Electronics Information WIRE COLOUR Red/White J3 Pink Grey/Green Blue/Yellow Green/Purple White/Yellow Orange/Yellow Black/Yellow Red/White Violet/Red Pink/Black Grey/Pink Blue/Pink Green/Pink White/Pink White/Blue Grey No Pin Red/White Grey/Violet Green Yellow/Grey Black/Red White/Green Orange Purple/Red Black/Pink No Pin Red/White Purple/White Yellow/Orange Yellow/White Yellow/Pink Yellow/Blue Yellow/Purple Yellow Yellow/Red Red/White Green/Red Grey/White Grey/Black Red/Green Orange/Red Green/Orange Green/Blue Red/White I/O BOARD 24V DC OUTPUTS 1 2 3 4 5 6 7 8 9 10 11 12 13 14 15 16 17 18 19 20 21 22 23 24 25 26 27 28 29 30 31 32 33 34 35 36 37 38 39 40 41 42 43 44 45 46 47 48 49 50 51 52 53 54 55 Green/Yellow EARTH STUD FUNCTION 1 +24V DC 2 Inlet Valve (Hot Fill) 3 Ingredient Motor 1 4 5 Ingredient Motor 2 6 Ingredient Motor 3 7 Ingredient Motor 4 8 Ingredient Motor 5 9 Ingredient Motor 6 10 +24V DC 11 Ingredient Motor 7 12 Ingredient Motor 8 13 Whipper Motor 1 14 Whipper Motor 2 15 Whipper Motor 3 16 Whipper Motor 4 17 Whipper 5 / Brewer Pump 1 18 Dispense Valve 1 19 POLARISING PIN 20 +24V DC H8 1 Dispense Valve 2 2 Dispense Valve 3 3 Dispense Valve 4 4 Dispense Valve 5 5 Dispense Valve 6 6 Dispense Valve 7 7 Dispense Valve 8 8 Whipper Motor 6 / FB Whipper Motor 9 POLARISING PIN 10 +24V DC 11 Turret Motor 1 12 Carbonator Valve 1 13 Still Valve 1 14 Syrup Pump 1 15 Syrup Pump 2 16 Still Valve 2 17 Cold Fill Valve / Water Pump 18 Brewer 1 Chamber Motor 19 +24V DC 20 Ingredient Motor 9 H8A 1 Brewer 1 Belt Motor 2 Autobar CDU 1 Peeler Motor 3 Brewer 2 Pump / Espresso Valve / Whipper 7 4 Brewer 2 Chamber / Pressure Valve 5 Brewer 2 Belt Motor / B2C Inlet Valve 6 Stick Stirrer Solenoid 7 +24V DC 8 9 10 11 12 13 14 15 I/O BOARD 240V AC OUTPUTS WIRE COLOUR H7 J10 1 H10 2 3 4 5 6 7 8 9 10 11 12 13 14 15 2 Blue/Violet 3 Blue/White 4 Blue/Grey 5 6 Blue(1) 7 8 FUNCTION 1 Pump 1 Pump 2 Grinder Motor Neutral I/O BOARD 24V DC HEATER O/Ps Purple/Black J8 1 H11 1 Violet/Orange 2 2 Purple/Green 3 3 Black/Grey 4 4 Solid State Relay 1 +ve Solid State Relay 1 -ve Solid State Relay 2 +ve Solid State Relay 2 -ve I/O BOARD 24V DC H-BRIDGE O/P's Orange/Black J9 1 Red/Orange 2 Orange/Black(1) 3 Red/Orange(1) 4 White 5 Orange/Pink 6 H9 1 2 3 4 5 6 Dispense Head Motor 1 +ve Dispense Head Motor 1 -ve Co-Ex Brewer Motor +ve Co-Ex Brewer Motor -ve I/O BOARD SIGNAL INPUTS WIRE COLOUR J2 White/Red Black/White 2 3 4 5 6 7 8 9 10 11 12 13 14 15 16 17 18 19 20 21 22 23 24 25 26 27 28 29 30 31 32 33 Pink/White Red Yellow Black Red Yellow Orange Red Green Black Pink/Yellow Blue/Black Yellow/Black Red/Black Brown/White Brown/Orange Brown/Green 1 H13 1 2 3 4 5 6 7 8 9 10 11 12 13 14 15 16 17 18 H17 1 2 3 4 5 6 7 8 9 10 11 12 13 14 15 FUNCTION Cold Fill Signal Input Common GND Autobar CDU 1 Peeler Motor Switch Flow Meter +5V Flow Meter Signal Input Flow Meter GND Dispense Head 1 Sensor +5V Dispense Head 1 Sensor input Dispense Head 1 Sensor GND CDU1 Cup Sensor +5V CDU1 Cup Sensor Signal Input CDU1 sensor GND Brewer 1 Home Position Switch Input Dispense Head 1 Home Switch Input CDU1 Carousel Position Switch Input Brewer 2 Home Position Switch / Co-Ex Switch WIRE COLOUR I/O BOARD 24V DC POWER White/Red J7 1 H6 1 No Pin 2 2 White/Black 3 3 Screen J5 2 3 4 5 Red Blue J3 1 J8 1 2 3 4 1 Red Blue Screen GND from SMPSU +24V DC from SMPSU 1 2 3 4 5 6 7 8 TXD RXD GND MPU BOARD ANALOGUE INPUTS White Black White Black Door Switch Input Door Switch GND H1 2 3 4 5 6 7 8 J4 2 3 4 5 6 7 8 H2 2 3 4 MPU BOARD SERIAL COMMS CONSOLE BOARD SWITCH INPUTS Yellow/Red Black 1 H14 1 GND 2 3 RXD 4 TXD 5 MPU BOARD 24V DC POWER Orange/Green J6 1 H12 1 Boiler Level Input Yellow/Green 2 2 Boiler GND Blue/Green 3 3 Waste Bucket 1 Level Input Yellow/Green(1) 4 4 Waste Bucket 1 GND 5 5 6 6 1 H11 1 2 3 4 5 6 7 8 GND from SMPSU I/O BOARD SERIAL COMMS Infinity Mug Sensor +5V Infinity Mug Sensor Signal Input Infinity Mug Sensor GND I/O BOARD WATER LEVEL INPUTS J6 FUNCTION +24V DC from SMPSU 1 H3 2 3 4 5 6 7 8 9 1 2 3 4 5 6 7 8 9 Thermistor 1 COM Thermistor 1 OUT Thermistor 2 COM Thermistor 2 OUT Section 11 - Dispense Pipe Lengths There are two sizes of pipe used on a Voce machine which can be replaced by the Operator, CoEx outlet – 8mm x 13mm All others 6mm x 10mm 11.1 To replace pipes. 1. Open cabinet door and extend the delivery head by pressing 8 on the service keypad. 2. Using the above information about pipe size connect the pipes to the dispense head; the numbers on the diagram below indicate which mixing bowl/brewer should be connected to which nozzle. 3. The pipes should be cut to such lengths that when the head is in this extended position they are not too taut and neither does the pipe sag below the delivery head. Section 12 – Spare Parts The following section details the spare parts that are available for the Voce. For all spare parts sales and enquiries: Telephone: 01249 667321 Exterior View 1 12 2 11 3 10 4 5 9 8 7 6 Exterior View Parts Ref No. 1 2 3 4 5 6 7 8 9 10 11 12 Part No. Item Description MT13807130 GL13772000 Door Surround Glass See Keypad Assembly Door Lock See Dispense Area Components Adjustable Foot Lower Graphic Panel Reject Flap Coin Insert Reject Button Card/Key Plate Upper Graphic Panel **Free Vend Reject Blanker **Free Vend Coin Insert Blanker ME13870000 ME13244000 GR1381000 PL13140000 + ME13141000 PL13780000 PL13786000 TBA GR13809000 PL13162000 + ME13141000 PL13837000 Interior View – Instant 8 Canister Ref No. 1 2 3 Part No. Item Description Canister Assembly (See pages 121 to 125) FB Canister Assembly (See pages 121 to 125) Mixing System (See pages 111 to 112) Interior View – Single Freshbrew Ref No. 1 2 3 4 Part No. Item Description Canister Assembly (See pages 121 to 125) FB Canister Assembly (See pages 121 to 125) Mixing System (See pages 111 to 112) Oltre Brewer (See pages 113 to 114) Interior View – Double Freshbrew Ref No. 1 2 3 4 Part No. Item Description Canister Assembly (See pages 121 to 125) FB Canister Assembly (See pages 121 to 125) Mixing System (See pages 111 to 112) Oltre Brewer (See pages 113 to 114) Interior View – Triple Freshbrew Ref No. 1 2 3 4 Part No. Item Description Canister Assembly (See pages 121 to 125) FB Canister Assembly (See pages 121 to 125) Mixing System (See pages 111 to 112) Oltre Brewer (See pages 113 to 114) Interior View – Bean to Cup and Fresh Brew Tea and Roast and Ground Models Ref No. 1 2 3 4 5 Part No Item Description Canister Assembly (See pages 121 to 125) Canister Assembly (See pages 121 to 125) Mixing System (See pages 111 to 112) CoEx Module Assembly (see pages 115 to 120) Oltre Brewer (See pages 113 to 114) Dispense Area Components 1, 2, 3 8 5 4 7 6 Ref No. 1 2 3 4 5 6 7 8 Part No. Item Description PL13126000 PL13125000 PL13128000 SI01142960 PL04589000 PL13802000 PL10274000 MT14064290 Cup Catcher Moulding - Squat Cup Cup Catcher Moulding - Tall Cup Cup Catcher Moulding - 12oz Cup Silicon pipe - 16mm OD Cup stand Drip tray Grille - drip tray Drip Catcher Bracket Dispense Head Assembly Dispense Head Assembly Ref No. 1 2 3 4 5 6 7 8 9 10 11 12 Part No. Item Description VO DISP HEAD MT10695000 EL04920000 EL10036000 MO10794000 MT10696080 MT10694000 PL10035000 MT10697000 MT13319000 FA01416000 ME04063000 PL05496000 PH05501000 LO11751000 Complete Head Assembly Dispense Head Channel Micro Switch Dispense Head Opto Device Motor, 24Vdc, 50rpm Dispense Head Front Cover Dispense Head Body Dispense Head Rack Moulding Dispense Head Code Angle Dispense Head Arm M5 Nylon Thumb Nut Dispense Head Slide Dispense Head Moulding Nozzle Set Moulded* Dispense Head Loom* *Not Illustrated Keypad – 18 Button Ref No. 1 2 3 4 5 6 Part No. Item Description PL13777000 EL10024000 EL10559001 FA10222000 FA10223000 EL10256000 LO10225000 LO10958000 Keypad LCD Display Console PCB PCB Stand Off PCB Mount - Brass MPU Board Link Loom – Console PCB to MPU* Link Loom – IRDA* *Not Illustrated Power Supply Assembly Ref No. 1 2 3 4 Part No. Item Description PH10534B2C MT13514000 EL10021000 EL13175000 FA01519000 I/O Board Plate Switch Mode Power Supply Mains Filter EDGE CONNECTOR BOARD* *Not Illustrated Heater Tank Assembly 13 13 Heater Tank Assembly Ref No. 1 2 3 4 5 6 7 8 9 10 11 12 13 Part No. Item Description ME04550000 VA03377000 MT11998000 SI10627960 BA11996000 VA10148000 FA01185000 SI01171960 FA03227000 ME03024001 EL03378000 SI01142960 EL11994000 Level Probe Assembly Valve Seal Boiler Lid Heater Tank Seal 8 Port Boiler Assembly Dispense Valve, 24Vdc x 8 Snapper Clip, 30 Silicon Pipe, 8mm ID Unix Clip, 19mm Temperature Cut-Out Holder Temperature Cut-Out Silicon Pipe, 12mm ID ELEMENT 2.35 KW 240V Cup Drop Unit Assembly 3 2 1 Cup Drop Unit Assembly Ref No. Part No. 1 2 3 (a) ME11767000 (b) ME11933000 (c) ME13030000 (a) ME11768000 (b) ME13031000 (a) PL02713000 (b) PL13113000 Item Description Cup Drop Unit (Tall) - 70mm Cup Drop Unit (Squat) - 73mm Cup Drop Unit (12oz) - 80mm Turret Assembly - inc. 3(a) Turret Assembly - inc. 3(b) - 12oz Model Lid (Cup Turret) Lid (Cup Turret) - 12oz Model 1 10 2 3 4 8 5 6 9 7 Mixing System Mixing System Ref No. 1 2 3 4 5 6 7 8 9 10 (a) (b) (a) (b) Part No. VCH HYG TEA VCH HYG COF83 VCH HYG B2C VCH HYG B2C FBT VCH HYG DFB VCH HYG INSTANT VCH HYG R&G VCH HYG SFBC VCH HYG SFBT VCH HYG TFB MO10991000 PL10188001 SI10343000 SI10344000 PL01970000 PL10992000 PL01967000 PL13716000 PL10183000 PL13504000 PL10187000 PL10802000 FA01134000 * Not Illustrated Item Description VOCE HYGIENE TEA KIT VOCE HYGIENE COFFEE83 KIT VOCE HYGIENE KIT B2C VOCE HYGIENE KIT B2C+FBT VOCE HYGIENE KIT DFB VOCE HYGIENE KIT INSTANT VOCE HYGIENE KIT R&G VOCE HYGIENE KIT SFB COFF VOCE HYGIENE KIT SFB TEA VOCE HYGIENE KIT TFB WHIPPER MOTOR 13K RPM 24V WHIPPER BASE EXTENDED ARM O RING WHIPPER BASE SEAL WHIPPER BASE IMPELLER GY WHIPPER BODY BOWL MIXING GREY (INCL) BOWL MIXING DUAL INLET BOWL ADAPTOR BOWL MIXING BULKHEAD STEAM TRAP WHIPPER MOUNTING PLATE Bowl Adaptor Seal* Oltre Brewer Fresh-Brew Tea and Fresh-Brew Coffee New image Ref No. 1 2 3 4 5 6 7 8 9 11&12 (a) (b) (a) (b) (a) (b) (a) (b) Part No. PL13454000 PL13456000 PL13455000 PL13484000 PL13469000 ME13714000 ME13713000 PL13477000 PL13478000 ME13463000 ME13466 PL13459 PL13451 MO13457000 ME13718000 ME13719000 Item Description for Fresh-Brew Tea Steam Trap for Brewer Adaptor Bowl Mixing Bowl Lower Chamber Assembly EU Tea Lower Chamber Assembly USA Coffee BELT FILTER-TEA (6 PK) BELT FILTER-COFFEE (6 PK) Spout ID4 for Tea Spout ID6 for Coffee Belt Filter Assy ID83 Belt Filter Assy ID73 Tea Pin with Traction Roller Release Handle Gear Motor Series 263 30RPM O-Ring for Outlet Plane Support Belt (Bags of 20)** CLEARING RIBBON KIT OLTRE (Bag of 10)** **Not Illustrated CoEx® Module Assembly (B2C Machines) CoEx® Module Assembly (B2C Machines) Ref No. Part No. 1 2 3 4 5 6 7 8 9 10 Item Description Module Assembly - See Page 120 PL10283000 MT13323000 MT10847000 PL10580000 PL10282000 PL10792000 PL13971000 PL01442000 MT11655080 * Not Illustrated CoEx® Brewer Assembly - See Page 119 CoEx® Brewer Spout Side Tray Long Brewer Cover Grinder Chute Grinder Chute Cover Fresh Beans Canister c/w Lid Freshbrew Canister Freshbrew Canister Chute Cover, Drain* CoEx® Brewer/Motor Assembly (B2C Machines) CoEx® Brewer/Motor Assembly (B2C Machines) Ref No. Part No. 1 3 4 5 6 7 8 9 10 11 12 13 14 15 16 17 18 19 PH10190000 PL11622000 PL10283000 (b) ME10284000 ME10596000 ME10595000 ME10762000 EL10903000 EL10587000 ME10763000 ME10597000 (b) PH11705000* ME10592000* ME07308000 (b) PH11683000* (b) MT10978000 (b) MO11679000 ME10595000 ZC10598000 Item Description CoEx® Brewer Assembly + Filterhead Wiper Arm Coffee Outlet Spout Filter Head Assembly (Includes item 6) Quad Ring ‘O’ Ring – Water Inlet Connection Mounting Bracket Microswitch, c/w Lead Lever, Microswitch Water Inlet Connection Drive Wheel Service Kit (Includes items 5, 7, 14 and 15) Lower Piston and Cylinder Assembly Grinder Blades Motor Assembly (Inc. items 12, 17 and 18) Motor Mounting Bracket CoEx® Brewer Motor Seal Cleaning Tablets (x30) + Includes items 2–5 and 7–12. * Not Illustrated CoEx® Module Assembly (B2C Machines) CoEx® Module Assembly (B2C Machines) Ref No. 1 2 3 4 5 6 7 8 9 11 12 13+14 15 16 17 18 19 Part No. Item Description 1 EVO B2C MOD MO10108001 MO10152000 ME10047000 ME10834000 VA10048000 VA13245000 BA10000000 VA10044000 MO11679000 VA10042000 ME11186000 VA11362000 ME10216000 ME10208000 HO10245000 MT10965000 MT10808000 ME07308000 ME11175000 Module, New Grinder, 230V Ingredient Motor - 130rpm, 24V DC Pump, 230V Flow Meter Pressure Reducing Valve, 0.5 Bar Inlet Valve, 24V DC Pressure Boiler Assembly 3 Bar Relief Valve Brewer Motor, 24V DC Espresso Valve, 2 Way Drain Plug Espresso Valve Body, 3 Way ‘T’ Shaped John Guest Fitting ‘R’ Shaped John Guest Fitting FEP Pipe Water Tray Mounting Bracket Grinder Blades* Grinder Gear* * Not Illustrated CoEx ®Additional Parts - B2C Module Assembly Ref No. Image Part No. Item Description 1 ME10216000 Pressure Fitting Equal Tee 2 ME10211000 Pressure Fitting Female 3 ME11654000 Pressure Fitting Elbow 4 ME10212000 Pressure Fitting Male Tee 5 ME10207000 Pressure Fitting Tee 6 ME10208000 Pressure Fitting Elbow Male 7 ME11186000 Pressure Fitting End Stop 8 ME10220000 Pressure Fitting Tube 9 EL10058000 Temp Cut out 120 Deg 10 PL10246000 Tee Piece Nylon 6mm 11 ME10217000 Pressure Fitting Male 12 ME10217000 Pressure Fitting Equal Elbow 13 EL10228000 Boiler Thermistor Probe Canister Assembly Canister Assembly Part Number Item Description PL11170000 Canister, 67mm wide (c/w agitator) - Freshbrew/Instant PL11608000 Canister, 67mm wide (no agitator) - Freshbrew/Instant PL11172000 PL10856000 Canister, 67mm wide (c/w agitator and stainless steel auger) Canister, 42mm wide (c/w agitator) – Freshbrew Coffee 1 PL11179000 Canister Lid, 67mm wide 2 PL10358000 Flange Rear 3 4 5 6 7 8 9 10 PL10356000 PL02711000 PL01128000 PL01441000 PL01442000 PL10297001 PL10357000 ME02706000 ME10386000 SI02705000 PL02707000 TBC End Cap Canister Drive Canister Chute - Central Canister Chute, LH - Long Canister Chute, RH - Long Extended Chute (B2C Tea Canister) Flange - Front Auger (Plastic c/w ‘O’ Ring) AUGER S/S WIRE 224 SERIES O’ Ring Agitator Assembly (Spring) Agitator Assembly (Wire) Ref No 11 (a) (b) (c) (a) (b) Canister Assembly – Freshbrew Coffee Canister Assembly – Freshbrew Coffee Part Number Item Description PL10821000 Large Canister Complete (LH) PL13986000 Large Coffee Canister Complete (LH) PL13717000 Large Canister Complete (RH) PL11180000 Canister Lid (a) PL11181000 Canister Base (RH) (b) TBC Canister Base (LH) PL10358000 PL10356000 PL02711000 PL01128000 PL10357000 TBC TBC SI02705000 PL11182000 PL11183000 Flange - Rear End Cap Canister Drive Canister Chute - Central Flange - Front Auger, Plastic c/w ‘O’ Ring Auger, S/S c/w ‘O’ Ring ‘O’ Ring Agitator Assembly Agitator Fixing Nut Ref No 1 2 3 4 5 6 7 8 9 10 (a) (b) (c) Canister Assembly – Bean Hopper (Round) Ref No. 1 2 Part No. Item Description PL14258000 PL14339000 BEAN HOPPER ROUND LID BEAN HOPPER ROUND Surevend Assembly Ref No. 1 2 3 4 5 6 7 8 9 10 Part No. Item Description FA13304000 PL13147000 PL13134000 PL13778000 PL13779000 EL13152000 EL13152000 MT13790000 MT13796000 FA04431000 K40 X 10 PT SCREW LN1452 CLIP CUP CATCHER LENS CUP SENSOR SURE VEND PCB LOCATOR LH SURE VEND PCB LOCATOR RH PCB CUP SENSOR (PAIR) - LED PCB CUP SENSOR (PAIR) - SEN VEND AREA RETAINER BRKT MNTG DRIP TRAY M5X10 TAPTITE POZIPAN HD Extract System Ref No. 1 2 3 4 5 6 Part No. Item Description MT04132000 ME10182000 HO01139000 FA01188000 PL03083000 PL04165000 Mounting Bracket Extract Fan Hose Cable Tie Extract Hose Adaptor ‘T’ Piece - 11⁄4” Waste Bucket 2 1 Ref No. 1 2 Part No. Item Description PL06672000 PL01172000 Bucket 24L FB Waste Grey Silver Bucket 10L Refrigeration Components Ref No. 1 Image Part No. Item Description VA11911000 Dispense Valve 24VDC 2 ME11912000 Syrup Pump Assembly 24VDC 3 ME11913000 Syrup Pump Tube 4 ME03072000 5 ME10857000 Pump Aquatech 6 ME07238000 Agitator Assembly 7 ME03278000 Fan Unit Condenser 8 EL11915000 PCB Viscount MK4 9 VA07921000 CO2 Pipe Assy Carb Water Pressure Regulator Additional Refrigeration Components – No Images Part No. HO04997000 HO04989000 PL11004000 PL08703000 PL08702000 PL12074000 HO06730000 C3638147 EL08784000 EL08985000 EL08786000 D80492549 VA07921000 ME06734000 ME02914000 ME13118000 ME08729000 ME08730000 EL01155000 MT13548000 MT13549000 Item Description EVA Tubing 8mm OD EVA Tubing 6mm OD Bath Filler Assembly 3/8” Tube to Hose Stem 3/8” to 5/16” Elbow JG 5/16” Equal Connector Straight 5/16” to 1/4” Elbow JG 5/16” to 3/8” Connector Straight Compressor Start Capacitor Compressor Start Relay Compressor Thermal Cut out Fuse 1 amp 20mm CO2 Pipe Assy Carb CO2 Regulator ODL Seal CO2 Regulator Dispense Harness Oetiker Clamp 7 to 8.7mm Oetiker Clamp 8.8 to 10mm Mains Filter 6 AMP Mains Filter Mounting Plate Mains Filter Cover Fixings & Fasteners FA10203000 FA01499000 FA01498000 FA10205000 FA05206000 FA01503000 FA04422000 FA01501000 FA01506000 FA03262000 FA03289000 FA01506000 FA02431000 FA10807000 FA01504000 FA01143000 FA07111000 FA04304000 FA02029000 FA04301000 FA01507000 FA01555000 FA01508000 FA01683000 FA13305000 FA01509000 FA04431000 FA05210000 FA01682000 FA10863000 FA01416000 FA01561000 FA01487000 FA01488000 FA01489000 FA14890000 FA01188000 FA01860000 FA01189000 FA10222000 FA03227000 M3 Nyloc Nut M3 Nut Plain ZP M3 X 6 Pozi Pan Screw M3 X 10 Pozi Pan Screw M3 X 16 CSK Screw M3 X 16 Pozi Pan Screw M4 Shakeproof Washer M4 Washer Plain M4 Hex Full Nut M4 Nyloc Nut ZP M4 Nyloc Nut Stainless M4 X 6 Pozi Pan M4 X 8 Pozi Pan Stainless M4 X 10 Taptite screw M4 X 10 Pozi pan M4 X 10 Hex Bolt Stainless M4 X 10 Thumb Screw M4 X 16 Pozi pan M4 X 20 Pozi Pan M4 Skiffy Thumb nut M5 Washer plain M5 Washer ShakeProof SS M5 Full Nut ZP M5 Nyloc Nut ZP M5 Flanged Nyloc Nut M5 X 10 Pozi Pan Screw M5 X 10 Taptite Screw M5 X 10 Cheese Head Screw M5 X 16 Pozi Pan Screw M5 X 25 Carriage Bolt M5 Skiffy Thumb Nut 1/4 ZP Plain Washer Faston Connector 1/4“ Faston Connector Boot 1/4 “ Spade Connector 1/4” Spade Connector Boot Cable Tie Small Cable Tie Medium Cable Tie Holder PCB Support Unex Clip 19mm

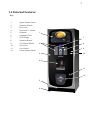
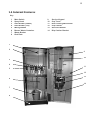

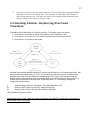
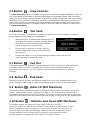
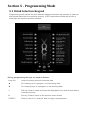
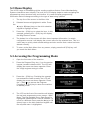
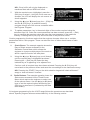

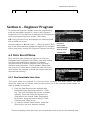

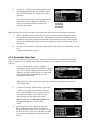
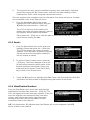

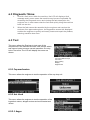

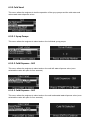
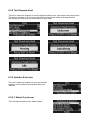

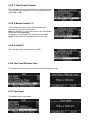
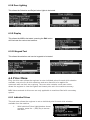

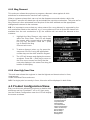


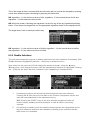


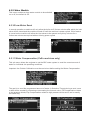


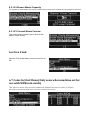
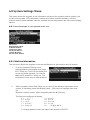
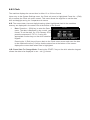

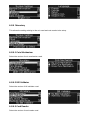
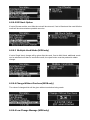


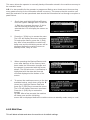
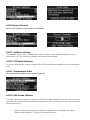
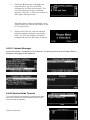
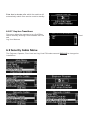
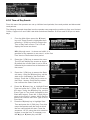


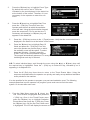

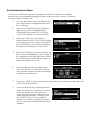
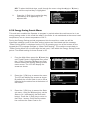


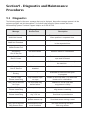
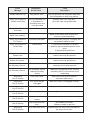
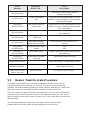

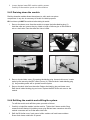
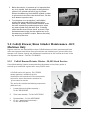
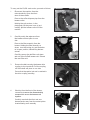
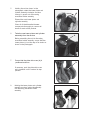

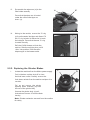

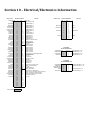


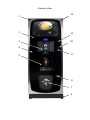
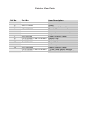
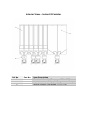


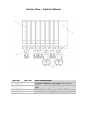
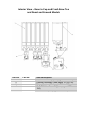
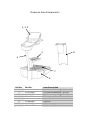
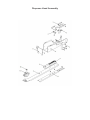
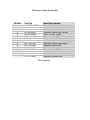

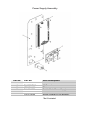
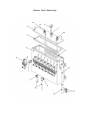
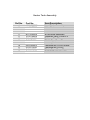

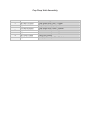
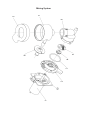
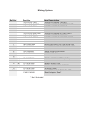
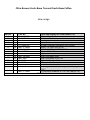


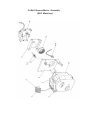

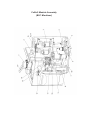
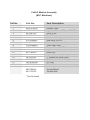

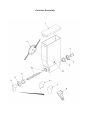

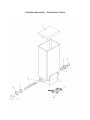
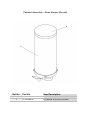
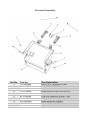
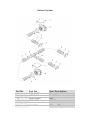
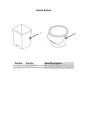
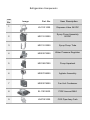
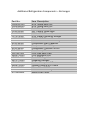


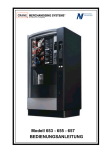
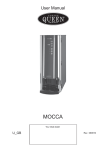
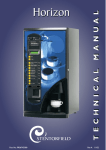


![sf-list [s]](http://vs1.manualzilla.com/store/data/005727021_1-5e70d84b679a2d9887789b982f459474-150x150.png)