1
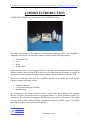
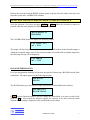
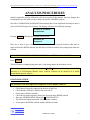
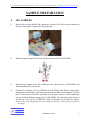
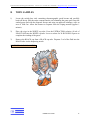
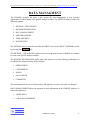
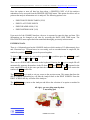
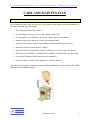
L2000DX ANALYSER User Manual Egypt ETI Umwelttechnik AG Kalchbuehlstrasse 18 P.O. Box 176 CH-7007 Chur / Switzerland Phone: +41 (0) 81 253 54 54 Facsimile: +41 (0) 81 253 66 22 E-mail: [email protected] Internet: www.eti-swiss.com ETI Environmental Technology International Ltd. – P.O. Box 176 – CH-7007 Chur / Switzerland – [email protected] - www.eti-swiss.com L2000DX INTRODUCTION CONGRATULATIONS on your purchase of the L2000DX Analyser. The target contaminant of the analyte is Polychlorinated Biphenyl (PCB). The L2000DX is designed to measure the Total Organic Chlorine content from the following matrices: • • • • Transformer Oil Soil Water Surface Wipe Oil has no other source of Total Organic Chlorine. Therefore it is assumed that the total organic chlorine content is derived from PCB. In the case of the other matrices the sample is required to be prepared in order to isolate the target organic chlorine content in order to analyse for PCB. There are 3 main steps that allow the L2000DX Analyser to determine the Total Organic Chlorine content of the target analyte. • • • Sample Preparation Conversion to Inorganic Chloride Quantification The preparation of the sample is done in order to convert the organic chlorine into inorganic chlorine. Therefore all external sources of inorganic chlorine, i.e. sweat, should be avoided, i.e. with gloves. The conversion to inorganic chloride remains the same for all matrices. The sample is reacted with metallic sodium and then extracted into an aqueous buffer solution. A chloride specified electrode is used to quantify the chloride. L2000DX User Manual 2 ETI Environmental Technology International Ltd. – P.O. Box 176 – CH-7007 Chur / Switzerland – [email protected] - www.eti-swiss.com CONTENTS OF THE L2000DX ANALYSER The L2000DX analyser is delivered in a carrying case with the following items. • • • • • • • • • • • • L2000DX Electronic PCB/Chloride Analyser Power Cube AC-DC Transformer Portable Electronic Balance 5 ml Pipette Vial Rack Timer Marking Pen Two Empty 20ml Vials for RINSE and CALIBRATION solutions One set of Instructions and MSDS Chloride-ion Specific Electrode Packet of Polishing Strips Test Tube Rack In order to prevent damage the reagents are shipped separately. There are four further options with respect to the available reagent packs. These are based on the required matrix for testing. OIL!! Reagents for Oil Tests 1 – 250 ml bottle of EXTRACT solution 1 – 250 ml bottle of RINSE solution 1 – 250 ml bottle of CALIBRATION solution 1 – 60 ml bottle of Electrode Filling Solution 1 – tray of empty 20 ml glass vials 1 – box of tissue wipes 1 – shelf pack containing: – filters – pipettes – reaction tubes (black dispenser caps) L2000DX User Manual 3 ETI Environmental Technology International Ltd. – P.O. Box 176 – CH-7007 Chur / Switzerland – [email protected] - www.eti-swiss.com INITITIAL SET UP 1) Take the vial rack out and place two 20 ml vials in the rack. Label them RINSE and CAL and remove the caps. 2) Fill the vials approximately HALF full with the appropriate solution. 3) Remove the protective cap from the tip of the Electrode 4) Fill the Electrode, up to the hole on the side, with the Orion Electrode Filling Solution supplied with each lot of Reagents. L2000DX User Manual 4 ETI Environmental Technology International Ltd. – P.O. Box 176 – CH-7007 Chur / Switzerland – [email protected] - www.eti-swiss.com 5) Drain the Electrode by pushing down on the black cap where the chord enters the body of the electrode. 6) Refill the Electrode, making sure the fill solution is making contact between the black cone and the plastic shell at the bottom. Place the electrode in the RINSE solution. 7) Connect the electrode to the BNC connector labelled ELECTRODE. 8) Turn on the L2000DX Analyser by pressing the ON/ENTER button. Select OPTIONS MENU from the first screen by pressing OPTIONS button. 9) At the OPTIONS MENU go to the DIAGNOSTICS menu by pressing 6. 10) The current temperature and electrode output will be displayed on the screen in the following format. DIAGNOSTICS X.X XXX mV 24 oC The electrode output should reach 140 mV within 1 minute if allowed to sit. If not then refill the RINSE solution. If necessary drain the electrode and refill. L2000DX User Manual 5 ETI Environmental Technology International Ltd. – P.O. Box 176 – CH-7007 Chur / Switzerland – [email protected] - www.eti-swiss.com BASIC OPERATION OF L2000DX The L2000DX Analyser once charged should be able to operate for 3 full 8-hour days of analysis. The operation of the analyser is conducted on the touch pad with a number of screens allowing inputs to be entered. The four main screens are the FIRST SCREEN, the SELECT METHOD screen, the ANALYSIS screen and the OPTIONS menu screen. The FIRST Screen is the first to appear on activation of the machine. By pressing the ENTER button the analyser will move to the SELECT METHOD screen. The OPTIONS menu can be reached from both of these screens at any time by pushing the OPTIONS button. The SELECT METHOD screen requires that the method of analysis be selected. Pressing the <NO and YES> buttons allows the user to scroll through the different options. Pressing ENTER allows selection of the required method. The program will now enter the ANALYSIS LOOP of the program. From here the OPTIONS menu is not accessible. The first step here is CALIBRATION of the electrode. CALIBRATION Once entering the ANALYSIS LOOP the first screen to arrive is the CALIBRATION screen. CALIBRATION FOR method name Pressing ENTER or YES> will request the placing of the electrode in the CALIBRATION solution. The CALIBRATION solution is a 50 ppm chloride standard solution. The CALIBRATION will automatically be required every 20 analysis or 15 minutes. IS CALIBRATION SOLUTION READY L2000DX User Manual 6 ETI Environmental Technology International Ltd. – P.O. Box 176 – CH-7007 Chur / Switzerland – [email protected] - www.eti-swiss.com Remove the electrode from the RINSE solution, gently wipe the electrode with a clean wipe and insert the tip into the CALIBRATION solution. DO NOT WIPE THE TIP OF THE ELECTRODE AS THIS MAY DAMAGE IT Swirl the electrode a few times and press ENTER or YES> . Allow the electrode to remain in position while the meter displays the following message. MEASURMENT IN PROGRESS The CALIBRATION menu will display the following output. CAL TEMP = 24 oC mV = XXX The output will also be printed out in hard copy form. This will indicate if the electrode output is within the acceptable range or not. If the electrode output is not within this acceptable range then the following message will be displayed. CAL ERROR MV = XXX BLANK DETERMINATION Every pre-programmed method gives the user the option of subtracting a BLANK from the final calculations. The option appears as the following message: USE BLANK YES/NO The BLANK menu gives the option of using a previously recorded blank in the analysis. USE PREVIOUS BLANK YES/NO If YES is selected then the option is given to change the stored blank, or to enter a value for the blank. If NO is selected then the analyser requires the electrode to be placed into the blank solution until a reading is displayed. Only stored blanks can be edited. L2000DX User Manual 7 ETI Environmental Technology International Ltd. – P.O. Box 176 – CH-7007 Chur / Switzerland – [email protected] - www.eti-swiss.com ANALYSIS PROCEDURES Sample preparation will be addressed in the next section of this manual. Once the Sample has been prepared you are NOW ready to analyse it with the L2000DX Analyser. Once the CALIBRATION and BLANK Determination have been completed, the analyser moves to the ANALYSIS stage of its function. The display will show the following message: ANALYZE SAMPLE method name Pressing ENTER will bring the machine to this screen: SAMPLE ID Sample id Here one is able to give a name or ID to the sample. The electrode should at this time be removed from the RINSE solution, dab the drop of solution carefully away and placed in the test solution. DO NOT WIPE THE TIP OF THE ELECTRODE AS THIS MAY DAMAGE IT Press ENTER. This will initiate a reading taking place and a value being shown on the display screen. Additional samples can be analysed by pressing ENTER. Pipettes, vials and gloves should be disposed of as PCB/Organo-Chlorine waste. Analysis solution can be disposed of as nickel contaminated aqueous solution. ELECTRODE CHECK The electrode is the most important component of the L2000DX Analyser • • • • • • • Check that it is properly connected to the back of the Unit Check that the electrode is filled to the correct level If necessary refill the electrode Check the electrode output by placing the electrode in the RINSE solution Enter the OPTIONS MENU and select 6 – DIAGNOSTICS. The Electrode Output must reach 140 mV within 1 minute. If not replace the RINSE solution and/or refill the electrode L2000DX User Manual 8 ETI Environmental Technology International Ltd. – P.O. Box 176 – CH-7007 Chur / Switzerland – [email protected] - www.eti-swiss.com SAMPLE PREPARATION A OIL SAMPLES 1) Remove the cap from the BLACK capped tube and add 5 ml of oil to the line marked on the tube with a pipette. Replace the cap on the tube. 2) Break the bottom Ampule in the Tube. Shake the tube well for 10 SECONDS. 3) Break the top Ampule in the Tube. Shake the tube vigorously for 10 SECONDS. And then intermittently for one minute. 4) Using the 5 ml Pipette ad 5 ml of EXTRACT SOLUTION to the BLACK capped tube. Re-apply the cap and shake vigorously until the foam and dark colour disappear. Vent the tube - if necessary several times, until there is no pressure anymore - and re-tighten the cap and continue shaking vigorously for 20 SECONDS. Place the tube upside down on the flat top of the cap for 2 MINUTES. This will separate the oil and water phases. à this is the same step/principle as you would use the Clor-N-Oil test kit (see pictures next page) L2000DX User Manual 9 ETI Environmental Technology International Ltd. – P.O. Box 176 – CH-7007 Chur / Switzerland – [email protected] - www.eti-swiss.com If oil layer is on bottom, STOP test! 5) If oil layer is on top, continue test! Place the FILTER FUNNEL in one of the 20 ml glass vial marked with the sample ID. Position the tube over the filter and dispense the solution through the dispenser nozzle into the filter. Make sure this is done in one go and stop as soon as oil appears The sample is now ready for Analysis!!!!!! B SOIL SAMPLES To analyse soil samples the PCB/Organic Chlorids need to be extracted from the soil. The quality of the analysis depends on the quality of the sampling techniques! 1) Using the stainless steel spatula and the portable electronic balance weigh out 10 GRAMS of soil and place in the WHITE cap test tube. 2) Remove the cap from the BLACK cap glas tube and pour the contents into the WHITE cap tube with the soil in it. Shake vigorously for 1 MINUTE. Break up lumps of soil in the tube by pressing on the sides of the tube. Let it settle for 2 MINUTES. L2000DX User Manual 10 ETI Environmental Technology International Ltd. – P.O. Box 176 – CH-7007 Chur / Switzerland – [email protected] - www.eti-swiss.com 3) Remove the DRYING COLUMN from its pouch and pull the PLUNGER out of the 10cc SYRINGE. Attach the end of the blue DRYING COLUMN to the SYRINGE by screwing the collar over the tip of the SYRINGE. Make sure it is tightly sealed. 4) Remove the cap from the BLACK cap tube with two ampules inside. Using a polyethylene PIPETTE take the extracted solution from the soil and put into the SYRINGE. Approx. 7 ml is needed. Push the solution with the plunger through the SYRINGE into the DRYING COLUMN at a rate of 2 to 3 DROPS per second. 5) Fill the BLACK cap tube to 5 ml level and tighten the cap. CONTINUE AS IN OIL SAMPLE C WATER SAMPLES HIGH RANGE (5 – 2000 ppm) 1) Fill sample up to 10 ml line with water samples 2) Add SODIUM SULFATE and shake vigorously 3) Add 10 ml of ISOOCTANE extraction solvent, and shake vigorously for 30 SECONDS. 4) Allow separation into two phases for 2 minutes. Remove 5 ml and add to the BLACK capped tube. CONTINUE AS IN OIL SAMPLE LOW RANGE (10 ppb – 20 ppm) 1) Collect sample in 1 QUART glass bottle, leaving 30 ml of head space. 2) Add 10 ml of ISOOCTANE to the sample container. Shake vigorously for 2 MINUTES and allow to set for 3 MINUTES. 3) Add sufficient chlorine free DISTILLED WATER to bring the water level up to the neck of the bottle. 4) Withdraw 5 ml from the upper solvent layer and place in BLACK capper tube. CONTINUE AS IN OIL SAMPLE L2000DX User Manual 11 ETI Environmental Technology International Ltd. – P.O. Box 176 – CH-7007 Chur / Switzerland – [email protected] - www.eti-swiss.com D WIPE SAMPLES 1) Locate the sealed glass vials containing chromatographic grade hexane and carefully break off the tip. Pour the entire contents into the vial containing the gauze pad. Grasp the soaked gauze pad with the disposed forceps and using an approved technique, wipe an area of 1000 cm2. Allow the hexane to evaporate from the wiping material (approx 1 minute). 2) Place the wipe in the WHITE cap tube. Pour the EXTRACTION solution (10 ml of ISOOCTANE) into the WHITE cap tube. Leave to solvate for 30 SECONDS. Squeeze to complete the washing of the gauze. 3) Remove the BLACK cap from a BLACK cap tube. Dispense 5 ml of the fluid into the BLACK tube via the dispensing nozzle. CONTINUE AS IN OIL SAMPLE L2000DX User Manual 12 ETI Environmental Technology International Ltd. – P.O. Box 176 – CH-7007 Chur / Switzerland – [email protected] - www.eti-swiss.com DATA MANAGMENT The L2000DX Analyser has quite a few options for data management. It also provides opportunities for developing a site specific analysis method. The OPTIONS menu provides the following options: 1. METHOD – CREATE/EDIT 2. HEADER INFORMATION 3. DATA MANAGEMENT 4. PRINTER OPTIONS 5. TIME AND DATE 6. DIAGNOSTICS The OPTIONS menu is entered from either the FIRST screen or the SELECT METHOD screen, by pressing the OPTIONS key. The METHOD – CREATE/EDIT option can be used with help from the L2000DX user manual to create a site specific analysis method. The HEADER INFORMATION option allows the operator to set the following information to be added to the storage facilities of the Analyser. • OPERATOR ID • CUSTOMER ID • JOB ID • LOCATION ID • COMMENTS This information will be stored in the memory and applied to each new job until it is changed. DATA MANAGEMENT allows the operator to store information in the L2000DX Analyser. It allows the operator to: • STORE DATA • CLEAR DATA MEMORY L2000DX User Manual 13 ETI Environmental Technology International Ltd. – P.O. Box 176 – CH-7007 Chur / Switzerland – [email protected] - www.eti-swiss.com Once the option to store all data has been taken, a PRINTED COPY of all the analyses undertaken can be accessed from the PRINTER OPTIONS menu. This option also allows one to print out the analysis information as it is analysed. The following options exist: • PRINT POINTS WHEN TAKEN (Y/N)? • PRINT LAST XXXX POINTS • PRINT HEADER NOW (Y/N) • PRINT METHOD NOW (Y/N) Upon arrival of the L2000DX Analyser, the user is requested to enter the date and time. This information can be changed at any time by accessing the DATE AND TIME menu. The DIAGNOSTICS menu option has been mentioned thoroughly previously in this manual. ENTERING DATA There is a 16 button keypad on the L2000DX Analyser which consists of 12 alpha-numeric keys and 4 function keys. To input letters in a text string, such as a method name or sample ID, the number key and the ALPHA key must be pressed together. To insert a U for example, the user needs to press the 7 key and then press the ALPHA key until the 7 changes to the S then T then U. There are two WILDCARD characters on the keyboard. Entering the * key in a sample ID will automatically sequence the numbers in the ID from 00001 and 99999. If the ? is inserted in the same sample ID it will do the same put limit the number of numbers i.e. ????, will restrict the numbers to 9999 possible IDs. The BACK/OFF key is used to exit any screen to the previous menu. This means that from the SELECT MENU option this key will take the Analyser back to the FIRST SCREEN. From the FIRST SCREEN this key will turn of the Analyser. The ENTER/ON key turns on the Analyser and allows the selection of an option or method in the Analysis process. All right, you are doing exactly what I am telling you! L2000DX User Manual 14 ETI Environmental Technology International Ltd. – P.O. Box 176 – CH-7007 Chur / Switzerland – [email protected] - www.eti-swiss.com CARE AND MAINTENANCE The electrode is the most important component of the L2000DX Analyser It is an important part of the long term use of the Analyser that proper care and maintenance of the unit is required. This will include: • The changing of Paper in the Printer • Not allowing the unit to get wet, or spill solutions on the Unit • To Prolong the use of the battery, use the AC adapter if power is available • Attempt to always use the device with a fully charged battery • Storage of the Analyser with a charged Battery, and periodically charge the Unit • Protect the Unit from Static Electric Charges • Store the unit away from possible sources of Chlorine i.e. Not in a salty environment • NEVER pour the RINSE, CALIBRATION or EXTRACT solutions back into the bottles • If necessary Polishing of the Electrode can be undertaken • If the electrode is out of use for a longer time, it must be drained Full details of how these maintenance steps should be undertaken can be found in the USER Manual for the L2000DX Analyser. L2000DX User Manual 15