1
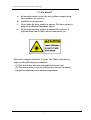
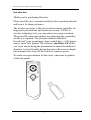
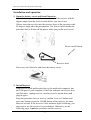
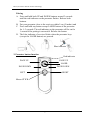
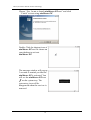
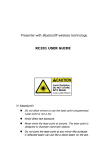
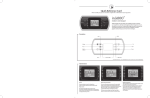
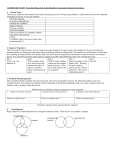
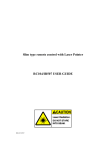
Presenter
User’s Manual
RF132, Presenter with RF wireless technology
!!! Attention!!!
A. Do not allow minors to use the laser pointer unsupervised.
Laser pointers are not toys.
B. Avoid direct eye exposure.
C. Never shine the laser pointer at anyone. The laser pointer is
designed to illustrate inanimate objects.
D. Do not point the laser pointer at mirror-like surfaces. A
reflected beam can act like a direct beam on the eye.
This device complies with Part 15 of the FCC Rules. Operation is
subject to the following two conditions:
(1) This device may not cause harmful interference and
(2) This device must accept any interference received, including
interference that may cause undesired operation.
1
RF132, Presenter with RF wireless technology
Table of Content
INTRODUCTION ................................................................... 3
FEATURES.............................................................................. 4
PACKAGE CONTENTS......................................................... 5
SYSTEM REQUIREMENTS ................................................. 5
INSTALLATION AND OPERATION ................................... 6
1. OPEN THE BATTERY COVER AND INSTALL BATTERIES .... 6
2. INSTALL RECEIVER .......................................................... 6
3. PRESENTER BUTTON FUNCTION ........................................ 7
4. INSTALL aimMaster EZ...................................................... 8
5. USE aimMaster EZ ........................................................... 11
TROUBLE SHOOTING ....................................................... 14
V1.0
2
RF132, Presenter with RF wireless technology
Introduction
Thank you for purchasing Presenter.
Please read this user’s manual carefully before operating the unit,
and keep it for future reference.
The wireless presenter is the ideal wireless remote controller for
large-scale presentations and conference rooms. 2.4GHz of
wireless technology lets you concentrate on your presentation.
The preset RF connection enables true plug-and-play capability;
no driver is required. The presenter features dedicated
PowerPoint® page-up and page-down control keys, a 360-degree
mouse, and a laser pointer. The software, aimMaster EZ allows
you to put marks during the presentation to attract the audiences’
attention. A travel-friendly design that stores the receiver dongle
into presenter also turns off the switch to conserve power.
We make no representation for the errors, omissions or updates
of this document.
3
RF132, Presenter with RF wireless technology
Features
1. 2.4 GHz RF wireless transmission provide up to 20 meters omnidirectional working range.
2. Built-in laser pointer for presentation guidance.
3. Built-in cursor mouse for 360-degree control.
4. Plug and Play. No driver required.
5. Store wireless USB receiver inside presenter.
6. Useful and friendly software, aimMaster EZ, works under Windows
2000/ XP/ Vista OS and allows you to put marks to attract audiences’
attention.
7. Compact design uses hidden dongle as on/off power switch of RF
and laser.
8. Bright laser beam provides easy to see pointer visibility.
9. Compatible with MS, Openoffice, Google Docs
10. Two AAA batteries provide long and reliable usage.
4
RF132, Presenter with RF wireless technology
Package contents
Presenter
USB type RF Dongle receiver
aimMaster EZ Software and User’s Manual CD-ROM
Two AAA batteries
Quick Guide
System Requirements
Microsoft® Windows® 2000/XP/ Vista and Mac OS
512MB RAM recommended
CD-ROM drive or DVD-ROM Drive
USB Port; PC platform
5
RF132, Presenter with RF wireless technology
Installation and operation
1. Open the battery cover and Install batteries
Open the battery cover of presenter and take off the receiver with 45
degrees angle from the receiver dock before you start to use.
(Please insert the receiver into the receiver dock of the presenter with
45 degrees angle after the presentation. The Power Switch inside the
presenter dock will turn off the power when you put the receiver in)
Power on/off button
Receiver dock
Put in two AAA batteries and close the battery cover.
2. Install Receiver
Plug receiver (with golden pins face up for notebook computer) into
the USB port of your computer. If the blue indicator on receiver does
not flash once, unplug receiver, turn the receiver upside down and
plug in again.
Keep the presenter close to receiver (within 5 cm, or 2 inches) and
press any button except the LASER button of the receiver for more
than one second. If the receiver’s blue indicator light is blinking, you
may start to use the receiver for presentation. Otherwise, do the
following steps to pair the presenter and the receiver:
6
RF132, Presenter with RF wireless technology
Pairing
A. Press and hold both UP and DOWN buttons around 3 seconds
until the red indicator on the presenter flashes. Release both
buttons.
B. Put your presenter close to the receiver within 5 cm (2 inches) and
C. Press and hold any button except LASER button of the presenter
for 1~3 seconds. The red indicator on the presenter will be on for
1 second if the pairing is successful. Release the button.
D. The blue indicator of receiver blinks when the presenter keys
(except the LASER button) are pressed.
Blue indicator
3. Presenter button function
Red indicator
PAGE UP
PAGE UP
LASER
PAGE DOWN
PAGE DOWN
LEFT
RIGHT
Mouse STICK
7
RF132, Presenter with RF wireless technology
Power on/off button
Receiver dock
Button
or
or
Function
PAGE UP button (suit for left-handed or
right-handed user)
PAGE DOWN button (suit for left-handed or
right-handed user)
LASER button (if receiver is put into presenter,
the laser power is off and can’t operate)
Mouse LEFT button
Mouse RIGHT button
Mouse STICK (use your finger tip to push
STICK to any direction.)
Power on/ off button (on/off power switch of
presenter)
4. Install aimMaster EZ
Insert the CD to your computer. The following window will pop up.
8
RF132, Presenter with RF wireless technology
Click “Next”
Click “Next”
Click “Install”
9
RF132, Presenter with RF wireless technology
Choose “Yes, I want to launch aimMaster EZ now” and click
“Finish” to start using aimMaster EZ.
Double Click the shortcut icon of
aimMaster EZ exe file shown on
your desktop to activate
aimMaster EZ.
The message window will pop up
3 seconds to remind you that the
aimMaster EZ is activated. You
will see the aimMaster EZ icon
on the system tray. The
system tray icon will be
disappeared when the receiver is
removed.
10
RF132, Presenter with RF wireless technology
5. Use aimMaster EZ
In a presentation, you can use the mark pen to highlight some
important articles or blank the screen to catch the audiences’ attention.
aimMaster EZ supports two mark pens, Check Pen and Line Pen. It
also provides a blank function. You can blank the screen so that the
audiences will focus on your speech. When you enter aimMaster EZ,
you can click the RIGHT button to choose one of the 4 modes, Check
Pen, Line Pen, Mouse and Blank.
Check Pen Mode
Press and hold the RIGHT button
for
2 seconds to enable aimMaster EZ. The
first mode entered is Check Pen Mode. A
check symbol
will replace the cursor
symbol and the aimMaster EZ icon on
the system tray will be changed from
to .
In the Check Pen Mode, each LEFT
click will leave a red check mark
below the cursor
position.
Please refer to the following table for the different modes.
Mark Pen Mode
Cursor
Mark
System Tray
Check Pen
Line Pen
Mouse
•
n.a.
Blank
n.a.
n.a.
n.a.
Note: When you turn on your computer, please remember to run
aimMaster EZ, otherwise when you press and hold RIGHT button for
2 seconds, you can NOT enter the Check Mark Mode.
11
RF132, Presenter with RF wireless technology
Line Pen Mode
once;
Click the RIGHT button
aimMaster EZ will go from the Check
Pen Mode into the Line Pen Mode.
The cursor symbol becomes
and
the aimMaster EZ icon on the system
tray is changed from
into .
In the Line Pen Mode, press and hold
the LEFT button
will draw a red
line from right end of the cursor
location and this red line extends
towards the right direction. The
longer you hold the LEFT button
, the longer the red line is.
Mouse Mode
Click the RIGHT button
again to
go from the Check Mode into the
Mouse Mode. In this mode, the cursor
becomes an arrow . The aimMaster
EZ icon will change to
on the
system tray. It has the normal mouse
functions. You can move the Mouse STICK and LEFT/RIGHT click
your hyper-link file that is inserted in your Presentation file.
In the Mouse Mode, click the RIGHT button
to go back to the
Check Pen Mode. In this way, the 3 modes, Check Pen, Line Pen, and
Mouse, are cycled by the RIGHT button
clicks.
Undo the Marks
To undo the Check/Line Marks you have done on the screen, click
PAGE UP button once will clear the latest Check/Line Mark. The
further PAGE UP clicks will undo the marks until all the Check/Line
marks are cleared.
12
RF132, Presenter with RF wireless technology
Clear all Marks
To clear all Check/Line Marks, you may either click PAGE DOWN
button once, or, press the ESC key of your keyboard. aimMaster EZ is
then disabled.
When you want to use mark pen again, press and hold RIGHT button
for 2 seconds to enable aimMaster EZ and enter the Mark Pen
Mode as we described previously.
Blank the Screen
When aimMaster EZ is enabled, press and hold the RIGHT button
for 1 second, the screen becomes blank. To get back the original
screen, click PAGE DOWN button once. aimMaster EZ will go back
to one of the 3 modes, Check Mark, Line Mark, and Mouse.
Quit from aimMaster EZ
If your receiver is unplugged
from the computer, the icon on
the system tray will be hidden,
but aimMaster EZ is still
running. Please move the cursor
above the aimMaster EZ icon on
the system tray, click the RIGHT
button
and then, LEFT click
“quit” to exit from aimMaster EZ.
13
RF132, Presenter with RF wireless technology
TROUBLE SHOOTING
You can’t use the mark pen when you press and hold the RIGHT
button for more than 2 seconds
You need to run aimMaster EZ exe file before you can enable the
aimMaster EZ. Then you can press and hold the RIGHT button for more
than 2 seconds to start using mark pen.
Note:
If you plan to use a computer not belonged to you, you need to store the
aimMaster EZ exe file into a USB flash drive. Plug it into the computer
that you want to use for the presentation, and double click this exe file
before the presentation.
Computer does not respond to clicks on the presenter
1. The presenter red indicator does not flash when you click the
presenter buttons
The receiver is not plugged to the USB port of computer
correctly
Either the receiver is not plugged into the USB port of your
computer, or the receiver is inserted into the USB port in the wrong
direction. If the receiver is plugged to the computer of the USB
port correctly, the blue indicator of the receiver should blink once.
The presenter batteries run out of electricity.
Please change two new A4 batteries.
The laser pointer is still working
The battery voltage might be too low although the laser pointer is
still working. Please change another pair of new batteries.
Notice:
Please do not use rechargeable batteries on this product
because they have lower voltage and will cause malfunctions.
2. The presenter red indicator does not flash when you click the
14
RF132, Presenter with RF wireless technology
presenter buttons. When you press and hold any button other than
LASER for more than 1 second, the red indicator flashes for about
1 second:
The receiver is not plugged into the computer.
Plug the receiver into the USB port of your computer.
The receiver is plugged into the computer but it is plugged with
wrong side.
Remove the receiver and plug it into USB port again on the correct
side – the blue indicator on the receiver will blink once if it is
plugged in correctly.
The receiver does not pair with the presenter
This situation happens if you use a receiver other than the one
provided with your presenter. Please follow the instruction of
pairing on Page 6.
Your cursor is moving too fast or too slow when you use the Mouse
STICK of the presenter
Please go to the control panel of your PC system to adjust the mouse
speed.
You changed a new receiver
You need to re-link the presenter and the receiver. Please follow the
instruction of pairing on Page 6.
15