1
Getting Started with Quarantine Manager
Getting Started with Quarantine Manager
The Quarantine Manager application enables the network administrator to quarantine devices to protect the
network from attacks. The application works with an external Intrusion Prevention System (IPS), such as
Fortinet, or a network device, such as an Alcatel AOS switch, which sends either a Syslog message or
SNMP trap to Quarantine Manager containing the IP or MAC address of the offending device. (If an IP
address is received, Quarantine Manager uses its Locator function to determine the device's MAC address.)
These messages trigger Quarantine Manager Rules. Depending on the rule that is written for the event, the
device can be immediately quarantined or placed in a Candidate List that can be reviewed by the Network
Administrator for further action.
Note: Quarantine Manager cannot quarantine any devices on the EMP subnet because the
EMP port has no mobility feature.
The following sections describe the requirements for getting started with Quarantine Manager.
Hardware/Software Requirements
Quarantine Manager is an optional add-on package to OmniVista 2500. It can be installed in the OmniVista
2540 Basic Single User environment or the OmniVista 2540 Basic Multi User environment. The hardware
requirements for Quarantine Manager are the same as for OmniVista 2500. Version 5.1.6 of the AOS
software is required for Trap Notification to work correctly; and Fortinet software version 2.3. is supported.
Quarantine Manager supports all platforms currently supported by OmniVista 2500.
External Notification Device
An external device must be set up to send notifications to the Quarantine Manager application. For
example, a Fortinet IPS device must be set up to send Syslog messages to Quarantine Manager. This set up
includes specifying the IP address of the OmniVista server and the port address for the OmniVista Syslog
daemon (preset default is 514); and specifying what events received by the IPS will generate a Syslog
Message. The message (either Syslog message or trap) must include the IP or MAC address of the
offending device. In addition, the Network Administrator must create a "Quarantine" VLAN and MAC
group.
Note: See the applicable user manual (e.g., Fortinet IPS) or the OmniVista Notifications
Application help pages (e.g., AOS switch) for more information on configuring the
external device used for Quarantine Manager.
Quarantine VLAN
You must first use the VLANs application to configure a Quarantine VLAN containing the switches you
want to monitor with Quarantine Manager. In addition, because VLANs cannot be used when Group
Mobility is not enabled, you must also configure an ACL by creating a Quarantined MAC group. You can
access the VLANs application by clicking the VLANs button in the Configuration tab.
Note: Quarantine Manager does not support ACLs on XOS machines.
1
Getting Started with Quarantine Manager
Rules
Quarantine Manager Rules are configured for dealing with Syslog events and SNMP traps. The easiest way
to use Quarantine Manager is to enable one of the Built-in Rules. The Rules determine which events from
an external IPS or switch are propagated through the network. For example, when the IPS notices an attack,
it generates a Syslog event. After receiving a Syslog message, Quarantine Manager uses the rules to
determine what device generated the event and whether or not the offending device is immediately
quarantined (Banned) or placed on the Candidate List to be reviewed by the Network Administrator. The
way in which a device is quarantined depends on the action that is configured for the rule.
If a device is placed in the Candidate list, all traffic to the suspect device continues. The Network
Administrator reviews each event in the Candidate list and decides what action to take. If a device is placed
in the Banned list, it is quarantined until it is manually removed by the Network Administrator.
Note: There are a number of important devices in a network that a Network
Administrator will never want to be quarantined. Use the Never Ban List to ensure that
important devices are never quarantined.
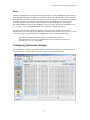
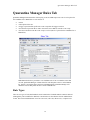
Configuring Quarantine Manager
After initial set up is complete, Quarantine Manager is configured and managed using the the tabs shown
and described below. Click the link for each tab for detailed configuration instructions.
2
Getting Started with Quarantine Manager
Quarantine Manager Tabs
Quarantine Manger tabs are described below. Click the link for each tab for detailed configuration
instructions.
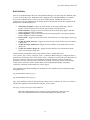
•
•
•
•
•
•
•
Candidates - The Candidates tab displays a list of devices that have been flagged by an IPS or
switch. The Network Administrator can release a device from the list, ban a device, or configure a
device to never be banned.
Banned - The Banned tab displays a list of all devices that have been banned and isolated from
the network.
Never Banned - The Never Banned tab displays a list of devices that have been configured never
to be banned (e.g., mail servers, IPS). Note that all switches discovered by OmniVista are
implicitly on the Never Banned List even though they are not displayed.
Disabled Ports - The Disabled Ports tab displays a list of all devices whose ports have been
disabled.
Rules - The Rules tab is used to configure the conditions that will trigger Quarantine Manager
notifications and actions.
Configuration - The Configuration tab is used to configure the "Quarantine" VLAN and MAC
group, as well as the action that will be taken for the event.
Responders - The Responders tab enables you to specify the responses, such as run an audio
program or send an e-mail to the MIS director, based on the conditions given. Quarantine Manager
Logs
The Audit application can be used to access the Quarantine log and Syslog. The logs contain
detailed information about Quarantine Manager and Syslog events. Currently, if Syslog is in use,
when launching Quarantine Manager, a warning message is displayed in server.txt that points to
the Preferences application, where you can change Syslog.
Note: Aruba default logging to Syslog produces 2,000 messages per 20 minutes.
3
Quarantine Manager Candidates Tab
Quarantine Manager Candidates Tab
When an external Intrusion Prevention System (IPS), such as Fortinet, detects a possible attack on the
network, it generates either a Syslog Event or an SNMP Trap. A Quarantine Manager rule can be
configured (Configuration Tab) to trigger an action based on these events. The action will either
immediately quarantine the offending device, or place the device on the Candidates List. If the device is
placed on the Candidates List, traffic to and from that device will continue until the Network Administrator
decides what action should take place.
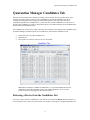
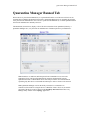
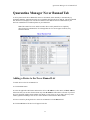
The Candidates tab, shown below, displays all of the devices that have been placed in the Candidates list by
Quarantine Manager (field descriptions are provided below). The Network Administrator can:
•
•
•
Release the device from the Candidates List
Ban the device
Place the device on the list of devices to never be banned.
Note: When evaluating a candidate for Ban/Release, it is recommended that the Network
Administrator check the quarantine.log file in the Audit application to see if any more
serious events have been logged by the same end-station.
Releasing a Device from the Candidates List
To remove a device from the Candidates list, select the device and click the Release button. The device is
removed from the list. A device may return to the list if another event triggers a configured quarantine rule.
4
Quarantine Manager Candidates Tab
Banning a Device
To ban a device from the network, select the device and click the Ban button. The device is removed from
the network and placed in the Banned list. Click here for more information on banning a device.
Placing a Device on the Never Banned List
To place a device in the Never Banned list, select the device and click the Never Ban button. The device is
placed in the Never Banned list. An event will never trigger a quarantine rule for a device in the Never Ban
list. Click here for more information on the Never Banned List.
Candidates Tab Field Descriptions
Candidates Tab field descriptions are provided below.
Mac Address - The device's MAC address. Quarantine Manager Rules extract the IP address of the device.
Quarantine Manager then uses the OmniVista Locator Function to determine the MAC address.
IP Address - The device's IP address. All Quarantine Manager Rules must extract the IP address from the
Syslog Message or SNMP Trap. If the IPS sends a MAC address, the IP address will have a value of
0.0.0.0.
Timestamp - The date and time the event occurred.
Reason - The reason the event triggered a Quarantine Manager rule. For all Fortinet-generated events,
select the event in the table and right-click to access a detailed description of the event. Click here for more
information.
Quarantine Switch List - This field contains any switches that were not successfully included in a
"Quarantine" sub-network.
5
Quarantine Manager Reason Description
Quarantine Manager Reason Description
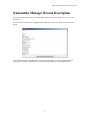
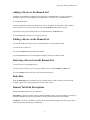
You can access the Fortinet web site for a detailed description of any any Fortinet event. To access the
description:
1. Click on the event in the table to highlight it; then right-click on the event. The Reason window will
appear.
2. Click on the Fortinet web address button at the bottom of the Reason window. A Fortinet In-Depth
Analysis page will appear describing the event in detail and providing any recommended actions.
6
Quarantine Manager Reason Description
7
Quarantine Manager Banned Tab
Quarantine Manager Banned Tab
When a device is placed in the Banned List, it is quarantined from the rest of the network. Devices can
automatically be added to the Banned List based on a Quarantine Manager rule or manually placed in the
list by the Network Administrator. Once a device is placed in the Banned List, it remains quarantined until
the Network Administrator manually releases it.
The Banned tab, shown below, displays a list of all devices than have been quarantined, either by a
Quarantine Manager rule, or by the Network Administrator. Field descriptions are provided below.
Note: In Release 3.0 and later, DHCP requests from a banned device are sent to the
Quarantine VLAN. The Network Administrator can direct banned traffic from the
Quarantined VLAN to a Remediation Server that will provide the user with information
explaining why their device was banned and what steps to take to connect to the network.
Note: Quarantine Manager now has the ability to ban devices connected to an
OmniAccess WLAN device using the device's "Blacklist" feature. However, the 'enable'
password of the device must be entered in the Secondary Password field of Discovery
Manager Entry window in the Topology application.
8
Quarantine Manager Banned Tab
Adding a Device to the Banned List
In addition to automatically quarantining devices based on a Quarantine Rule, you can also manually
quarantine a specific device by adding it to the Banned List. To add a device to the Banned List:
1. Click the New button.
2. Select the applicable radio button and enter the device's IP Address (or host name) or MAC Address.
Please note that you can enter the host name only if the IP Address radio button is selected.
3. Enter the reason you are placing the device on the Banned list in the Reason field.
4. Click the OK button. The device will appear in the list.
Editing a Device on the Banned List
You can edit the Reason field for a device in the Banned list. To edit the Reason field:
1. Select the device in the list.
2. Click on the Edit button and edit the Reason field.
3. Click the OK button. The new information will display in the device's Reason field.
Releasing a Device from the Banned List
To release a device from the Banned List:
1. Select the device in the list. (You can select multiple devices using the SHIFT or CTRL keys.)
2. Click the Release button. The device will be deleted from the list.
Redo Ban
Click the Redo Ban button to poll the network for banned switches. This is useful if you have banned
switches without first creating a Quarantine VLAN or MAC Group.
Banned Tab Field Descriptions
Banned tab field descriptions are provided below.
Mac Address - The device's MAC address. Quarantine Manager Rules extract the IP address of the device.
Quarantine Manager then uses the OmniVista Locator function to determine the MAC Address.
IP Address - The device's IP address or the host name. All Quarantine Manager rules must extract the IP
address from the Syslog Message or SNMP Trap.
9
Quarantine Manager Banned Tab
Timestamp - The date and time the event occurred.
State - The state of the banning action:
•
•
•
•
•
Scheduled to be Banned (Ban is in process)
Completed (Ban is complete)
Partially Banned (Ban not completed for all devices)
Scheduled to Be Released (Release is in process)
Partially Released (Release not completed for all devices).
Reason - The reason the event triggered a Quarantine Manager rule. For all Fortinet-generated events,
select the event in the table and right-click to access a detailed description of the event. Click here for more
information.
Partial Results - The devices where the ban has either succeeded, or for which the user has not
configured/enabled Quarantine Manager.
VLAN Name - The user-configured name for the Quarantine VLAN.
Mac Group Name - The user-configured name for the Quarantine Mac group.
Quarantine Switch List - This field contains any switches that were not successfully included in a
"Quarantine" sub-network.
10
Quarantine Manager Never Banned Tab
Quarantine Manager Never Banned Tab
A device placed on the Never Banned list can never be banned, either manually or automatically, by
Quarantine Manager. Important network servers should be placed in the Never Ban list. The Never Banned
tab, shown below, displays a list of all devices that have been added to the Never Banned list by the
Network Administrator. Field descriptions are provided below.
Note: The OmniVista server and all switches discovered by OmniVista are implicitly
placed in the Never Banned list. Even though these devices do not appear in the list, they
cannot be banned.
Adding a Device to the Never Banned List
To add a device to the Never Banned List:
1. Click the New button.
2. Select the applicable radio button and enter the device's IP Address (or host name) or MAC Address.
Please note that you can enter the host name only if the IP Address radio button is selected. If you ban a
device by the MAC address, the IP address will display a value of 0.0.0.0. If you ban a device by its IP
address, Quarantine Manager will use its Locator function to determine the MAC address.
3. Enter a reason for placing the device on the Never Banned List in the Reason field.
4. Click the OK button. The device will appear in the list.
11
Quarantine Manager Never Banned Tab
Editing a Device in the Never Banned List
You can edit the Reason field for a device in the Never Banned list. To edit the Reason field:
1. Select the device in the list.
2. Click on the Edit button and edit the Reason field.
3. Click the OK button. The new information will display in the device's Reason field.
Deleting a Device from the Never Banned List
To delete a device from the Never Banned List:
1. Select the device in the list. (You can select multiple devices using the SHIFT or CTRL keys.)
2. Click the Delete button. The device will be deleted from the list.
Never Banned Tab Field Descriptions
Never Banned Tab field descriptions are provided below.
Mac Address - The device's MAC address.
IP Address - The device's IP address or host name. If an Intrusion Prevention System (IPS) sends a MAC
address, the IP address will have a value of 0.0.0.0.
Timestamp - The date and time the device was placed on the Never Banned list.
Reason - The reason the device is in the Never Banned list.
Quarantine Switch List - This field contains any switches that were not successfully included in a
"Quarantine" sub-network.
12
Quarantine Manager Disabled Ports Tab
Quarantine Manager Disabled Ports Tab
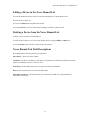
When a port is disabled, an entry appears in the Disabled Ports List table. If you attempt to ban multiple
MAC addresses for the same switch's slot/port, multiple entries will appear in the table. The Disabled Ports
tab shown below, displays a list of all devices whose ports have been disabled, either by a Quarantine
Manager Rule or by the Network Administrator. Field descriptions are provided below.
Note: If you disable the port, that was already disabled, there will be two entries in the
table. The first entry will contain the MAC address of the offending end station. The
second entry will contain a null ( possibly 000000:000000) MAC address. The reason for
this second entry is that when you use the Banned tab to release a MAC address, the port
will not be re-enabled. The Network Administrator will have to manually re-enable the
port by releasing the port from the Disabled Ports tab.
Note: When you delete an entry from the Disabled Ports List table, the item will be
removed. If it is the last item with the specified IP address and slot/port combination,
then that port will be enabled. That is, the port will not be enabled until every device that
caused it to be banned has been released.
Note: Use the Configuration tab to turn on port disabling; then use the Topology
application to enable port disabling for each switch.
13
Quarantine Manager Disabled Ports Tab
Editing a Device in the Disabled Ports List
You can edit the Reason and the Timestamp fields for a device in the Disabled Ports list. To edit the
Reason and the Timestamp fields:
1. Select the device in the list.
2. Click on the Edit button and edit the Reason and the Timestamp fields.
3. Click the OK button. The new information will display in the device's Reason and Timestamp fields.
Releasing a Device from the Disabled Ports List
To release a device from the Disabled Ports list:
1. Select the device in the list. (You can select multiple devices by using the SHIFT or CTRL keys.)
2. Click the Release button. The device will be deleted from the list.
Retry the Failed Operation
To retry the failed operation during the enabling/disabling of a port:
1. Select the device in the list.
2. Click the Retry button. The failed operation will be retried.
Disabled Ports Tab Field Descriptions
Disabled Ports tab field descriptions are provided below.
Switch Address - The device's IP address. Quarantine Manager Rules extract the IP address from Syslog
Message or SNMP trap.
Slot - The disabled slot number.
Port - The disabled port number.
IfIndex - The value of the slot/port numbers of the offending device that are disabled, which equals 1000
times the slot number plus the port number. This calculated value is applicable for Alcatel switches only.
Timestamp - The date and time the event occurred.
Mac Address - The device's MAC address. Quarantine Manager Rules extract the IP address of the device.
Quarantine Manager then uses the OmniVista Locator function to determine the MAC address.
14
Quarantine Manager Disabled Ports Tab
State - The state of the disabling or enabling action:
•
•
Completed (Disabling is complete)
Failed (Disabling/enabling of a port failed)
Reason - The reason a port was disabled.
15
Quarantine Manager Rules Tab
Quarantine Manager Rules Tab
Quarantine Manager Rules determine which Syslog events or SNMP traps cause a device to be placed in
the Candidates list or Banned list. A rule consists of:
•
•
•
•
•
A name
A description of the rule
A trigger expression that specifies the event or trap that will trigger an action
An extraction expression that is used to extract the source address from the event or trap
An action to be taken when the event or trap is received (device is placed in the Candidates list or
Banned list).
Note: Banned rules have precedence over Candidate rules. If an event matches more than
one rule, Quarantine Manager will match the first rule that places a device on the Banned
list. If there is no rule that places the item on the Banned list, Quarantine Manager will
match the first rule that places the device on the Candidate list.
Rule Types
There are two types of rules: Built-In Rules and Custom Rules. The Built-In Rules cannot be deleted
(although they can be modified or disabled). Custom Rules are rules that the Network Administrator
creates. The Network Administrator can create a new rule, edit a rule, delete a rule, or import a rule.
16
Quarantine Manager Rules Tab
Built-In Rules
There are seven Built-In Rules that come with Quarantine Manager. You must change the "Enabled" status
to "True" to enable these rules. The default action configured for all of the Built-In Rules is to send the
device to the Candidates list for review by the Network Administrator. Although the rules are preconfigured, the Network Administrator can modify the them. Built-In Rules are initially configured in the
Disabled state. The Built-In Rules are:
•
•
•
•
•
•
•
Alcatel DOS Trap Rule - Triggers an action based on an AOS trap (AlaDosTrap). The rule
triggers an action in response to a Teardrop, Ping of Death, or Port Scan attack.
Fortinet Anomaly - Triggers an action on a Fortinet Attack Anomaly Event. Ignores Anomaly
attacks configured to "Pass" on Fortigate.
Fortinet Signature - Triggers an action on a Fortinet Syslog Signature event. Ignores Signature
attacks configured to "Pass" on Fortigate.
Fortinet Virus - Triggers an action on a Fortinet Virus Detection event. Only triggers on sub-type
"infected".
OA WLAN: Rogue AP Active - Triggers an action when the switch classifies an Access Point as
a "Rogue AP."
OA WLAN: Rogue AP Detected - Triggers an action when the Access Point detects an active
"Rogue AP."
OA WLAN: Station w/ Rogue AP - Triggers an action when the Access Point detects traffic
from a client through a "Rogue AP."
Fortinet Anomaly and Signature attack events include a "status=" attribute that can be
"clear_session","pass_session", "dropped", "reset", or "detected". When Fortigate is configured to allow a
particular attack (using the GUI to set its action to "Pass"), a Syslog event is still sent out for that attack, but
its status is "detected"; meaning it is detected but not acted upon. Our built-in triggers are therefore
designed to act on any value of "status=" EXCEPT for "detected". This means you can use the Fortigate
control panel to selectively enable or disable attack actions and Quarantine Manager will behave
consistently, without the need to change any of these triggers.
The Canned rules in Quarantine Manager for Fortigate have been modified as such, in both the anomaly
and signature rules.
log_id=0421073001.*status=[^p].[^t]
log_id=0420070000.*status=[^p].[^t]
The [^p] was added to exclude any Syslog message starting with a "p" character, as well as a "t" character.
This prevents quarantine for both "detected" and "pass_session" status.
The "pass_session" state was previously unknown.
Note: The Audit application can be used to access the Quarantine log and Syslog. The
logs contain detailed information about Quarantine Manager and Syslog events.
17
Quarantine Manager Rules Tab
Custom Rules
The Network Administrator can create Custom rules using Regular Expressions to configure the trigger
event and extraction expression. The rules can be based on an Intrusion Prevention System (IPS) event or
an AOS SNMP trap notification.
Note: You must be careful when creating a rule since a misconfigured rule could cause
an important service to be inadvertently banned.
Creating a New Rule
To create a new rule, click the New Button and complete the Quarantine Rules Parameters. When you have
completed all the fields, click the OK button, then click the Apply button to write the rule to the server.
Editing an Existing Rule
To edit an existing rule, select the rule and click the Edit button. Edit the applicable Quarantine Rules
Parameter(s), click the OK button, and then click the Apply button to write the changes to the server.
Deleting a Rule
To delete a rule, select the rule (use the SHIFT or CTRL keys to select multiple rules), click the Delete
button, and then click the Apply button.
Importing a Rule
You can import a new rule from Alcatel without having to update the Quarantine Manager code. New rules
are sent by Alcatel as .xml files.
1. Save the .xml file on your machine.
2. Select Import from the QM Rules drop-down menu or click the Import icon.
An Import window will open in the OmniVista directory.
18
Quarantine Manager Rules Tab
3. Browse to the .xml file that you saved, select the rule and click the Open button. The Import window
will close and the new rule will appear in the Rules table.
Note: Imported rules are initially configured in the Disabled state. You must change the
"Enabled" status to "True" to enable the rules.
Rule Parameters
The Quarantine Manager Rule parameters are described below.
Name - The user-defined name for the rule.
Description - The user-defined description for the rule.
Trigger Expression - A regular Java expression that is used to determine if a Syslog message or SNMP
trap should trigger a quarantine action. If a Syslog message or SNMP Trap matches this regular expression,
the action is performed. The regular expressions used by OmniVista are very similar to those used by
programs such as PERL and AWK. See http://java.sun.com/docs/books/tutorial/extra/regex/intro.html for
more information on using regular expressions. Click here for more information on Regular Expressions.
Extraction Expression - A regular Java expression that specifies the source address of the suspect device.
Use the ( ) expression to capture the source IP or MAC address. (Quarantine Manager also supports the hex
form of IP addresses.) Once Quarantine Manager receives a Syslog message or SNMP trap that matches a
Trigger Expression, it must extract from it the source address of the suspect end station. Click here for
more information on Regular Expressions.
Note: You can check the server.txt file to verify that your Extraction Expression is
functioning properly.
19
Quarantine Manager Rules Tab
Action - The action to be taken when the rule is triggered:
•
•
•
Candidate List - The device is added to the Candidates list. The device can still send and receive
traffic. The Network Administrator reviews the list and determines what action to take (e.g.,
remove the device from the list, ban the device)
Quarantine - The device is moved to the Quarantined VLAN and/or MAC Group, and added to
the Banned list. While on the Banned list, the device cannot send or receive traffic. The device
remains on the list until it is manually removed by the Network Administrator.
Release - The device is released from the Quarantined VLAN and/or MAC Group. This can be
used to allow an external system (e.g., Trouble Ticket System) to send a syslog message or trap to
OmniVista to automatically release a quarantine without having to access OmniVista.
Note: The Quarantine VLAN or MAC group must be properly set up for traffic to be
quarantined. If you do not first configure a Quarantine VLAN or MAC group, even a
device on the Banned list could still pass traffic. The Quarantine VLAN or MAC group is
configured in the Configuration tab.
Enabled - Administrative state of the rule:
•
•
True - The rule is enabled.
False - The rule is disabled.
Event Type - The type of triggering event (Syslog or Trap).
Regular Expressions Overview
Trigger Expressions
As stated earlier, a Trigger Expression is a regular Java expression that is used to determine if a Syslog
message or SNMP Trap should trigger a quarantine action. If a Syslog Message or SNMP Trap matches
this regular expression, the action is performed. For example, let's say that we are interested in a Fortinet
Syslog Event that looks something like:
Fortinet Anomaly 03-08-200 14:09:34 device_id=FG36002805033253 log_id=0421073001 type=ips
subtype=anomaly pri=critical attack_id=102039582 src=90.0.0.10 dst=10.10.10.100 src_port=2370
dst_port=139 src_int=internal dst_int=external status=dropped proto=6 service=139/tcp msg="netbios:
SMB.NTLMSSP.Attempt.B
Many Syslog messages appear similar. However, each message may have a different date, device ID,
source and destination address, etc. What is unique about each Syslog message is the log_id value. If you
are interested in all Fortinet Syslog messages with a log_id of 0421073001, then the regular expression is
easy - you can simply search for any message that contains the String log_id=0421073001. In the Trigger
Expression Field you would type the value
log_id=0421073001.
20
Quarantine Manager Rules Tab
Extraction Expressions
As stated earlier, an Extraction Expression is a regular Java expression that specifies the source address of
the offending device. Once a Syslog message matches a Trigger Expression, Quarantine Manager must
extract the source address of the suspect end station from the message. In our the Fortinet example above,
the source address is preceded by the string "src=" and then an IP address. An IP address consists of 4 sets
of numbers separated by the "." character. Each set is 1 to 3 characters in length and the numbers are
decimal (0-9) digits. One way to express this is with the regular expression
src=([0-9]{1,3}\.[0-9]{1,3}\.[0-9]{1,3}\.[0-9]{1,3})
Because we are only interested in the IP address and not the characters "src=", place ( ) around the IP
address to indicate which part you want to capture. The [0-9] means any single character from 0-9, the
{1,3} means that you are looking for a set of 1 to 3 numbers. The \. says that you are looking for a "."
character. The backslash is an escape character that says take the "." literally (normally "." is a special
character that means any character.
Often there are a number regular expressions that you can use to achieve the same results. In the Fortinet
example above, there is the string "src=" followed by the IP address, followed by either a space or a tab
character. The regular express for getting the IP address could be
src=([^ ]*)
The characters between the [ ] are ^, a space character and a tab character. This expressions says: the string
"src=" followed by a sequence of characters that are not spaces or tabs. This expression works well, but is
can be difficult to read because the space and tab character are not "visible".
Another way to extract the IP address would be
src=([0-9.]*)
This says, the string "src=" followed by a sequence of characters that contain only numbers and the "." ( a
"." inside of [ ] does not need to be escaped).
Note: If an extraction expression is not working, check the server.txt file to troubleshoot
the problem.
Useful Operators for Quarantine Manager Rules
^ the "not" operator
[ start of character list
] end of character list
( beginning of an expression
) end of an expression
[.] useful for escaping characters used as operators in regular expressions
21
Quarantine Manager Rules Tab
Basic Regular Expressions
. Matches any single character
[...] Matches any one of the characters enclosed between the brackets. If the first character is a circumflex
(^), then it matches any one character Not enclosed between the brackets. A hyphen (-) is used to indicate a
range of characters.
\ Escape the special character that follows.
* Matches any number (including none) of the single character that immediately precedes it.
+ Matches one or more occurrences of the preceding regular expression.
? Matches zero or one occurrences of the preceding regular expression.
For example:
[abc] Matches either an 'a', 'b' or 'c'
[a-z] Matches all lower case letters
[a-zA-Z] Matches all letters
[0-9a-fA-F] Matches all hex digits
[^0-9] Matches any character that is not a digit
Quarantine Manager configures a maximum of 32 MAC rules when it is trying to ban 100 IP addresses on
XOS devices. Quarantining using XOS devices is limited by the number of MAC rules supported by these
devices, which is 32. This means that even if you attempt to quarantine 100 end-stations, only the first 32
will be quarantined on the XOS switches in the management domain. To avoid this limitation, release
quarantines as soon as possible.
22
Quarantine Manager Configuration Tab
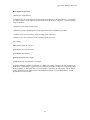
Quarantine Manager Configuration Tab
The Configuration tab is used to configure the Quarantine VLAN and Quarantine MAC groups. By default,
the name of the Quarantine VLAN is "Quarantined". However, you can change the name as desired. The
VLAN is created using the OmniVista VLANs application, which opens when you click the VLANs...
button at the bottom of the page. The Quarantine MAC group is created using the Omnivista Groups and
SecureView ACLs applications.
In order for Quarantine Manager to use SecureView ACL, you first create an L2 MAC group (which has a
MAC group that matches the MAC group name specified in the Configuration tab of Quarantine Manager)
using the Groups application. After creating the MAC group, you create an ACL rule using the
SecureView ACLs Expert Wizard, which drops traffic if it finds a matching MAC address. For
instructions on setting up an ACL using the SecureView ACLs application, click here.
Note: The Quarantine Manager ACL feature is not currently supported for OS6200
devices. Quarantine Manager support for these devices is based on creating VLAN MAC
Rules. The user creates a Quarantine VLAN and an associated MAC Group. If
Quarantine Manager needs to ban a MAC Address on the device, it adds the new MAC
Address to the Group specifying the Quarantine VLAN ID. This will result in traffic
moving to Quarantine VLAN based on the MAC Rule.
ACL has been extended to include ACL rules that have been stored in the OmniVista LDAP server through
the SecureView ACLs application. When Quarantine Manager attempts to quarantine a device, it first
checks the LDAP server for a MAC group with a specified name . If the MAC group exists, Quarantine
Manager quarantines the device by adding the MAC address to the MAC group on the LDAP server. If the
MAC group does not exist, Quarantine Manager adds the MAC address to the Quarantine MAC group you
have created on the switch. Note that Quarantine Manager does not support ACLs on XOS machines.
Note: Quarantine Manager now has the ability to ban devices connected to an
OmniAccess WLAN device using the device's "Blacklist" feature.
When devices are banned, either through a Quarantine Manager rule or by the Network Administrator, they
are added to the Quarantined VLAN and/or Quarantine MAC group. These devices no longer route traffic.
The devices remain in the Banned list until removed by the Network Administrator.
Note: You can create a logical "Quarantine" subnet to limit Quarantine Manager actions
to a specific set of switches.
23
Quarantine Manager Configuration Tab
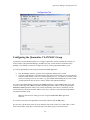
Configuring the Quarantine VLAN/MAC Group
You must first use the VLANs application to configure a Quarantine VLAN containing the switches you
want to monitor with Quarantine Manager. In addition, because VLANs cannot be used when Group
Mobility is not enabled, you must also configure an ACL by creating a Quarantined MAC group.
1. Create the Quarantined VLAN using the OmniVista VLANs application.
•
•
Click the VLANs... button to open the VLAN application and the VLAN wizard.
Create the "Quarantined" VLAN following the steps in the VLAN wizard. You can accept the next
available VLAN number or enter a new VLAN number; however, you cannot use a number for the
VLAN. You must give the VLAN a name (e.g., Quarantined). When adding devices to the VLAN,
you must add all the devices that you want to monitor with Quarantine Manager.
2. Create the Quarantined MAC group using the Groups application. Create a Source MAC group and
associate it with a QoS rule to Deny any traffic originating from MAC addresses in this group using the
SecureView ACLs application. When a rule extracts an IP address from a device, OmniVista uses the
Locator function to determine the MAC address of the device. The device is then automatically added to
the Quarantined MAC group.
Note: For instructions on setting up an ACL using the SecureView ACLs application,
click here.
3. Click the VLAN name in the Quarantine Action table, and then click the Edit button.
4. If necessary, edit the name of the VLAN to match the name of the VLAN you created in Step 1. Then,
add or edit the MAC group name to match the name of the MAC group you created in Step 2.
24
Quarantine Manager Configuration Tab
5. Click the Apply button to write the changes to the server.
Note: Quarantine Manager cannot quarantine any devices on the EMP subnet because the
EMP port has no mobility feature.
Editing the Quarantine VLAN/MAC Group
You can change the name of your Quarantined VLAN/MAC group by selecting the name in the list and
clicking the Edit button. When you have completed the name change, click the Apply button to write the
change to the server.
Note: The names you configure in this tab must match the names you use when you
create the VLAN/MAC group. In Quarantine Manager, VLAN names are caseinsensitive.
Please note that switches discovered after the 'Quarantined' VLAN is created cannot be added via VLANs.
Also, there will be no warning message when you add the VLANs manually to the switches. Add
'Quarantined' VLAN to switches to protect them. It is not necessary that all the switches should be included
in the ‘Quarantined’ VLAN. It is a decision that is up to the Network Administrator. If you want to include
all the discovered switches in the ‘Quarantined’ VLAN, create a CLI script and run it periodically.
Configuring Quarantine Manager on OmniAccess WLAN
Devices
Quarantine Manger can ban wireless devices connected to an OmniAccess WLAN device by placing them
in the OmniAccess "Blacklist". If wireless device(s) is found in a Quarantine Segment, the MAC address of
the Quarantined device is placed in the blacklist. Due to limitations in the current OmniAccess device's
SNMP implementation, the banned device is placed on the blacklist using SSH to send CLI commands to
OmniAccess. SSH must be able to login to the OmniAccess device. In addition, the OmniAcess device's
'enable' command must be executed and a secondary password is required to entry the privileges commands
necessary to perform the blacklist. To enable automatic login, configure a valid user name and password
for the OmniAccess device using the Topology application.
1. Open the Topology application, click on the Switches node, right click on the device you want to
configure and select Edit. The Edit Discovery Manager Entry window appears.
25
Quarantine Manager Configuration Tab
2. Enter a user name in the Telnet FTP User Name field.
3. Enter a password in the Telnet/FTP Password field.
4. Enter a secondary password in the Secondary Password field.
5. Click the OK button.
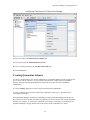
Creating Quarantine Subnets
If a device is banned either by the Network Administrator or Quarantine Manger, the ban is applied to all
devices in the network. However, you can segment your network by creating a logical "Quarantine"
Network. This will limit Quarantine Manager actions to only those switches in the "Quarantine"
subnetwork(s).
1. Use the Topology application to create a Logical Network named "Quarantine".
2. Create a sub-network or networks to segment the "Quarantine" network (e.g., "Quarantine Test",
"Quarantine Engineering").
When Quarantine Manager is notified of an offending end station, Quarantine Manager determines the
device directly connected to that end station and applies the ban to all switches in that switch's Quarantine
subnet(s). For example, if a switch in the "Quarantine Test" subnet is connected to an offending device,
Quarantine Manager will apply the ban to all of the switches in the "Quarantine Test" subnet.
26
Quarantine Manager Configuration Tab
Note: Network segmentation does not work if the SecureView ACLs application is used
to create the ACLs for Quarantine Manager. The SecureView ACLs application
overrides the Quarantine Manager network segmentation setup.
Enabling/Disabling the Quarantine Port
You can enable or disable a port rather than create a VLAN or ACL rule. In addition to the VLAN name
and Mac group name, an Allow Port Disabling check box is available for enabling or disabling a port in
the Configuration tab. By default, this checkbox is disabled. If the checkbox is checked, it means that you
want to disable the port when a Quarantine rule is matched. Please note that you must turn on port disabling
for each switch in addition to turning on global port disabling.
Note: Port disabling looks for Locator Live Search information and does not look for
historical information.
You can also enable/disable a port from the Topology application. To do this, right-click the desired switch
in the Topology application and select Edit. The Edit Discovery Manager Entry window appears. To
enable port disabling, check the Allow Port Disabling checkbox.
27
Quarantine Manager Configuration Tab
You can disable the ports for a switch that is on the "Quarantine" logical network and allows ports to be
disabled. By default, all switches prohibit port disabling. You must specifically enable this feature for all
ports to be disabled.
28
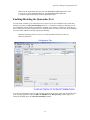
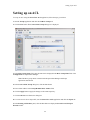
Setting Up an ACL
Setting up an ACL
To set up an ACL using the SecureView ACLs application, follow the steps given below:
1. Start the Groups application and click the L2 MAC Groups tab.
2. Click the New button. The Create a MAC Group dialog box is displayed.
3. In the MAC Group Name field, enter the name that is displayed in the MAC Group Name field of the
Configuration tab in Quarantine Manager.
Note: The MAC group names created in both the Quarantine Manager and Groups
applications must match.
4. In the Create a MAC Group dialog box, click the New button.
5. Enter a MAC address in the Group Member MAC Address field.
6. Click the Apply button to apply the changes to the LDAP repository.
7. Click the OK button to dismiss the dialog box.
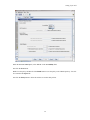
8. To create an ACL rule to drop traffic, start the SecureView ACLs application and click the Expert tab.
9. In the Existing ACL Policies panel, click the New button to display the SecureView ACL Expert
Wizard window.
29
Setting Up an ACL
10. In the Policy Name field, enter a policy name such as "Quarantined".
11. Select the switches to which you want to apply this policy and then click the Add button.
12. Click the Next button to create a policy condition.
13. Click the L2 MACs tab.
30
Setting Up an ACL
14. In the Source MAC Addresses panel, uncheck the Ignore Source MACs in defining Policy Condition
checkbox. This will enable the other controls in this section.
15. Click the Group radio button.
16. In the MAC Group dropdown list select the Quarantined MAC group. This name should be the same
as that entered in Step 3.
17. Click the Next button to create a policy action.
Note: If you select a switch in Step 11 that does not support the MAC group, an error
will be displayed. You must go back and remove the switch from the selection list.
31
Setting Up an ACL
18. In the Access Control panel, select "DROP" in the Accessibility field.
19. Click the Next button.
20. Review the policy and then click the Finish button to save the policy to the LDAP repository. You will
be returned to the Expert tab.
21. Click the Notify button to allow the switches to recache their policies.
32
Quarantine Manager Responders Tab
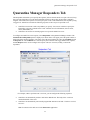
Quarantine Manager Responders Tab
The Responders tab enables you to specify the response, such as external emails or scripts to be run (if any)
that you want OmniVista to provide when quarantine actions are taken. This will provides a method to
integrate with trouble-ticket systems. You can specify the events to which OmniVista will respond by using
a trigger level. OmniVista can make the following responses to the receipt of a specified event:
•
•
OmniVista can send an e-mail to any address you specify. You can use variables to specify the
information you want to include in the e-mail. Variables exist for information, such as action,
reason, MacAddress, etc.
OmniVista can execute an external program or script on the OmniVista server.
To configure an OmniVista event response, select Responders in the Quarantine Manager window. The
Automatic Event Responders panel is displayed, as shown below. The upper part of the panel contains a
table with all the current responders. The lower part of the panel contains two tabs, the Condition tab and
the Response tab. The Condition tab is used to specify the events that will trigger OmniVista's response;
and the Response tab is used to configure the response. The user can create, modify, or delete the
responders.
For example, when a specified event is received, you can configure the following responses:
•
•
OmniVista can automatically send an e-mail to the MIS director. The body of the e-mail can
contain the details of the event.
OmniVista can automatically run an audio program that announces out loud: "You have received
an event."
Note: You must set the mail server in the Preferences application.
33
Quarantine Manager Responders Tab
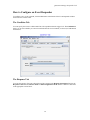
How to Configure an Event Responder
To configure a new event responder, click the New button at the bottom of the Event Responder window
and refer to the sections below.
The Condition Tab
You can specify the events to which OmniVista will respond based on the trigger level. The Condition tab
allows you to select whether you want to be notified when devices are banned, or released, or both banned
and released.
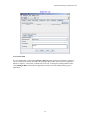
The Response Tab
To create the response, first enter a description of the response in the Response Description field. Set the
Response Action field to Send an e-mail or to Run an application on the server. Continue as described
in the appropriate section below.
34
Quarantine Manager Responders Tab
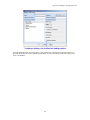
To Send an E-Mail
If you set the Response Action field to Send an e-mail, follow the steps below to define the email to be
sent. It is important to note that all fields in the Sending E-Mail window in the Preferences application
MUST be complete, or the emails you define will not be sent. To display the Sending E-Mail window,
select Sending E-Mail in the Preferences application, which is part of the Administration group of
applications.
35
Quarantine Manager Responders Tab
1. Enter a response description.
2. Enter the address to which the email will be sent in the E-mail To field. (The "From" address in the
responder emails is determined from the entry in the Use "From" Address field in the Sending E-mail
window of the Preferences application.)
3. Enter a subject for the email that is to be sent in response.
4. Define the body of the email in the E-mail Body field by typing in the desired text and/or the desired
variables. The variables you can use are explained in the Event Variables section below. You can also
accept the default email body, which is the variable $Details$ (explained below).
5. Click on the OK button. The new automatic event responder is saved to the session memory and is listed
in the Automatic Event Responders table as an unsaved change. Click on the Apply button to save the new
responder to the server.
36
Quarantine Manager Responders Tab
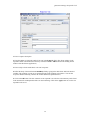
To Run an Application on the Server
If you set the response action to Run an application on the server, follow the steps below to define the
application to be run.
1. Enter a response description.
2. Enter the command to be executed in the Command field.
3. Enter the arguments to the command specified above in the Arguments field, or accept the default
argument, which is the variable $MacAddress$ (explained in the Event Variables section below).
4. Enter the directory in which the command should be executed in the Start Directory field.
5. Enter the standard input for the command in the Standard Input field, or accept the default standard
input, which is the variable $Details$ (explained in the Event Variables section below).
6. Click on the OK button. The new automatic event responder is saved to the session memory and is listed
in the Automatic Event Responders table as an unsaved change. Click on the Apply button to save the new
responder to the server.
37
Quarantine Manager Responders Tab
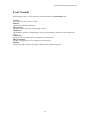
Event Variables
When sending an email, you can specify the following variables in the E-mail Body field:
$Action$
The action being taken, a ban or a release.
$Reason$
The Reason field from the QM object.
$MacAddress$
The MAC address of the device being banned or release.
$IpAddress$
The IP address of the device being banned or release. If the IP address is unknown it will be displayed as
0.0.0.0
$VlanName$
The name of the vlan that the device was banned to or released from.
$MacGroupName$
The MAC group that the device was banned to or released from.
$Details$
Contains a message with the Action, Mac, IP address, Vlan, and MacGroupName.
38