1
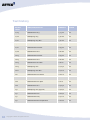
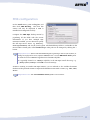
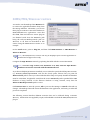
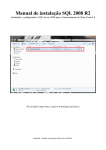
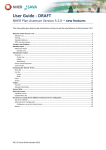
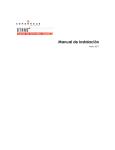
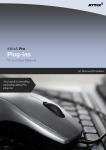
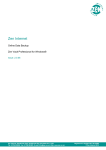
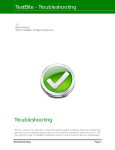
Attix5 Pro SIMS/FMS/Discover plug-in User Manual Cover Your guide to using the Attix5 Pro SIMS/FMS/Discover plug-in. 2013/03 for Microsoft Windows SIMS/FMS/Discover enhancements We are pleased to introduce the SIMS/FMS/Discover plug-in V3.10 (plug-in ID: 28) for the Backup Client V7.0.3 Server Edition. The current plug-in was enhanced by adding the following features: SIMS/FMS/Discover plug-in V3.10.146 Increased the version number’s build number to ensure that the correct plug-in version is used with the latest Backup Client (V7.0.3). (DBAttach Version = 1.31.36.0) SIMS/FMS/Discover plug-in V3.10 Increased the version number’s build number to ensure that the correct plug-in version is used with the latest Backup Client (V7.0.2). (DBAttach Version = 1.30.22.0) SIMS/FMS/Discover plug-in V3.10 Increased the version number to ensure that the correct plug-in version is used with the latest Backup Client (V7.0.1). SIMS/FMS/Discover plug-in V3.2 Fixed a bug where the Backup Client logs an error asking if the FMS plug-in has been configured, despite the FMS database not being installed. Fixed a bug where after performing a Capita SIMS Summer 2012 upgrade on a system that also has the Capita Discover component installed, the Attix5 Pro Backup Client hangs during the next backup. The backup will complete successfully but Discover will produce an error stating that it could not back up. SIMS/FMS/Discover plug-in V3.1 Fixed a bug where the Backup Client logs an error asking if the Discover plug-in has been configured, despite the Discover database not being installed. SIMS/FMS/Discover plug-in V3.0 Support for the Discover database has been added. The Discover Backup and Restore options will only be visible if Discover is installed and configured. 1 Copyright © Attix5. All rights reserved. SIMS/FMS plug-in V2.9 V6.2 recompiled and increased the version number to enable auto-updates for the V6.2 SP. (DBAttach Version = 1.26.2.0) SIMS/FMS plug-in V2.8 V6.0 recompiled and increased the version number to enable auto-updates for the V6.0 SP. (DBAttach Version = 1.26.1.0) SIMS/FMS plug-in V2.5 Increased version for V5.1 auto-update due to Backup Client enumerator changes. SIMS/FMS plug-in V2.4 Fixed legacy update issue where the server name could revert back to (local) in certain environments. SIMS/FMS plug-in V2.3 Removed the DBAttach version checker in the plug-in due to unexpected issues with the process. The version is still logged during each backup, and if there are any problems you will be able to verify the version in the log file. SIMS/FMS plug-in V2.2 Check box option to automatically include the SQL Master database, enabled by default. The SIMS usernames and passwords are saved in the Master database, so it is recommended to include this database in your daily backup set. The path to the DBAttach application can be specified in the GUI. Capita recommends that you use separate DBAttach applications for SIMS and FMS. This enhancement enables you to point the Attix5 Pro plug-in to the correct FMS DBAttach application. SIMS/FMS plug-in V2.1 The password entry in a5backup.properties is now encrypted. Support for the FMS database has been added. The FMS Backup and Restore options will only be visible if FMS is installed and configured. The FMS SQL instance is automatically populated from the Windows\SIMS.ini file (if the information is available). The SIMS and FMS sections support multiple databases in the same instance, by separating entries with a comma, e.g. SIMS, FMS, FMS2. Errors and Warnings are reported in the Storage Platform Overview Report. Copyright © Attix5. All rights reserved. 2 Test history Backup SIMS/FMS/Discover DBAttach Tested V7.0.3 SIMS Summer 2013 1.31.36.0 Yes V7.0.2 SIMS Spring 2013 1.30.22.0 Yes V7.0.1 SIMS Spring 2013 Beta 1.30.10.0 Yes V7.0.1 SIMS Autumn 2012 1.29.36.0 Yes V7.0.1 SIMS Autumn 2012 Beta 1.29.36.0 Yes V7.0.0 SIMS Summer 2012 1.28.20.0 Yes V6.2.3 SIMS Autumn 2012 Beta 1.29.36.0 Yes V6.2.3 SIMS Summer 2012 1.28.20.0 Yes V6.2.3 SIMS Summer 2012 Beta 1.28.8.0 Yes V6.2.3 SIMS Spring 2012 1.27.25.0 Yes V6.2.1 SIMS Spring 2012 Beta 1.27.10.0 Yes V6.1 SIMS Autumn 2011 Release 1.26.21.0 Yes V6.1 SIMS Autumn 2011 Beta 1.26.2.0 Yes V6.0 SIMS Autumn 2011 Alpha 1.26.1.0 Yes V6.0 SIMS Summer 2011 1.25.23.0 Yes V5.1 SIMS Spring 2011 (upgrade) 1.24.24.0 Yes V5.1 SIMS Autumn 2010 1.22.24.0 Yes V5.1 SIMS Autumn 2009 1.19.12.0 Yes V5.1 SIMS Autumn Main 2009 Release 1.18.22.0 Yes Client 3 Copyright © Attix5. All rights reserved. Installation The plug-in is currently shipped in a zip file, with a separate plug-in installer planned for a future release. Until then, you are advised to use the Attix5 Pro Deployment Wizard to package and include the plug-in in a standard Server Edition installation file (MSI). More information is available in the Attix5 Pro Storage Platform Console User Manual. To install the plug-in manually: 1. Close the Backup Client and then stop the Attix5 Pro SE service in the Control Panel. 2. Only applicable if an older version of the plug-in is already installed: Browse to the Backup Client plugins subfolder (the default location is C:\Program Files\Attix5 Pro\Backup Client SE\plugins) and rename the existing sims_plugin.jar file to sims_plugin.old. 3. Copy the sims_plugin.jar file to the plugins folder and then start the Attix5 Pro SE service again. 4. Open the Backup Client and configure the plug-in sections. Auto Updates As with all Attix5 Pro plug-ins, the SIMS/FMS/Discover plug-in will automatically be upgraded during the backup process when an update is available on the Storage Platform, if the Storage Platform is already running a later version of Attix5 Pro (and configured to do the update automatically). This negates the need to manually update all plug-ins in your environment. Copyright © Attix5. All rights reserved. 4 SIMS configuration On the Tools menu, point to Plug-ins, and then click SIMS Backup. Ensure that the Backup SIMS SQL Server check box is selected. Configure the SIMS SQL backup section by verifying that all the boxes are populated with the correct information, and then specifying the SQL password. Important notes: The SIMS Database Name field is case sensitive. Please ensure that you enter the SQL Server name and instance when specifying the server name. E.g. WIN2003-SIMS\ SQLEXPRESSSIMS. The default dump folder is a subfolder in the Server Edition install path called SIMSBackups. This path can be changed by clicking on the … button. Whilst the DBAttach path option is available, you will rarely have to modify this setting. Only change it when specifically requested by your support team. The Include Master database option is enabled by default. This setting will automatically add the MS SQL Master database to the backup selection list. Note that SIMS usernames and passwords are stored in the Master, and not in the SIMS database, so you are strongly recommended to include this database for Disaster Recovery purposes. Enable/Disable the Backup Shared SIMS Directory and Backup SIMS Document Management Server (DMS) check boxes next, verify that the correct locations are specified, and then click OK. 5 Copyright © Attix5. All rights reserved. FMS configuration On the Tools menu, point to Plug-ins, and then click FMS Backup. Note that this section will only be displayed if FMS is installed and configured correctly. Configure the FMS SQL backup section by populating all the fields with the correct information. If you have multiple SQL instances installed, you are advised to specify the full SQL Server Name, e.g. WIN2003SIMS\SQLEXPRESS, and not the (local) option. The default dump folder is a subfolder in the Server Edition install path, called FMSBackups. This path can be changed by clicking the … button. Important note: Ensure that the DBAttach path is pointing to the correct location, as it may be configured to use a separate DBAttach tool. Use the DBAttach Path option to select the correct DBAttach application in the FMS subfolder. It is typically located in a FMSSQL subfolder in the MS SQL install directory, e.g. …\MSSQL\BINN\FMSSQL. Click OK to save the settings. If FMS is running on another MS SQL instance, you are advised to also include the Master database of the particular instance. Separate the database names with a comma, e.g. FMS, FMS1, Master. Important note: The FMS Database Name field is case sensitive. Copyright © Attix5. All rights reserved. 6 Discover configuration On the Tools menu, point to Plugins, and then click Discover Backup. Note that this section will only be displayed if Discover is installed and configured correctly. Configure the Discover SQL backup section by populating all the fields with the correct information. If you have multiple SQL instances installed, you are advised to specify the full SQL Server Name, e.g. WIN2003-SIMS\SQLEXPRESS, and not the (local) option. The default dump folder is a subfolder in the Server Edition install path, called DiscoverBackups. This path can be changed by clicking the … button. Important note: Ensure that the Discover.Backup.Console path is pointing to the correct location. It is typically located in the following directory: C:\Program Files\Microsoft SQL Server\MSSQL\Binn. Click OK to save the settings. If Discover is running on another MS SQL instance, you are advised to also include the Master database of the particular instance. Separate the database names with a comma, e.g. Discover, Discover1, Master. Important note: The Discover Database Name field is case sensitive. Backup process Once you have finalised the SIMS/FMS/Discover database settings, and you have selected any additional files and folders to be included in the backup selection, you can click the Backup toolbar button to initiate the first backup. Note: If there are any problems with the SIMS or FMS database backups, please refer to the dbattach.log file(s), found in the Binn directory of the installed SQL instance. 7 Copyright © Attix5. All rights reserved. SIMS/FMS/Discover restore You need to use the Backup Client Restore tab to retrieve the applicable database dump from the Storage Platform. Thereafter, you can use these plug-in sections to restore the database to SIMS/FMS/Discover applications. Note that the SIMS, FMS and Discover restore plug-ins are identical (aside from the DBAttach path being the Discover.Backup.Console path for Discover) so all three are described in this section using the SIMS Restore section as an example. On the Tools menu, point to Plug-ins, and then click SIMS Restore or FMS Restore or Discover Restore. Note: The FMS/Discover sections will only be displayed if the relevant application is installed and configured correctly. Configure the SQL Restore section by populating the fields with the correct information. Note: You can only restore one database at a time and the SQL Master database cannot be restored with the DBAttach tool. If you have multiple SQL instances installed, you are advised to specify the full SQL Server Name, e.g. WIN2003-SIMS\SQLEXPRESS, and not the (local) option. Ensure that you point the Restore from path to where you restored the database dump and specify whether the database must be overwritten, if applicable. Verify that the correct DBAttach path is specified if the FMS database is being restored. If the Discover database is being restored, verify that the Discover.Backup.Console path is correct. Click Restore Now to start the process, Ok to just save the settings or Cancel to discard any changes. The Backup Client will restore the database to the application, and notify you when the process is completed. The following section describes different scenarios that can be followed during a Disaster Recovery. Information was supplied by Capita, and modified to include the SIMS/FMS/Discover plug-in. Copyright © Attix5. All rights reserved. 8 SIMS restore DR scenario tests Scenario 1 A: Backup of only SIMS Database [assuming DBDetach has not been run in the past] 1. Installed SIMS Server/SQLExpress and SIMS Workstation. 2. SIMS was working properly. 3. Created a new user called user1/abcd in it. 4. Ran SIMS plug-in to back up only the SIMS database [assuming the school would have done Detach sometime]. 5. Started with completely new Virtual machine having no SIMS or SQL2005 installation. 6. Installed SIMS and SQLExpress. Restored the backup taken in Step 4 using the SIMS plug-in. 7. Sysman username/password should remain intact. Result: Sysman password was reset to password and hence can login into SIMS even without backing up master database. Disadvantage: All the passwords for all users will be reset. B: Backup of only SIMS database [assuming DBDetach was run sometime in past] 1. Installed SIMS Server/SQLExpress and SIMS Workstation. 2. SIMS was working properly. 3. Created a new user called user1/abcd in it. 4. Ran DBAttach to first detach the DB and then re-attach it. This is to repeat the scenario which schools would have done during migration from SQL 2000 to SQL2005 [This activity could have been taken from August to date]. 5. This would transfer all SQL Logins from Master to SIMS database [No new logins created after last detach will be stored in SIMS]. 6. Ran SIMS plug-in to back up only SIMS database [assuming the school would have done Detach sometime]. 7. Started with completely new Virtual machine having no SIMS or SQL2005 installation. 8. Installed SIMS and SQLExpress. Restored the backup taken in Step 6 using SIMS plug-in 9. All the usernames/passwords [which were stored due to last detach] are working. Disadvantage: This method depends on the school having done detach of SIMS database sometime after August release of SIMS. 9 Copyright © Attix5. All rights reserved. Notes: This will be fine for all schools that have done migration from SQL 2000 to SQL 2005 [anytime in between August and February]. This will not work for any new school that has directly used SQL 2005 and has not done detaching of SIMS DB. Only logins from the last detach will work. This will always include sysman login. Scenario 2 Restoring Master and SIMS database 1. Started with an empty virtual machine. 2. Installed SIMS [Workstation, Server], SQLExpress on this virtual machine. 3. Created 2 new users in SIMS DB. 4. Used SIMS plug-in to backup SIMS, Master. 5. Used a clean VM [again with nothing on it]. 6. Installed SIMS [Workstation, Server, and SQLExpress on this VM]. 7. Restored the backup of Master Database using below command: RESTORE DATABASE master FROM DISK = 'C:\Backup\Master.BAK' DBAttach cannot be used to restore Master Database. Master DB will have to restore when the service is running in single user mode. You will get below error while trying to use DBAttach for restoring of Master DB: 01/04/2008 14:50:38 Could not connect to Server: Login failed for user 'sa'. Reason: Server is in single user mode. Only one administrator can connect at this time Restoring of master database will get all the names of databases/logins in the state Master was being backed up. This would in affect means that you will be able to even see database for which the data files no longer exist as shown below. But this process will restore all the logins required. 8. Ran the service back into multi user mode 9. Restored the backup of SIMS in Step 4 using the SIMS plug-in Result: All the users and their passwords were left intact. Copyright © Attix5. All rights reserved. 10 Disadvantage: Any databases between last backup of master will also be restored if they were deleted [though their corresponding data files may be missing.] Scenario 3 Detaching SIMS database This method requires detaching of SIMS database using below command: DBATTACH /SERVER="SR2003SRV\SIMS2005" /DATABASE="SIMS" /USER="sa" /PASSWORD=P@ssw0rd1 /AUTO /AUTODETACHMODE The database will be detached and the data files will be left in ‘data’ folder of SIMS instance [i.e. C:\Program Files\Microsoft SQL Server\MSSQL.1\MSSQL\Data]. Re-attaching the data files will restore all login and their passwords. Disadvantage: This method cannot be used while SIMS Database is in use. 11 Copyright © Attix5. All rights reserved. Discover restore from total server failure In the event of a total server failure affecting both the SIMS and Discover installations and resulting in the replacement of the designated SIMS server, the following recommendations should be considered: 1. If the affected Discover server hosted the SIMS installation, begin by installing and restoring SIMS to normal operation. 2. Re-install the Discover application. 3. Initiate the Discover Transfer Process. 4. Log into Discover to ensure that the server is operational. 5. Locate the Discover backup file and restore the data. Note: The new server should be given the same name as the defunct server and the SQL Server should be given the same instance name. If this is not possible, all Discover clients must be revisited to ensure that they are pointing to the correct server location and SQL Server instance. 6. In the event that a recovered Discover database needs to be installed on a server with a new name (instance or machine name), the Discover clients will need to point to the new server. The location of the Discover Discover.Designer.Desktop.exe.config server file is located contained alongside within the the Discover executable. 7. Replace the values of the discoverInstance and discoverDatabase line items with the new Discover database server location. Discover restore from partial server failure In the event of a partial server failure that renders the Discover database inaccessible but does not affect the Discover services or related scheduled tasks, the following procedures can be undertaken: 1. Uninstall the Discover server components via Control Panel > Programs and Features. 2. Re-install the Discover application. 3. Initiate the Discover Transfer Process. 4. Log into Discover to ensure that the server is operational. 5. Locate the Discover backup file and restore the data. The account management and access rights configurations remain unaffected by this restore procedure. Copyright © Attix5. All rights reserved. 12 SIMS & FMS plug-in migration guide from SQL Express 2005 to 2008 Important note: Please note that this document is to be used as an Attix5 SIMS & FMS Plug-in reconfiguration guide (for v2.6 and above). It is not intended to replace the Capita Sims Migration Document. Before you begin migration, it is important to check that you have an upto-date backup of your SIMS & FMS databases. For more information about configuring the Attix5 SIMS/FMS/Discover Plugin, see: http://v6.attix5.com/kb/?View=entry&EntryID=48. The Attix5 SIMS & FMS Plug-in has a number of configuration fields that require information about your database & SQL Express configuration: SQL Username [SQL database user] (Default = “sa”) SQL Password Database Name (Default = “SIMS”) Server Name [Specify server name and instance] Backup to [Attix5 backup dump location] DBAttach path (Default SQL2005 Path = C:\Program Files\ Microsoft SQL Server\ MSSQL.1\MSSQL\binn) 13 Copyright © Attix5. All rights reserved. During the Capita Sims migration process, you will be prompted to provide new configuration information that will affect the Attix5 SIMS & FMS plug-in configuration. It is very important that you note the following information during your SQL Express 2008 Migration: Entry Screenshot New named instance (SIMS2008 Default) New “sa” password (Could be the same as SQL Express 2005) New SQL Express installation paths Copyright © Attix5. All rights reserved. 14 Once the migration has completed, you will need to change the following Attix5 SIMS & FMS configuration fields: SQL Username (sa default) SQL Password (If changed) SIMS Database Name (Case sensitive) Server Name & Instance DBAttach path: C:\Program Files\Microsoft SQL Server\MSSQL10.SIMSDATA\ MSSQL\Binn\DBattach.exe (Default) Once the SIMS & FMS plug-in has been reconfigured, perform a backup and inspect the Attix5 backup logs for any warnings or errors. For more information on troubleshooting any error, please inspect the DBAttach.log located in the new SQL2008 instance path for more information (i.e. C:\Program Files\Microsoft SQL Server\MSSQL10.SIMSDATA\MSSQL\Binn). 15 Copyright © Attix5. All rights reserved.