1
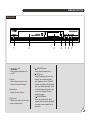
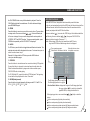
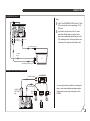
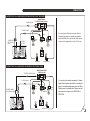
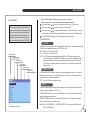
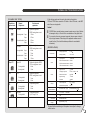
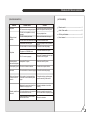
CONTENT
[TABLE OF CONTENTS]
CONTENT ------------------------------------------------------------------------------------------------ 2
[DIGITAL SETUP] --------------------------------------------------------------------------------- 18
PRECAUTIONS ----------------------------------------------------------------------------------------- 3
PLAYABLE DISC TYPES/SPECIFICATIONS ------------------------------------------------ 19
NOTES ON DISCS--------------------------------------------------------------------------------------- 4
TROUBLESHOOTING ------------------------------------------------------------------------------ 20
5
ACCESSORIES -------------------------------------------------------------------------------------- 20
OPERATION GUIDE ---------------------------------------------------------------------------------
NAMES AND FUNCTIONS --------------------------------------------------------------------- 6-12
FRONT PANEL -----------------------------------------------------------------------------------
6
REAR PANEL ---------------------------------------------------------------------------------------- 7
DISPLAY WINDOW---------------------------------------------------------------------------------- 8
REMOTE CONTROL --------------------------------------------------------------------------- 9-12
MP3/ JPEG PLAYBACK ------------------------------------------------------------------------- 12
CONNECTIONS ---------------------------------------------------------------------------------- 13-14
CONNECTING TO A TV -------------------------------------------------------------------------- 13
CONNECTING TO A 2CH AMPLIFIER ------------------------------------------------------ 13
CONNECTING TO AN AMPLIFIER WITH DOLBY PRO LOGIC DECODER------ 14
CONNECTING TO AN AMPLIFIER WITH DOLBY DIGITAL DECODER---------- 14
BASIC SETTING ----------------------------------------------------------------------------------- 15-18
[SETUP MENU] ------------------------------------------------------------------------------------ 15
[SYSTEM SETUP] ----------------------------------------------------------------------------- 15-16
[LANGUAGE SETUP] -------------------------------------------------------------------------
16
[AUDIO SETUP] ----------------------------------------------------------------------------------- 17
[VIDEO SETUP] ----------------------------------------------------------------------------------- 17
2
PRECAUTIONS
SAFETY PRECAUTIONS
To prevent fire or shock hazard, do not expose
this appliance to rain or moisture.
This appliance is a Class I laser product. Direct
exposure to beam may cause eyes injury.
Do not open the cabinet by yourself and leave
all servicing to qualified service personnel.
Power requirement for this appliance is AC
110~240V, 50/60 Hz, please ensure the power
supply is in the range before turning on.
OPERATION PRECAUTIONS
Please use the original packing case and
materials when transporting this DVD player,
and pack the appliance in the original factory
packing style for better protection.
The temperature of the upper cover board
and the rear panel of the player may be high
after a long period of time of playing. This is
not a problem but a normal phenomenon.
When the player is not to be used, please
remove the disc and turn the power off.
Malfunction may be caused when the player
is not used for too long, so please turn it on
occasionally for better maintenance.
Some kinds of discs may cause the
appliance to hang, please restart the
appliance when this occurs.
Interval of restarting should be longer than 10
seconds, which can help to extend the life
expectancy of the appliance.
This appliance had better be unplugged
after using each time for better protection.
LOCATION
The moving pictures and played sound may
be affected when the DVD player is placed
close to TV set, radio or VCR, so please keep
them further away.
ACQUIRING CLEAR PICTURES
This DVD player is a device of high
technology and high precision. The image
quality may be impaired when the laser
head or the disc driving parts are dirty or
damaged.
CONDENSATION PRECAUTIONS
Condensation may cause certain kinds of
damage to the player. It may form because
The player is being used in a surrounding
of high humidity.
Do not use the player where condensation
may be form easily, otherwise damage may
be caused to the disc and inner parts of the
player. Please take the disc out, plug the
power cord into a wall outlet and turn the
player on. The moisture will disappear when
the temperature rises two or three hours later.
CLEANING PRECAUTIONS
Use a soft and dry cloth for cleaning.
For the stains that cannot be removed easily,
apply some diluted neutral detergent to a
cloth, wring the cloth dry and wipe the stains
away, then use a dry cloth to clean. Do not
use any solvents such as thinner or benzine;
otherwise the surface of the player may be
damaged.
When using duster cloth with chemical substance for cleaning, please refer to the
product`s instructions.
The player is moved from cold to warm
surroundings;
The player is placed inside a room where
the heater is just on or exposed to the
ventilation hole of an air-conditioner;
The player is moved out from an airconditioned room to a place of high
temperature and humidity in summer time.
3
NOTES ON DISCS
MULTI-LANGUAGE SUBTITLES
Differences in disc composition
You can select your desired subtitle language or turn subtitles off when watching movies
or discs that have multi-language subtitles recorded on them.
DVD
All discs are divided up into smaller, more manageable
sections so that you can find specific content more easily.
DVD discs are divided into one or more titles. Each title
may be further divided into several chapters. Occasionally,
a chapter may contain index points, effectively dividing the
chapter up into several parts, too.
SVCD/VCD/CD
SVCD/VCD/CD are divided into a number of tracks. A track may contain a number of
index points occasionally, which effectively divides the track up into several parts.
TRACK1
TRACK2
TRACK3
TRACK4
SVCD/VCD DISCS
TRACK1
TRACK2
TRACK3
TRACK4
TRACK5
CD DISCS
MULTI-ANGLE
You can view scenes from different camera angles when
watching movies or other media with multiple angle
playback available.
1/4
2/4
This DVD video player supports VIDEO CDs equipped with the PBC(Version 2.0) function.
(PBC is the abbreviation of Playback Control.) You can enjoy two playback variations
depending on types of discs.
VIDEO CD not equipped with PBC function(Version 1.1)
Sound and movie can be played on this DVD video player in the same way as audio CD.
VIDEO CD equipped with PBC function(Version 2.0)
In addition to operation of a VIDEO CD not equipped with the PBC function, you can enjoy
playback of interactive software by using the menu displayed on the TV screen.
MP3/JPEG
MP3 is a compressed audio file format. Files are recognized by their file extension
".mp3" or ".MP3". JPEG is a compressed image file format. Files are recognized
by their file extension ".jpg" or ".JPG".
MULTIPLE LANGUAGES
FOLDER1
TRACK1
You can select the expected language on when watching
movies or discs that have multiple languages and/or
audio soundtracks recorded on them.
TRACK2
FOLDER2
TRACK3
PICTURE1
PICTURE2
PICTURE3
MP3/JPEG
Note:It can read up to a maximum of 256 folders or 900 files.
4
OPERATION GUIDE
About this owner's manual
This owner's manual explains the basic instructions of this DVD video
player. Some DVD video discs are produced in a manner that allows
specific or limited operation during playback. As such, the DVD video
player may not respond to all operating commands. This is not a defect
in the DVD video player.
"INVALID KEY" may appear on the TV screen during operation.
"INVALID KEY" means that the operation is not permitted by the DVD
video player or the disc.
INTRODUCTION OF PRODUCT FUNCTIONS
This appliance supports full functional DVD playback modes including 8 languages,
32 subtitles and 9 angles. The appliance can play DVD, super VCD, VCD, DVCD, CD and
CD-R discs. In addition, MP3 and Picture CD are also playable.
The player has the following features:
10-bit/27MHz-60Mhz video D/A converter with up to 500-line horizontal resolution.
24-bit/192KHz audio D/A converter with high-quality DVD audio output.
Coaxial digital audio out jack, standard 2-channel audio out jack.
Standard video out (CVBS) and component video out (Y, Pb, Pr) output.
Notes on region numbers
The region number of this DVD video player is 5 . If region numbers,
which stand for their playable area, are printed on your DVD video disc
and you do not find
or
, disc playback will not be allowed
by the player.(In this case, the DVD video player will display a message
on-screen.) Some DVDs that have no region code label may still
be subject to area restrictions and therefore not playable.
16:9 and 4:3 TV screen aspect ratio support.
Playback functions including Repeat, Fast Forward/Reverse, Zoom In/Out etc.
Parental Lock Level control system.
High-reliability power supply switch.
Screen saver program for screen protection.
Auto STANDBY function for automatic electricity saving.
Super search function, supporting various search modes.
Notes on copyright
Unauthorized copying, broadcasting, public performance and lending
of discs are prohibited. This product incorperates copyright protection
technology that is protected by U.S. patents and other intellectual
property rights. Use of this copyright protection technology must be
authorized by Macrovision, and is intended for home and other limited
viewing uses only unless otherwise authorized by Macrovision. Reverse
engineering or disassembly is prohibited.
5
NAMES AND FUNCTIONS
FRONT PANEL
1
1.
2
button
Press to toggle the player between ON
and OFF.
3
5.
(OPEN/CLOSE) button
Press to open and close the disc tray.
6.
(STOP) button
During DVD playback, press once to stop
playback. The unit records the stopped
point, depending on the disc. Press PLAY
button to resume playback from the stopped
point. If you press this button again ,the unit
will clear the stopped point causes the disc
to return to the beginning of the disc if
playback starts again.
7.
(PLAY/PAUSE) button
Press to play or pause the disc. During
playback, press once to pause the playback,
press again to resume playback from the
pause point.
2. Disc tray
When loading a disc, place disc in the
disc tray with the label side facing up.
3. Display window
Displays current disc information.
4. Remote sensor
Point the remote control toward the remote
sensor to operate the player.
4
5
6
7
6
NAMES AND FUNCTIONS
REAR PANEL
1
2
3
5
1.
AC IN power cord connection terminal
Use to connect the power cord to the wall outlet.
2. 2CH AUDIO OUT jack
Use to output decoded 2ch audio to multichannel receiver or amplifier. FL and FR jacks
are connected to the stereo input of a pro logic
of stereo 2 channel amplifier or receiver.
3. VIDEO(CVBS) jack
Connect to the video input on a TV, monitor,
AV amplifier or receiver with video input
capability.
4
4.COMPONENT VIDEO OUT jacks
If your TV or monitor or other similar devices
has component video inputs, you can produce
a higher quality picture on it by connecting its
component video cable to the YPbPr jack on
this unit.
5,COAXIAL DIGITAL AUDIO OUT jack
Use to output digital audio recorded on discs
by connecting to the coaxial digital audio input
on an AV amplifier or receiver with digital audio
input capability, but first you need to change
the setting to digital audio output on the
SETUP MENU.
7
NAMES AND FUNCTIONS
DISPLAY WINDOW
PLAY mode
Indicator
Pause mode
Indicator
DVD Indicator
VCD Indicator
MP3 Indicator
Track number
Indicator
minutes
Indicator
REPEAT playback
Indicator
seconds
Indicator
working status
Indicator
VCD
MP3 PBC
PBC Indicator
88- 88:88
DTS Indicator
Dolby Indicator
Multifunction Indicator
(Indicates operating status or messages, etc.)
8
NAMES AND FUNCTIONS
REMOTE CONTROL
1
1. REMOTE SIGNAL
OPEN/CLOSE
DISPLAY
17
2
3
4
17. ON/STANDBY
ON/STANDBY
EMITTER
18. T-SEARCH
2. OPEN/CLOSE
19. SETUP
6
3. DISPLAY
20. OK
9
4. NUMBER
21. LEFT/RIGHT
18
5. MENU
22. TITLE
19
20
6. UP/DOWN
23. NEXT
7. RETURN
24. PREV
8. FAST REVERSE
25. STOP
9. FAST FORWARD
26.PLAY/PAUSE
1
2
3
4
5
7
8
+10
0
T-SEARCH
5
6
MENU
SETUP
OK
7
F.R
8
9
10
STEP
REPEAT
11
12
13
14
15
16
TITLE
RETURN
F.F
PREV
PLAY/PAUSE
A-B
NEXT
STOP
BOOKMARK CLEAR
SUBTITLE ANGLE
AUDIO
RANDOM
SLOW PREVIEW
PROG
SE-R0236
21
22
ZOOM
23
24
25
26
27
28
29
30
31
32
10. STEP
27. CLEAR
11. REPEAT
28. BOOKMARK
12. REPEAT A-B
29. ZOOM
13. SUBTITLE
30. AUDIO
14. ANGLE
31. PREVIEW
15. RANDOM
32. SLOW
16. PROG
9
NAMES AND FUNCTIONS
1. REMOTE SIGNAL EMITTER
Point the remote control to the remote sensor on the front panel.
Effective distance: less than 6 meters.
Effective angle: (H/V)
30
2. OPEN/CLOSE
Press this button to open/close the disc tray.
3. DISPLAY
Press to display the current disc information including title information, chapter
information, time information, etc.
4. NUMBER
Press number buttons to play relevant chapter/track.
5. MENU
Press to display the DVD root menu on the screen or changes the status of PBC
functionality for VCD(PBC ON or PBC OFF).
For DVD disc, select the item with the cursor buttons then press
OK to start playback.
6, UP/DOWN(
/
)
Press to move the cursor to the items or settings.
7. RETURN
Press this button to return to the menu. This function is only for VCD and DVD
discs.
8. FAST REVERSE
Press this button to toggle between the following modes: BACKWARD 2->
BACKWARD 4->BACKWARD 8->BACKWARD 20->PLAY. For DVD discs,
press this button will fast reverse to the beginning of previous chapter/title to
start playback. For SVCD and VCD discs, if the PBC is ON, press this button
9. FAST FORWARD
Press this button to toggle between 4 different playback speeds.
10. STEP
Each pressing of the button will advance the picture one frame ahead. Press
the PLAY/PAUSE button to resume normal playback.
11. REPEAT
For DVD discs, press this button to toggle between OFF, CHAPTER, TITLE
and REP ALL modes. For other discs, press to toggle between OFF, REP 1,
REP DIR(JPEG/MP3 only) and REP ALL modes.
Remarks: Repeat can not function when you play a PBC-featured Video-CD/
SVCD while the PBC is on.
CHAPTER: Repeats the chapters within the current title.
TITLE: Repeats the current title.
REP ALL: Repeats the entire disc.
REP 1: Repeats the current track/file.
REP DIR: repeats the current folder.
OFF: Resumes normal playback.
12. A-B
A-B means that repeat playback is from point A to B. Press this button to
access the setting of the starting point A.Press this button again to access the
end point B. Press this button the third time to cancel the A-B repeat.
13. SUBTITLE
For DVD discs, press this button to change the language of the subtitle.
To turn off the subtitle, press SUBTITLE several times until "OFF" appears
on the screen.
Note: the numbers of languages vary with the DVD discs.
14. ANGLE
Press for the first time to play the current camera angle. For DVD discs that
contains scenes recorded in multiple camera angles, press to switch the camera
angle during playback.
will fast reverse to the beginning of current track to start playback.
10
NAMES AND FUNCTIONS
15. RANDOM PLAYBACK
Press this button to toggle between RANDOM ON and RANDOM OFF mode.
16.PRG(Program Play)
Press this button,the OSD will show as below.
1
2
3
4
PROG
For VCD:
- - - - 5 - - - - 9 - - - - 13 - - - - - - - 6 - - - - 10 - - - - 14 - - - - - - - 7 - - - - 11 - - - - 15 - - - - - - - 8 - - - - 12 - - - - 16 - - - PLAY CLEAR
PROG
T C
1--:-2--:-3--:-4--:--
For DVD:
T
C
T C
T C
5 - - : - - 9 - - : - - 13 - - : - 6 - - : - - 10 - - : - - 14 - - : - 7 - - : - - 11 - - : - - 15 - - : - 8 - - : - - 12 - - : -- 16 - - : - PLAY CLEAR
You can use the cursor buttons( /
/ ) and number buttons to input
your desired title/chapter/track in the blank.When you finished ,you can move
the cursor to the PLAY,then press the OK button or directly press PLAY button
to start the program playback.Press the PRG button twice to cancel the program
playback.
17. ON/STANDBY
Press this button to turn on or turn off this unit.
18. T-SEARCH
This function allows the user to start playback from a designated point.
Press the SEARCH button to display the search menu on the TV screen,
then use the cursor buttons( / ) and the NUMBER buttons to input the
desired title/chapter/track number or the specific time. Press OK to
confirm and playback will start from the designated point. This function is not
available for MP3 discs.
19. SETUP
Press this button to access the setup menu.
20. OK
Press this button to confirm current operation.
21. LEFT/RIGHT( / )
Press to move the cursor to the items or settings.
22. TITLE
Press TITLE button to access the title menu of the disc. Select the item with the
cursor buttons(
/
/
) t hen press OK to start playback.
Remarks: Only for DVD discs. Depending on the DVD discs, you may not be able
to select the title.
23. NEXT
Press this button to skip to next title/chapter/track. For SVCD and VCD discs,
when the PBC is OFF and the playing track is the last track, press this button
will stop the playback.
24. PREVIOUS
Press this button to go to previous title/chapter/track. For SVCD and VCD discs,
when the PBC is OFF and the playing track is the first track, press this button
will stop the playback; and if the playback is stopped, press this button will take
no effects.
25. STOP
Press once to stop and then press PLAY/PAUSE button to resume
playback from the stop point; press this button twice causes the disc
to return to the beginning of the disc if playback starts again.
26. PLAY/PAUSE
Press this button to toggle between the PLAY and PAUSE mode .
27. CLEAR
Using this button, you can delete the mistyped entires or cancel some
functions.
28. BOOKMARK
During playback,press the BOOKMARK button. The OSD will show
MARK ----- TRK 1 00:02:22 . Press the OK button to mark the desired
scene on any of the five positions using the
/
cursor buttons. Press
11
NAMES AND FUNCTIONS
the PLAY/PAUSE button on any of the bookmark to playback. Press the
CLEAR button to delete the marked scene. To exit the bookmark display,
press BOOKMARK again.
29. ZOOM
Press this button to zoom in or zoom out the current picture. There are three
zooming modes. Press cursor buttons( /
/ ) to view a different part
of the zoom in image. You may move the image from the centre position to
UP, DOWN, LEFT and RIGHT direction . To resume normal playback, press
ZOOM button repeatedly until the "ZOOM:OFF" is displayed.
30. AUDIO
For DVD discs, press this button to toggle between different audio modes. The
selected audio mode will be displayed on the screen. For stereo discs, press to
switch the audio channel output.
Remarks: For bilingual edition VCD discs, press the AUDIO button to
select your desired language.
31. PREVIEW
Press this button to view nine frames from current track during VCD playback.
Or press this button in stop mode to view nine frames from the whole disc.
Select the desired frame/track by using number buttons and then press
PLAY/PAUSE button to start playing.
For CD-DA(Audio CD), press this button for INTRO playback. The beginning
of each track will be played back for about 15 seconds.
32. SLOW(Slowly forward)
Press this button to toggle between the following modes:SF 1/2 SF 1/3
SF 1/4 SF 1/5 SF 1/6 SF 1/7 PLAY.
MP 3/JPEG PLAYBACK
Load a MP3/JPEG disc, the appliance will automatically search the folders
on the disc, and automatically enter the first MP3 folder (for folders that contain files
in different formats, the first folder that contains files in the same format will be
entered) and playback the first MP3 file in that folder .
Use cursor buttons( / ) to move to the JPEG file type. Select the desired folder
and file using the cursor buttons( /
/ ), then press PLAY/PAUSE to
playback in slide slow mode. ( See page 17. )
Notes: While playing JPEG picture, you cannot hear the MP3 music.
Large size JPEG files will take a longer time to be displayed.
The current page name
Folder Section: all folders on the disc
Slider will slide down when
the highlight moves down
The file being played back is a mp3 file.
The file being played back is a jpg file.
Function Switch Section: displays the file type of the file being played back.
Use cursor buttons( / ) to switch to a desired file
type(MP3/JPEG) to display the folder/file list..
When playing a picture, use cursor buttons( /
/ ) to flip or rotate the
picture:
button: each pressing flips the picture vertically.
button: each pressing flips the picture horizontally.
button: each pressing rotates picture by 90 degrees anticlockwise.
button: each pressing rotates picture by 90 degrees clockwise.
12
CONNECTIONS
CONNECTING TO A TV
Notes:
To VIDEO OUT jack
To AUDIO OUT
(LEFT/RIGHT) jacks
If the TV has COMPONENT VIDEO IN jacks (Y, Cb/Pb,
Cr/Pr), connects them to the corresponding Y Pb Pr
OUT jacks.
If you'd like to output the audio to the TV, please
connect the Left/Right channel output jack on the
player to the corresponding channel input jack on the
TV by matching the colour of the plugs with the colour
of the jacks (red for right channel and white for left).
To Y Pb Pr OUT
jack
To Y Cb/Pb Cr/Pr IN jack
To VIDEO
IN jack
TV
To AUDIO IN (LEFT/RIGHT) jacks
CONNECTING TO A 2CH AMPLIFIER
2-CH AMPLIFIER
To AUDIO IN jacks
Surround Audio Amplifier for Home Theater
TA-3020
To VIDEO IN jack
To AUDIO OUT
(LEFT/RIGHT)
jacks
FRONT
LEFT
FRONT
RIGHT
You can enjoy the stereo audio effect by connecting the
player to a two-channel amplifier-and-speakers system.
Please ensure the audio output of the player is set to
STEREO.
TV
13
CONNECTIONS
CONNECTING TO AN AMPLIFIER WITH DOLBY PRO LOGIC DECODER
AMPLIFIER with
DOLBY PRO LOGIC decoder
To AUDIO IN jacks
Surround Audio Amplifier for Home Theater
TA-3020
To VIDEO IN jack
CENTER
To AUDIO OUT
(LEFT/RIGHT)
jacks
To VIDEO
OUT jack
FRONT
RIGHT
FRONT
LEFT
TV
SURROUND LEFT
You can enjoy the Dolby Surround audio effect by
connecting the player to an amplifier-and-speakers
system with Dolby Pro Logic decoder. Please ensure
the audio of the playback disc is set to 2 CH sound.
SURROUND RIGHT
CONNECTING TO AN AMPLIFIER WITH DOLBY DIGITAL DECODER
To DIGITAL AUDIO IN jacks
AMPLIFIER with DOLBY
DIGITAL decoder
S u r r o u n d Au d i o A m pl i f i e r f o r Ho m e T h e at e r
TA-3020
To VIDEO IN jack
CENTER
FRONT
LEFT
To DIGITAL AUDIO
OUT (COAXIAL) jacks
FRONT
RIGHT
TV SUBWOOFER
SURROUND LEFT
SURROUND RIGHT
You can enjoy the completely-reproduced 5.1-channel
Digital Theatre Systems audio effect by connecting the
player to an amplifier-and-speakers system with Dolby
Digital decoder via a coaxial cable. Please ensure the
audio output of the player is set to SPDIF RAW or
SPDIF/PCM.
14
BASIC SETTING
1. Press the SETUP button to display the main menu on the TV screen.
When the setup menu is shown, the playback will be automatically paused.
Press cursor buttons ( / ) to select the desired setup, then press
curso r button.
[SETUP MENU]
To achieve the best effect of the DVD player,
you may need to perform initial setting according to the content of the disc and peripheral
equipment. Details of all the adjustable functions will be described later in this chapter,
and this section introduce the SETUP MENU.
Press cursor buttons (
/
) to select the sub menu, then press OK.
Press cursor buttons ( / ) to select the desired option, then press the OK button to save the
new setting into memory. The setting will be effective when you switch on the appliance again.
Press the SETUP button again to remove the setup menu from the screen.
[SYSTEM SETUP]
TV SYSTEM
System Setup
Language setup
Audio setup
Video setup
Speaker setup
Digital setup
SYSTEM SETUP
TV SYSTEM
SCREEN SAVER
VIDEO
TV TYPE
PASSWORD
RATING
DEFAULT
EXIT SETUP
System setup sub-menu
According to the colour system of the TV the appliance is connected to. Select the corresponding
TV system for the appliance including AUTO, NTSC, and PAL.
NTSC: Select if your TV system is NTSC.
PAL: Select if your TV system is PAL.
AUTO: The DVD video player automatically identifies PAL or NTSC video system of a disc.
Connect a multisystem TV(PAL/NTSC compatible) to view a picture. A playback picture
may be distorted when detected a signal change between PAL and NTSC on the disc.
For the case of Progressive mode, your multisystem TV must be able to support both
525p and 625p.
SCREEN SAVER
ON: When this unit is in idle status, such as disc playback is stopped or paused, or the unit is
waiting for input from the user, and this idle status lasts for 5 minutes, a moving screen saver
logo will appear on the screen for protection.
OFF: Turn off the TV screen protection function.
VIDEO
Select the corresponding video output mode according to the respective video outputs that are
used to connect the appliance to the TV set:
P-SCAN YPBPR: Select if you connect the DVD player to your TV which has component video
inputs that supports progressive scan.
INTERLACE-YPBPR: Select if you connect the DVD player to your TV which has component
video inputs that supports the interlace mode.
Note: Select " P-SCAN YPBPR " or " INTERLACE-YPBPR " if you connect the DVD player to
the TV via VIDEO output.
15
BASIC SETTING
TV TYPE
16:9 (wide screen): select this when connecting to a wide-screen TV set.
4:3LB (letterbox): select this when connecting to a conventional TV set. When
playing wide-screen picture, a black bar will be placed on top and bottom
portion of the TV screen.
4:3PS (pan & scan): select this when connecting to a conventional TV set.
When playing wide-screen picture, the left and right side of the picture
will be cropped to suit the screen.
The default setting is 4:3PS(pan & scan).
Remarks:
The playback effect is related to the disc content, so some discs may not
be played according to your setting.
For 4:3 movie disc, the aspect ratio will be always 4:3 regardless of the
setting.
The screen aspect ratio should be related to the TV screen used.
Remarks:
The discs must contain the RATING information.
The RATING setting will take no effects if the password is unlocked.
The RATING setting can not be changed until the password is unlocked.
DEFAULT
Select RESTORE to resume the default setting.
[LANGUAGE SETUP]
Remarks: The disc tray must be opened to change the OSD Language, audio
language or subtitle language.
OSD LANGUAGE
Choose an On-Screen Display language including English and Russian.
AUDIO LANG
PASSWORD
The default setting is password locked and the RATING setting is not available.
If the RATING setting needs to be made,you should enter the initial password:
1234 and then press OK. If you need to change the password, first enter the
old password to unlock the password, and then enter the new one. (The effective
password has 4 digits.)
Remaks: The disc tray must be opened to activate the password or RATING
settings.
Choose an audio language including CHINESE, ENGLISH, RUSSIAN, FRENCH,
SPANISH, PORTUGUESE, LATIN, GERMAN.
SUBTITLE LANG
Choose a subtitle language including CHINESE, ENGLISH, RUSSIAN, FRENCH,
SPANISH, PORTUGUESE, GERMAN and OFF.
MENU LANG
RATING
When playing a disc with RATING information, you can select different RATING
settings from 1 to 8 according to the disc information and your intention.
The limitation will be more severe as the rating level is lower. If the DVD disc
has been designed to temporarily cancel the Rating level, the " PASSWORD "
screen will appear. Input the 4-digit password as you have set then followed
by OK button and playback will start.
Choose a menu language including CHINESE, ENGLISH, RUSSIAN, FRENCH,
SPANISH, PORTUGUESE, GERMAN and LATIN.
Remarks:
If the DVD disc does not contain the language you selected, the appliance will
automatically select the default language of the disc.
To change the AUDIO LANG or SUBTITLE LANG, the unit must be in stop mode.
The default setting of all items in LANGUAGE SETUP is ENGLISH.
16
BASIC SETTING
[AUDIO SETUP]
AUDIO OUT
Select an audio output mode:
SPDIF/OFF: output analog audio, no digital audio will be output from the
coaxial out jack .
SPDIF/RAW: Select this when the DVD player is connected to the amplifier
through the coaxial out jack. When playing a disc that is recorded in
Dolby Digital, DTS and MPEG audio system, the DVD player will output
the original digital signal from the coaxial out jack. The amplifier should
has Dolby Digital decoding function.
SPDIF/PCM: Select this when the DVD player is connected to a two-channel
stereo digital amplifier. When playing a disc that is recorded in Dolby Digital,
DTS and MPEG audio system, the DVD player will convert the digital audio
into two-channel PCM format and output through the coaxial out jack.
[VIDEO SETUP]
BRIGHTNESS
Use cursor buttons (
video output.
/
) to move the slider to adjust the brightness of the
/
) to move the slider to adjust the contrast of the
/
) to move the slider to adjust the hue of the
/
) to move the slider to adjust the saturation of the
/
) to move the slider to adjust the sharpness of the
CONTRAST
Use cursor buttons (
video output.
HUE
Use cursor buttons (
video output.
SATURATION
Use cursor buttons (
video output.
SHARPNESS
Use cursor buttons (
video output.
TIME
Use cursor buttons ( / ) to set the JPEG interval of the slide show
playback.
3 SEC: plays back images in the form of a slide show at 3 seconds interval.
5 SEC: plays back images in the form of a slide show at 5 seconds interval.
10 SEC: plays back images in the form of a slide show at 10 seconds interval.
17
BASIC SETTING
[DIGITAL SETUP]
OP MODE
LINE OUT: This mode will output a bigger sound, which suits the daytime.
RF REMOD: The output will be linear compressed and has a smaller volume,
which suits the quiet night.
DYNAMIC RANGE
In Dolby Digital mode, dynamic range compression can reduce sudden
volume changes by letting you adjust the difference between soft and loud
sounds. With this function, you can enjoy the surround sound effect while
viewing discs in mid-night without disturbing others.
Ratio of dynamic range compression includes FULL, 6/8, 4/8, 2/8 and OFF.
DUAL MONO
Different setting can be applied to the left and right channel when audio
output is only two-channel.
STEREO: output left channel audio to left channel and right to right channel.
MONO-L: output left channel audio to both channels.
MONO-R: output right channel audio to both channels.
MIX MONO: mixed left and right channel audio and output to both channels.
Note: only for discs recorded in Dolby MONO format.
18
PLAYABLE DISC TYPES/SPECIFICATIONS
[PLAYABLE DISC TYPES]
Diameter /
Playable sides
Playable discs
types and marks
DVD video
Disc features and
playback time
DVD video
Digital audio, digital video
12cm single-sided 1 layer
2 layer
MPEG2, moving pictures + sound
135 min.
270 min.
12cm double-sided 1 layer
2 layer
DVD video
8cm single-sided
1 layer
2 layer
8cm double-sided
1 layer
2 layer
270 min.
540 min.
Digital audio, digital video
MPEG2, moving pictures + sound
45 min.
70 min.
83 min.
152 min.
All the disc type mark can be found on disc labels or disc jackets.
CD-R and CD-RW discs recorded in CD Audio or Video CD format, or with MP3
audio files, are also playable.
Caution!
CD-R/RW discs recorded using a personal computer may not play if the disc
is damaged or dirty, or if there is dirt or condensation on the player's lens.
If you record a disc using a personal computer, there are cases in which it
may not play because of the settings of the application software used to
create the disc. (Check with the software publisher for more detailed
information.)
[SPECIFICATIONS]
Environment:
working temperature
: 0 ~ 40
working humidity
: 10% ~ 80%
Colour system
: PAL/NTSC
DVD horizontal resolution : 500 line
Super VCD
Super VCD
12cm single-sided
8cm single-sided
VCD
VCD
12cm single-sided
8cm single-sided
CD
MP3
CD
Digital audio, digital video, MPEG2
1/2,2/3, moving pictures + sound
40 min.
10 min.
Digital audio, digital video,
MPEG1, moving pictures + sound
74 min.
20 min.
12cm single-sided
8cm single-sided
Compressed digital audio
74 min.
20 min.
MP3 discs
12cm single-sided
Compressed digital audio
Up to 170 songs, 12 hr.
Video:
SVCD horizontal resolution : 350 line
VCD horizontal resolution : 250 line
Audio:
Output:
Remote-control
effective distance:
Power requirement:
Power consumption:
Signal to noise
:
Frequency response
: 20 Hz ~ 20 KHz + 1 dB
90 dB
Distortion and noise
:
Dynamic range
: > 80dB
Crosstalk
:
Video output level
:1.0
Audio basic output level
V
:1.8V+-10.2
.0 V
not less than 6m; angle
AC 110-240V
-70dB
80dB
0.2 Vp-p
: (horizontal/vertical)
30
50Hz/60Hz
15W
Dimensions:
430mmx260mmx38mm
Weight:
approximately 2.5 kg
The specifications and design of this product are subject to change
without notice.
19
TROUBLESHOOTING/ACCESSORIES
[TROUBLESHOOTING]
Problem
No power
Playback is not
possible
[ACCESSORIES]
Possible cause
Solution
AC Power socket is not plugged properly.
Connect the plug to the socket firmly and
make sure the power outlet has power.
The disc is not compatible or seriously
damaged.
Only use playable discs.
The disc is loaded upside down.
Make sure the label side is facing up.
Remote control -------------------------------------------------1
Audio / Video cable--------------------------------------------3
AAA dry cell batteries-----------------------------------------2
User,s manual ---------------------------------------------------1
The disc is above the Parental Lock Level. Turn off the Parental Control.
Turn on the player to warm up for about
30 min.
The video cable is not connected properly. Connect the video cable properly.
Condensation inside the player.
No picture
The player is in STANDBY mode.
The TV is not set up properly.
Press ON/STANDBY button again.
Turn on the TV and select the video input
connected to the DVD player.
Incompatible TV system.
Select the correct TV system.
Picture quality is poor
The disc is not clean or scratched.
Clean the disc or replace the disc.
No sound
The audio cable is not connected properly. Connect the audio cable properly.
Buttons on front panel
or remote control do
not work
Such operation is not supported by the
current disc or the current setting of the
player.
Change the setting or perform a proper
operation according to this manual.
Batteries in the remote control are flat or
inserted the wrong way round.
Replace the batteries or insert them
correctly.
Too far from the player, or the angle with
the remote sensor is too wide.
Be sure to operate the remote control
from a location within its operating range.
Obstacles between the remote sensor
and the remote control
Remove the obstacles.
Distorted picture or
black-and-white picture
Remote control does
not work
20