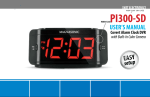
1
USER MANUAL
Model Z64
Congratulations on purchasing this excellent multifunction home/office alarm security system. This system has a
clearly written English User Manual providing step by step instruction for set up.
STEP 1
Preparation of Sensors for Installation
Motion Detectors.
A. turn ON/OFF switch to OFF position
B. open motion detector and install battery
C. maintain ON/OFF switch in OFF position
Window/Door Sensor.
A. separate sensor from magnetic bar
B. opens the sensor and installs battery
C. keeps sensor and bar separate
Smoking Detector.
Install battery
Gas Detector and Glass Break Detector.
Plug power cord into wall outlet.
Wireless Portable Keypad.
Open back cover. Install battery.
Attach Wired Siren
Insert plug of your alarm siren into siren jack on keypad/dialer
Attaching telephone to keypad/controller.
A. Insert your telephone line into the “LINE” jack of the keypad/dialer.
B. Insert the line from your telephone into the “TEL” jack of the keypad/dialer.
Notice: A phone line inserted into the wrong dialer phone jack may prevent the accessibility of the keypad/dialer from a remote location by
telephone.
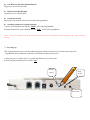
Powering up
This keypad/controller has a security enhancing design which locates the on/off switch on the top of the
keypad/dialer unit, push down on the blue on/off button (with a pencil point)
A. Plug the power cord into power receptacle and then into your wall outlet.
B. Turn keypad/controller powers switch “ON”.
On/off
switch
Study
Switch
Rec switch
Activating Wireless Outdoor Siren.
A. Turn keypad/controller power switch on. Depress the keypad “PANIC” button.
B. Plug power cord of wireless outdoor siren into power receptacle and then into your wall outlet. Repeat this action until
you hear “short sound”, and then you will hear “long sound” that indicating it has been activated. Turn keypad power switch
off.
Activating Wireless Luxury out/in door Siren w/strobe.
B. Turn keypad/controller power switch on. Depress the keypad “PANIC” button.
B. Plug power cord of wireless luxury out/in door siren w/strobe into power receptacle and then into your wall outlet. Repeat
this action until you hear “short sound”, and then you will hear “long sound” that indicating it has been activated. Turn
keypad power switch off.
Activating Wireless Siren /w Strobe.
Plug siren. Depress and hold black button on side of cover which will produce pulsating light in red LED case. Hold button
until light is steady on. Turn keypad power switch on. Depress and hold black siren button again. Pulsating light in red LED
reappears. Depress the keypad PANIC button. Pulsating siren light will steady and go off (release black button).four red lights
will come on. Registration complete. Turn keypad power switch off.
STEP 2
Each component of the alarm system has to be activated to become functional; all activation takes place when
the system is in Programming status, When you have completed programming the system’s functions, push
the button “Exit” on the keypad; after 30 second system will automatically exit “Programming status”
1. To place system into Programming status.
Enter the factory password numbers 1, 2, 3, 4 and push the button #. (You can substitute your own password for
factory password see section “2”). You are now in programming status and in position to program any of the
changes listed below.
1 => 2 => 3 => 4 => #
2. Changing the Password.
5 => 1 => * => Enter your new password (4 digits) => #
3. Activating Your Keychain Remote /Panic button.
With your system in programming status enter the number below. In word of the trigger,
A. Push any of the four buttons on your keychain remote. You will hear double beeping sounds indicating that your
keychain remote is now activated.
B. Push buttons on your panic button. You will hear double beeping sounds indicating that your panic button is now
activated.
Study => 6 => 4 => # => trigger
The study switch on the
top of the keypad/dialer
unit;
A. Push any button on keychain.
B. Push button on panic button.
Activating the detectors
Our system supports 32 defense zones. This system is unique in letting you know exactly which sensor is setting off
the alarm. Each individual sensor (Motion detector, window/door sensor, smoking/gas detector, glass break detector)
has to be individually activated while unit is in “programming status”. Each sensor is programmed to have its own
numerical identity. Same types of sensors/detectors can share the same assigned numerical number. To perform this,
you first assign a two digit numbers to each sensor. Window/door sensors may be assigned any number between 09
and 64(notice: must 2 digits); motion detectors, smoke & gas detectors any number between 01 and 09(notice: must
2 digits). These are zone numbers. You may use the same assigned zone for up to 99 sensors. When a sensor is
triggered the assigned zone number will light up on the LED screen of the keypad. It may be helpful for you to keep a list of the
areas corresponding to the assigned zones.
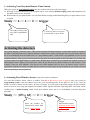
4. Activating Door/Window Sensors. Each sensor needs to be numbered
For each door/window sensor, choose a number from 09 to 63 (notice: must 2 digits), with your system in
programming status, enter the number below into your keypad/controller. In the place of {09 to 63}, enter the
number you have chosen for the sensor. In place of trigger, you will need to physically trigger the door/window
sensor to activate it by bring the magnetic bar and the sensor together and then separating them. Activation will be
confirmed by a double beeping sound. Each door/window sensor has to be individually activated using this
procedure.
Study => {09 to 63} => # => trigger
Enter the number for
selected this sensor from
09-63, (must 2 digits)
Trigger
Door/window sensor
(Separate sensor from
magnetic bar)
5. Activating Wireless Range Bean Motion Detectors. Each sensor needs to be numbered
Activating Wireless Bean Motion Detectors. Each sensor needs to be numbered
For each wireless range bean motion detector/bean motion detector, choose a number from 09 to 32 (notice: must 2
digits), with your system in programming status, enter the number and symbol sequence below into your
keypad/controller. In the place of first question mark (?), enter the number you have chosen for the sensor. The
second question mark (?) comes after the pound sign (#). In place of the question mark you will need to physically
trigger the wireless range bean motion detector/bean motion detector to activate it by Plug in power supply of wireless
range bean motion detector receiver. Activation will be confirmed by a double beeping sound. Each wireless range
bean motion detector/bean motion detector has to be individually activated using this procedure
Study => {09 to 63} => # => trigger
Enter the number for
selected this sensor from
09-63, (must 2 digits)
Trigger wireless range bean motion
detector/bean motion detector.
Plug in power supply of wireless range
bean motion detector receiver
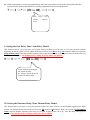
6. Activating the Motion Detector.
For each motion detector you use choose a number from 01 to 08 (notice: must 2 digits), with your system in
programming status, enter the number sequence below into the keypad/controller. In the place of {01 to 63} enter
the number you have chosen for the sensor. In place of the trigger after the pound sign (#), you will need to
physically trigger the motion detector to activate it. On the motion detector, switch the ON/OFF switch to the on
position. Secondly, physically move the motion detector about in front of an object as the motion detector warms up;
you will hear a double beep sound indicating that it has been activated. Each motion detector has to be individually
activated using this procedure.
Study => {01 to 08} => # => trigger
Enter the number for
selected this sensor
from 01-08 (must 2
digits)
Trigger
Motion detector
7. Activating the Smoke Detector/Gas Detector/Glass Break Detector.
For each smoke detector/gas detector/glass break detector you use, choose a number from 01 to 08 (notice: must 2
digits). With your system in programming status, on your keypad enter the number sequence below. In the place of
In the place of {01 to 08}, enter the number you have chosen for the sensor. After entering the pound sign (#), you
will need to physically trigger the smoking/gas detector/glass break detector to activate them.
A.To trigger the smoke detector, depress the clear plastic button on the face of the smoking detector. You will hear a
double beep sound to indicate that it has been activated.
B. To trigger the gas detector, depress the white plastic button on the face of the gas detector. You will hear a double
beep sound to indicate that it has been activated.
C. To trigger the glass break detector, knock your glass window with any metal. Until you hear a double beep sound
from your wireless keypad controller to indicate that it has been activated.
Each smoke/ gas detector/glass break detector has to be individually activated using this procedure.
Study => {01 to 08} => # => trigger
Enter the number
selected for this
sensor from 01-08
(Must 2 digits)
Trigger
Smoke detector
Gas detector
Glass break detector
8. Programming multiple functions.
(For first eight zoon only)
First eight zoon can have multiple functions (emergency, home arm)
Emergency function: A sensor programmed to the emergency function will always be operational even when the system is
disarmed, this function is usually programmed for the gas detector, smoking detector, glass break detector.
7 => 2=>* => {01 to 08} =>2 => #
Enter sensor zoon
number
between
(01-08)
Home arm function: A sensor programmed to the home arm function will not be operational when the
system is home armed, this function is usually programmed for the motion detector.
7 => 2 =>*=> {01 to 08} =>3 => #
Enter sensor zoon
number
between
01-08.
9. Setting the Exit Delay Time/ Arm Delay Model.
This function allows you to activate your system while providing you with time to exit your premises without
triggering the alarm system; you can adjust the delay time from zero (00) to thirty (30) minutes. With your system in
programming status, enter the number sequence below, and where the {00 to 30} appears enter the delay time you
wish (up to 30 minutes). The default factory setting for delay time is one minute.
5 => 5 => * => {00 to 30} => #
Enter minutes in two digits.
00 means no delay
01 means 1 minute delay 30
means 30 minute delay
10. Setting the Entrance Delay Time/ Disarm Delay Model.
This function allows you time to enter your premises when your alarm system is armed without triggering the alarm
system. The entrance delay time can be set from zero (00) to thirty (30) minutes. With your system in programming
status, enter the number sequence below into your keypad. In place of the {00 to 30}, enter the delay time (up to 30
minutes). The default factory setting for delay time is zero minute.
5 => 6 => * => {00 to 30} => #
Enter minutes in two digits.
00 means no delay
01 means 1 minutes delay
30 means 30 minutes delay
11. Setting Siren Sounding Time/ Silent Alarm Model.
This function allows you to set the length of time your siren will sound; you have a range from silent alarm (00) up
to thirty (30) minutes. The factory default setting is three (01) minutes. With your system in programming status,
enter the number below into your keypad. In place of the {00 to 30}, enter the length of siren sounding time from
zero (00) to thirty (30) minutes.
5 => 4 => * => {00 to 30} => #
Enter minutes in two digits.
00 means silent alarm
01 means 1 minutes sound
30 means 30 minutes sounds
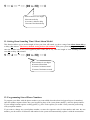
12. Programming Stored Phone Numbers.
To program your dialer with the phone numbers you want called when the alarm is triggered (up to six numbers),
enter the number sequence below into your keypad. In place of the {enter phone number}, enter the phone number.
If your calling location requires a calling prefix (e.g. New York requires you to dial 1 first), enter the prefix along
with your phone number.
If you want to change any stored phone number, re-enter the sequence code for that number and enter the new
number; you do not have to delete the old number as the system will automatically replace it with the new number.
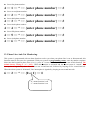
Store first phone number:
4 => 1 => * => {enter phone number} => #
Store second phone number:
4 => 2 => * => {enter phone number} => #
Store third phone number:
4 => 3 => * => {enter phone number} => #
Store fourth phone number:
4 => 4 => * => {enter phone number} => #
Store fifth phone number:
4 => 5 => * => {enter phone number} => #
Store sixth phone number:
4 => 6 => * => {enter phone number} => #
13. Phone Line Anti-Cut Monitoring.
This system is programmed with an alarm function to alert you when your phone line is cut or disconnected; this
function must be turn on to be operational. With your system in programming status, enter the number sequence
below into the keypad. In place of the {0 or 1}, press “1” to turn on this function or “0” to turn off this function. The
default factory setting is “ 1” ( ON ) ,When this function is activated and the alarm system is “armed”, line
interruption is signaled by three siren blasts at ten second intervals, followed by beeping at five second intervals.
When the alarm system is “disarmed”, line interruption is signaled by beeping at ten second intervals.
6 => 2 => * => {0 or 1} => #
“0” means function is off
“1” means function is on
14. Record Message.
To record your outgoing message, (while in “programming status”), press: rec + # and record your message for a
maximum of 10 seconds.
Rec => # =>
Speak your message
into the keypad
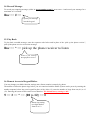
15. Play Back.
To play back recorded message, enter the sequence code below and in place of the “pick up the phone receiver”,
pick up the phone receiver to hear the message.
Rec => * => pick up the phone receiver to listen
Listen to your message
through phone receiver
16. Remote Access to Keypad/Dialer.
You may change your dialer function settings (arm, disarm, monitor) remotely by phone.
The number of times the phone rings before you are connected with the Dialer System can be preset by entering the
number sequence below into your keypad. In place of the {00 to 12} enter the number of rings from one (01) to 12
(12). Entering (00) turns off the remote access function. The default factory setting is “08”.
5 => 3 => * => {00 to 12} => #
Phone ring setting:
two digit number
from 01 to 12
17. Professional Monitoring Service Function.
This alarm system has a function which supports the use of professional monitoring service. To activate this function
(with your system in programming status), enter the number sequence below into the keypad. In place of the {0000
to 9999}, enter the four digit (CONTACT ID) number. To deactivate this function, enter the coded sequence into the
keypad and in place of the {0000 to 9999}, enter “0000”.
Notice: this system will support professional monitoring service which use the “ CONTACT ID” , the local number of the professional monitoring
service must be enter as the fifth or sixth number only in the “ Stored Phone Number”,
5 => 2 => * => {0000 to 9999} => #
Professional
CONTACT ID code,
must be 4 numbers
18. Exit Programming Status.
When you have completed programming the system’s functions, push the button Exit on the keypad; after 30 second
system will automatically exit “programming status”
18. Resetting Your System Functions.
Reset your system to the factory default setting. The factory default password is “1234”
# => turn off power => turn on power
STEP 3
Operating the System
Arming Function: all sensors active.
Home Arm Function: all sensors active except motion detectors.
1. Keypad/Controller Operation.
To ARM the alarm system: press the away button and hold for 3 seconds.
To HOME ARM the alarm system: After system is in the arm position, press the home button and hold for
3 seconds.
To DISARM the alarm system: press password + disarm
For emergency: press the panic button.
2. Key Chain Remote Operation.
To arm system; press the “lock” button
To disarm system; press the “unlock” button.
To home arm system: press the “house” button.
For emergency; press the “alarm” button
Notice: When you arm or disarm the system using the keychain, you will hear a confirmation double “beep” sound from the
siren to confirm acceptance of the command, if you arm or disarm from the keypad/dialer, you will see a confirming light on
the LCD screen instead of confirming siren beep.
Notice: if confirmation siren sound disturbs your neighbors, please use keypad/dialer to arm and disarm the
system.
3. Remote Operation by Phone.
Dial the phone number that is connected to your alarm system and after approximately 8 rings (the number of rings
can be changed: see section 17 “Remote Access to Keypad/Dialer”), you will hear two Beeping sounds. That is the
signal to enter the password + #. This will be followed by two beeping sounds. Follow the beeps by entering the
number of the function you want to activate:
To arm system: press number: “1”
To disarm system: press number: “2”
To monitor your home: press: “*”, this allows 30 seconds of listening time; press “*” for an additional 30
seconds.
To exit: press “#”
4. What to do When the Alarm Auto-Dialer call you?
When you receive the recorded message from your alarm system you have three options:
Press “*” This allows you to monitor your premises for 30 seconds. You can press “*” again for an additional
30 seconds.
Press “#” This allows you to turn off the automatic calling system. If you do not turn off. The system will
continue dialing all of your stored phone numbers.
Handing up phone. System will proceed to dial the next stored numbers. While the system is dialing through
the stored number you can not call in to your phone.
5. Wireless Portable Keypad Operation.
Activating Wireless Portable Keypad.
With your system (wireless keypad/controller) in programming status (see section 1), Press the follow button
below on wireless keypad/controller (not portable keypad)
Study => 6 => 4 => #
And then Press the follow button below on wireless portable keypad
1=>2=>3=>4=>12=>1=>12
Activation will be confirmed by a double beeping sound
Change Portable Keypad PASSWORD. Press the follow button below on wireless portable keypad.
Password (factory password is 1234) =>12=>new password (must 4 digits) =>12
To ARM the alarm system: Press the follow button below on wireless portable keypad.
Password (factory password is 1234) =>12=>1=>12
To HOME ARM the alarm system: Press the follow button below on wireless portable keypad.
Password (factory password is 1234) =>12=>2=>12
To DISARM the alarm system: Press the follow button below on wireless portable keypad.
Password (factory password is 1234) =>12=>3=>12
For Emergency: Press the follow button below on wireless portable keypad.
Password (factory password is 1234) =>12=>11
Resetting Wireless Portable Keypad. Press the follow button below on wireless portable keypad.
10=>10=>10=>10=>12