1
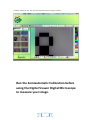
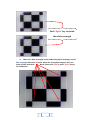
 Digital ViewerTM Digital Microscope Image Editing and Measurement Software User Manual (DA-70351)
1
IMAGE EDITING AND MEASUREMENT SOFTWARE 1 USER MANUAL 1 Open the measurement software 3 Calibration 9 Operation Guide for Drawing with Measurement 8 Tool bar description 9 2
Open the Measurement Software 1. Select an image in preview browsing folder and right clicking the mouse, then pop‐up the context menu as below: Click “ Measure”
3
Click the “Measure” key, then the measurement feature will open as below: Run the Semiautomatic Calibration before using the Digital Viewer Digital Microscope to measure your image. 4
Calibration: 1. Click Calibration icon “
standard. ”, and set the magnification to 50x for 2. Put the Digital Viewer microscope on the Calibration Pattern sheet, you can see the black/white block on the screen. 5
3. Align the Calibration pattern block (black and white) to the white rectangle edge. (To push the “ PgUp” key to enlarge the white rectangle or push the “PgDn” to shrink the white rectangle.) Push “PgUp” key to enlarge the white rectangle 6
Push “PgDn” key to shrink the white rectangle 4. There are 5 blue rectangles in the inside of big white rectangle, and all blue rectangles have one red point. When the 5 red points align on the cross point of black and white block, Please click ”OK” or press ”enter” key to run Calibration. 7
Operation Guide for Drawing with Measurement Click to define the “size” and “color” of line on left of the image window like below: Click to select one of the drawing tools on tool‐bar above of the image window by drawing, and then start the drawing in image window. Execute the drawing as per the type of TOOL selected. To show the measurement data on the image, left click again on the image where you would like the data to be displayed. The data will then appear on the image in the colour and font selected. ( Note: right click will escape the measurement.) Click the right key of the mouse to end this measurement. Notice: you can cancel the drawing operation with “Esc” at any time.
8
Tool bar description Open: open a file ( “jpg” or “bmp” format is supported), which you want to edit or measure. Save: save the operating picture in the picture folder. Print: print the current picture on the current state. Undo: back to the previous drawing state. Redo: forward to the next drawing state. Text: allow to key in text into picture. Line: draw line and measure the length. Radius Circle: draw circle with radius and measure the area of the circle Diameter Circle: draw circle with diameter and measure the area of the circle. Three Point Circle: draw circle with three points and measure the area of the circle. Rectangle: draw rectangle and measure the area of the rectangle. Angle: draw angle and measure the degrees on angle. Polygon: draw the polygon and measure the area in polygon. (Notice: complete the drawing with “C” or middle button‐wheel of mouse.) Clockwise: allow to clockwise the picture in the editing window. 9
Anticlockwise: allow to anticlockwise the picture in the editing window. Sets font: selecting the fonts, size or colors on character. Calibration: semiautomatic calibration by Calibration pattern sheet. Magnify: key the correct magnification in the block according the “A” Roller indication. 10