1
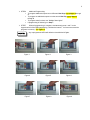
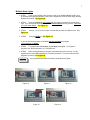
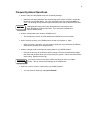
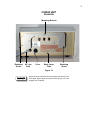
THE CS2000
USER’S MANUAL
VARITRONICS INC.
620 PARKWAY
BROOMALL, PA 19008
610-356-3995
COPYRIGHT 1996. VARITRONICS INC. ALL RIGHTS RESERVED.
Table of Contents
Introduction……………………………………………..……..…………………………………………….
1
Operation of Keys………………………………….……………………………………………………….
2
System Functions……………………………………………………………………………….………….
3
Doctor Sequence……………………………………………..….…………………………………………..
3
Tech Sequence………………………………………..……………………………………………………..
3
Call for Assistance………………………………………….……………………………………………….
4
Programming the CS2000…………………………………….…………………………………………..
5
Programming Guidelines……………….……………………….…………………………………………..
5
Doctor or Tech Sequence……………………………………….…...……………………………………...
5
Multiple State Lights………………………………………………………………………………………..
7
Frequently Asked Questions………………………………..……………………………………………
8
Appendix A………………………………………………………………………………………………….
9
CS2000: Rearview………...…………………..……………………………………………………………
10
1
Introduction
What the CS2000 Can Do For You
The Varitronics CS2000 is a flexible interoffice communication tool. It will boost the efficiency,
productivity, and profitability of your practice. Key personnel have all of the information that they need to
instantly locate doctors, nurses and patients.
Key CS2000 features:
•
Doctor/Patient sequencing
•
Tech Sequencing
•
Call for Assistance
•
Two distinct buzz sounds for room notification
•
Timer with or without buzz alert
•
Programmable multi-state lights
•
Powerful substitution feature to control any light in the system from any location
•
Transportable to a new location
Optional CS2000 Features:
•
Infrared Tracking Automatically activate system without user input
Automatically activate system without user input.
•
Personnel Pager
Silent interoffice paging system.
•
Intercom
Interoffice voice communication.
•
Outside Room Monitor Panels
•
Outside Room Switch Panels
•
Master Annunciator Panels
2
Operation of Keys
ASST (short for assistance)
Use this key when you need instant notification in all rooms. Pressing this key will cause the LED column
associated with that room to blink and buzz on all units. Can only be canceled in the originating room by
depressing the ASST key a second time.
To remove this feature, please contact factory for assistance.
BUZZ
ENTER
This key has two functions:
•
BUZZ: Allow a single buzz to a specific room or all rooms simultaneously. To buzz a specific
room, press the room number on the keypad, then press the BUZZ key. To buzz all rooms, press
the BUZZ key.
•
ENTER: Used in the programming mode. See “Programming the CS2000.”
COLOR KEYS
These keys advance the appropriate colored LED’s associated with a particular room. You only need to
gently tap the middle of the key.
INTER
This key performs the same function as the BUZZ key except that it sounds an intermittent buzz sound.
This is useful in differentiating messages. See BUZZ.
SUB (short for substitute)
This powerful feature allows you to control any CS2000 unit from any other unit. Enter the room number
of the unit you wish to control. Press the SUB key, then press the Color Key corresponding to the color
you wish to effect. It will advance to its next programmed state.
Also: The SUB key can clear all of the LED’s associated with any one room simultaneously. Enter the
room number on the keypad, press the SUB key, then the zero key. All of the LED’s in the column
associated with the room will go off.
TIMER
You can time various procedures using this key. Enter the number of minutes you wish to time (I-99) on
the keypad, then press the Timer key. The LED’s associated with the white Color Key will change to the
on state. After the prescribed time has elapsed, the LED will advance to the blink state. Press the white
Color Key once to cancel the Timer after the LED starts blinking. Press the white Color Key twice
rapidly to cancel the Timer before the LED starts blinking.
Also: The SUB key can control the Timer light from any CS2000 unit. See SUB. A buzz alert can
accompany the blinking state of an elapsed Timer. To install this feature, see Appendix A.
3
System Functions
Sequence
A “sequence” is a group of colored lights that the CS2000 is capable of tracking. The display shows the
status of the associated group of LEDs.
Doctor Sequence: Doctor’s location/Who’s next?/Patients waiting.
In the following example, you have programmed the red LED’s (1-10) as a Dr.
Red’s sequence.
When a staff member brings a patient into an exam room, he will press the red Color Key once. The
LED corresponding to that room will fast blink, indicating to Dr. Red that this is his next patient. When the
staff member places patients into other exam rooms and presses the red Color Key, the room LED for
that room will go on. This indicates that the patient is in the sequence waiting for the doctor.
When Dr. Red comes into the exam room, he will press his Color Key once. The LED corresponding to
that room will slow blink, indicating that the doctor is in the room. The next room in the sequence will fast
blink, indicating where the doctor is to go next. Dr. Red presses his Color Key again, when finished with
patient. The room LED goes off, and he goes to the next room indicated by the fast blinking LED.
Other Features
If Dr. Red forgets to turn off the room LED, he need not go back to the previous room to turn it off. Upon
entering the next room in the sequence, indicated by the fast blinking LED, he simply pushes his Color
Key twice rapidly. This automatically turns the slow blink LED off, advances the Led in the room he is in
to slow blink and the next room in the sequence to fast blink.
The priority of “who’s next?” in the sequence can be changed. Dr. Red’s next patient is in the room 2, but
you wish the patient in room 3 to be next. Go to room 3 and press the red Color Key twice rapidly. The
red LED for room 2 will change to on while the red LED for room 3 will change to slow blink.
You can also change the priority of “who’s next?” by using the SUB key. Dr Red’s next patient is in room
2, but you wish the patient in room 3 to be next. Go to any CS2000 location and enter 3 on the keypad,
press the SUB key once, and the red Color Key twice rapidly. The red LED for room 2 will change to on
while the red LED for room 3 will change to slow blink.
Tech Sequence: Who’s next?/Patients waiting.
In the following example, you have programmed the green LED’s (1-10) as Tech Green’s sequence.
A patient is ready for an x-ray. The doctor treating the patient presses the green Color Key once in that
exam room. The green LED begins to slow blink indicating the next x-ray patient. Tech Green sees the
slow blink green LED and enters the exam room to take the patient to x-ray. He presses the green Color
Key once when leaving. The slow blinking green LED goes off and the next LED in the sequence begins
to slow blink.
4
Other Features
If Tech Green forgets to turn off the room LED, he need not go back to the previous room to turn it off.
Upon entering the next room in the sequence, indicated by the slow blinking LED, he simply presses his
Color Key twice rapidly (tap, tap). This automatically turns the slow blink LED off and advances the LED
in the room he is in to slow blink.
The priority of “who’s next?” in the sequence can be changed. The next x-ray patient is in room 2, but
you wish the patient in room 3 to be next. Go to room 3 and press the green Color Key twice rapidly
(tap, tap) The green LED for room 2 will change to on while the green LED for room 3 will change to slow
blink.
You can also change the priority of “who’s next?” by using the SUB key. The next x-ray patient is in room
2, but you wish the patient in room 3 to be next. Go to any CS2000 location and enter 3 on the keypad,
press the SUB key once and the green Color Key twice rapidly. The green LED for room 2 will change
to on while the green LED for room 3 will change to slow blink.
Call for Assistance
In the following example, you have programmed the orange LEDs (1-10) as multiple state lights with three
states, slow blink, on, off.
As the assistant enters room 3, he advances the orange light to the on state by pressing the orange
Color Key once and then once again. This signifies to the staff that the assistant is in room 3.
The doctor in room 1 needs assistance. He advances the orange LED to the slow blink state in room 1
by pressing the orange Color Key once. Observing the location of his assistant, he buzzes room 3 by
pressing 3 on the keypad and then BUZZ key.
ENTER
As the alerted assistant leaves, he turns off the orange LED in room 3 by pressing the orange Color Key
once. When he enters the room the doctor is in, he advances the orange LED to the on state by pressing
the orange Color Key once. This indicates the call for assistance has been answered.
5
Programming The CS2000
Please read and understand the following instructions before attempting to
program unit.
When the system is first turned on, each LED has three states, slow blink,/on/off. The CS2000’s
programmable configurations are as follows:
•
•
•
•
Doctor Sequence or Tech Sequence
on/off (2 state)
slow blink/on/off (3 state: default mode)
slow blink/fast blink/on/off ( 4 state)
Programming Guidelines
A Color Key and its associated LEDs can have only one type of programmable configuration.
There are two exceptions as follows:
• Doctor and Tech sequences: The unprogrammed LEDs associated with a Doctor or Tech
sequence will default to slow/blink/on/off.
•
TIMER lights: The lights controlled by the white Color Key have a dual function (Timer and slow
blink/on/off) in the default state. These LEDs will lose their ability to be TIMER lights if
reprogrammed.
The CS2000 can be programmed as either a Doctor Sequence or Tech
Sequence, but not both. See Appendix A.
Doctor Sequence or Tech Sequence
•
On the CS2000 Master Unit # 1, enter the program mode by simultaneously pressing
STEP 1
buttons 1 and 7 on the keypad until all of the LEDs begin blinking. Release the button. See
Figure 1, Page 6.
!
STEP 2
Press the FUNC key. See Figure 2, Page 6.
!
STEP 3
Press the Color Key that you want to program. See Figure 3, Page 6.
!
STEP 4
Enter the room numbers for the sequence by pressing the corresponding keypad
followed by the ENTER key. Repeat for as many rooms as you want in the sequence. See
Figures 4-7, Page 6.
!
STEP 5
Press the FUNC key again. If you do not hear two beeps, the CS2000 has not
accepted the sequence. You must return to Step 2. See Figure 8, Page 6.
6
!
STEP 6
•
•
•
•
!
Additional Programming:
To program additional sequences on different Color Keys repeat Steps 2 through
5.
To program an additional sequence on the same Color Key repeat Steps 2
through 5.
To program other functions see “Multiple State Lights”
If programming is finished, go to Step 7.
STEP 7
When all programming is complete, simultaneously press 1 and 7 on the
keypad until all of the LEDs stop blinking. Release the buttons. You have now stored the
programs in memory. See Figure 9.
Any unprogrammed LEDs will default to slow blink/on/off lights.
Figure 1
Figure 2
Figure 4
Figure 5
Figure 7
Figure 8
Figure 3
Figure 6
Figure 9
7
Multiple State Lights
!
STEP 1
If you are not already in the program mode on the CS2000 Master Unit#1, do so
by simultaneously pressing buttons 1 and 7 on the keypad until all of the LEDs begin blinking.
Release the buttons. See Figure 10.
!
STEP 2
Press the Color Key twice rapidly that you want to program as a multiple state
light. If you do not hear two beeps, the CS2000 has accepted your key presses. Otherwise
you must repeat Step 2. See Figure 11.
!
!
STEP 3
Press 2, 3, or 4, for the number of states that you want the LEDs to have. See
Figure 12.
!
STEP 4
Press the BUZZ key. See Figure 13.
ENTER
If you do not hear two beeps, the CS2000 has not accepted the program
You must return to Step 2.
!
STEP 5
To program other Color Keys, repeat Steps 2 through 4. To program a
sequence see “Doctor Sequence or Tech Sequence”.
!
STEP 6
When all programming is complete, simultaneously press 1 through 7 on the
keypad until all of the LEDs stop blinking. Release the buttons. You have now stored the
programs in memory. See Figure 14.
Any unprogrammed LEDs will default to slow blink/on/off lights.
Figure 10
Figure 11
Figure 13
Figure 12
Figure 14
8
Frequently Asked Questions
!
How do I stop all of the CS2000 units from continually buzzing?
•
Identify the unit that initiated the alert by observing which column of LEDs is continually
blinking on any CS2000 display. Go to the associated room and press the ASST key
once. The buzzing will stop and the system will resume the status it had before the alert.
tatus
!
How do I identify what room number a CS2000 unit is?
•
!
The dot above the column of LEDs identifies the CS2000 unit’s room number.
When I press a key twice, the CS2000 doesn’t do what it is suppose to. Why?
•
!
Unplugging the unit(s) will not stop the system from resuming the alert
when plugged back into the wall outlet. If you would like to disable this
feature, call the factory.
When you press a key twice, you must press it rapidly (tap, tap). Otherwise the CS2000
reads the key presses as two single presses.
How do I change a bulb on the optional outside panel of my CS2000 System?
•
Remove the lens cap of the bulb you wish to change. Remove the bulb with the tubing
that came with the spare bulbs you received with your system. Insert a new bulb with the
same tubing. Replace the lens cap.
Do not use forceps or any other metallic instrument to remove or replace
bulbs. This can cause severe damage to the CS2000 Unit.
!
Where do I call for service if I cannot solve my CS2000 problem?
•
You can reach the factory by calling 610-356-3995.
9
Appendix A
Certain features of the CS2000 require an internal dip switch change.
Unplug unit from wall outlet before attempting to remove back
cover plate. High voltage can cause serious injury if unit is left
plugged into receptacle.
Remove the back panel by unscrewing the two retaining screws with a small Phillips head screw
driver. See Figure 15 on page 9 for the correct location of these screws.
Back cover plate is still attached when unscrewed from unit.
Do not pull on wires. If they should become disconnected,
call the factory. Do not plug unit into wall outlet.
If the factory has not installed the following features for you, continue as outlined below.
Installing the Tech Sequence feature (this will disable the Doctor Sequence feature)
!
STEP 1
Locate the dip switch inside the CS2000 unit in the upper right
corner of the PC board.
!
STEP 2
Move switch number 8 to the ON position. Do not change any of
the other settings on the dip switch.
!
STEP 3
Replace back panel.
!
STEP 4
Plug the CS2000 unit into wall outlet.
!
STEP 5
You must repeat Steps 1 through 4 for each unit in the system.
!
STEP 6
Program your system. See “Programming the CS2000”.
Installing the Timer with buzz alert feature.
!
STEP 1
Locate the dip switch in the upper right corner of the PC board.
!
STEP 2
Move switch number 9 to the ON position. Do not change any of
The other settings on the dip switch.
!
STEP 3
Replace back panel.
!
STEP 4
Plug the CS2000 unit into wall outlet.
!
STEP 5
Repeat Steps 1 through 4 for each unit in the system that you want
This feature installed on.
!
STEP 6
Program your system. See “Programming the CS2000”.
10
CS2000 UNIT
REARVIEW
Mounting Bracket
Retaining
Screw
AC Line
Cord
Fuse
Back Cover
Plate
Retaining
Screw
Figure 15
Unplug unit form wall outlet before attempting to remove back
cover plate. High voltage can cause serious injury if unit is left
plugged into receptacle.