1
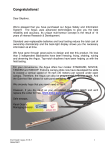
WARNING! Performing ACCESS One Warning Alarm The OPTIMA II is intended to be a backup device and must not be relied upon as your primary means of maintaining altitude awareness. Use the OPTIMA II at your own risk. Note: The OPTIMA II goes out of ACCESS and back to the Main Display if no button has been pressed within 5 sec. ALL functions (except Power ON) can be performed ONLY when the OPTIMA II is in ACCESS mode. If you wish only one warning alarm, choose same altitude for all three warning alarms using the above procedure. (The unit sounds only the 3rd warning alarm). Do not put the OPTIMA II directly next to your ear when testing the alarm sounds on the ground, as the OPTIMA II alarm volume is very loud. It may cause pain or damage to the ear. 1. Press and release quickly – the padlock icon turns off (disappears) 2. When the padlock icon reappears, immediately press and keep it pressed – the padlock icon will disappear again 3. When the padlock icon appears again, release immediately Sound Pitch Due to outside wind noise in freefall, the alarm sounds will not be perceived to be as loud as when testing the OPTIMA II on the ground. If the OPTIMA II is not mounted correctly, you may not hear the alarm sounds in freefall. Make sure the OPTIMA II is mounted correctly before you jump. The OPTIMA II must be active (powered on) prior to entering the airplane. 1st. warning altitude (1st. low speed alarm) 2nd. warning altitude (2nd. low speed alarm) 3rd. warning alarm (3rd. low speed alarm) Perform ACCESS Warning bank Pitch OFF Battery status Lo speed status Alarm sounds FT/MTR Altitude/altitude offset Clock Up Mode Down INTRODUCTION Congratulations on purchasing your new OPTIMA II! The OPTIMA II design is based upon the latest findings in microcomputer technology and freefall parameters and provides four warning banks (four sets of warning altitudes) for both high speed and low speed to provide added flexibility in configuring frequently used warning alarms. In addition, up to three climb warning alarms can be set. NEW!! The OPTIMA II introduces a new class of warnings for use by skydivers – Canopy Descent Warnings and landing Guide Tones. These allow you to preset warning altitudes for use under canopy and, if desired, to provide timing beeps to help you track your landing progress versus your altitude during the semi-final stage of your canopy descent. NOTE: The Canopy Descent Alerts are essentially low speed alerts and can also be used by wing suit flyers to keep track of altitude in preparation for separation and canopy deployment. WARRANTY The following conditions apply to the OPTIMA II warranty: The OPTIMA II is fully automatic. It continually records the ambient air pressure and temperature and adjusts the electronic circuitry to the local elevation. Press again. The musical note icon and pitch bar graph will begin to flash or to change the pitch up or down. The pitch Press bar graph will display the number of bars corresponding to the selected pitch and the selected pitch will sound. The OPTIMA II now flashes the warning bank icon with a number in front of it to indicate the active warning bank number. Note: When selecting a pitch on either side of the center vertical bar (3,800 Hz), the output volume decreases about 5 dB because the speaker is no longer at its optimum resonance frequency. Menu Function Sequence Sound Volume By repeatedly pressing the OPTIMA II scrolls through the menu functions in this order: or to select output volume. Press ”1” is very low volume (112 dB), ”10” is very high volume (117 dB) The OPTIMA II is factory preset to ”7”. For the active warning bank: 1st warning altitude - 2nd warning altitude - 3rd warning altitude; sound pitch; sound volume; test alarm sounds; feet/meters; altitude offset; OFF icon; Main Display. NOTE: In case of low capacity the volume will automatically switch to ”1” and it cannot be changed until the batteries have been replaced. General Note: Test Warning Sounds To leave a menu function, wait until the display times out, or, press and hold for 5 sec., or, press repeatedly until the padlock icon flashes, then press or to exit Press again. The ear icon will begin to flash. or . This causes the OPTIMA II to sound the Press preset alarm sequence at the selected pitch. Feet/Meters High Speed Warnings and Setup Selector again. The FT or MT indicator located in the altitude Press area of the Main Display will begin to flash. Warning Bank Menu Functions Press The OPTIMA II has 4 freefall warning banks. When the or to select warning bank icon is flashing, press warning bank 1 to 4. or to switch between feet (FT) or meters (MT). Altitude Offset Explanation: Setting the Warning Altitudes Within 12 months after delivery, damage or defects in the unit that are proven to be caused by faulty manufacture will be repaired by LARSEN & BRUSGAARD at no cost to the end user. To make a claim under this warranty, send the unit to an authorized dealer or directly to LARSEN & BRUSGAARD together with the dated purchase invoice or receipt. The warranty becomes void if damage is caused by external circumstances or if the unit has been serviced or repaired by third parties unauthorized by our national agents or LARSEN & BRUSGAARD. All further claims, especially for defects after skydiving accidents, are excluded. LARSEN & BRUSGAARD has no obligation to honour any extension of warranty granted by any national agent. Waiver of Liability The thin and ergonomic design ensures a perfect and comfortable fit to your ear when placed in your fraphat or hard helmet. The OPTIMA II can be mounted on the outside of any type of helmet by means of the enclosed ties. The OPTIMA II is ideally suited for Relative Work, Skysurfing, Freeflying, Head Down, Wing Suit Flying, Student, Tandem, AFF, and also canopy related activities such as accuracy, Crew and swooping. We hope you will enjoy jumping with your new OPTIMA II. Please read ALL of the instructions prior to actual skydiving use. It is a very good idea to practice ACCESSing the OPTIMA II and setting the warning values on the ground prior to your first jump with the OPTIMA II. If you have any questions please call, fax or e-mail us. LARSEN & BRUSGAARD The buyer and user of the OPTIMA II indemnify the manufacturer and vendor from any liability for damage incurred before, during and after skydiving with the instrument. INSTRUCTIONS Power ON The OPTIMA II has been powered off prior to shipping from our factory. To turn the power on, press and hold any key until the unit beeps, then release the key. The OPTIMA II runs a self-test and sounds three beeps as it flashes the screen three times. It then displays a screen configuration referred to henceforth as the “Main Display.” This represents the starting point for all further actions with respect to OPTIMA II actions and subsequent displays. NOTE: To save battery power, the screen display will switch OFF after 14 hours. However, the unit is still ready to jump. The setting of altitudes in each warning bank can be performed either on the ground or in the airplane during climb to jump altitude. Three Warning Alarms 1. Press 2. Press 3. Press 4. Press 5. Press 6. Press until 1st warning altitude flashes or to change 1st warning altitude again and the 2nd warning altitude flashes or to change 2nd warning altitude again and the 3rd warning altitude flashes or to change 3rd warning altitude Sequence of Warning Alarm Altitudes You may note that when setting the warning altitudes, it is possible to set the 1st warning alarm altitude lower than the second or even the 3rd warning altitudes. The 2nd warning altitude could be set to a higher value than the 1st warning altitude or a lower value than the 3rd warning altitude, and so on. This is not a problem – when the OPTIMA II exits ACCESS mode, it will automatically sort and store the warning alarms such that the highest warning altitude become the 1st warning alarm, the next highest warning altitude becomes the 2nd warning alarm, and the lowest warning altitude becomes the 3rd warning alarm. Two Warning Alarms If you choose, you may have only two warning alarms. The procedure is the same as above, but choose same altitude for the two highest warning alarms (the OPTIMA II then sounds only the 2nd and 3rd warning alarms). If the DZ elevation differs from that of the airport of takeoff, use the altitude offset capability to set the DZ elevation prior to entering the airplane or set the altitude offset to zero when climbing through the DZ elevation. again. The displayed altitude (normally 0) in front Press of the FT or MT indicator will begin to flash. or to set an altitude offset to match the Press altitude of the landing DZ relative to the takeoff airport. Note: When performing manual altitude offset the OPTIMA II enters Jump Mode and retains the altitude offset for 14 hours, if no jump is made. After 14 hours the OPTIMA II recalibrates to the field elevation where it is currently located and once again displays 0. The altitude offset is not retained when the OPTIMA II is powered OFF. Power OFF The OPTIMA II can be manually powered OFF to further extend the battery life time when not in use. again. The OFF icon in the icon area of the Main Press Display will begin to flash. and until the display flashes, Press and hold both then release. The OPTIMA II will shut off. Customer settings (except altitude offset) are stored in nonvolatile memory when the OPTIMA II is powered OFF. When powered OFF, the OPTIMA II cannot be used for jumping. Canopy Descent and Low Speed Warnings Selector Setting Guide Tones Explanation: NOTE: At the same time the output volume setting is automatically changed to low volume “1” and it cannot be changed until the batteries have been replaced. Description When the aircraft begins climbing to altitude, the OPTIMA II displays the current altitude at the top of the display. The OPTIMA II includes two types of warning sounds which can be selected to sound while under canopy descent or during wing suit flight. 1. Canopy Descent and Low Speed Warnings: Setting Climb to Altitude Warnings The setting of warning altitudes can be performed either on the ground or in the airplane during climb to jump altitude. the output volume setting is automatically changed to low volume “1”. Empty batteries: The battery icon flashes. Replace batteries immediately. reset Mounting the OPTIMA II Press The OPTIMA II can be mounted on the outside of the helmet or on a Goggle Mount. The OPTIMA II resets to factory settings and sounds three beeps. Loop the waxed tack cords through the four mounting holes and fasten with knobs to the helmet/Goggle Mount If the unit is still faulty, please contact your local dealer or LARSEN & BRUSGAARD. NOTE: Make sure that there is no material between the OPTIMA II loudspeaker hole and your ear. SPECIFICATIONS If the unit does not function correctly even after replacing batteries and pressing reset, perform following: and hold while resetting. Short beeps sound when passing through one, two or three selectable altitudes during canopy descent or wing suit flight. When Guide Tones are activated, a unique series of beeps sound between the 2nd and 3rd Canopy Descent Warning altitudes. 2. Guide Tones: The series of beeps can be compared to an aircraft ILS approach. The first beep sounds when passing through the 2nd warning altitude, the next beep 30% into the glide corridor, then after 55% and so on as depicted in the diagram. The diagram shows an example where the 2nd warning is set to 1,500 ft and the 3rd warning to 300 ft. A long beep sounds when passing through the 3rd selected altitude. The steeper a glide angle the shorter time between beeps. 1. Press 2. Press 3. Press 4. Press 5. Press 6. Press Sequence of Climb Warning Alarm Altitudes Battery type: 2 x CR 2325 or equivalent Note: Default values 1200 ft., 900 ft., and 600 ft. have been factory preset for Canopy Descent Warning altitudes. NOTE: For safety reasons, the minimum selectable swoop height is 100 ft.(30 meter) and the minimum selectable altitude difference between the 2nd and the 3rd warnings is 300 ft.(90 meters). Battery Life Time: 2.5 years or 500 jumps In the Main Display mode, press to access the Canopy Descent and Low Speed Warnings Selector. To enable Guide Tones You may note that when setting the warning altitudes, it is possible to set the 1st warning alarm altitude lower than the second or even the 3rd warning altitudes. The 2nd warning altitude could be set to a higher value than the 1st warning altitude or a lower value than the 3rd warning altitude, and so on. This is not a problem – when the OPTIMA II exits ACCESS mode, it will automatically sort and store the warning alarms such that the highest warning altitude become the 1st warning alarm, the next highest warning altitude becomes the 2nd warning alarm, and the lowest warning altitude becomes the 3rd warning alarm. A unique series of guide beeps sound when flying from the 2nd through the 3rd selected Canopy Descent Warning altitudes. Setting Canopy Descent and Low Speed Warnings Note: Minimum selectable height is 100 ft (30 meters) Warning Bank Menu Functions The OPTIMA II has 4 canopy descent and low speed warning banks. When the warning bank icon is flashing, press or to select warning bank 1 to 4. Setting the Warning Alarm Altitudes The setting of altitudes in each warning bank can be performed either on the ground or in the airplane during climb to jump altitude. Three Warning Alarms 1. Press 2. Press 3. Press 4. Press 5. Press 6. Press until 1st warning altitude flashes or to change 1st warning altitude again and the 2nd warning altitude flashes or to change 2nd warning altitude again and the 3rd warning altitude flashes or to change 3rd warning altitude NOTE: Before enabling Guide Tones, the minimum altitude difference between the 2nd and the 3rd warnings must be 300 ft. (90 meters) Press repeatedly until GUIDE flashes. Press until the GUIDE icon is on. or One 3 second pulsating alarm if vertical airspeed exceeds 13 m/ sec at preset altitude. Sound sequence: Pulsating, low repetition. NOTE: Reset the unit after battery replacement, when troubleshooting and when verifying software version number. 2nd warning: Air Filter One 4 second pulsating alarm if vertical airspeed exceeds 13 m/sec at preset altitude. Sound sequence: Pulsating, high repetition. 3rd warning: To disable Guide Tones Time Set Function Siren alarm as long as vertical airspeed exceeds 13 m/sec at or below the preset altitude. After deployment the trigger speed switches to 35 m/sec. Sound sequence: High pitch continuous siren. Low Speed alarm sounds: Press repeatedly until GUIDE flashes. Press until the GUIDE icon is off. or NOTE: When Canopy Descent and Low Speed Warnings are enabled, the LO SPD icon will show in the warning bank area of all warning bank displays and in the Main Display. To disable LO SPD, first disable Guide Tones, then set all warnings to --- Built-in clock NOTE: The Air Filter must be replaced if jumping is resumed quickly or if the OPTIMA II has been submerged into water. In Main Display mode, press to display the time. The time is in 24-hour format. The time is displayed for 15 seconds and then reverts back to the Main Display. Air Filter removal tooling kit is an accessory which can be purchased separately. Setting the time: OPTIMA II Firmware Version repeatedly until “clock” flashes. Perform ACCESS and press Then press or to set the time. Perform reset. The version number is displayed at the upper part of the screen (altitude area). The numbers displayed in the middle of the screen is a factory reference number. OPERATIONAL CONSIDERATIONS Battery replacement 1st warning: One 0.2 second beep 2nd warning: Two 0.2 second beeps 3rd warning: One 1.3 second beep Climb to Altitude Warnings: Two 0.2 second beeps NOTE: When GUIDE is enabled, a series of beeps sound which simulates a 10m/sec canopy descent and when GUIDE is disabled, three warning beeps sound Climb to Altitude Warnings and Clock Selector The altitude during climb at which the beep is heard may be changed or up to three different altitudes during climb may be selected for beep sounds. or to change the pitch up or down. The pitch Press bar graph will display the number of bars corresponding to the selected pitch and the selected pitch will sound. At the lowest preset altitude (factory preset to 1,000 feet), the OPTIMA II sounds a sequence of beeps. These beeps have two functions: NOTE: When selecting a pitch on either side of the center vertical bar (3,800 Hz), the output volume decreases about 5 dB because the speaker is no longer at its optimum resonance frequency. 1. The beeps indicate that the OPTIMA II has calibrated itself to the local ground elevation and is ready to jump. NOTE: In case of low capacity the volume will automatically switch to ”1” and it cannot be changed until the batteries have been replaced. 1st warning: Press a paperclip into the tiny hole on the rear side of the unit and release. The unit restarts. The Air Filter is the white circular part mounted on the side of the unit. If it becomes wet (after a splash in the swoop pond) then let the OPTIMA II dry in a warm place for 48 hours. again. The musical note icon and pitch bar graph Press will begin to flash or to select output volume. Press ”1” is very low volume (112 dB), ”10” is very high volume (117 dB) The OPTIMA II is factory preset to ”3”. Freefall alarm sounds: If you wish only one warning alarm or two alarms, preset the not used alarm(s) to --- again. The ”Ear” icon will begin to flash. Press Press or . This causes the OPTIMA to sound the preset alarm sequence at the selected pitch. Sound Volume Dimensions: 52 x 40 x 12 mm (2.16 x 1.57 x 0.47 inches) Weight: 26 grams (0.9 oz.) The OPTIMA II is water resistant. If you choose, you may have only two warning alarms. The procedure is the same as above, but choose same altitude for the two highest warning alarms (the OPTIMA II then sounds only the 2nd and 3rd warning alarms). Sound Pitch Resetting the OPTIMA II One or Two Warning Alarms Test Alarm Sounds If you wish only one warning alarm, choose same altitude for all three warning alarms using the above procedure. (The unit sounds only the 3rd warning alarm). until 1st warning altitude flashes or to change 1st warning altitude again and the 2nd warning altitude flashes or to change 2nd warning altitude again and 3rd warning altitude flashes or to change 3rd warning altitude NOTE: When Guide Tones are enabled, the GUIDE icon will show in the warning bank area of all warning bank displays and in the Main Display. Two Warning Alarms One Warning Alarm Three Warning Alarms The OPTIMA II continually adjusts to the local elevation and displays 0 FT (MT) at the top of the display. If the top of the display does not show “0” (or your selected altitude offset) prior to jumping, the unit has not adjusted itself to the local elevation and it must be manually zeroed. See the section, “Altitude Offset Function” under Menu functions above. Even when the display turns OFF, the unit is still ready for jumping If the drop zone (DZ) elevation is different from that of the take-off airport, you may compensate for this difference by setting an Altitude Offset – see the Altitude Offset menu function described above. Battery Status Should the battery voltage of the OPTIMA II show low capacity, the beep sequence is followed by 5 short beeps. This indicates that the batteries should be replaced. 112 dB at maximum pitch 117 dB at minimum pitch Freefall alarm calibration range: 1,000 to 9,990 feet (30 to 3,330 meters) Prior to Jumping Setting an Altitude Offset 2. The number of beeps indicates the altitude at which the highest warning alarm is set; for example: If set to 4,500 feet, the signal will sound: beep-beep-beep-beep-(pause)beep. The number of rapid-sequence of beeps indicates the highest warning altitude in thousands of feet. The beep after a pause (if any), signifies a 500-foot altitude increment. Alarm output volume: Full capacity: Symbol shows two black bars inside the battery icon. Half capacity: Symbol shows one black bar inside the battery icon. Low capacity: Symbol shows no black bars, just an “empty” battery icon. Batteries should be replaced as soon as possible. As a reminder, 5 short beeps sound when climbing through the lowest preset climb altitude. At the same time Low speed alarm calibration range: 100 to 9,990 feet (90 to 3,330 meters) Minimum Climb to Altitude setting: 1,000 ft. (300 meters) Altitude selection interval: 10 feet (10 meters) Operating altitude: 0 to 40,000 feet Carefully remove screw from battery cover and remove batteries. Install new batteries and note polarity. Use only CR-2325 or equivalent. Accuracy: ± 20 feet (+/- 6 meters) at MSL Operating Temperature Range: -20° C to +50° C (-4° F to +122° F) NOTE: Reset the OPTIMA II after replacing batteries. Customer settings are kept in non-volatile memory when removing batteries. However, the built-in clock may again be set to the correct time. Trouble-shooting When the OPTIMA II detects a fault, an error (“ERR”) sign and trouble shooting number 2 to 4 are displayed in the upper part of the screen. At the same time the unit beeps every minute. The “ERR” trouble shooting codes are as follows: ERR 2, ERR 3, ERR 4 = unit is defective. Remedy: perform Meets or exceeds EEC/89/336 L&B part no.: 205222 NATO Stock no.: 6605-22-609-1694