1
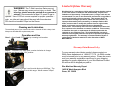
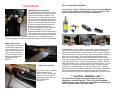
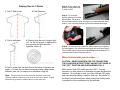
Optional Accessories
2
Extra ON/OFF CO Tank
$45 each
THE DEUCE
O-Rings(pack of 10)
$5.00 per pack
O Rings - O Rings are used to seal
your CO2 bottle into your launcher,
occasionally they become damaged,
worn and will need replacing.
Deluxe Co2 Fill Station
$80 each
Deluxe Two Valve CO2
Cylinder Fill Station
RAPID FIRE – QUICK RELOAD
ULTIMATE POWER
T-SHIRT LAUNCHER MANUAL
Replacement Gauge
$30 each
Quick-Disconnect
Hose $59 each
This allows you to connect your launcher directly
to a bulk CO2 tank, providing a direct and
continuous air source without the use of a CO2
tank. The quick disconnect comes with a 2-piece
adapter that screws directly into your launcher
where the CO2 tank usually goes and a braided
hose with air fitting to adapt directly to a bulk tank
Professional Fill Station with Muffler
$199 each
The best professional fill station on the market!
The muffler reduces noise while the fill station
itself makes filling tanks much faster than dual
valve fill stations and very durable.
Digital Scale
$35 each
This optional accessory allows you fill
your own CO2 tanks by weighing
them accurately
The DEUCE has set a new precedent for the sports entertainment
industry. A new robust breach loading design from our engineers allows
this shoulder slung cannon to reach distances in excess of 400 feet.
By using not one, but two tanks of air and a patented electronic
firing mechanism this launcher can fire a t-shirt every 2 to 3
seconds. The Deuce ships with a travel case, padded shoulder
strap, two CO2 canisters, extra O-rings, oil, user manual, and
a LIFETIME LIMITED WARRANTY.
WARNING! The T-Shirt Launcher Series are not
toys. Misuse may cause serious injury or death. The
launcher should never be pointed at any person or
animal!! Recommended at least 18 years of age to
operate. Use of CO2 air source required for proper operation –
note: no other air types should be used with these devices.
PSI should not exceed 100psi on the Deuce.
Cleaning and Lubrication
The anodized parts of your launcher should be cleaned off with a damp cloth.
Always use War Machine replacement parts.
Operation and Use
Step 1: Attach both CO2 bottles by screwing into launcher.
Limited Lifetime Warranty
War Machine Inc. warranties to initial retail purchaser that the product
is free from defects in materials and workmanship, subject to the
limitations of the warranty. Disposable parts (o-rings, seals etc) are
not warranted. The use of non sanctioned accessories or upgrades is
not covered and will void your warranty. This warranty does not
cover aesthetic damages (scratches, dents and nicks) misuse, or
improper disassembly and re-assembly, or attempts made to drill
holes, remove metal or modify this product from its original state,
which could cause pressure safety factors or degrade the
performance. This warranty does not cover failures due to wear and
tear, exposure to the elements or extreme conditions. This warranty
is limited to the repair or replacement of defective parts with the
customer to pay shipping costs. This limited lifetime warranty is
effective to the original customer with proof of purchase and proper
warranty registration. The warranty is non-transferable. Repair or
replacement of defective material is at the discretion of WAR
MACHINE INC.
Warranty Claim/Return Policy
Step 2: Turn each CO2 tank valve counter clockwise to charge
launcher and leave in the “ON” position.
Step 3: The pressure gauge is set from the factory at 60-80psi. The
gauge pressure should now be in this range. *Never exceed 100psi*
For any warranty return/claim needed, please contact our
RMA claims department at 1-864-877-1179. An RMA number
must be issued prior to any warranty return. Please be sure to
mail your warranty registration card found in your shipping
package for proper registration of your War Machine Product.
All returns will be shipped pre-paid to:
War Machine Warranty Depot
1425 W Wade Hampton Blvd
Greer, SC 29650
TECH SUPPORT
Changing the Gauge Pressure
The air pressure may be adjusted on each
canister individually. Discharge all air from
the gun with both tanks turned off. Turn
“ON” the tank you wish to adjust and use a
1/8” Allen key to slowly adjust this regulator.
Make very small turns while watching the
gauge. You may adjust the pressure down
to 40psi for shorter distances by turning
counter clockwise and increase the
pressure up to 80psi by turning clockwise
for maximum distances. Be sure to
alternate and adjust only one tank at a time.
The pressure on the gauge represents only
the pressure of the tank that is turned “ON”.
Now turn this tank “OFF”, discharge the launcher, and repeat process with
second tank. Both tanks need to be adjusted equally for optimum performance.
Battery Replacement
The pneumatic operation of
the launcher is powered by
(3) 9-volt batteries. You will
need to replace these from
time to time by removing
the thumb screws from the
battery compartment and
changing with fresh
batteries.
TO FILL YOUR OWN CO2 TANKS:
You will need: A 20lb or larger bulk tank from your local Gas/Welding
supplier, the Fill Station included with your launcher, and your CO2
tanks. (A digital 10lb scale is also highly recommended)
(PIC 1)
LED Proximity Switch
The Proximity switch is a safety
feature installed on your
launcher. If this unit becomes
loose or has moved, call the
factory and we will assist you
with re-aligning this
component.
(PIC 2)
(PIC 3)
To fill the tank: Filling a C02 tank is simple but it can be dangerous if you
are not careful. Screw the tank into your fill adapter (PIC 1) and tighten
down the pin depressor until you feel resistance. (PIC 2) With the bleed
valve open (shown in PIC 2), any CO2 in your tank will escape, chilling the
tank. If your tank is empty, you should close the bleed valve on the fill
station (PIC 3), open the valve on your bulk tank (PIC 3) and fill to about
2oz on your scale. Turn bulk tank OFF and open bleed valve to empty your
CO2 tank and chill. (PIC 3) Now you are ready to fill your tank. With the
bleed valve closed on your fill station and the bulk tank turned on, you will
fill a twenty-ounce tank to about seventeen ounces. This way if the gas
expands, your tank pressure will not rise above safe levels. Close your
bulk tank valve, and unscrew the fill adapter until you feel the resistance of
the valve pin decrease sufficiently. Open the bleed valve to bleed the
excess C02 that's in the line and unscrew the CO2 tank. Your tank is filled.
*** CAUTION – FEDERAL LAW ***
All CO2 must be emptied from tanks before air travel or
shipping via common carriers. This is a Federal Regulation
subject to heavy fines. Be sure to empty/bleed all air from your
tanks using the method described above.
Folding Tips for T-Shirts
1. Fold T-Shirt in half
2. Fold Sleeves in
Step 4: At this stage, the
breech is open and ready
to load a t-shirt
Step 5: To close the
breech, press and hold the
black button. The breech
will close and remain closed as long as you are holding the black
button – this is a safety feature to prevent accidental discharge
3. Fold in half again
4. Starting from the neck, begin a tight
roll. As the roll is done, a slight pull on
the opposite end will insure the
tightness of the roll.
Step 6: You are ready to LAUNCH! While continuing to depress
the black button, you will pull the red trigger with your index finger.
The red LED light will light up to acknowledge that the breech is in
closed position and the launcher will fire.
When finished with your launcher……
CAUTION: NEVER UNSCREW THE CO2 TANKS FROM
THE LAUNCHER WITHOUT FIRST HAVING THE TANKS IN
THE “OFF” POSITION AND DISCHARGING FULLY.
5. Test to make sure the shirt fits into the barrel of the launcher
easily – if it does, the roll should be secured with rubber bands,
balloons, tape, etc. to make sure it maintains a tight roll.
Note: The tighter the shirt fits into the barrel, the farther it will travel.
Likewise, distance is affected by how loose the roll is in the barrel. A tightly
rolled shirt will go farther in distance than a loosely rolled shirt.
Make certain both CO2 tanks are turned OFF. Fire the
launcher in a safe direction to discharge any gas and clear the
chamber. Once all gas is clear, you may unscrew CO2 tanks
and store launcher safely in case for next use. Be mindful of
the hoses and pneumatic arm when storing that nothing rests
or presses on the movable parts of the launcher.