1
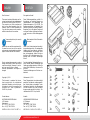
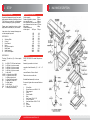
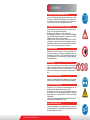
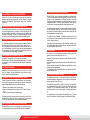
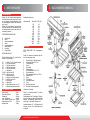
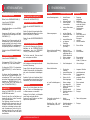
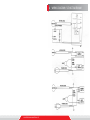
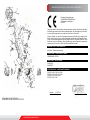
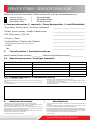
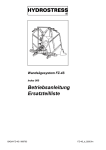
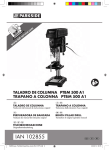
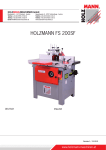
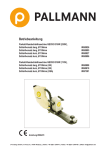
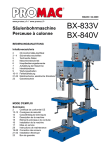
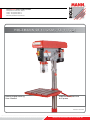
HOLZMANN-MASCHINEN GmbH
Marktplatz 4 · 4170 Haslach · Austria
Telefon+43.(0)7289.71562-0
Telefax+43.(0)7289.71562-4
Email [email protected]
HOLZMANN SB 4132SM / SB 4132LR
BedienungsanleitungStänderbohrmaschine
User Manualdrill press
Revision 1 / 29.07.14
www.holzmann-maschinen.at
ENGLISH
DEUTSCH
Dear Customer!
Sehr geehrter Kunde!
This manual contains Information and important instructions for the installation and
correct use of the drill press SB 4132SM.
This manual is part of the machine and
shall not be stored separately from the
machine. Save it for later reference and
if you let other persons use the machine,
add this instruction to the machine.
Diese Bedienungsanleitung enthält Informationen und wichtige Hinweise zur
Inbetriebnahme und Handhabung der
Ständerbohrmaschine SB 4132SM. Die
Bedienungsanleitung ist Bestandteil der
Maschine und darf nicht entfernt werden.
Bewahren Sie sie für spätere Zwecke auf
und legen Sie diese Anleitung der Maschine bei, wenn sie an Dritte weitergegeben
wird!
Please read and obey the security
instructions!
Bitte beachten Sie die Sicherheitshinweise!
Before first use read this manual carefully.
It eases the correct use of the machine
and prevents misunderstanding and damages of machine and the user’s health.
Lesen Sie vor Inbetriebnahme diese Anleitung aufmerksam durch. Der sachgemäße
Umgang wird Ihnen dadurch erleichtert,
Missverständnissen und etwaigen Schäden wird vorgebeugt. Halten Sie sich an
die Warn- und Sicherheitshinweise. Missachtung kann zu ernsten Verletzungen
führen.
Due to constant advancements in product
design construction pictures and content
may diverse slightly. However, if you discover any errors, inform us please.
Technical specifications are subject to
changes!
Durch die ständige Weiterentwicklung unserer Produkte können Abbildungen und
Inhalte geringfügig abweichen. Sollten Sie
jedoch Fehler feststellen, informieren Sie
uns bitte.
Technische Änderungen und Irrtümer vorbehalten!
Copyright © 2011
Urheberrecht © 2011
This document is protected by international copyright law. Any unauthorized
duplication, translation or use of pictures,
illustrations or text of this manual will be
pursued by law – court of jurisdiction is
A-4020 Linz, Austria!
Diese Dokumentation ist urheberrechtlich
geschützt. Die dadurch verfassungsmäßigen Rechte bleiben vorbehalten! Insbesondere der Nachdruck, die Übersetzung
und die Entnahme von Fotos und Abbildungen werden gerichtlich verfolgt – Gerichtsstand ist A-4020 Linz, Austria!
Contact adress:
Kontakt:
HOLZMANN MASCHINEN GmbH
4170 Haslach
Marktplatz 4
Tel.: +43 (0) 7289 71562 0
Fax: +43 (0) 7289 71562 4
HOLZMANN MASCHINEN GmbH
4170 Haslach
Marktplatz 4
Tel.: +43 (0) 7289 71562 0
Fax: +43 (0) 7289 71562 4
MO-FR 8:00-12 & 13:00-17:00 GMT +1
MO-FR 8:00-12 & 13:00-17:00 GMT +1
www.holzmann-maschinen.at
1
2
4x
S1
1x
1x
1x
1x
1x
M3
1x
1x
K
1x
1x
M4
M5
M6
V-A29
V-A33
1x
3x
L
N1
N2
Z
1x
CH1
1x
CH2
1x
W
3
1.SAFETY
READ THE MANUAL
Read and understand the owner’s manual and labels affixed to
the machine. Learn the machines application field and limitations as well as the specific potential hazards peculiar to it.
AVOID DANGEROUS CONDITIONS
Keep working area and the ground clean and free of oil and other
materials!
Assure that the working area is sufficiently lighted!
Don’t use the machine outside!
The use of the machine is forbidden if you are tired, not concentrated as well if you are under the influence of medicaments,
alcohol and other drugs. Reduce distraction sources in the working area.
BEWARE: Routine leads to insufficient attention.
OPERATOR
The machine shall be used only by trained persons wiht an age
of at least 18 years.
Non authorized personnel, especially children, shall be kept away
from the machine! Make your workshop childproof.
CLOTHING
When working with the machine, don’t wear loose clothing, long
hair openly or loose jewellery like necklaces etc. Loose objects
might be catched by rotating parts and cause serious injuries.
SAFETY EQUIPMENT
Use proper safety clothing and devices when operating the machine (safety glasses, ear protectors)!
ELECTRIC CONNECTION
Assure yourself that your feeding current complies with the requirements of the motor - check the typeplate.
Electric checks and the electric installation of the machine may
only be performed by a qualified electrician.
DO NOT touch leading machine parts.
Prior to any Cleaning, checks, maintenance or tool change shut
the machine off and disconnect it from the power supply in order
to prevent unintended start up of the machine.
GROUNDING
In the event of a malfunction or breakdown, grounding provides
a path of least resistance for electric current to reduce the risk of
electric shock. The plug must be plugged into a matching outlet
that is properly installed and grounded in accordance with all
local codes and ordinances. Improper connection of the equipment-grounding conductor can result in a risk of electric shock.
Check with a qualified electrician whether the machine is grounded properly.
www.holzmann-maschinen.at
REMOVE ADJUSTING KEYS AND WRENCHES
Form a habit of checking to see whether adjusting keys, wrenches and other objects are removed from the machine before turning it on.
DO NOT FORCE THE MACHINE
It will do a better job when being used within its power range it
has been constructed for. Do not misuse the machine or parts of
it for jobs for which it was not intended.
USE PROPER EXTENSION CORD
Make sure your extension cord is in good condition. When using
an extension cord, be sure to use one with sufficient cross-section to carry the current your machine will draw. An undersized
cord will cause a drop in the line voltage resulting in power loss
and overheating.
USE ONLY RECOMMENDED AND SAFE ACCESORIES
Use only accesories matching with the machines specifications
and being suitable for the use with the machine. Especially important are the max. allowed revolution speeds for which the
accesory is allowed to be used. Use only Accesories whose max.
allowed revolution speed is higher than the max. speed of the
machine you intend them to use with.
DRILL SAFETY
Do not drill workpieces that are too small to be supported safely.
For smaller workpieces you should install a vice onto the working
table and support the workpiece with the vice.
HAZARD FROM DUST
SOME DUST CREATED by power sanding, sawing, grinding, drilling and other construction activities contains chemicals known to
cause cancer, birth defects or other reproductive harm. Some
examples of these chemicals are:
• Lead from lead based paint
• crystalline silica from bricks and cement and other masonry products, and
• arsenic and chromium from chemically-treated lumber.
• Your risk from those exposures varies, depending on how often you do this type of work. To reduce your exposure to these
chemicals: work in a well ventilated area, and work with approved safety equipment, such as those dust masks that are
specifically designed to filter out microscopic particles.
WORK SAFETY RULES
Finally obey all general working safety rules imperative when
operating a machine and follow all rules and regulations being
in power in your country regarding safety at work, accident prevention, first aid, fire prevention.
www.holzmann-maschinen.at
DRILL SPECIFIC SAFETY RULES
Take care to remove the Chuck key from the drill chuck before
turning the machine on.
The drill bit shall not touch the workpiece when turning the machine on.
Especially workpieces with not even surface have to be clamped
by a vice.
Never change, remove, adjust workpiece while machine is running.
INTENDED USE
This vertical drill press is designed for performing vertical drills
with max. diameter of 20mm and max. drilling depth of 100mm
into suitable materials under the premise to use the correct combination of drill bits, spindle speed and feed rate.
Stainless steel can be drilled up to a diameter of 16mm
The intended use incorporates sufficient knowledge of the operator regarding the work with drill presses and regarding accident
prevention rules, sufficient material knowledge as well as sufficient maintenance.
Any manipulation of the machine is a misuse, in this case HOLZMANN-Maschinen and its sales partners cannot be made liable
for ANY direct or indirect damage.
It is imperative to obey all safety rules as well as assembly, operation and maintenance instructions to keep alive your guarantee rights.
REMAINING RISKS
The work with a drill press always incorportates some remaining
risks which can never be eliminated entirely and the operator
should be aware of:
Hazard of severe injury when touching the rotating drill bit, drill
chuck or spindle.
Hazard of cutting injury caused by sharp drill edges or sharp
metal chips.
Hazard of injury through material or parts of the workpiece being catapulted away.
SECURITY DEVICES
The drill press is equipped with an ON/OFF switch with a emergency OFF cap activating the red OFF button when being depressed.
The drill press has an automatic OFF switch which is activated as
long as the drive belt cover is not closed entirely
The drill press is equipped with a chip protection cover which
should be always used when performing drills.
3. MACHINE DESCRIPTION
2.SETUP
DELIVERY CONTENT
Unpack and separate all parts from packaging material and check with figure 1 and
2 the delivery content for completeness
before discarding any packing material.
Please report eventual missing or damaged parts immediately to your reseller.
Later claims from transport damage cannot be accepted anymore.
SEE FIGURE 1
A
Working Table
BColumn
C
User Manual
DMotor
E
Bag of Loose parts
F
Base Stand
G
Head Assembly
H
Box of Loose parts
SEE FIGURE 2
MAIN SPECIFICATION
Chuck capacity20mm
Distance Spindle to column 254mm
max. spindle travel
120mm
max. distance chuck to table 595mm
max. distance chuck to base 1075mm
Net weight144kg
Spindle speeds at
motor speed 1400rpm 700rpm
120
60
200
100
250
120
360
180
400
200
450
220
950
470
1280 640
1520 760
1840 920
24401220
34801740
ASSEMBLY
The bag (E) and box (H) of loose parts
contain:
REFER TO FIGURE 3 to install all parts correctly.
S1
M3
M4
M5
M6
K
V-A29
V-A33
L
N1
N2
Z
CH1
CH2
W
Assembly procedure is in short:
4x
1x
1x
1x
1x
1x
1x
1x
1x
1x
1x
3x
1x
2x
1x
M12x1.75-40 Hex head screw
M3 Hex L type hex wrench
M4 Hex L type hex wrench
M5 Hex L type hex wrench
M6 Hex L type hex wrench
Key-drift
V-type drive belt A29
V-type drive belt A33
Clamp-column lock
Crank (with set screw)
Handle for Crank N1
Feed Handle
Drill Chuck
Key for Drill Chuck CH1
idler pullex assembly
complete Head Assembly (G + W + Z
+D)
connect Base to Column & rack
Table onto column with rack
finished Head assembly to column
Be sure to tighten all screws and bolts securely.
1
Collar Rack
2
Screw Hex soc set M6x1.0-10
3
Table support
4Crank
5
Crank Handle
6Rack
7
Hex Screw M10x1.5-12
8
Column Support
9
Hex Head screw M12x1.75-40
10Base
11Column
12 Table Lock
www.holzmann-maschinen.at
4. OPERATION & MAINTENANCE
CHANGE SPEED
Open the BELT GUARD (1)
Loosen the BELT TENSION LOCK HANDLE (3)
5.TROUBLESHOOTING
SWITCH MACHINE ON/OFF
PROBLEM
With the DRILL ON-OFF SWITCH (21)
DETERMINE DRILLING DEPTH
Loosen the belts with the BELT TENSION
HANDLE (4)
Set DEPTH SCALE INDICATOR (16) to
Zero.
Arrange the belts into position according
to the DRILL SPEED CHART (2)
Move Chuck downwards with FEED HANDLE (6) until desired depth is reached.
Tension the belts accordingly (Do not
overtension or you will ruin the bearings)
with the BELT TENSION HANDLE (4) and
fix the chosen tension level with the BELT
TENSION LOCK HANDLE (3).
Read depth off
INDICATOR(16)
Close the BELT GUARD (1) again
CHANGE TABLE POSITION
Loosen the SUPPORT LOCK (24)
You can vary the table height with the TABLE CRANK (9)
You can swing the TABLE (13) around the
column, the rack will follow.
You can tilt the TABLE (13) by loosening
the TABLE BEVEL LOCK (25) and tilting
the table to the desired angle, which
you can read off from the TABLE BEVEL
SCALE(23)
CHUCK INSTALLATION
Be sure to keep chuck and arbor tidy and
dry.
Insert the ARBOR in to the CHUCK (18)
Insert the arbor into the quill
To remove the drill chuck turn the Quill
down with the FEED HANDLE (6) and insert the WEDGE KEY into the slot.
Hit the key end with a wooden or rubber
hammer to release the arbor.
Hold with your left hand the chuck in order to prevent it from dropping onto the
table.
Noisy Operation
the
DEPTH
SCALE
Drill bit burns
Tighten the DEPTH SCALE LOCK (17).
RUNNING DIRECTION (ONLY LR)
With the SB 4132LR model you can choose the running direction of the spindle with
the switch on the gearhead.
Put the switch into 0 Position and wait until
the spindle stands still before you change
running direction.
FEED SPRING ADJUSTMENT
You can adjust the feed tension with the
FEED SPRING ADJUSTMENT without removing the SPRING CAP (20).
This makes sense when the quill returns
too fast or too slow.
LUBRICATION
All ball bearings are sealed and require no
further lubrication.
You should lubricate the table elevation
mechanism, namely the rack, wormgear
and handle.
Furthermore lubricate with grease the
spindle/quill.
Coat regularily the table and ground plate
as well as all other non coated metal parts
with a thin layer of anticorrosion oil-based
solvent.
CLEANING
Frequently blow out any dust that may accumulate inside the motor.
Clean the table etc. from metal and wood
chips and dust after every usage.
www.holzmann-maschinen.at
PROBABLE CAUSE
1.
2.
3.
Incorrect belt tension
Dry Spindle
Loose Spindle pulley
4.
Loose motor pulley
1.
2.
Incorrect speed
Chips not coming out
of hole
3.
4.
5.
Dull drill bit
Feeding too slow
Not lubricated
SOLUTION
1.
Adjust tension
2.
Lubricate spindle
3.
Check tightness of
retaining nut on
pulley and tighten if
necessary
4.
Tighten setscrews in
pulleys
1.
Change speed
2.
Retract drill bit
frequently to clear chips.
3.
Resharpen drill bit
4.
Faster feed speed
5.
Lubricate drill bit
Drill bit leads off to a direc- 1.
Hard grain in wood
tion, hole not round
2.
Cutting lips of bit not
equally long or have
not equal angles
3.
bent drill bit
4.
Spindle bearings too
loose
1.
2.
try to avoid
resharpen or change
3.
4.
change bit
Fasten Nut pulley (19) tighter
Wood splinters on undersi- 1. No back-up material
de
on underside of
workpiece
1.
Place a scrap wood as
back-up material
under your workpiece
Drill bit stalls in material
To high feed rate
dull drill bit
Inproper belt tension
Bit not suitable for
material or material
too hard (e.g. some stainless steel types)
1. Reduce feed rate
2.sharpen/replace
3.
Increase belt tension
4.
Choose correct bit
Bent drill bit
Worn spindle bearings
Drill not properly
installed in chuck
Chuck defect
arbor or chuck
surface dirty
1.Replace
2.Replace
3.Check
1.
2.
3. 4.
Excessive drill bit runout or 1.
wobble
2.
3.
4.
5.
4.Check/replace
5.Check/clean
Quill returns too slow / too 1. Inproper spring
fast
tension
1.
Chuck does not stay atta- 1.
ched to spindle or it falls off when trying to install it
1. Check and clean if
necessary
arbor, chuck or quill
surface dirty, greasy
Adjust spring tension
1.SICHERHEIT
LESEN SIE DIE BEDIENUNGSANLEITUNG
Lesen Sie die Bedienungsanleitung aufmerksam durch, machen
Sie sich mit der Bedeutung der Aufkleber auf der Maschine vertraut. Machen Sie sich mit der Maschine und ihrer Funktionsweieise, Gefahrenquellen und Leistungsfähigkeit vertraut.
VERMEIDEN SIE GEFÄHRLICHE SITUATIONEN
Arbeitsumgebung und Boden stets sauber und trocken halten!
Sorgen Sie für ausreichende Beleuchtung!
Die Benutzung der Maschine im Freien ist untersagt!
Die Bedienung der Maschine unter dem Einfluss von Müdigkeit
oder bewußtseinsbeeinträchtigenden Substanzen wie Alkohol,
Medikamente oder Drogen ist streng verboten!
Arbeiten Sie stets hoch konzentriert! Routine führt zu Unaufmerksamkeit - Unaufmerksamkeit ist die häufigste Ursache für
Arbeitsunfälle! Reduzieren Sie potentielle Ablenkungs- und Störquellen in Ihrer Arbeitsumgebung auf ein Minimum.
BEDIENPERSONAL
Bedienung nur durch Personen ab 18 mit ausreichender fachlicher Eignung. Halten Sie Unbefugte, insbesondere Kinder, von
der Maschine fern! Richten Sie Ihre Werkstatt kindersicher ein
mit Hauptschaltern für Stromversorung und weiteren Unfallverhütungsmaßnahmen.
BEKLEIDUNG
Tragen Sie Arbeitskleidung. Keine abstehende Kleidungsstücke
oder loose abstehende Ärmel. Looses offenes Haar sowie das
Tragen von Schmuck ist verboten. Diese könnten sich in rotierenden Teilen verfangen und zu schwersten Verletzungen führen!
SICHERHEITSAUSRÜSTUNG
Tragen Sie während dem Betrieb unbedingt eine CE geprüfte
Schutzbrille sowie Gehörschutz. Tragen Sie keine Handschuhe!
ELEKTRISCHER ANSCHLUSS
Vergewissern Sie sich dass die Speisestromspannung mit den
Anforderungen der Maschine übereinstimmt (V/Hz).
Die Maschine muss für den Fall einer Fehlfunktion oder eines
Kurzschlusses an einer ordnungsgemäß geerdeten Steckdose
angeschlossen sein. Ansonsten besteht im Falle eines Defektes
Lebensgefahr!
Lassen Sie die ordnungsgemäße Erdung der Maschine durch einen qualifizierten Elektrofachmann prüfen.
MASCHINE AUSSCHALTEN
Lassen Sie die Maschine nie unbeaufsichtigt laufen. Vor Verlassen des Arbeitsbereiches ist die Maschine auszuschalten und von
der Stromversorgung zu trenne.
www.holzmann-maschinen.at
GEGENSTÄNDE VON MASCHINE ENTFERNEN
Prüfen Sie vor jeder Inebtriebnahme, dass alle Schlüssel und
sonstigen Werkzeuge/Gegenstände von der Maschine entfernt
wurden. Herumliegende Gegenstände stellen eine Gefahrenquelle dar.
ÜBERBEANSPRUCHEN SIE DIE MASCHINE NICHT
Sie erzielen bessere Ergebnisse, wenn Sie die Maschine innerhalb
ihres Leistungsspektrums verwenden. Die Überlastung der Maschine erhöht die Unfallgefahr und verkürzt die Lebensdauer der
Maschine beträchtlich. Sie kann zu Maschinendefekten führen,
die nicht durch Gewährleistung oder Garantie abgedeckt sind.
GEEIGNETES VERLÄNGERUNGSKABEL
Ihr Verlängerungskabel sollte genügend Querschnitt aufweisen,
damit die Maschine stets mit genügend Strom versorgt wird.
Der Mindestquerschnitt hängt von der Stromaufnahme des Motors (Motorplakette) sowie der Länge des Verlängerungskabels
ab. Ungeeignete Verlängerungskabel beeinträchtigen die Motorleistung und können diesen sogar überhitzen.
NUR PASSENDES & GEPRÜFTES WERZEUG
Verwenden Sie ausschließlich CE-geprüfte Werkzeuge.
Das Werkzeug sollte den Maschinenanforderungen in Drehzahl
etc. genügen und an das zu bearbeitende Material passend gewählt sein!
WERSTÜCKSICHERUNG
Bearbeiten Sie keine Werkstücke, die zu klein sind, um sicher
fixiert zu werden. Kleinere Werkstücke sollten mit einem montierten Schraubstock fixiert werden.
GESUNDHEITLICHE SCHÄDIGUNG DURCH STAUB
Manche Werkstücke bestehen ganz/teilweise aus Materialien,
deren Staub eingeatmet krebserregend und/oder anderweitig
gesundheitsgefährdend sein kann. Beispielsweise:
• Bleistaub von bleibasierenden Lackierungen
• Quarz und kieselsäurehaltiges Material (z.B. Ziegel, Zement etc. )
• Arsen und chromhaltige Holzlackierungen
Das tatsächliche Risiko hängt von den Materialien ab, die Sie bearbeiten. Bitte informieren Sie sich diesbezüglich und schützen
Sie sich bei Bedarf mit geeigneten Atmeschutzmasken.
ARBEITSSICHERHEIT UND UNFALLVERHÜTUNG
Es sind sämtliche in ihrem Land gültigen Vorschriften zu Arbeitsund Arbeitsplatzsicherheit sowie Unfallprävention zu befolgen.
www.holzmann-maschinen.at
BESTIMMUNGSGEMÄSSE VERWENDUNG
Die SB 4132SM ist eine Ständerbohrmaschine mit Keilriemenantrieb mit 24 wählbaren Geschwindigkeiten. Es können Bohrungen
bis max. 20mm Durchmesser und 100mm Bohrtiefe in vertikaler
Richtung durchgeführt werden unter Berücksichtigung, dass Zustellgeschwindigkeit, Drehzahl-Geschwindigkeit sowie Bohrerprofil auf das zu bearbeitende Material abzustimmen sind!
Zur bestimmungsgemäßen Verwendung gehört auch die Einhaltung der Betriebs-, Wartungs- und vor allem Sichherheitshinweise als auch die Einhaltung aller generellen Unfallverhütungs- und
Arbeitsplatzsicherheitsvorschriften.
Zur Wahrung ihrer Garantie- & Gewährleistungsansprüche und
im Interesse der Produktsicherheit sollten Sie diese stets und in
vollem Umfang befolgen.
Eigenmächtige Veränderungen an der Maschine schließen jegliche Haftung des Herstellers für direkt oder indirekt daraus resultierenden Schäden gänzlich aus!
RESTRISIKEN
Die Arbeit mit einer Ständerbohrmaschine bringt stets nicht
gänzlich eliminierbare Restrisiken mit sich:
Schwere Verletzungen bei Eingreifen in das laufende Bohrfutter
oder Bohrer.
Schnittverletzung durch Kontakt mit scharfen Bohrkanten, Bohrspitze.
Schwerste Verletzung durch das Erfassen und Eindrehen von abstehenden Kleidungsstücken.
Verletzungen durch Herauskatapultieren von Spänen oder splitternden Werkstücken.
SICHERHEITSVORRICHTUNGEN
Die Ständerbohrmaschine ist mit einem EIN/AUS SCHALTER mit
Notausabdeckkappe ausgestattet. Das Drücken der Notauskappe aktiviert den roten AUS Knopf.
Die Ständerbohrmaschine ist weiters mit einem Micro-Ausschalter ausgestattet, der an der Innenseite der Riemenabdeckung
montiert ist. Die Ständerbohrmaschine kann nur dann eingeschalten werden, wenn die Abdeckung vollständig geschlossen
ist!
Die wegklappbare Schnellspannfutterabdeckung aus Plexiglas
sorgt für zusätzliche Sicherheit gegen herumfliegende Späne.
3.MASCHINENBESCHREIBUNG
2.INBETRIEBNAHME
LIEFERUMFANG
Packen Sie alle Maschinenkomponenten
und Kleinteile aus und überprüfen Sie diese auf etwaige Transportschäden sowie
auf Vollständigkeit mithilfe der Abbildungen 1 und 2.
Melden Sie bitte etwaige Transportschäden oder fehlende Teile umgehend, spätere Reklamationen können nicht mehr berücksichtigt werden.
LIEFERUMFANG ABBILDUNG 1
AArbeitstisch
BSäule
CBenutzerhandbuch
DMotor
EKleinteilesäckchen
FMaschinenfuß
GBohrkopf
HKleinteilebox
SIEHE ABBILDUNG 2
Das Kleinteilesäckchen (E) und die Kleinteilebox (H) beinhalten:
S1
M3
M4
M5
M6
K
V-A29
V-A33
L
N1
N2
Z
CH1
CH2
W
4x
1x
1x
1x
1x
1x
1x
1x
1x
1x
1x
3x
1x
1x
1x
M12x1.75-40 6-Kantschrauben
M3 Inbusschlüssel
M4 Inbusschlüssel
M5 Inbusschlüssel
M6 Inbusschlüssel
Austreiber
Keilriemen A29
Keilriemen A33
Klemmschraube
Kurbel (mit Stellschraube)
Griff für Kurbel N1
Zustellgriff
Bohrfutter
Bohrfutterschlüssel zu CH1
Übersetzungsriemenscheibe
TECHNISCHE DATEN
Bohrleistung 20mm
Bohrleistung Stahl
16mm
Ausladung254mm
max. Spindelhub120mm
max. Abstand Spindel-Tisch 595mm
Abstand Spindel-Fuß
1075mm
Nettogewicht144kg
Spindeldrehzahlen bei
Motordrehzahl
1400U/Min700U/Min
120
60
200
100
250
120
360
180
400
200
450
220
950
470
1280 640
1520 760
1840 920
24401220
34801740
MONTAGE
SIEHE ABBILDUNG 3 für Montageanleitung.
Prüfen Sie, dass alle Schrauben und Muttern fest angezogen sind.
1
Abschlußring für Zahngestänge
2
Wurmschraube M6x1.0-10
3Tischhalterung
4Kurbel
5
Kurbelgriff
6Zahngestänge
7
Wurmschraube M10x1.5-12
8Säulenhalterung
9
Sechskantschraube M12x1.75-40
10Maschinenfuß
11Säule
12Fixierbolzen
13Gewindeschnecke
14Tisch
15Bohrfutterschlüssel
16 Bohrkopf zusammengebaut
Hinweise zu Montage:
Säule 11 mit Wurmschraube 7 zu Halterung 8 fixieren.
Zahngestänge 6 auf 11 auflegen, Tischhalterung von oben auf Säule+Zahngestänge
stecken, Zahngestänge fixieren mit Abschlußring 1 und diesen fixieren mit 2.
Gewindeschnecke 13 in Tischhalterung 3
einlegen, Kurbel 4 auf Tischhalterung 3
montieren.
www.holzmann-maschinen.at
4. BETRIEB & WARTUNG
5.FEHLERBEHEBUNG
TRENNEN SIE VOR JEGLICHEN EINSTELLARBEITEN SOWIE REINIGUNG DIE MASCHINE VON DER STROMVERSORGUNG!
DREHZAHL WECHSELN
Öffnen Sie die RIEMENABDECKUNG (1)
Lösen Sie den FIXIERHEBEL
RIEMENSPANNUNG (3)
Lösen Sie die Riemen mit dem RIEMENSPANNHEBEL (4)
Arrangieren Sie die Riemen in die Position gemäß den Anforderungen der DREHZAHLTABELLE (2).
Spannen Sie die Riemen wieder auf Betriebsspannung (nicht zu fest spannen ansonsten ruinieren Sie die Lager) mit dem
RIEMENSPANNHEBEL (4) und fixieren Sie
die Spannung mit dem FIXIERHEBEL (3)
Schließen Sie die RIEMENABDECKUNG (1)
wieder.
TISCHVERSTELLUNG
Lösen Sie den FIXIERHEBEL (24)
Sie können den TISCH (13) durch Drehen
der KURBEL (9) in der Höhe verstellen.
Sie können den TISCH (13) mitsamt dem
ZAHNGESTÄNGE (12) um die Säule drehen.
Sie können den Tisch schwenken. Dazu
lösen Sie den TISCHHALTEBOLZEN (22),
schwenken den TISCH - wenn Sie den gewünschten Neigungsgrad erreicht haben,
abzulesen an SCHWENKSKALA (23), Fixieren Sie den Tisch in der Position mit
dem TISCHHALTEBOLZEN (22).
BOHRFUTTER
Halten Sie BOHRFUTTER (18) und AUFNAHMEDORN stets sauber.
Stecken Sie den Dorn ins Bohrfutter und
stecken Sie den Dorn (mit der Dornseite)
in die Pinolenaufnahme.
Zum Entfernen, drehen Sie mit dem Zustellgriff die Pinole etwas nach unten, bis
Sie einen Schlitz sehen, führen den Austreibkeil ein und schlagen mit einem Holzoder Gummihammer leicht auf die Hinterkante bis sich der Dorn von der Pinole
löst. Halten Sie dabei mit der linken Hand
das Bohrfutter.
MASCHINE EIN-/AUSSCHALTEN
MIt dem EIN- AUSSCHALTER (21)
PROBLEM
Lautes Betriebsgeräusch
1.
falsche Riemenspannung
2.
trockene Spindel
3.
Lockere Spindelriemenscheibe
Verbrennungsspuren
1.
zu hohe Drehzahl
2.
Späne werden nicht ausgeworfen
BOHRTIEFENEINSTELLUNG
Stellen Sie die BOHRTIEFENANZEIGE (16)
auf 0.
Stellen Sie bis auf die gewünschte Bohrtiefe zu. Die Bohrtiefe können Sie auf der
BOHRTIEFENSKALA (16) ablesen.
Ziehen Sie den BOHRTIEFENBEGRENZER
(17) an.
BEHEBUNG
1.Spannung
nachjustiern
2.Nachfetten
3.
Prüfen Sie die Halte-
mutter der Spindelriemenscheibe.
4.
Lockere Motorriemen- 4.Stellschrauben
scheibe
nachziehen
3.
stumpfe Bohrspitze
4.
zu langsame
Zustellung
5.
keine Kühlung
(bei Metall)
RÜCKHOLFEDERSPANNUNG
Sie können die Spannung der Rückziehblattfeder mit der FEDEREINSTELLUNG
nachjustieren, ohne die FEDERABDECKUNG (20) abnehmen zu müssen.
MÖGLICHE URSACHE
1.Reduzieren
2.
Bohrer öfter zurück-
ziehen bei tiefen
Bohrungen
3.schärfen
4.
schneller zustellen
5.
Bohrer kühlen
Bohrer zieht in eine Richtung 1.
weg, ovales Bohrloch
2.
3.
4.
Knoten in Holz
Bohrspitze ungleichmäßig lang oder in Winkel abweichend
Bohrer verbogen
Lager zu locker
1.Vermeiden
2.Bohrerwechsel
Alle Kugellager sind versiegelt und bedürfen keiner Schmierung.
Holz splittert unten aus
1. Kein Unterlageholz
1.
Holz unterlegen
Sorgen Sie für stets gute Schmierung der
Spindel-/Pinoleneinheit, des Zahngestänges, sowie aller anderen Verbindungsteile.
Bohrer bleibt stecken
1.
Zu schnelles
Zustellen
2.
stumpfe Bohrspitze
3. Riemen zu locker
1. langsamer Zustellen
Tun Sie dies, wenn die Pinole zu schnell
bzw. zu langsam zurückfährt.
SCHMIERUNG
Bedecken Sie alle nicht lackierten Metallteile regelmäßig mit einer dünnen Schicht
Maschinenöl, um Korrosion vorzubeugen.
REINIGUNG
Blasen Sie mit Druckluftstrahl den Motor
aus, um Dreck- und Staubablagerungen
im Motorinnenraum zu vermeiden!
Entfernen Sie die Metall- und Holzspäne
sowie Staub nach jedem Betrieb.
Benutzen Sie zum Entfernen von Metallspänen einen Spänebesen.
4.
Bohrer nicht für
Material geeignet
2.schärfen/wechseln
3.Riemenspannung
erhöhen
4.
geeigneten Bohrer
verwenden
zu hohe Rundlaufungenau- 1.
Bohrer verbogen
igkeit
2.
Lager abgenutzt
3.
Bohrer nicht korrekt
angezogen
4.
Bohrfutter defekt
5.Bohrfutteraufnahme
oder Dorn
verschmutzt
1.
Bohrer wechseln
2.Wechseln
3.Prüfen
Pinole geht zu schnell oder
zu langsam zurück
1.
Feder richtig spannen
1. Reinigen
1. falsche
Federspannung
Bohrfutter/Dorn läßt sich 1.Bohrfutteraufnahme
nicht installieren, fällt hinn- oder Dorn fettig/
unter
verschmutzt
www.holzmann-maschinen.at
3.Bohrerwechsel
4.
Ziehen Sie die
Mutter (19) fester an
4.Wechseln
5.Reinigen
6. WIRING DIAGRAM / SCHALTDIAGRAMM
www.holzmann-maschinen.at
7. SPARE PARTS / ERSATZTEILE
www.holzmann-maschinen.at
KONFORMITÄTSERKLÄRUNG / DECLARATION OF CONFORMITY
Distributor/Inverkehrbringer
HOLZMANN MASCHINEN GmbH
4170 Haslach, Marktplatz 4
AUSTRIA
Hereby we declare, that the below mentioned machine complies with all relevant safety
and health requirements of the below stated directives. Any manipulation of the machine not explicitly approved by us renders this document null and void.
Hiermit erklären wir, dass die nachfolgend genannte(n) Maschine(n) aufgrund ihrer
Bauart und in der von uns in Verkehr gebrachten Version den grundlegenden Sicherheits- und Gesundheitsanforderungen der angeführten EG-Richtlinien entspricht. Diese
Erklärung verliert ihre Gültigkeit, wenn Veränderungen an der Maschine vorgenommen
werden, die nicht mit uns im Vorfel schriftlich abgestimmt wurden.
MACHINE TYPE / MASCHINENTYPE
drill press / Ständerbohrmaschine
MODEL NAME / MODELLBEZEICHNUNG
HOLZMANN SB 4132SM
DIRECTIVES / RICHTLINIEN
2006/42/EC
2006/95/EC
APPLIED NORMS / ANGEWANDTE NORMEN
EN
EN
EN
EN
ISO 12100-1:2003+A1:2009
ISO 12100-2:2003+A1:2009
60204-1:2006+A1:2009
ISO 14121-1:2007
Haslach07.01.2011
Place,/Ort Date/datum
USE ORIGINAL SPARE PARTS ONLY!
VERWENDEN SIE NUR ORIGINAL-ERSATZTEILE!
www.holzmann-maschinen.at
Klaus Schörgenhuber, CEO
GUARANTEE & SERVICE
GARANTIE & SERVICE
GUARANTEE (applicable from 09.03.2011)
Please consult our troubleshooting section for initial problem solving. Feel free to contact
your HOLZMANN reseller or us for Customer Support!
Warranty claims based on your sales contract with your HOLZMANN retailer, including
your statutory rights, shall not be affected by this guarantee declaration.
HOLZMANN-MASCHINEN grants guarantee according to following conditions:
A)
The guarantee covers the correction of deficiencies to the tool/machine, at no
charge, if it can be verified adequately that the deficiencies were caused by a material or
manufacturing fault.
B)
The guarantee period lasts 12 months, and is reduced to 6 months for tools in commercial use. The guarantee period begins from the time the new tool is purchased from
the first end user. The starting date is the date on the original delivery receipt, or the
sales receipt in the case of pickup by the customer.
C) Please lodge your guarantee claims to your HOLZMANN reseller you acquired the
claimed tool from with following information:
>> Original Sales receipt and/or delivery receipt
>> Service form (see next page) filed, with a sufficient deficiency report
>> for spare part claims: a copy of the respective exploded drawing with the required spare parts being marked clear and unmistakable.
D) The Guarantee handling procedure and place of fulfilment is determined according
to HOLZMANNs sole discretion in accordance with the HOLZMANN retail partner. If there
is no additional Service contract made including on-site service, the place of fulfilment is
principally the HOLZMANN Service Center in Haslach, Austria.
Transport charges for sendings to and from our Service Center are not covered in this
guarantee.
E) The Guarantee does not cover:
- Wear and tear parts like belts, provided tools etc., except to intial damage which has to
be claimed immediately after receipt and inital check of the machine.
- Defects in the tool caused by non-compliance with the operating instructions, improper
assembly, insufficient power supply, improper use, abnormal environmental conditions,
inappropriate operating conditions, overload or insufficient servicing or maintenance.
- Damages being the causal effect of performed manipulations, changes, additions made
to the machine.
- Defects caused by using accessories, components or spare parts other than original
HOLZMANN spare parts.
-Slight deviations from the specified quality or slight appearance changes that do not affect functionality or value of the tool.
- Defects resulting from a commercial use of tools that - based on their construction and
power output - are not designed and built to be used within the frame of industrial/commercial continuous load.
F)
Claims other than the right to correction of faults in the tool named in these guarantee conditions are not covered by our guarantee.
G) This guarantee is voluntary. Therefore Services provided under guarantee do not
lengthen or renew the guarantee period for the tool or the replaced part.
SERVICE
After Guarantee and warranty expiration specialist repair shops can perform maintenance
and repair jobs. But we are still at your service as well with spare parts and/or machine
service. Place your spare part / repair service cost inquiry by filing the SERVICE form on
the following page and send it:
via Mail to [email protected]
via Fax to +43 7248 61 116 6
www.holzmann-maschinen.at
GARANTIE (Stand 09.03.2011)
Mängelhaftungsansprüche des Käufers aus dem Kaufvertrag gegenüber dem Verkäufer
(Holzmann Vertriebspartner) sowie gesetzliche Gewährleistungsrechte des jeweiligen
Landes werden durch diese Garantieerklärung nicht berührt.
Für diese Maschine leisten wir Garantie gemäß folgenden Bedingungen:
A) Die Garantie umfasst die unentgeltliche Beseitigung aller Mängel an der Maschine,
nach Maßgabe der nachfolgenden Regelungen (B-G), welche die ordnungsgemäße Funktion der Maschine beeinträchtigen und nachweislich auf Material- oder Herstellungsfehler
beruhen.
B) Die Garantiezeit beträgt 12 Monate, bei gewerblicher Nutzung 6 Monate, gültig ab
Lieferung der Maschine an den Erstendabnehmer. Als Nachweis ist der Original-Ablieferbeleg maßgeblich, bei Selbstabholung der Maschine der Original Kaufbeleg.
C) Zur Anmeldung von Garantieansprüchen kontaktieren Sie bitte den HOLZMANN
Vertriebspartner, von dem Sie die Maschine erworben haben, mit folgenden Unterlagen:
>> Kaufbeleg und/oder Ablieferbeleg
>> ausgefülltes Serviceformular mit Fehlerbericht
>> Bei Anforderung von Ersatzteilen eine Kopie der Ersatzteilzeichnung, mit den
benötigten Ersatzteilen markiert.
D) Die Garantieabwicklung und der Ort der Garantieerfüllung erfolgt nach Maßgabe der
HOLZMANN GmbH. Leicht zu behebende Mängel werden durch unsere Vertriebspartner
beseitigt, bei komplexeren Defekten behalten wir uns eine Begutachtung in 4707 Haslach,
Österreich vor. Sofern nicht explizit ein zusätzlicher Vor-Ort Servicevertrag abgeschlossen
ist, gilt als Erfüllungsort der Garantieleistung stets der HOLZMANN-MASCHINEN Firmensitz in 4707 Haslach, Österreich. Die im Rahmen einer Garantiebearbeitung anfallenden
allfälligen Transportkosten von und zum Firmensitz sind in dieser Hersteller-Garantie nicht
abgedeckt.
E)
Garantieausschluss bei Mängeln:
-an Maschinenteilen, welche gebrauchsbedingten oder sonstigen natürlichen Verschleiß
unterliegen, sowie Mängeln an der Maschine, die auf einen gebrauchsbedingten oder
sonstigen natürlichen Verschleiß zurückzuführen sind.
-die auf unsachgemäße oder fahrlässige Montage, Inbetriebnahme, bzw. Anschluss an
das elektrische Netz zurückzuführen sind.
-die auf Nichtbeachtung von Bedienungshinweisen, nicht bestimmungsgemäßen Gebrauch, atypischen Umweltbedingungen, sachfremden Betriebsbedingungen und Einsatzgebiet, mangelnde bzw. unsachgemäße Wartung oder Pflege zurückzuführen sind.
-die durch die Verwendung sowie Einbau von Zubehör-, Ergänzungs- oder Ersatzteilen
verursacht wurden, die keine Original HOLZMANN Ersatzteile sind.
-die geringfügige Abweichungen vom Soll-Zustand darstellen, welche für den Wert oder
die Gebrauchstauglichkeit der Maschine unerheblich sind.
-die auf fahrlässige konstruktionsbedingte Überbeanspruchung zurückzuführen sind. Insbesondere bei Mängeln durch Nutzung, welche durch Belastungsniveau und Umfang als
gewerblich einzustufen sind, bei Maschinen, die nach Bauart und Leistungsvermögen
nicht für den gewerblichen Gebrauch konstruiert und bestimmt sind.
F)
Im Rahmen dieser Garantie sind weitere Ansprüche des Käufers über die hier ausdrücklich genannten Garantieleistungen hinaus ausgeschlossen.
G) Diese Hersteller-Garantie wird freiwillig übernommen. Garantieleistungen bewirken
daher keine Verlängerung der Garantiefrist und setzen auch keine neue Frist, auch nicht
für Ersatzteile, in Gang.
SERVICE
Nach Ablauf der Garantiezeit können Instandsetzungs- und Reparaturarbeiten von entsprechend geeigneten Fachfirmen durchgeführt werden. Es steht Ihnen auch die HOLZMANN-Maschinen GmbH weiterhin gerne mit Service und Reparatur zur Seite. Stellen Sie
in diesem Fall eine unverbindliche Kostenanfrage, unter Angabe der Informationen siehe
C) an unseren Kundendienst oder senden Sie uns Ihre Anfrage per umseitig beiliegendem
Formular ein. Mail: [email protected] FAX: +43 (0) 7248 61116 6
SERVICE FORM / SERVICEFORMULAR
Please tick one box from below / Bitte kreuzen Sie eine der untenstehenden an:
service inquiry
spare part inquiry guarantee claim
/
/
/
Serviceanfrage
Ersatzteilanfrage
Garantieantrag
1. Senders information (* required) / Daten Antragsteller (* sind Pflichtfelder)
*First name, Family name / Vorname, Nachname
____________________________
*Street, house number / Straße, Hausnummer
____________________________
*ZIP Code, place / PLZ, Ort
____________________________
*Country / Staat____________________________
*(mobile)Phone / Telefon bzw. Mobiltel.
International numbers with country code
____________________________
* E-Mail ____________________________
Fax____________________________
2. Tool information / Geräteinformationen
serial number/Seriennummer:_________*Machine type/Maschinentype:____________
2.1 Required spare parts / benötigte Ersatzteile
Part No° / Ersatzteilnummer Description / Beschreibung
Number/Anzahl
2.2 Problem
description / Problembeschreibung
Please describe amongst others in the problem:
What has caused the problem/defect, what was the last activity before you noticed the problem/defect?
For electric problems: Have you had checked your electric supply and the machine already
by a certified electrician?
3.
Additional information Bitte führen Sie in der Fehlerbeschreibung unter anderem an:
Was hat den Defekt verursacht bzw. was war die letzte durchgeführte Tätigkeit, bevor Ihnen das Problem/der Defekt aufgefallen ist?
Bei Elektrodefekten: Wurde die Stromzuleitung sowie die Maschine bereits von einem
Elektrofachmann geprüft?
/
Bitte Beachten
INCOMPLETELY FILED SERVICE FORMS CANNOT BE PROCESSED!
FOR GUARANTEE CLAIMS PLEASE ADD A COPY OF YOUR ORIGINAL SALES /
DELIVERY RECEIPT OTHERWISE IT CANNOT BE ACCEPTED.
FOR SPARE PART ORDERS PLEASE ADD TO THIS SERVICE FORM A COPY OF
THE RESPECTIVE EXPLODED DRAWING WITH THE REQUIRED SPARE PARTS
BEING MARKED CLEARLY AND UNMISTAKABLE.
THIS HELPS US TO IDENTIFY THE REQUIRED SPARE PARTS FASTLY AND ACCELERATES THE HANDLING OF YOUR INQUIRY.
UNVOLLSTÄNDIG AUSGEFÜLLTE FORMULARE KÖNNEN NICHT BEARBEITET
WERDEN!
GARANTIEANTRÄGE KÖNNEN AUSSCHLIESSLICH UNTER BEILAGE DES
KAUFBELEGES/ABLIEFERBELEGES AKZEPTIERT WERDEN.
BEI ERSATZTEILBESTELLUNGEN LEGEN SIE DIESEM FORMULAR EINE KOPIE
DER BETREFFENDEN ERSATZTEILZEICHNUNG BEI! MARKIEREN SIE DARAUF
DIE BENÖTIGTEN ERSATZTEILE. DIES ERLEICHTERT UNS DIE IDENTIFIZIERUNG UND ERMÖGLICHT SO EINE RASCHERE BEARBEITUNG.
THANK YOU FOR YOUR COOPERATION!
VIELEN DANK!
www.holzmann-maschinen.at