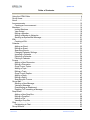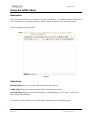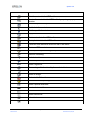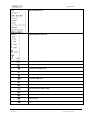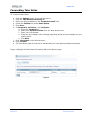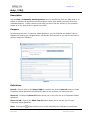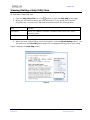
1
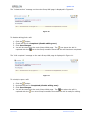
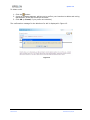
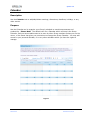
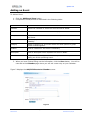
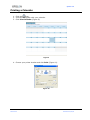
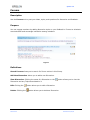
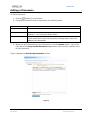
Epsilen 2.0
User Manual
For
Groups
Page 1 of 85
Manual 2.0
Version 1.0
Published 5/04/09
Epsilen 2.0
Table of Contents
Using the HTML Editor ..................................................................................................... 4
Group Home ..................................................................................................................... 7
About .............................................................................................................................. 11
Announcements .............................................................................................................. 12
Creating an Announcement ....................................................................................... 13
Members ......................................................................................................................... 14
Inviting Members ....................................................................................................... 15
View Invited ............................................................................................................... 18
Editing a Member....................................................................................................... 19
Adding a Member to Networks................................................................................... 20
Sending an Epsilen Mail Message ............................................................................. 21
Wiki ................................................................................................................................. 22
Creating a Wiki .......................................................................................................... 23
Calendar ......................................................................................................................... 31
Adding an Event ........................................................................................................ 33
Editing an Event......................................................................................................... 34
Searching Events....................................................................................................... 35
Changing Calendar Settings ...................................................................................... 36
Importing a Calendar ................................................................................................. 37
Exporting a Calendar ................................................................................................. 38
Printing a Calendar .................................................................................................... 39
Forums ........................................................................................................................... 40
Adding a New Discussion .......................................................................................... 41
Editing a Discussion .................................................................................................. 42
Group Forum Topics .................................................................................................. 43
Adding a Topic ........................................................................................................... 44
Editing a Topic ........................................................................................................... 45
Group Forum Replies ................................................................................................ 46
Adding a Reply .......................................................................................................... 47
Editing a Reply........................................................................................................... 48
Searching the Forums ............................................................................................... 49
Group Mail ...................................................................................................................... 50
Sending a New Message ........................................................................................... 52
Viewing a Message .................................................................................................... 53
Downloading an Attachment ...................................................................................... 54
Replying To/Forwarding a Message .......................................................................... 55
Drop Boxes ..................................................................................................................... 56
Adding a New Drop Box ............................................................................................ 57
Editing a Drop Box ..................................................................................................... 58
Adding a File .............................................................................................................. 59
Viewing a Drop Box ................................................................................................... 60
Chat ................................................................................................................................ 61
Participating in Chat................................................................................................... 62
Group Website ................................................................................................................ 63
Page 2 of 85
Manual 2.0
Version 1.0
Published 5/04/09
Epsilen 2.0
Take Notes ..................................................................................................................... 66
Saving Group Notes .................................................................................................. 67
Sending Group Notes ................................................................................................ 68
Exporting Take Notes ................................................................................................ 68
Forwarding Take Notes ............................................................................................. 69
Help / FAQ ...................................................................................................................... 70
Viewing/Rating a Help/FAQ Item ............................................................................... 71
Requesting Help from the Help Desk......................................................................... 72
Show/Hide Tools............................................................................................................. 73
Showing/Hiding Tools/Features ................................................................................. 73
Custom Tools ................................................................................................................. 74
Group Options ................................................................................................................ 77
Group Details (Owners only)...................................................................................... 77
Registration Settings (Owners only) .......................................................................... 78
Public Web Address Options (Owners only) .............................................................. 79
Change Group Ownership (Owners only) .................................................................. 79
Member Profile (All Group Members) ........................................................................ 80
Take Notes Forwarding (All Group Members) ........................................................... 81
Welcome Message (Owners only) ............................................................................. 82
Theme Settings (Owners only) .................................................................................. 83
Owner View .................................................................................................................... 84
Page 3 of 85
Manual 2.0
Version 1.0
Published 5/04/09
Epsilen 2.0
Using the HTML Editor
Description
The HTML editor allows you to create a rich-text environment. It is used throughout Epsilen for
your convenience in entering text and/or HTML content to achieve your intended results.
Figure 1 displays the HTML editor.
Figure 1
Definitions
Normal View allows you to type, add content and edit content.
HTML View allows you to type and add HTML markup to the content.
Preview View allows you to see the content as it would appear to your users. In this view,
the content is not editable.
The function of each button in the HTML editor is described in the following table.
Page 4 of 85
Manual 2.0
Version 1.0
Published 5/04/09
Epsilen 2.0
Button
Function
Print the content in the HTML editor.
Preview the content in the HTML editor by opening a popup
window.
Find and replace the specified text.
Spell-check the content.
Cut the specified content.
Copy content from the HTML editor.
Paste content into the HTML editor.
Paste plain text into the HTML editor.
Paste text from Microsoft Word into the HTML editor.
Paste as HTML content.
Clean up HTML (remove tags, etc.).
Remove formatting.
Undo last action.
Redo last (undone) action.
Insert a hyperlink.
Remove hyperlink functionality from selected text.
Insert a file.
Insert an image.
Embed a YouTube video.
Insert an emoticon (smiley).
Insert a special character.
Insert a horizontal line.
Insert numbered list.
Insert bulleted list.
Indent text.
Outdent text.
Page 5 of 85
Manual 2.0
Version 1.0
Published 5/04/09
Epsilen 2.0
Select desired font.
Select desired text size.
Change color of selected text.
Highlight selected text.
Boldface selected text.
Italicize selected text.
Underline selected text.
Strikethrough text.
Superscript text.
Subscript text.
Convert text to upper case.
Convert text to lower case.
Left-justify text.
Center text.
Right-justify text.
Page 6 of 85
Manual 2.0
Version 1.0
Published 5/04/09
Epsilen 2.0
Group Home
Description
The Home page serves as an introduction to the Group environment.
Purpose
Use the Home page to offer Announcements (using the Announcements tool), conduct searches
for Group content, and monitor the Footprint to see which Group members have visited.
Figure 1
Definitions
Search For: Enter search terms in this field to search various areas of the Group.
Switch to Group: Use this drop-down menu to quickly navigate between your Groups.
What’s New: The number of unreviewed Forum posts is shown.
Page 7 of 85
Manual 2.0
Version 1.0
Published 5/04/09
Epsilen 2.0
Searching
Use the upper-right-hand corner field to enter your desired search terms, and use the dropdown menu to select the intended area of the Group (Figure 2). Click Search to get your
results.
Figure 2
Switching Groups
Use the Switch to Group drop-down menu to see a list of your currently active groups (Figure
3). Click on a Group to refresh the page and go to the Group in question.
Figure 3
Page 8 of 85
Manual 2.0
Version 1.0
Published 5/04/09
Epsilen 2.0
Footprint
The Footprint records each member’s time of entry into the Group. When you enter, you have
the option to enter a brief message and click Save Your Words (Figure 4) to display your
message to the other members.
Figure 4
Owners have the ability to click View By Date or View By Member at the bottom of the
Footprint. Clicking View By Date shows all entries in reverse chronological order (Figure 5).
Click
to remove a member’s message.
Figure 5
Page 9 of 85
Manual 2.0
Version 1.0
Published 5/04/09
Epsilen 2.0
Clicking View By Member shows each Group member and the Last Logged In date (Figure 6).
Figure 6
Clicking
for a member shows all of that member’s footprints in reverse chronological order
(Figure 7).
Figure 7
Page 10 of 85
Manual 2.0
Version 1.0
Published 5/04/09
Epsilen 2.0
About
Description
The About tool allows you to list a Group Description (which is visible to Epsilen members
searching for your Group), as well as its Purpose and History (for those who visit the Group’s
public page).
Purpose
Use this tool to define your state your Group’s intentions.
1. To change your Group information, click Edit About (Figure 1).
Figure 1
2. Enter new information in Group Description, Group Purpose and/or Group
History. When all of the information has been updated, click Save (Figure 2).
Figure 2
Page 11 of 85
Manual 2.0
Version 1.0
Published 5/04/09
Epsilen 2.0
Announcements
Description
The Announcements tool allows Group Members to post a message on the Group’s home page
and/or send a copy of that message to all Group Members. Announcements also can be
created but scheduled for posting at a later time.
Purpose
Using the Announcements tool provides an easy messaging system to ensure communication to
all Group Members.
The Announcements screen (with two previously added Announcements) is displayed in
Figure 1.
Figure 1
Page 12 of 85
Manual 2.0
Version 1.0
Published 5/04/09
Epsilen 2.0
Creating an Announcement
1. Click the Announcements button in the left-side menu.
2. Click Add New.
3. Complete the fields/choices as described in the following table:
Field
Function
Title
The title will appear on the Group’s home page as well as the
Announcements page.
Announcement
Add your message.
Public
Check this box to allow the announcement to appear on the Group’s public
Web page (where non-members will be able to see it).
Email
Check this box to send a copy of this message to all members as a Group
Mail message.
4. When you have finished filling out the information, click the Save button. You will be
returned to the Announcements page, where you will see a new entry for your new
Announcement.
Figure 2 displays the Add Announcement screen.
Figure 2
Page 13 of 85
Manual 2.0
Version 1.0
Published 5/04/09
Epsilen 2.0
Members
Description
The Members tool is used to keep track of your Group members, to manage their permissions,
and to invite new members.
Purpose
Use the Members tool to share permissions to manage tools within the Group. (Only the
owner has management permissions by default.)
The Members screen is displayed in Figure 1.
Figure 1
Definitions
Owner: The creator or manager of the Group, who has full management rights to all tools.
(While there may only be one person in the role of Owner, many of the management rights
may be shared.)
Member: Any person participating in the Group, who should have basic rights to send
messages, add forum feedback, edit a wiki, etc. The owner may assign additional tool
management rights to members if desired.
Add to Network: Clicking the
your Networks.
button allows you to add the selected member to one of
Page 14 of 85
Manual 2.0
Version 1.0
Published 5/04/09
Epsilen 2.0
Send Message: Clicking the
Mail message.
Edit: Clicking the
Group members.
Delete: Clicking the
button allows you to send the selected member an Epsilen
button allows you to adjust the basic information and permissions of
button allows you to delete the selected member from the Group.
Invited People have been given the opportunity to join the Group.
Disabled/Banned Members have been temporarily restricted from entering the Group.
However, their access can be restored if appropriate.
Membership Requests are from Epsilen users seeking to join your Group. You may review
these requests for approval or rejection.
Deleted Members have been removed from your Group. However, their access can be
restored if appropriate.
Inviting Members
To invite people to the Group:
1. Click Invite.
2. Two options are presented: Invite current Epsilen members (people who have
already created their Epsilen accounts) and Invite others who do not yet have
an Epsilen account by entering their email addresses.
a. If Invite current… is selected:
i. Enter search criteria in the Search For box and click Search Epsilen
Members.
ii. Check the boxes next to your desired invitee(s) and click Add Selected.
iii. Repeat the search as in steps i & ii until all selected invitees are listed.
iv. A general greeting message for the invitation appears in the HTML editor;
this message may be customized as desired. (Click View Example Email
to preview how the invitation would appear with the default message
included.) If you prefer, you may remove all text from the HTML editor;
the invitee will still receive the details regarding the Group and
instructions on how to access it.
v. Click Invite Selected.
vi. A confirmation message regarding the successful sending of the
invitation(s) should appear.
Page 15 of 85
Manual 2.0
Version 1.0
Published 5/04/09
Epsilen 2.0
The Invite Members screen for current Epsilen members (with the general greeting message
included) is displayed in Figure 2.
Figure 2
Page 16 of 85
Manual 2.0
Version 1.0
Published 5/04/09
Epsilen 2.0
b. If Invite others… is selected:
i. Enter email addresses for the desired invitees. Separate multiple
addresses with commas.
ii. A general greeting message for the invitation appears in the HTML editor;
this message may be customized as desired. (Click View Example Email
to preview how the invitation would appear with the default message
included.) If you prefer, you may remove all text from the HTML editor;
the invitee will still receive the information regarding how to create an
Epsilen account and how to access the Group.
iii. Click Invite Emails.
iv. A confirmation message regarding the successful sending of the
invitation(s) should appear.
The Invite Members screen for invitees outside Epsilen (with the general greeting message
included) is displayed in Figure 3.
Figure 3
Page 17 of 85
Manual 2.0
Version 1.0
Published 5/04/09
Epsilen 2.0
View Invited
To review outstanding invitations to members:
1. Click on View Invited.
2. People who have been invited to join the Group (and have not yet accepted and become
members) are listed on the tab reflecting the method of invitation: Invited Epsilen
Members or Invited Email Addresses.
a. For Invited Epsilen Members, you can click the
My Corner page, or you can click the
button to view the member’s
button to delete the invitation.
b. For Invited Email Addresses, you can click the
button to delete the invitation.
3. If desired, you can click Invite People to this Group to send additional invitations.
The Invited People screen (reflecting the Invited Email Addresses tab) is displayed in Figure 4.
Figure 4
Page 18 of 85
Manual 2.0
Version 1.0
Published 5/04/09
Epsilen 2.0
Editing a Member
Every member can edit his or her own information in a Group:
1. Click the
button next to the member in question.
2. The Name may be edited if desired (to reflect a nickname, etc.).
3. The Title may be edited to more accurately reflect the member’s role in the Group
(Project Coordinator, Forum Administrator, etc.).
An owner can also edit the member’s role in the Group to assign additional management
permissions if desired.
4. The member may be assigned a Color, which is reflected on the Members page. This
may be used to reflect team assignments or something similar.
5. Each member’s Status is Enabled by default, but may be revised to Disabled or Banned.
Either status informs the member when they attempt to re-enter the Group that they
have been “disabled” or “banned” from entering, and that they should contact the Group
owner if they believe this is in error. (The only difference between these stati is the
terminology – so if you want to convey to the member that the action is temporary, you
might use Disabled rather than Banned.)
6. Permissions can be assigned to members for specific tools:
a. Upload Files – ability to add files to Drop Box (this is the only Permission
checked by default for members, but it can be unchecked)
b. Moderate Files – ability to delete files from Drop Boxes
c. Moderate Forums – ability to add, edit or delete Forum Topics and Replies
d. Manage Files – ability to add or delete Drop Boxes and files within
e. Manage Forums – ability to add, edit or delete Forum Discussions, Topics and
Replies
f. Manage Members – ability to invite or remove Group members, as well as to
assign Permissions to other members
g. Manage Public Page – ability to update the Group’s public web page (using the
Group Website tool)
h. Manage Wiki – ability to view, edit or delete all Wiki documents
i. Manage Calendar – ability to add events to Group calendar
7. Click Update.
Page 19 of 85
Manual 2.0
Version 1.0
Published 5/04/09
Epsilen 2.0
The Edit Member screen (as seen by the Group’s owner) is displayed in Figure 5.
Figure 5
Adding a Member to Networks
To Add a Member to Networks
1. Click the
button for a member to open the Add Person To Network popup page.
2. Check the box next to each Network to add this person into.
3. Click the Add selected button. You will see a message that the person was added
successfully, and then the popup page will close automatically.
Figure 6 displays the Add Person To Network screen.
Figure 6
Page 20 of 85
Manual 2.0
Version 1.0
Published 5/04/09
Epsilen 2.0
Sending an Epsilen Mail Message
To Send a New Message
1. Click
for the member in question.
2. The selected member will be checked by default to receive the message. Check the
boxes for other members, or for All Members, to add them to the list as well.
3. Complete the fields/choices as described in the following table:
Field
Function
Subject
Enter the subject of your new message.
Message
Enter the text of your new message.
4. Adjust your Message text as desired using the HTML editor (see “Using the HTML
Editor”).
5. To attach a file, click Add Attachment(s) to open the Attach File popup page. You
may upload three files and select three existing files from your Files/Folders at a time.
Click Attach Now to complete the file attachment process.
6. Click Send to send the message. You will remain on the Send Epsilen Mail Message
page with a confirmation of the successful message send.
Figure 7 displays the Send Group Mail Message screen.
Figure 7
Page 21 of 85
Manual 2.0
Version 1.0
Published 5/04/09
Epsilen 2.0
Wiki
Description
The Wiki tool allows Group members to post, view, edit, delete, and/or export documents that
all members can easily access to contribute changes and modify content.
Purpose
Wikis provide Group members a method to become involved in the process of teaming with
other Group members in creating and revising collaborative documents.
The Wiki screen (with two wikis already created) is displayed in Figure 1.
Figure 1
Definitions
View: Clicking the
Edit: Clicking the
History: Clicking the
button allows you to review a wiki without opening it for editing.
button allows you to edit a wiki.
button allows you to review the history of a wiki’s different versions.
Delete: Clicking the
button allows you to delete a wiki.
Export: Clicking the
button allows you to export the wiki as an HTML document.
Page 22 of 85
Manual 2.0
Version 1.0
Published 5/04/09
Epsilen 2.0
Creating a Wiki
To Create a Wiki
1. Click Create New Wiki.
2. Complete the fields/choices as described in the following table:
Field
Function
Title
Enter a title for the new Wiki (required). The title should help distinguish
this wiki from others that may be created for the Group.
Description
Enter additional text to help guide collaborators and focus efforts moving
forward.
Make content Noneditable
Check this box if you wish for the initial version of the wiki to be read-only
(for presentation, rather than collaboration, purposes).
Content
Enter content to get the Wiki started using the HTML editor. (For additional
information, see “Using the HTML Editor.”)
Add Section
If desired, you can check this box to add a separate section to the Wiki.
This includes a separate HTML editor for its content, as well as the option to
make the section non-editable.
3. Review your content and settings, and make any desired changes.
The Create Group Wiki page is displayed in Figure 2.
Figure 2
4. Click Create Wiki.
5. You will be returned to the main Group Wikis page. An entry for your new creation
appears at the top of the listings, listed as “Version 1,” and you will be credited as the
author of this version on this page and in the history log. The
icon appears above the
entry to let other Group members know that it is ready for editing (if you have allowed
editing).
Page 23 of 85
Manual 2.0
Version 1.0
Published 5/04/09
Epsilen 2.0
A newly created wiki (ready for editing) is displayed in Figure 3.
Figure 3
To view a wiki:
1. Click on the link for the title of the wiki, or click the
button.
To edit a wiki:
1.
2.
3.
4.
Click the
button.
Revise any desired fields.
Click Save Changes.
This will update the wiki with your revisions, and you will be credited as the author of
this version in the history log.
While a member is editing a wiki, it is not accessible to other members for editing. The Locked
for Editing icon ( ) is listed above the entry on the Group Wiki page.
An example of a wiki locked for editing by a user is displayed in Figure 4. Note that the Edit
button (
) is not available.
Figure 4
Important: If you elect not to make any changes, click Cancel. If you open the wiki for
editing and leave the page in any way other than saving changes or canceling editing, you will
create a draft. (Your activity is automatically saved every few minutes, allowing a draft to be
created even if your version is not officially closed.)
While this draft is saved for your convenience, it may be an inconvenience to other members of
the Group. If they later attempt to edit the wiki, they will receive a message that your draft
needs to be edited or deleted in order to continue.
Page 24 of 85
Manual 2.0
Version 1.0
Published 5/04/09
Epsilen 2.0
To edit a draft
1. If a draft exists, a button called View Wiki Drafts appears on the main Wiki page for
the Group. Click this link to review the draft.
2. The Group Wiki Drafts page lists any drafts which are outstanding. To review the
draft, click the
button.
3. To edit the draft, click the
button.
button. Alternately, to delete the draft, click the
4. If you click
to edit the draft, you may revise the draft and click Save Changes to
update the Wiki. Alternately, you may click Delete Draft, which removes the draft and
allows the previous (last saved) version of the Wiki to be edited.
The Group Wiki Drafts page is displayed in Figure 5.
Figure 5
Page 25 of 85
Manual 2.0
Version 1.0
Published 5/04/09
Epsilen 2.0
To review the history of a wiki
1. Click on the
button.
2. The Group Wiki History page displays a list of the versions, the members who
authored them, and the dates/times they were saved. You can click on the
button to
review any version. However, only the most recent version may be edited (if it is
available to be edited).
The Group Wiki History page is displayed in Figure 6.
Figure 6
Page 26 of 85
Manual 2.0
Version 1.0
Published 5/04/09
Epsilen 2.0
To export a wiki
1. Click the
button.
2. Click the
button.
3. You will be given the option to save the wiki as an HTML document.
The export option is displayed in Figure 7.
Figure 7
To subscribe to a wiki
1. Click the
button above the wiki on the main Group Wiki page.
2. The
button changes to a
button, indicating that you are now subscribed to be
notified of any changes to this wiki.
A wiki with the green subscription flag set is displayed in Figure 8.
Figure 8
Page 27 of 85
Manual 2.0
Version 1.0
Published 5/04/09
Epsilen 2.0
To unsubscribe to a wiki
1. Click the
button above the wiki on the main Group Wiki page.
2. The
changes to a
button, indicating that you are no longer subscribed to be
notified of any changes to this wiki.
To add a section to a wiki
1.
2.
3.
4.
Click the
button.
Below the HTML editor, check the box for Add Section.
A second HTML editor appears. Enter the desired content.
If you wish to make this section non-editable (due to copyright issues, for example),
check the box.
The Add Section option (with the section being added as non-editable) is displayed in Figure 9.
Figure 9
5. Click Update Changes.
6. You will be returned to the main Group Wikis page. If you have chosen to make the
section non-editable, the
icon above the wiki is replaced with the
icon to let Group
members know that a section has been locked.
Page 28 of 85
Manual 2.0
Version 1.0
Published 5/04/09
Epsilen 2.0
The “locked section” message on the main Group Wiki page is displayed in Figure 10.
Figure 10
To disable editing/lock a wiki
1.
2.
3.
4.
Click the
button.
Check the box for Completed (disable editing now).
Click Save Changes.
You will be returned to the main Group Wikis page. The
replaced with the
icon above the wiki is
icon to let Group members know that the wiki has been completed.
The “wiki complete” message on the main Group Wiki page is displayed in Figure 11.
Figure 11
To unlock/re-open a wiki
1. Click the
button.
2. Uncheck the box for Completed (disable editing now).
3. Click Save Changes.
4. You will be returned to the main Group Wikis page. The
icon above the wiki is
replaced with the
icon to let Group members know that the wiki is ready for editing.
Page 29 of 85
Manual 2.0
Version 1.0
Published 5/04/09
Epsilen 2.0
To delete a wiki
1. Click the
button.
2. A pop-up message appears, asking you to confirm your intention to delete and noting
that deletion of the wiki cannot be reversed.
3. Click OK (or Cancel, if you prefer not to delete).
The confirmation message for the deletion of a wiki is displayed in Figure 12.
Figure 12
Page 30 of 85
Manual 2.0
Version 1.0
Published 5/04/09
Epsilen 2.0
Calendar
Description
Use the Calendar tool to add/edit/delete meetings, discussions, deadlines, holidays, or any
other events.
Purpose
Use the Calendar tool to organize your Group’s schedule to maximize awareness and
productivity. Please Note: The default view for a Calendar within a Group is the Group
Calendar, and you cannot add events to be seen by other Group members unless you are the
owner, or the owner has given you permission to manage the Group Calendar. You may add
events to your personal calendar, or to any other calendars which you have the rights to
manage.
Figure 1
Page 31 of 85
Manual 2.0
Version 1.0
Published 5/04/09
Epsilen 2.0
Definitions:
Last/Previous: Clicking the left and right arrows at the top left of the Calendar allows you to
view the last or previous day, week or month based on your current view.
Calendar View allows you to select which calendar to view, including your Personal, Course,
and Group Calendars, or the Consolidated Calendar which displays all of them at once. The
Group calendar is displayed by default.
Select Month: Clicking the Month list allows you to select a different month in the current year
selected.
Select Year: Clicking the Year list allows you to select a different year for the current month
selected.
Print Calendar: Clicking the
button allows you to print the Calendar.
Search Events: Clicking the
Calendars.
button allows you to search for an event on any of your
Manage Settings: Clicking the
button allows you to export your Calendar to a file and
save it to your computer or change your Calendar settings, such as time zone and color display.
Day: Clicking the Day tab allows you to view the current day only.
Week: Clicking the Week tab allows you to view the current week only.
Month: Clicking the Month tab allows you to view the current month only.
View Day: Clicking the
button for a specific date allows you to view that day only.
Add Event/Item allows you to add a new event/item to your Calendar.
Add/Edit Events: Clicking a specific date number on the Month view of a Calendar allows you
to add/edit events for that date.
View Event: Clicking the title of an event on your Calendar allows you to view the title,
description, location and dates/times for the event.
Edit: Clicking the
Delete: Clicking the
Copy: Clicking the
different Calendar.
button while viewing an event allows you to edit that event.
button while viewing an event allows you to delete that event.
button while viewing an event allows you to copy that event to a
Page 32 of 85
Manual 2.0
Version 1.0
Published 5/04/09
Epsilen 2.0
Adding an Event
To Add an Event
1. Click the Add Event/Item button
2. Complete the fields/choices as described in the following table:
Field
Function
Calendar
Select the Calendar to which the event should be added.
Title
Enter a title for this event which will display on the Calendar.
When/To
Enter the start and end dates for this event, as well as the start and
end times.
Repeats
Select an option from the list of Repeat Types, such as “Daily” or
“Weekly”.
Category
Select a Category for this event which will allow Epsilen to group
similar events together.
Location
Enter a Location for this event if necessary.
Description
Enter a description which explains the event in detail.
Reminder
Choose a Reminder type from the list if you would like Epsilen to
notify you of this upcoming event.
3. When you have finished filling out the information, click the Save button. You will be
returned to the Calendar page where you will see a new entry on your Calendar.
Figure 2 displays the Add/Edit Events to Calendar screen.
Figure 2
Page 33 of 85
Manual 2.0
Version 1.0
Published 5/04/09
Epsilen 2.0
Editing an Event
To Edit an Event
1. Click the title of the event on your Calendar
2. Click the
button to open the Add/Edit events to calendar popup page.
3. Complete the fields/choices as described in the following table:
Field
Function
Calendar
Select the Calendar to which the event should be added.
Title
Enter a title for this event which will display on the Calendar.
When/To
Enter the start and end dates for this event, as well as the start and
end times.
Repeats
Select an option from the list of Repeat Types, such as “Daily” or
“Weekly”.
Category
Select a Category for this event which will allow Epsilen to group
similar events together.
Location
Enter a Location for this event if necessary.
Description
Enter a description which explains the event in detail.
Reminder
Choose a Reminder type from the list if you would like Epsilen to
notify you of this upcoming event.
4. When you have finished filling out the information, click the Update button. You will be
returned to the Calendar page where you will see a modified entry on your Calendar.
Figure 3 displays the Add/Edit events to calendar screen.
Figure 3
Page 34 of 85
Manual 2.0
Version 1.0
Published 5/04/09
Epsilen 2.0
Searching Events
To Search for an Event
1. Click the
button.
2. Complete the fields/choices as described in the following table:
Field
Function
Title
Enter all or part of the event title that you are searching for.
Location
Enter all or part of the event location that you are searching for.
Date Range
Enter a date range so that Epsilen will only retrieve those events
which match your search values and occur within the specified date
range.
3. When you have finished filling out the information, click the Search button. You will see
a list of Calendar entries that meet your search criteria.
Figure 4 displays the Search Event screen.
Figure 4
Page 35 of 85
Manual 2.0
Version 1.0
Published 5/04/09
Epsilen 2.0
Changing Calendar Settings
To Change your Calendar Settings
1. Click the
button.
2. Complete the fields/choices as described in the following table:
Field
Function
Current time zone
Enter the time zone in which you currently reside.
Calendar event color
Choose a color for your calendar events.
Default view
Select a Default view for your Calendar, such as Day, Week or Month.
3. When you have finished filling out the information, click the Save button. You will
remain on the Calendar Settings page where you will see a message stating that the
Calendar settings saved successfully.
Figure 5 displays the Calendar Setting screen.
Figure 5
Page 36 of 85
Manual 2.0
Version 1.0
Published 5/04/09
Epsilen 2.0
Importing a Calendar
To Import a Calendar
1. Click the
button.
2. Click the Import Calendar link.
3. Click the Browse… button to locate a Calendar file (“.ics” file extension) on your
computer to select. When you have finished selecting a file, you will see the filename
displayed in the File Path field.
4. Click the Import button. You will remain on the Calendar Setting page where you will
see a message stating that the Calendar was imported successfully.
Figure 6 displays the Calendar Setting screen for Import Calendar.
Figure 6
Page 37 of 85
Manual 2.0
Version 1.0
Published 5/04/09
Epsilen 2.0
Exporting a Calendar
1. Click the
button.
2. Click Export Calendar link
3. Choose whether to Export All Events or Events Between a Given Date Range
(Figure 7).
Figure 7
4. To choose Events Between a Given Date Range, enter from date and to date
(Figure 8).
Figure 8
5. Click Export Events.
6. A file download box will appear. Choose whether you would like to Open or Save.
7. When opened or saved, the calendar will be viewable in your operating system’s email
client.
Page 38 of 85
Manual 2.0
Version 1.0
Published 5/04/09
Epsilen 2.0
Printing a Calendar
1. Click the
icon.
2. A screen will appear with your calendar.
3. Click Print Calendar (Figure 9).
Figure 9
4. Choose your printer location and click Print (Figure 10).
Figure 10
Page 39 of 85
Manual 2.0
Version 1.0
Published 5/04/09
Epsilen 2.0
Forums
Description
Use the Forums tool to post your ideas, topics, and questions for discussion and feedback.
Purpose
You can engage members by adding discussion topics or your feedback in Forums to stimulate
communication and encourage interaction among members.
Figure 1
Definitions
Search Forums allows you to search for Forum entries in this Group.
Add New Discussion allows you to add a new Discussion.
View Discussion: Clicking the name of a Discussion or the
Discussion and any Topics associated to it.
Edit: Clicking the
Delete: Clicking the
button allows you to edit a Discussion.
button allows you to delete a Discussion.
Page 40 of 85
Manual 2.0
button allows you to view the
Version 1.0
Published 5/04/09
Epsilen 2.0
Adding a New Discussion
To Add a New Discussion
1. Click the Add New Discussion button.
2. Complete the fields/choices as described in the following table:
Field
Function
Discussion Title
Enter a title for the Discussion.
Description
Enter the Discussion content that members will post Topics and
Replies to. See “Using the HTML Editor.”
Notify me …
Select the “Notify me when Topic is added to this discussion” option
if you would like to receive a Group Mail message when Topics are
added to this Discussion.
3. When you are finished filling in the information, click the Save button. You will be
returned to the Group Forum Discussions page where you will see a new entry for the
Discussion.
Figure 2 displays the Add Group Forum Discussion screen.
Figure 2
Page 41 of 85
Manual 2.0
Version 1.0
Published 5/04/09
Epsilen 2.0
Editing a Discussion
To Edit a Discussion
1. Click the
button for a Discussion.
2. Complete the fields/choices as described in the following table:
Field
Function
Discussion Title
Enter a title for the Discussion.
Description
Enter the Discussion content that members will post Topics and
Replies to. See “Using the HTML Editor.”
Notify me …
Select the “Notify me when Topic is added to this discussion” option
if you would like to receive a Group Mail message when Topics are
added to this Discussion.
3. When you are finished filling in the information, click the Update button. You will be
returned to the Group Forum Discussions page where you will see a modified entry
for the Discussion.
Figure 3 displays the Edit Group Discussion screen.
Figure 3
Page 42 of 85
Manual 2.0
Version 1.0
Published 5/04/09
Epsilen 2.0
Group Forum Topics
Figure 4 displays the Group Forum Topics screen.
Figure 4
Definitions
Search Forums allows you to search for Forum entries in this Group.
Add Topic allows you to add a new Topic to a Discussion.
View Topic: Clicking the name of a Topic or the
any Replies associated to it.
Edit: Clicking the
Delete: Clicking the
button allows you to view the Topic and
button allows you to edit a Topic.
button allows you to delete a Topic.
Hide Topic(s) allows you to hide the Topics associated to a Discussion.
Show Topic(s) allows you to show the Topics associated to a Discussion.
Page 43 of 85
Manual 2.0
Version 1.0
Published 5/04/09
Epsilen 2.0
Adding a Topic
To Add a Topic
1. Click the Add Topic button.
2. Complete the fields/choices as described in the following table:
Field
Function
Subject
Enter a subject/title for the Topic
Topic/Question
Enter the content for the Topic you are posting. See “Using the
HTML Editor.”
Notify me …
Select the “Notify me when Reply is added to this topic” option if you
would like to receive a Group Mail message when Replies are added
to this Topic.
3. When you have finished filling out the information, click Save. You will be returned to
the Group Forum Topics page where you will see a new entry for your Topic.
Figure 5 displays the Add Group Topic screen.
Figure 5
Page 44 of 85
Manual 2.0
Version 1.0
Published 5/04/09
Epsilen 2.0
Editing a Topic
To Edit a Topic
1. Click the
button for a Topic.
2. Complete the fields/choices as described in the following table:
Field
Function
Subject
Enter a subject/title for the Topic
Topic/Question
Enter the content for the Topic you are posting. See “Using the
HTML Editor.”
Notify me …
Select the “Notify me when Reply is added to this topic” option if you
would like to receive a Group Mail message when Replies are added
to this Topic.
3. When you have finished filling out the information, click the Update button. You will be
returned to the Group Forum Topics page where you will see a modified entry for your
Topic.
Figure 6 displays the Edit Group Topic screen.
Figure 6
Page 45 of 85
Manual 2.0
Version 1.0
Published 5/04/09
Epsilen 2.0
Group Forum Replies
Figure 7 displays the Group Forum Replies screen.
Figure 7
Definitions
Search Forums allows you to search for Forum entries in this Group.
Add Reply allows you to add a new Reply to a Topic.
Unread: This designation appears next to any reply which you have not yet opened.
Show/Hide Reply: Clicking the plus/minus button next to a Reply title will show/hide the
Reply content.
Read all Reply(s): Clicking this link opens all replies in a thread (on the current page).
Edit: Clicking the
button allows you to edit a Reply.
Send: Clicking the
button allows you to send a Group Mail message to the author of the
reply (or to other Group members if desired).
Delete: Clicking the
Print: Clicking the
button allows you to delete a Reply.
button allows you to print a Reply.
Hide Reply(s) allows you to hide the Replies associated to a Topic.
Show Reply(s) allows you to show the Replies associated to a Topic.
Page 46 of 85
Manual 2.0
Version 1.0
Published 5/04/09
Epsilen 2.0
Adding a Reply
To Add a Reply
1. Click the Add Reply link for a Topic.
2. Complete the fields/choices as described in the following table:
Field
Function
Subject
Enter a subject for this Reply.
Reply
Enter the content for this Reply. See “Using the HTML Editor.”
Attach a Reply…
Check the box to attach a file to this reply.
Notify me …
Select the “Notify me when a Reply is added to this reply” option if
you would like to receive a Group Mail message when Replies are
added to this Reply.
3. When you have finished filling out the information, click the Save button. You will be
returned to the Group Forum Replies page where you will see a new entry for your
Reply.
Figure 8 displays the Add Group Forum Post screen.
Figure 8
Page 47 of 85
Manual 2.0
Version 1.0
Published 5/04/09
Epsilen 2.0
Editing a Reply
To Edit a Reply
1. Click the
button for a Reply.
2. Complete the fields/choices as described in the following table:
Field
Function
Subject
Enter a subject for this Reply.
Reply
Enter the content for this Reply. See “Using the HTML Editor.”
Attach a Reply…
Check the box to attach a file to this reply.
Notify me …
Select the “Notify me when a Reply is added to this reply” option if
you would like to receive a Group Mail message when Replies are
added to this Reply.
3. When you have finished filling out the information, click the Update button. You will be
returned to the Group Forum Replies page where you will see a modified entry for
your Reply.
Figure 9 displays the Edit Group Forum Post screen.
Figure 9
Page 48 of 85
Manual 2.0
Version 1.0
Published 5/04/09
Epsilen 2.0
Searching the Forums
To Search the Forums
1. Enter a value in the Search field in the top right corner of the page.
2. Click the
button. You will see a list of Forum entries that match what you are
searching for.
Figure 10 displays the Group Forum Search screen.
Figure 10
Page 49 of 85
Manual 2.0
Version 1.0
Published 5/04/09
Epsilen 2.0
Group Mail
Description
Group Mail is the home page to manage your preferences for handling all mail or messages
within a Group.
Purpose
The Group Mail tool allows you to manage your messages so you can create, send, forward,
review, move, archive, or delete at your convenience.
Figure 1
Definitions
Send Mail / Send a New Message allows you to send an email to members of the group.
Archived allows you to store any messages you have chosen to move off the “All Mail” tab.
Sent allows you to review the messages you have previously sent from this group.
Archive: Check multiple messages and click the Archive Selected link, or click the
for one message to move messages from the current tab to the Archived tab.
button
Unarchive: Check multiple messages and click the Unarchive Selected link, or click the
button for one message to move messages from the Archived tab to the tab it originated from.
Delete: Check multiple messages and click the Delete Selected link, or click the
button to
delete one or more messages. The message(s) will be permanently deleted, both from your
Epsilen Mail box and any other Mail tool (e.g. Group Mail, Group Mail)
Mark as Unread: Check one or more messages and click the Mark as Unread link to mark
them as unread (bold text).
Page 50 of 85
Manual 2.0
Version 1.0
Published 5/04/09
Epsilen 2.0
Mark as Read: Check one or more messages and click the Mark as Read link to mark them
as read (normal text).
Move All Read: Click the Read link to select all messages that have been read. These
messages may all be archived, unarchived, deleted, etc. using the directions above.
Move All Unread: Click the Unread link to select all messages that have not been read.
These messages may all be archived, unarchived, deleted, etc. using the directions above.
Sorting: To change message sorting: Use the “Sort by” drop-down menu to make a selection.
a. “From” presents the messages in alphabetical order by first name of the
sender.
b. “Subject” presents the messages in alphabetical order by the subject.
c. “Date” presents the messages in reverse chronological order, with the newest
message at the top. (This is the default sorting presentation.)
d. “Read” presents all unread messages in reverse chronological order, with the
newest message at the top, followed by all read messages in reverse
chronological order.
Add To Network: To add a sender to one of your networks:
1. Find the message from the person you would like to add.
2. Click
.
3. A new “Add Person to Network” window will open. Check the box next to any
network to which you would like to add the selected person.
4. Click “Add in Selected.”
5. Click “Close Window.”
Navigate Message Pages: To navigate multiple pages of mail messages:
1. The lower right-hand side of the box displays a series of buttons: “First”,
“Previous”, a numbered series reflecting the current number of pages, “Next”
and “Last.” Page 1 is the default page you reach when first accessing Group
Mail, and presents the five most recent messages (unless you use the sort
menu to change the presentation). The button for the current page is
highlighted.
2. You can click either “Next” or the next numbered button in sequence to
progress through the pages… and click the numbers in reverse order to
backtrack (which can also be done by clicking “Previous”).
3. Clicking “First” will take you to the starting/default page, while clicking “Last”
will take you to the other end of the list of messages.
4. An option to pick a given page also appears at the lower left-hand side of the
box. For example, if the display says “Page 1 of 4”, and you want to see the
messages appearing on Page 3, you can change the page number to “3” and
click “Go.” (This is equivalent to clicking the “3” button from the lower righthand side options.)
Page 51 of 85
Manual 2.0
Version 1.0
Published 5/04/09
Epsilen 2.0
Sending a New Message
To Send a New Message
1. Click Send New Mail from the left navigation menu or send a new message from the
main body of the Group Mail page.
2. Complete the fields/choices as described in the following table:
Field
Function
To
Select “Member” to send this message to all active group members, or
select each member to send this message to.
Subject
Enter a subject for this message.
Message
Enter the message. See “Using the HTML Editor.”
3. To attach a file, click Add Attachment(s) to open the Attach File popup page. You
may upload three files and select three existing files from your Files/Folders at a time.
Click Attach Now to complete the file attachment process.
4. Click Send to send the message. You will remain on the Send Group Mail Message
page with a message stating that your message was sent successfully.
Figure 2 displays the Send Group Mail Message screen.
Figure 2
Page 52 of 85
Manual 2.0
Version 1.0
Published 5/04/09
Epsilen 2.0
Viewing a Message
To View a Message
1. Click on the subject link or the
button for a message.
2. You will see the body of text, along with any included attachments. Several options
appear below the message:
a. Grade allows you to grade the sender of a message.
b. Reply allows you to respond to the sender, and to include additional
recipients. (Any original attachments are not included in your reply
message.)
c. Forward allows you to send the message to other recipients. (Any original
attachments will be included in your forwarded message.)
d. Delete allows you to delete a message.
e. Back allows you to return to the Group Mail page.
Figure 3 displays the Group Mail Message screen.
Figure 3
Page 53 of 85
Manual 2.0
Version 1.0
Published 5/04/09
Epsilen 2.0
Downloading an Attachment
To Download an Attachment
Option 1
1. Click on the attached filename link or the
button for an attachment.
2. Click Open to open the document on your computer, or click Save to save the file to
your computer.
Option 2
1. Click on the
button for an attachment.
2. On the Import Attachment popup page, click the Download To My Computer
link.
3. Click Open to open the document on your computer, or click Save to save the file to
your computer.
Figure 4 displays the Import Attachment screen with File Download popup.
Figure 4
Page 54 of 85
Manual 2.0
Version 1.0
Published 5/04/09
Epsilen 2.0
Replying To/Forwarding a Message
To Reply To/Forward a Message
1. Click the Reply button to send a reply back to a message sender, or click Forward to
send a message to other group members.
2. Check the box next to each recipient in the To list or select “Member” to send this
message to all group members.
3. Modify the Subject and Message of the message (see “Using the HTML Editor”).
4. To attach a file, click Add Attachment(s) to open the Attach File popup page. You
may upload three files and select three existing files from your Files/Folders at a time.
Click Attach Now to complete the file attachment process.
5. Click the Send button to send the message.
Figure 5 displays the Send Group Mail Message screen for sending a Reply.
Figure 5
Page 55 of 85
Manual 2.0
Version 1.0
Published 5/04/09
Epsilen 2.0
Drop Boxes
Description
The Drop Box tool provides members with a repository for resource files.
Purpose
Use the Drop Box tool to add, view or download files that are available to all Group members.
Figure 1
Definitions
New Drop Box allows you to add a new Drop Box.
Add File allows you to add a new file to any Drop Box.
View Drop Box: Clicking the name of a Drop Box or the
in a Drop Box.
button allows you to view the files
Read More: Clicking the Read More … link allows you to read a full description of a Drop Box.
Edit: Clicking the
Delete: Clicking the
button allows you to edit a Drop Box.
button allows you to delete a Drop Box.
Page 56 of 85
Manual 2.0
Version 1.0
Published 5/04/09
Epsilen 2.0
Adding a New Drop Box
To Add a New Drop Box
1. Click the New Drop Box button.
2. Enter a Name for the Drop Box.
3. Enter a Description to distinguish the purpose of this box from the other Drop Boxes in
the Group.
4. When you are finished filling in the information, click the Add button. You will be
returned to the Drop Boxes page where you will see a new entry for the Drop Box.
Figure 2 displays the Add Drop Box screen.
Figure 2
Page 57 of 85
Manual 2.0
Version 1.0
Published 5/04/09
Epsilen 2.0
Editing a Drop Box
To Edit a Drop Box
1. Click the
button for a Drop Box.
2. Update the Name for the Drop Box.
3. Update the Description to distinguish the purpose of this box from the other Drop
Boxes in the Group.
4. When you are finished updating the information, click the Update button. You will be
returned to the Drop Boxes page where you will see a modified entry for the Drop Box.
Figure 3 displays the Edit Drop Box screen.
Figure 3
Page 58 of 85
Manual 2.0
Version 1.0
Published 5/04/09
Epsilen 2.0
Adding a File
To Add a File
1. Click the Add File button.
2. Complete the fields/choices as described in the following table:
Field
Function
Drop Box
Select a Drop Box in which this file should be added.
File: Upload New
Select the “I want to upload a new file” option and click the Upload
File button to upload a new file from your computer. The file will be
placed in your Files/Folders and linked within this Drop Box.
File: Select Existing
Select the “I want to transfer a file from My Epsilen files and click
the Select Existing button to select a file from your Files/Folders.
The file will remain in your Files/Folders and linked within this Drop
Box.
Description
Enter a description/explanation for the file.
3. When you have finished filling out the information, click the Add to Drop Box button.
You will be returned to the Drop Boxes page.
Figure 4 displays the Add File screen.
Figure 4
Page 59 of 85
Manual 2.0
Version 1.0
Published 5/04/09
Epsilen 2.0
Viewing a Drop Box
Figure 5 displays the Drop Box screen.
Figure 5
Definitions
Add File allows you to add a new file to any Drop Box.
Download File: Clicking the name of a file or the
Send File: Clicking the
message to someone.
button allows you to download a file.
button allows you to send a file as an attachment to an Epsilen Mail
Remove File: Clicking the
button allows you to remove a file from a Drop Box. However,
removing a file does not delete the file from the Files/Folders of the member who uploaded it.
Page 60 of 85
Manual 2.0
Version 1.0
Published 5/04/09
Epsilen 2.0
Chat
Description
The Group Chat is a tool for users to communicate online in real time in an instant message
type of environment. Each Group Chat is recorded and archived.
Purpose
The Group Chat tool allows users to correspond quickly and gain immediate feedback to
comments or questions, with an archived record of participation.
The Chat page is displayed in Figure 1.
Figure 1
Definitions
Send allows you to add a message to initiate or continue a group discussion.
Active Users are users who are currently logged into the chat room, and have made a
contribution within the preceding 5 minutes.
Inactive Users are users who are currently logged into the chat room, but have not made a
contribution within the preceding 5 minutes.
Emoticons (a/k/a “Smileys”) can be placed into a message to provide a shorthand
comment regarding the user’s mood (happiness, anger, confusion, etc.).
Pause: Clicking the
button allows you to suspend receiving chat text.
Page 61 of 85
Manual 2.0
Version 1.0
Published 5/04/09
Epsilen 2.0
Search: Clicking the
button allows you to check the chat archives. (Please note that
comments appear in the archive approximately 10 minutes after entry.)
Participating in Chat
To send a message:
1. Enter your text (up to 250 characters) in the text entry window (beneath the
emoticons).
2. Click Send.
3. Your text will appear in the chat window, along with the time of entry.
To pause:
1. Click the
button.
2. This will change the appearance and function of the button to play (
button again to resume.
). Click the
To check the archive:
1. Click the
button.
2. Enter the desired text in the entry window and click Search.
3. Any occurrences of the entered text will appear highlighted.
4. The archive may also be printed using the
Page 62 of 85
Manual 2.0
button.
Version 1.0
Published 5/04/09
Epsilen 2.0
Group Website
Description
The Group Website options include the ability to upload a Group Logo, as well as to add
Welcome Notes and QuickLinks for visitors to the Group’s public page.
Purpose
The Group Website options allow you to customize the Group settings for
branding/identification purposes.
1. You can provide your own Group Logo to identify the group by clicking on Group Logo
(Figure 1).
Figure 1
2. If you have a Current Logo, you can remove it by clicking Delete (Figure 2). To add a
new Logo, click Browse and find the existing file within your computer and click Open.
The file location will appear and then click Upload New Logo.
Figure 2
Page 63 of 85
Manual 2.0
Version 1.0
Published 5/04/09
Epsilen 2.0
3.
The new Logo will appear in the upper left hand corner of the group page (Figure 3).
Figure 3
4. Click Add Welcome Note to display a message on the group’s public page (Figure 4).
Figure 4
5. Use the HTML editor to create a Welcome Note and click Save (Figure 5).
Figure 5
Page 64 of 85
Manual 2.0
Version 1.0
Published 5/04/09
Epsilen 2.0
6. To add a QuickLink, create a Title and add the Link/URL that you would like to
display on the group’s public page and click Save (Figure 6).
Figure 6
7.
Once the link has been saved, more QuickLinks can be added. To edit or change an
existing QuickLink, click Edit (
) or Delete (
) (Figure 7).
Figure 7
Page 65 of 85
Manual 2.0
Version 1.0
Published 5/04/09
Epsilen 2.0
Take Notes
Description
The Group Notes (or Group Take Notes) tool is an online Group notebook, and each Epsilen
member is provided by default a Take Notes file upon joining a Group. Entries in a Group Take
Notes file may be edited, sent, or deleted; however, Group Notes must be created within the
Group before they appear on your personal ePortfolio.
Purpose
Creating a Group Take Notes file allows you to make note entries from lectures, chats, assigned
readings, or other lesson activities. You may edit, send, or delete a Group Take Notes file.
Figure 1
Definitions
Switch to Take Note allows you to modify the Notes you have created for any Course, any
Group, or within the Take Notes tool of your personal ePortfolio. You can also change to My
Journal and create your own thoughts (not necessarily group related).
Send allows you to send your Notes to another Epsilen member.
Export allows you to export your Notes to an HTML, Microsoft Word or PDF document and save
it to your computer.
Forward allows you to send your Notes to your designated email address or cell phone.
Page 66 of 85
Manual 2.0
Version 1.0
Published 5/04/09
Epsilen 2.0
Saving Group Notes
To Save Group Notes
1. Click the Group Take Notes button in the left menu to open the Take Notes popup
page.
2. Complete the fields/choices as described in the following table:
Field
Function
Title
You may edit the title of your Group Notes or leave the title as the title of
the Group.
Content
Enter your notes. See “Using the HTML Editor.”
3. When you have finished filling out the information, click the Save button. You will
remain on the Group Take Notes popup page where you will see a new entry for your
new Note.
Page 67 of 85
Manual 2.0
Version 1.0
Published 5/04/09
Epsilen 2.0
Sending Group Notes
To Send Group Notes
1. Click the Send button.
2. Enter criteria to search for and click the Search button. You will see a list of Epsilen
members that meet your search criteria.
3. Click the
button to the right of a member to send your Group Notes to that member.
Figure 2 displays the Take Notes: Send Notes screen.
Figure 2
Exporting Take Notes
To Export Group Notes
1. Click the Export button.
2. A pop-up window with the Export Notes screen will appear. Click Export to HTML or
Export to Word to open or save the file type of your choice.
Figure 3 displays the Export Notes screen.
Figure 3
Page 68 of 85
Manual 2.0
Version 1.0
Published 5/04/09
Epsilen 2.0
Forwarding Take Notes
To Forward Group Notes
1.
2.
3.
4.
5.
6.
Click the Options button in the left-side menu.
Click the Take Notes Forwarding tab.
Enter your desired address in the Forward to Email field.
Check the Enabled box under Email Status.
Click Save.
To Forward to Cell Phone, click Configure.
a. Check the Forward box.
b. Select your Service Provider from the drop-down menu.
c. Enter Your Cell Number.
d. Check the box related to the message regarding receipt of text messages on your
mobile device.
e. Click Save.
7. Click Take Notes in the left-side menu.
8. Click Forward.
9. The Take Notes page will refresh to indicate that your note was forwarded successfully.
Figure 4 displays the Take Notes Forwarding tab of the Options page.
Figure 4
Page 69 of 85
Manual 2.0
Version 1.0
Published 5/04/09
Epsilen 2.0
Help / FAQ
Description
Use the Help / Frequently Asked Questions tool to request help from the Help Desk or to
search for answers to questions that other Epsilen users have asked previously when they
needed assistance. If after searching the FAQs you don’t find the answer to your question,
please go to the Help Desk to request more help.
Purpose
By accessing the Help / Frequently Asked Questions, you will find that the Epsilen Team is
dedicated to helping you navigate within the Epsilen Environment so you can use its tools to
achieve maximum utilization.
Figure 1
Definitions
Search: Enter a value in the Search FAQ for textbox and click the Search button to locate
Frequently Asked Questions which directly relate to the problem you need help with.
Show All: Clicking the Show All button allows you to see a full list of all Frequently Asked
Questions.
Show Top 10: Clicking the Show Top 10 button allows you to see the Top 10 most
Frequently Asked Questions.
View: Clicking the
button allows you to view a Help/FAQ item and rate its usefulness.
Page 70 of 85
Manual 2.0
Version 1.0
Published 5/04/09
Epsilen 2.0
Viewing/Rating a Help/FAQ Item
To View/Rate a Help/FAQ Item
1. Click the Help/FAQ Title link or the
button to open the View FAQ popup page.
2. When you are finished reading the help information, if you would like to rate the
Help/FAQ item, complete the fields/choices as described in the following table:
Field
Function
How useful was this
information?
Select an option from the list to indicate how helpful the Help information
was to you. Options: not useful, somewhat useful, useful, very useful,
extremely useful.
Comments
Enter a comment about how helpful the Help information was for you.
3. When you have finished filling out the information, click the Submit Rating button. You
will remain on the View FAQ popup page with a message thanking you for your rating.
Figure 2 displays the View FAQ screen.
Figure 2
Page 71 of 85
Manual 2.0
Version 1.0
Published 5/04/09
Epsilen 2.0
Requesting Help from the Help Desk
To Request Help from the Help Desk
1. Click the Help Desk to open the Help Desk popup page.
2. Complete the fields/choices as described in the following table:
Field
Function
Topic/Help Desk
Select a Help Desk topic to help the support team better address your
needs.
Your Name
Enter your name for identification purposes.
Your Email Address
Enter you email address for identification purposes and to enable
communication from the support team.
Message Subject
Enter a brief subject to summarize your issue.
Message
Enter a message which explains the problem you are having and what you
need help with, including as much detail as possible.
3. When you have finished filling out the information, click the Send Message button. You
will remain on the Help Desk popup page with a message stating that your Help Desk
message was sent successfully.
Figure 3 displays the Help Desk screen.
Figure 3
Page 72 of 85
Manual 2.0
Version 1.0
Published 5/04/09
Epsilen 2.0
Show/Hide Tools
Description
Use the Show / Hide Tools options by checking the box next to each tool you wish to display
within your Group. For example, you may want the Forums link to appear on the left menu of
your Group, so your members will have access to the Forums content. However, if you do not
want to use the Wiki tool within your Group, you would want to prevent the Wiki link from
appearing on the left menu.
Purpose
The Show / Hide Tools options simplify your left menu to display only those links you need.
Figure 1
Showing/Hiding Tools/Features
To Show/Hide Tools
1. Check the box next to the name of each tool that you would like to use.
2. Uncheck the box next to the name of each tool that you would prefer not to use.
3. Click the Save button. You will see a message stating that your tool list was saved
successfully. Your left menu will refresh to display only those tools that you selected to
“Show”.
4. By checking Show Footprint and clicking Save, you and other members will be able to
view who has logged into the Group on the Group’s home page.
Page 73 of 85
Manual 2.0
Version 1.0
Published 5/04/09
Epsilen 2.0
Custom Tools
Description
The Custom Tools functionality provides an owner with the ability to add content (or links to
other websites) to supplement the other tools built into the Group.
Purpose
Use a Custom Tool to add content that is easily accessible to the Group members.
1.
To add a Custom Tool, click Add Custom Tool (Figure 1).
Figure 1
2. Name your tool by giving it a Title and Description (Figure 2). The Title is what will
appear on the newly created button appearing to Group members. The Description
appears to you on the Custom Tools page, so if you’re creating multiple tools, be sure
to describe each in a distinctive fashion.
Figure 2
Page 74 of 85
Manual 2.0
Version 1.0
Published 5/04/09
Epsilen 2.0
3. Select an Icon to associate with your Custom Tool.
4. The Public option allows you to choose whether or not your custom tool will be viewable
on the Group’s public page. You can choose if you would like to enter a website’s URL
(Figure 3) OR enter content with the HTML editor (Figure 4).
Figure 3
Figure 4
5. Click Save.
Page 75 of 85
Manual 2.0
Version 1.0
Published 5/04/09
Epsilen 2.0
6. The newly created Custom Tool will now appear in the left side menu (Figure 5).
Figure 5
7. To Edit the Custom Tool, click
. To Delete the Custom Tool, click
Page 76 of 85
Manual 2.0
.
Version 1.0
Published 5/04/09
Epsilen 2.0
Group Options
Description
The Options page includes a variety of tools to configure the Group settings.
Purpose
Owners may use the Options tools to adjust the group details, registration options, and
appearance of the Group. All Group members may use the Member Profile page to update their
personal information, and the Take Notes Forwarding to enable forwarding of any Take Notes
content.
Group Details (Owners only)
1. In this section, edit your Group information such as the Name, Description, and
Keywords and click Save (Figure 1).
Figure 1
Page 77 of 85
Manual 2.0
Version 1.0
Published 5/04/09
Epsilen 2.0
Registration Settings (Owners only)
1. One of the following Registration options must be selected:
Invite Only (must be invited by Group member with permission to manage the
roster)
Invite and Request (users may send message to Owner to ask if they may
participate)
Open to Everyone in Your Institution (all Epsilen members who are part of your
institution may enter)
Open to All Epsilen Members (any Epsilen member may enter)
2. If you want the group to be hidden from non-members, check the box for Yes, this
group is a private group.
3. If you would like for your group to be eligible for institutional oversight (because your
group activities are directly tied to the institution), check the box for Yes, I would like
to submit this group for institution approval. The Institutional Administrator will
see your request in a queue, and may approve or reject the request.
4. Click Save.
Figure 2
Page 78 of 85
Manual 2.0
Version 1.0
Published 5/04/09
Epsilen 2.0
Public Web Address Options (Owners only)
1. You may personalize your group name by entering an alternate Address. (The originally
assigned group number address will be replaced with the text you enter here.) Click
Save when completed (Figure 3).
Please Note: This option is not shown if the group was marked as “Private” under
Registration Settings.
Figure 3
Change Group Ownership (Owners only)
1. As a group owner, you can transfer ownership to anyone else in the group. To do so,
click on the icon to the left of the individual’s name that you would like to give
ownership ( ). Click OK when are asked if you are sure that you want to change
owners (Figure 4).
Please Note: If you transfer ownership of the Group to a different member, you will no longer
see this tool offered (nor any of the other tools available to the Group’s owner).
Figure 4
Page 79 of 85
Manual 2.0
Version 1.0
Published 5/04/09
Epsilen 2.0
Member Profile (All Group Members)
1. The Name from the Epsilen membership is displayed, but can be revised if the member
prefers to use a nickname, reflect a name change, etc.
2. The Email from the Epsilen membership is displayed, but the member can choose to
display an alternate address to the Group.
3. The Title with which the member was added to the Group is displayed, but can be
revised to more accurately reflect responsibilities in the Group (for example, Project
Leader, Program Coordinator, etc.).
4. All Pictures from the user’s Picture Manager in My Portal are displayed. Click the
Picture you want to display as your default in the Group.
5. Click Save.
Figure 5
Page 80 of 85
Manual 2.0
Version 1.0
Published 5/04/09
Epsilen 2.0
Take Notes Forwarding (All Group Members)
1.
2.
3.
4.
Enter your desired address in the Forward to Email field.
Check the Enabled box under Email Status.
Click Save.
To Forward to Cell Phone, click Configure.
a. Check the Forward box.
b. Select your Service Provider from the drop-down menu.
c. Enter Your Cell Number.
d. Check the box related to the message regarding receipt of text messages on your
mobile device.
e. Click Save.
Figure 6
5. To forward to your cell phone, click Configure (Figure 7). Complete all of your contact
information and click Save. Please Note: This page enables the forwarding only. You
must click forward on the Take Notes page to generate a message to be forwarded.
Figure 7
Page 81 of 85
Manual 2.0
Version 1.0
Published 5/04/09
Epsilen 2.0
Welcome Message (Owners only)
1. Use the HTML editor to create a Welcome Message for new members in your group.
Click Save when finished (Figure 8). Check the box to send it to new members.
Figure 8
Page 82 of 85
Manual 2.0
Version 1.0
Published 5/04/09
Epsilen 2.0
Theme Settings (Owners only)
The Theme Settings may be set for the Group’s public web page here. (Please note that
users will see their own preferred Theme while logged into the Group; this theme only affects
the public page shown to visitors.)
1. Review the Themes that are currently available to use. Hovering your cursor over a
theme will show a larger sample image to help you decide.
2. Check the box below your selected theme.
3. Click Save.
Please Note: No Theme options are shown if the group was marked as “Private” under
Registration Settings.
Figure 9
Page 83 of 85
Manual 2.0
Version 1.0
Published 5/04/09
Epsilen 2.0
Owner View
Description
The Owner View option allows the owner of a Group to view the Group not only from the
administrative perspective (by default), but also from the member perspective or the public
perspective.
Purpose
Use the Owner View tool to confirm that your Group content is appearing to members or to
public visitors exactly as intended.
1. Note Drop Boxes in the Owner View (Figure 1). The ability to Edit or Delete the
Drop Boxes which have been added to the Group is available, along with the ability to
add a New Drop Box.
Figure 1
Page 84 of 85
Manual 2.0
Version 1.0
Published 5/04/09
Epsilen 2.0
2. By changing the status to Member View, you will see what other members see – just
the Drop Boxes, with no ability to delete or edit the existing boxes, or to add a new one
(Figure 2).
Figure 2
3. The Public View shows minimal tools. This is what visitors see when coming to the
Group’s public page (Figure 3).
Figure 3
Page 85 of 85
Manual 2.0
Version 1.0
Published 5/04/09