1
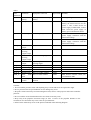
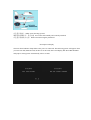
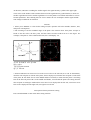
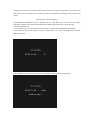
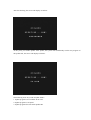
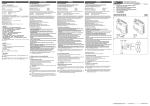
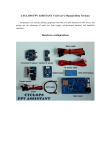
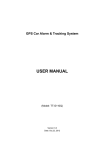
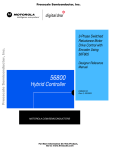
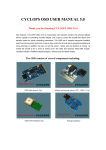
CYCLOPS FPV ASSISTANT V1.0 User's Manual (Beta Version)
The product is an assistant flying equipment with OSD, auto pilot functions for FPV fans. The
product has the advantages of small size, light weight, well-developed functions, and simplified
operations.
Hardware configurations
Description of the cables
T plug should be purchased alone
Table 1
PCB
indications
Functions
Equipment connected
Signal mode
Remarks
BAT
12V power or 3S lipo
battery
DC
Working voltage 6-14V
JP
Main board
battery
Jumper
V_OUT
Video output
Video frequency
NTSC/PAL
V_IN
Video input
Camera
NTSC/PAL
AUX_Out
Rudder
output
Aileron
steering
engine output
Elevator
steering
engine output
Throttle
output
Aileron input
Elevator input
Throttle input
Rudder input
Pilot
mode
shift
AIL_OUT
ELE_Out
THO_Out
AIL_In
ELE_In
THO_In
AUX_In
MOD_In
SCR_In
OSD display
switch
If only the power is 12V or 3S Lipo
battery, the main board can use the
power. 1 and 2 short circuit for
power supply of main board, 2 and 3
short circuit for power supply of
battery power and the main board
Automatic detection of video signal,
power supply consistent with the
main board voltage
Automatic detection of video signal,
power supply consistent with the
main board voltage
PWM
Elevator steering engine
PWM
Speed regulator or throttle
steering engine
Receiver aileron channel
Receiver elevator channel
Receiver throttle channel
Receiver rudder channel
Receiver knob channel
PWM
Receiver
channel
PWM
knob
switch
PWM
PWM
PWM
PWM
PWM
Shift between manual control, PA,
AUTOPILOT, RTH
Cautions:
1. Never touch the pressure sensor with anything, keep it clean and free from explosion to light.
2. Never pressurize the air speed indicator in case damage may occur.
3. Keep the circuit board away from electromagnetic field, such as video projector and remote controller
protector.
4. Never touch the circuit board with metal in case short circuit may occur.
5. Keep away from propeller movement range (at least 1.5 times of the propeller diameter to the
assistant) in case deviations may occur to the air speed indicator.
6. Please fit the infrared ray sensor to the plain as indicated in the following diagram.
白色箭头指向上 White arrow directing upward
确保两传感器水平,垂直安装 Two sensors horizontally and vertically installed
白色箭头指向机头方向 White arrow directing the plain head
Description of display
The main board indicator lamp flashes after power is connected. The following picture will appear when
you insert TF card (Mini SD card). If there is not TF card, then it will display NO SD CARD FOUND
and jump to startup picture automatically after 2 seconds.
About 5 seconds later, the system will enter pilot interface.
飞行总里程 Milelage
与起飞点的直线距离 Linear distance to the take-off
飞机当前方位角 Current azimuthal angle of the plane
GPS 信号强度 GPS signal intensity
俯仰姿态角度 pitch attitude angle
横测姿态角度
主板(视频)电压 Main board (Video) voltage
动力电压 Motor voltage
动力电流 Motor current
航向 Course
与目标点的航向差 Course difference against the destination
地速 Ground velocity
高度 Altitude
空速 Air velocity
已消耗动力电量 Consumption of motor power
与目标点的地面投影距离 Ground projector distance to the destination
飞行时间 Flying time
At this time, GPS starts searching the satellite signal. The signal intensity symbol at the upper-right
corner refers to the number of the satellites detected. If the signal intensity symbol flashes, it means no
satellite signal detected or the satellite signal date received by GPS is not reliable and cannot be used as
location parameters. The searching lasts one to five minutes in case of adequate satellite signal and the
time changes in different environment.
Cautions
1. Please press "RESET" to Clear before taking off (The operation will Clear altitude, distance, time,
and power consumption).
2. The meaning of current azimuthal angle of the plane: The location where there plane occupies is
based on the take-off as the base point, and the rotates from due north from 0 to 360 degree. For
example, if the plane is at the southeast direction, the it will display 135.
东 east 南 south 西 west 北 north
航向 course
飞机位置 plane location
起飞点 take-off
3. Position indication in return travel: H in the screen refers to the take-off (A-G refer to destinations),
when the take-off point is in front of the plane, then it displays H, when the take-off point is at the back
of the plane, H will flash. If H is in the middle and does not flash, it means that the plane is travelling
back to the take-off point. If H is in the middle and flashes, it means that the plane is deviating from the
take-off point at 180 degree. Methods for return travel: H is displayed at the left side, turn left to travel
back. If H is displayed at the right side, turn right to travel back.
Description of menu parameters setting
Press UP and DOWN to enter main menu setting interface.
SYSTEM CONFIGU SETTING DESCRIPTION
Options
Settings
Remarks
Page 1
ATT DATA
If the attitude angle parameters
displayed in the flying interface
If the environment is not suitable for flying, the
attitude angle parameters in flying interface will
flash.
BAT SCALE
Battery scale setting
If the power consumption reaches the value set
during the flying, the battery scale symbol will
flash.
RESET
CURRENT
Clear current sensor
Clear the first application or after current sensor
change.
RESET
AIRSPEED
Clear air speed
Re-clear the air speed if the environment
changes.
SERVO
CENTER
Confirm the servo center.
You need to confirm the servo center after you
change the model aeroplane. Please manually
fly the plane and adjust the servo center..
REV
TRIM
Reversal setting
Refer to Operation instruction 1
Trim the infrared ray sensor
Refer to Operation instruction 2
CRUISE
AIRSPEED
Set cruise airspeed.
Airspeed value (0-200Km/h) during auto pilot,
when set as 0, the system will not control the
airspeed.
SPEEDMAX
LIM
Maximal limit of airspeed
The air speed of the throttle in PA mode
SPEEDLOW
LIM
Lowest limit of airspeed
When the air speed of the model plane is lower
than the value set, the system will not f;u ascent
to avoid speed loss.
ELEVON
Set elevator aileron
Used to control aileron-type model plane. If
Page 2
choose Y, close compound control setting on the
remote controller projector.
ROLL
Roll control parameters
SEV: 舵量:ANG:maximal slope limit at turn
PITCH
Pitch control parameters
SEV:舵量:ANG: maximal angle limit at pitch
RETURN
Return to the main menu
Description of waypoints
Options
Settings
Remarks
Page 1, page 2
DIS
Waypoint distance
The distance between the Waypoint and the home
point, setting range: 0-5000meters
ANGLE
Waypoint angle
The angle between the line of waypoint and the home
point with the due north, setting range: 0-359
ALT
Altitude of waypoint
Setting range 0-800 meters
RAD
Hovering radius
The hovering radius with the waypoint as the center,
setting range: 0-500 meters
DIR
Hovering direction
L: counterclockwise; R: clockwise
ON/OFF
Whether to use the
waypoint
Page 3
AUTOWAYPOIN
T
Auto waypoint shift
Y: Shift to the next waypoint after the plane reaches
the waypoint, N: hover as set above the current
waypoint. The operators need to turn the knob
manually to shift to the next waypoint.
MAXISCHG
Advance distance for
waypoint shift
Setting range: 0-100 meters
NOTE: The system is in default value at leaving factory. The clients need only to set the red bold
characters for auto pilot.
Operations
1. REV reversal setting: Cover the upper part (Z axis infrared ray) of the vertical infrared ray sensor (Z
axis infrared ray) with a hand after proper connections confirmed, shift the flying mode to PA mode.
Then cover the left side and front of the horizontal infrared ray sensor (XY axis infrared ray), observe
whether the aileron is calibrated to the right side and the elevator steering engine is properly adjusted. If
not, adjust AIL and ELE of REV options. If motor is used as the model plane throttle channel, the
reversal is available for default value. The clients only need to the remote controller throttle channel.
2. TRIM infrared ray sensor trim setting: After infrared ray sensor is fitted on the model plane, put the
plane higher than the head in the open space and observe the attitude angle parameters, if P parameters is
negative number, such as -3, you need to adjust P parameters to -3. Repeat the operations and observe P
parameters until it becomes 0. Observe R parameters with the methods as mentioned above to trim R
parameters. You need only conduct the operations once after the infrared ray sensor is properly fitted
unless the plane is changed or infrared ray attitude sensor is newly fitted.
3. If there is TF card (mini SD card) and power supply is connected, TF card will generate USERID.txt
file, in which 30-digit ID number of the main board will be stored. Please keep the number properly for
future maintenance and software updating.
Description of auto pilot
1. Please confirm that infrared ray sensor and airspeed pipe are properly installed and the infrared ray
attitude sensor shall not bear large angle deviations from the plane.
2. We recommend the clients to use model plane with good stability.
3. Flying mode shift shall be connected to any knob ratio channel on the remote controller. Under
different modes, the flying interface will display different information, PA (auxiliary manual pilot mode),
AUTOPILOT (auto pilot mode), RTH (Auto return mode). At auto pilot mode, turn the knob
AUTOPILOT to PA and quickly back to AUTOPILOT, the system will shift to the next waypoint.
带增稳手动驾驶 auxiliary manual pilot mode
自动驾驶 auto pilot mode
手动驾驶 manual pilot mode
自动返航 auto return mode
4. We recommend to use remote controller with failure protection functions (F/S function). You may set
plain pilot mode shift channel failure protection as auto return pilot. In this case, the plane can
automatically return in case of failure.
5. In PA mode, the system can keep the course and altitude automatically, and the screen will display to
"LOCK" symbols as follows. If the operator control aileron (direction steer) or elevator steer, the course
or the altitude lock will be released. At this time, the system will automatically control the plane attitude
according to the control amount of the operators. For example, if the aileron is in 100% amount, the
plane will fly left (right) at 45 degree slope, if the elevator steer is in 100% amount, the plane will lift
(lower) at 20 degree angle. Until the control lever returns to the neutral, the system will lock and keep
the course and altitude at the moment.
Additional functions
When TF card is inserted into the system and the system detects satellite signal, press for seconds UP
button, and SD symbols will appear on the upper-right corner and flash. At this point, the card starts
storing the system data. Press Reset and the card will restart storing the system data. If you want to end
data storage, press UP button for 3 seconds and SD card symbol stops flashing, and you end data
storage.
Description of software updating
CYCLOPS FPV ASSISTANT may be updated with TF (mini SD) card. We will issue the update
programs on Internet. The clients may download the update program and copy it to the TF card.
1. Download Update.cyc
2. Copy Update.cyc to TF card and insert TF card into CYCLOPS FPV ASSISTANT main board
3. Press OK and start up the system, release the button when you see the following picture until the
update is finished.
When update progression is 100%, the screen will display as follows for system checking.
After the checking, the screen will display as follows:
At this point, you finishes update. After update, the system will automatically run the new program. If
the update fails, the screen will display as follows.
The following cases may result in update failure:
1. Update program is not available in TF card
2. Update program is corrupted
3. Update program does not match product ID.