1
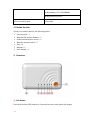
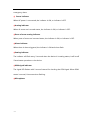
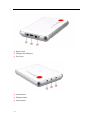
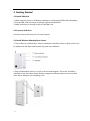
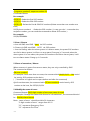
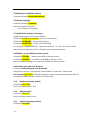
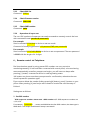
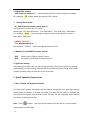
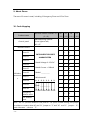
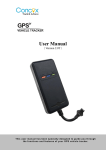
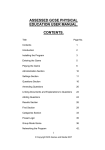
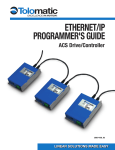
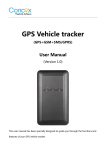
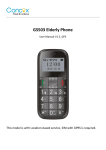
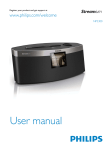
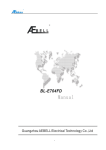
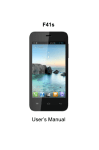
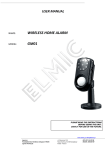
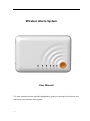
Wireless Alarm System User Manual This user manual has been specially designed to guide you through the functions and features of your wireless alarm system. -1- Content 1. 2. At a glance............................................................................................................................. - 2 1.1 Features ..................................................................................................................... - 3 - 1.2 Specifications ............................................................................................................. - 3 - 1.3 Inside the box ............................................................................................................ - 4 - Overview ............................................................................................................................... - 4 - 3. Getting Started ......................................................................................................................... - 7 3.1 Install SIM Card ............................................................................................................... - 7 3.2 Connect with Siren .......................................................................................................... - 7 3.3 Install Wireless Window/Door Sensor ............................................................................ - 7 3.4 Install PIR Motion Sensor ................................................................................................ - 8 3.5 Start up ........................................................................................................................... - 8 4. Personalize alert voice record ............................................................................................... - 8 - 5. Functions and Commands Reference ................................................................................... - 8 5.1 Set SOS number ......................................................................................................... - 8 - 5.2 Arm / Disarm ............................................................................................................. - 9 - 5.3 Parts of zones Arm / Disarm ...................................................................................... - 9 - 5.4 Modify the name of zones......................................................................................... - 9 - 5.5 Modify the installation address............................................................................... - 10 - 5.6 Change language ..................................................................................................... - 10 - 5.7 HOME Mode arming / disarming ............................................................................ - 10 - 5.8 Whether to send SMS of remote control ................................................................ - 10 - 5.9 Set delay time and siren duration ........................................................................... - 10 - 5.10 Restore to factory default ................................................................................... - 10 - 5.11 Reboot device ...................................................................................................... - 10 - 5.12 Check control panel status .................................................................................. - 10 - 5.13 Check SOS list....................................................................................................... - 11 - 5.14 Check firmware version ....................................................................................... - 11 - 5.15 Check IMEI number ............................................................................................. - 11 - 5.16 Operation of super user ...................................................................................... - 11 - 6.Remote control via Telephone .............................................................................................. - 11 5. Whether to send SMS of remote control ....................................................................... - 12 7. Quick Operation Instructions.................................................................................................. - 12 1. Arm / Disarm via Remote Controller ...................................................................................... - 12 9. About Zones............................................................................................................................ - 15 10. Code Hopping ....................................................................................................................... - 15 - At a glance -2- The hassle-free Wireless Alarm System for commercial and home use is built on leading microprocessor technology with advanced GSM digital signal processing power. It is a highly integrated system of digital speech, mobile messages, multiple modes of wireless coding, long-distance home appliances controlling, SMS Messages identification and other technologies. When alarming, it will automatically notify users via mobile network about the possible break-in using either voice calling or SMS messaging. It is stable, reliable and safe. With its user-friendly design and without the need of fixed telephone network, it can be widely used in different locations including shops, offices, villas, residential estate, to name just a few. It is an ideal choice to protect your properties and personnel safety. 1.1 Features APP controller available for both IOS & Android. 12 wireless zones, including two 7*24 armed zones. Support up to 6 pre-set SOS numbers for alarm info. 3 different alert ways: Dialing, SMS, Dialing + SMS 3 different control methods: APP, SMS, Dialing Emergency alert button (SOS) Two way communications (need an extra speaker). Voice prompts for operation Support 10 second personalized voice message recording SMS notification for AC power failure & recovery Built-in 1000mAh backup battery 1.2 Specifications Wireless frequency 433.92MHz GSM frequency 850/900/1800/1900MHz Operation Temperature -20℃-60℃ Working Humidity ≤95% Response time of data processing ≤8 seconds(GSM status isnormal) Power details Power voltage: AC 220V 50Hz/60Hz -3- Backup battery: DC 7.4V/1000MA Backup time:≥10 hours Voice recording time 10 seconds 1.3 Inside the box Check your product box for the following items: Control panel * 1 Wireless PIR motion detector * 1 wireless window/door sensor * 1 Wireless remote control * 2 Siren * 1 Adaptor * 1 User manual * 1 2. Overview ① SOS button Press and hold the SOS button for 3 seconds on the control panel will trigger -4- emergency alarm. ② Power indicator When AC power is connected, the indicator is ON; or indicator is OFF. ③Arming indicator When all zones are in armed status, the indicator is ON; or indicator is OFF. ④Parts of zones arming indicator When parts of zones are in armed status, the indicator is ON; or indicator is OFF. ⑤Alarm indicator When there is alarm triggered, the indicator is ON and slows flash. ⑥Setting indicator The indicator will flash every 2 seconds when the device is it setting status; it will be off if terminates operation on the device. ⑦GSM signal indicator The signal LED flashes with 1 second interval for checking the GSM signal. When GSM status is normal, it becomes slow flashing. ⑧Microphone -5- ① Power input ② Charger and USB port ③ Siren port ① Voice button ② Setting button ③ Learn button -6- 3. Getting Started 3.1 Install SIM Card 1. Make sure the power is off before installing or replacing the SIM card and battery. 2. Put the SIM card into tray according to the correct direction. 3. Make sure there is enough credit on the SIM card. 3.2 Connect with Siren Connect siren to the siren port of control panel. 3.3 Install Wireless Window/Door Sensor 1. The surface for window/door sensor installation should be clean so door sensor can be attached to the door and frame firmly with twin adhesive. 2. Each window/door sensor is a pair of sensor and magnet. The sensor should be installed on the fixed door frame and the magnet should be placed on the movable door with a distance not exceeding 1 cm. -7- 3.4Install PIR Motion Sensor Kindly refer to the PIR motion sensor user manual for details. 3.5 Start up Connect with AC power and turn the ON/OFF button at back side to ON position. All indicators of Control Panel are on if everything of host runs well; it will be in normal status after 20 seconds. Note: The GSM signal light is always on or off represents signal failure. 4. Personalize alert voice record Press the Voice record button, it can record personal voice message for 10 seconds after one Beep is heard. Two beeps will be heard once the function is set up. It would be better to record the address as the content of voice message. For example, “This is an automatic calling from a home alarm system at address XXXX, please come for assistance as soon as possible”. 5. Functions and Commands Reference 5.1 Set SOS number a. Add SOS number Only preset SOS numbers are authorized to control system. Any telephone numbers can be set as SOS numbers, the command as follows: SOS,A, alarm code,phonenumber,phonenumber,phonenumber,phonenumber,phone number phone number,# (Alarm code: 1 for Auto-dial alarm,2 for SMS alarm,3 for Auto-dial + SMS alarm, the default alarm is Auto-dial + SMS alarm) For example:6 telephone numbers set as SOS numbers, the alarm mode is Auto-dial + SMS alarm, the commandas follows:: SOS,A,3,35106xxxx,35116xxxx,36126xxxx,36126xxxx,35106xxxxx,35106xxxxx# If only need to add a SOS number, just add corresponding sequence number with A. For example: SOS,A1,3,35106xxxx# --Set the first SOS number, alarm mode: Auto-dial + SMS alarm. SOS,A2,2,35116xxxx# --Set the second SOS number, alarm mode: SMS alarm. SOS,A4,1,36126xxxx#--Set the fourth SOS number, alarm mode: Auto-dial alarm. b. Delete SOS number Delete preset SOS numbers, the command as follows: SOS,D,sequence number 1, sequence number 2,sequence number 3, sequence number -8- 4, sequence number5, sequence number 6# D indicated Delete. For example: SOS,D,1#--Delete the first SOS number. SOS,D,5#--Delete the fifth SOS number. SOS,D,1,5#--Delete the first & fifth SOS numbers.(Delete more than one number at a time) SOS,D,phone number# --Delete the SOS number(in case you don’t remember the sequence number, you can send the command to delete SOS number) For example: SOS,D,62366888# . 5.2 Arm / Disarm a. Arm via SMS: send SMS“ON#”via SOS number. b. Disarm via SMS: send SMS “OFF#”via SOS number. c. Arm via Dialing: when the alarm system is in disarm status, the preset SOS numbers can dial to alarm system, it will turn to arm status if hang up in 5 seconds; when the alarm system is in arm status, the preset SOS numbers can dial to alarm system, it will turn to disarm status if hang up in 5 seconds. 5.3 Parts of zonesArm / Disarm When zones are in parts of zones arm status, they are only controlled by SMS. The command as follows: ON,zone number# For example: if arm more than one zone, the command with ON,01,02,03……10# would be sent by SOS numbers to the device. (“,"should be in English and no space before and after the command) Quit from the aratus, the command with OFF,zone number# would sent by SOS number to the host, like OFF,01,02,03# 5.4 Modify the name of zones Command format: DM,2-digit number of zone,new name of zone# For example: if change the name of No.6 zone to“infrared alarm”, the command should be:DM,06,infrared alarm# Note:“name of zone”should be within 20 characters “2-digit number of zone”ranges from 01-12 “11”represents Emergency Zone “12”represents Fire Zone. -9- 5.5 Modify the installation address Command format: AD,defined address# 5.6 Change language Command format: L,number# Note: the numbers are 1 & 2. 1 for Chinese; 2 for English. 5.7 HOME Mode arming / disarming HOME Mode arming can be set as follows: Command: HOME,zone number# --Zones in home mode Command: HOMEON# -- home mode arming Command: HOMEOFF# -- home mode disarming For example:“HOME,01,02,03#”represents zones 01,02,03 are in home mode. Note:10 zones range from 01-10, multiple zones can be set at home. 5.8 Whether to send SMS of remote control Command: CTRON# -- need to send SMS of remote control Command: CTROFF# -- no need to send SMS of remote control Note: the default setting is no need to send SMS of remote control. 5.9 Set delay time and siren duration Command: ALM,delaytime,siren duration# Delay time: 0 second~240 seconds; siren duration: 10 seconds~300 seconds For example:ALM,30,90#(Default parameters) means entering arming status with 30 seconds time delay, the siren duration is 90 seconds. 5.10 Restore to factory default Command: RESTORE# Device will auto restart in 30s. 5.11 Reboot device Command: REBOOT# Device will auto restart in 30s. 5.12 Check control panel status Command: STATUS# - 10 - 5.13 Check SOS list Command:SOSQ# 5.14 Check firmware version Command:VERSION# 5.15 Check IMEI number Command:IMEI# 5.16 Operation of super user The non-SOS numbers of superuser can send command to remotely control the host with command format: password,command# For example: Send a command 1234,ON# to device to set arm mode. Command of modifying password: old password,PWD,new password# For example: Send a command 1234,PWD,88888# to device to set new password. The new password is 88888 with the length of 4-9 digits. 6.Remote control via Telephone Dial into the alarm panel by using preset SOS numbers can carry out voice monitoringremotely. 10 seconds after connected with control panel, voice monitoring starts automatically as well as prompt tone begins, you will hear two beeps after pressing [*] button, it means the device is entering setting status. *All buttons on phone must have prompt tone for confirmation, otherwise the user should repeat this operation again. If you want to delete the number (before pressing[#] button), press[*] button on your phone. After pressing [#], two beeps will be heard to remind the user the setup is finished. Settings are as follows: 1.Set SOS number “SOS sequence number+ alarm code + SOS number + #”. SOS sequence numbers are 1,2,3,4,5,6. For example:“12623688#”,means set 623688 as the first SOS number, the alarm type is SMS alarm. Two beeps will be heard if setup is successful. - 11 - 2. Delete SOS number “SOS sequence number+#”, means delete the SOS number (sequence number)。 For example:“2#”means delete the second SOS number. 3. Change alarm mode “8+ SOS sequence number+alarm type+#” SOS sequence numbers are 1,2,3,4,5,6. Alarm type: 1 for Auto-dial alarm,2 for SMS alarm,3 for Auto-dial + SMS alarm. For example:“823#” means change the alarm mode of second SOS number to Auto-dial + SMS alarm. 4. Modify password “7+4-digit password+#” For example:“74321#” means change password to 4321. 5. Whether to send SMS of remote control “91#” Need to send SMS of remote control “92#” No need to send SMS of remote control 6. Quit from setting If the setting is finished, do not press any key button, the host will quit from setting automatically, and the setting indicator will be off with two beeps heard, mean while relevant content will be send to the first SOS number 7. Quick Operation Instructions 1. Arm / Disarm via Remote Controller Press the Learn button, two beeps will be heard to remind the user entering studying status; press any button of remote controller, one beep will be heard to indicate the host can receive signals from remote control. The user will get a message when learned operation of remote controller. Arm:Press [ ] button,one beep will be heard, all zones will be in armed status, armed status indicator ON. - 12 - Disarm:Press [ ] button,one beep will be heard, all zones will be in armed status, armed status indicator OFF. HOME Mode Arming:press [ ] button,one beep will be heard, the preset zones of home mode will be in armed status, parts zones arming indicator ON. 2. Emergency Alert Press [ ]button of remote controller or host, then the device will enteremergency alarm status immediately, the siren will be hoot, meanwhile the device will send alarm info to the preset SOS numbers. 3. External power failure alarm When AC power is disconnect, the device will send a message “external power failure alert” and continuously dial the preset numbers for 3 times. When AC power is recovered, the device will send SMS“power recovered” to the users. 4. Receiving Alert on Telephone After Panel alerts, it will automatically dial all preset telephone numbers in sequence. Also, the siren will hoot for 90 seconds, and the host will send SMS contains “the name of zone” to the users automatically. When the user picks up the phone, a piece of pre-recorded voice message will be played back immediately and let the receiver noted about the event. The Panel will continuously dial the next phone number for alerting until someone picks up the call. Each phone number preset will be tried for three times. Upon receiving the call, it can also control the alarm panel remotely via the phone (according to the command below). [0] key: disarm [1] key: arm [3] key: siren ringing [5] key: remote recording [2] key: home mode arming [4] key: siren closed [*] key: into setting status Note: The host is in arming status when in voice monitoring, if detectors are triggered, the host will receive signals at once. - 13 - 5. Voice Monitoring Dial into the alarm panel by using preset SOS numbers can carry out voice monitoring remotely. 10 seconds after connected with control panel, voice monitoring starts automatically. Operation is as follows: Press “0” disarm, Press“1”arm, Press“2” STAY arm, Press“3”alert open, Press“4”alert closed, Press“5”remote recording, Press“*”control panel enters setting status. Hang up the phone to terminate the operation. 8. Safety Precautions 1. Do not allow your device to get wet—liquids can cause serious damage and will change the color of the label that indicates water damage inside the device. Do not handle your device with wet hands. 2. Avoid installing or storing the control panel in dusty, dirty areas; do install it in a hidden area, you also pay attention to the signal of device. 3. Make sure to always turn off the power before installing or replacing the SIM card and battery. 4. Firmly stick the charger and ensure it is in optimal heat dissipation. 5. The control panel needs 20 seconds after power on before READY for normal operation. 6. Replace the batteries in the units periodically. There are batteries in the Door Sensors and in the PIR Motion Sensors. 7. Do not install the PIR Sensor near any device which emits heat or cold, such as televisions, computers or other electronic equipment which generates heat as a by-product of operation. 8. Do not put the alarm control panel near large‐scale metal objects or household appliances with high‐frequency interference. 9. Regular check the SIM card (e.g. the balance, the signal, etc.). 10. Test the alarm periodically (every 1-2 months and each time you charge the batteries) to ensure it is working properly. 11. All components are for indoor use only; do not install outdoors. - 14 - 9. About Zones There are 12 zones in total, including 1 Emergency Zone and 1 Fire Zone. 10. Code Hopping Product name Wireless address codeA0~A7 (1~8) D0 D1 D2 D3 (13) (12) (11) (10) Manufacturing number Control panel (from right to left) -- -- -- -- -- -- -- -- 1 0 1 0 0 1 1 0 1 1 1 0 1 0 0 1 A0~A7 Remote control Zone 01 Zone 02 INTELLIGENT SECURITY ALARMSYSTEM Zone 03 Zone 04 Wireless Rated Voltage: 9-12V DC Zone 05 Rated Current: ≤300mA 0 1 0 1 Zone 06 Model: ____________ 1 1 0 1 0 0 1 1 1 0 1 1 0 1 1 1 1 1 1 1 0 0 0 0 1 1 0 0 accessorie Zone 07 s Zone 08 Zone 09 Wireless add: 0 1 2 2 1 1 0 2 Date: ______________ Zone 10 Emergency A7 A6 A5 A4 A3 A2 A1 A0 defense zone Fire defense zone Note:A0~A7 (wireless address code) and D0~D3 (zone number setting) use jumper or solder to connect, when N”and“H”jumper to“1”and“N” and“L” jump to “0”, both sides won’t turn to “2”. - 15 - ShenZhenConcox Information Technology CO.,Ltd Tel: +86755 2912 1200 Fax: +86 755 2912 1290 E-mail: [email protected]. Add: 4/F, Building B, Gaoxinqi Industrial Park, Liuxian 1st Road,No.67 Bao'an District, Shenzhen www.iconcox.com - 16 -