1
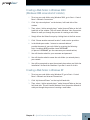
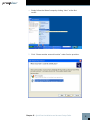
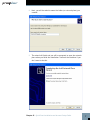
Cost-effectively safeguard the integrity of your documents
and prove the authenticity of electronic records to
clients, counsel or even courts – right from the desktop
User’s Manual
ProofSpace, Inc.
900 Clancy Ave NE
Grand Rapids, MI 49503
(312) 933.8823
www.proofspace.com
Thank you for purchasing ProofDoc™ from ProofSpace.
You need a legally airtight system that thwarts fraud, provides an
undeniable record of good enterprise conduct and repudiates false
legal claims against your company. ProofDoc is the solution.
ProofDoc’s patented Transient Key™ technology tags your electronic
business records with a self-validating cryptographic seal of
authenticity called a “ProofMark™” that acts as a tamper indicator
based on a provable time-reference that is impossible to manipulate,
even by trusted insiders. ProofMarks irrefutably prove that the
content of a record has not changed since it was sealed, no matter
where the data has been stored, distributed, or under whose control
it has been.
Once generated, the ProofMark itself contains all the elements
to prove the authenticity of your document, and the time and
date it was checked-in or sealed. Your ProofMarks are archived by
and remain in the ProofSpace Forensic Repository while the files
themselves reside on your desktop. None of your documents are ever
copied or transmitted to our servers, so ProofSpace never actually
sees the content of your files. This means that the privacy and the
confidentiality of your files are assured.
The ProofDoc solution is easy to deploy, enabling you to apply a seal
of authenticity to any electronic record placed into short-term or
long-term storage, based on business rules you define. ProofMarks
are persistent and can be verified independently by anyone,
eliminating the need for trusted third parties or expensive publickey certification hierarchies. ProofMark seals are portable, selfcontained, independent and indelible, giving you the highest level of
assurance over the authenticity of your electronic business records.
Finally, ProofDoc’s Transient Key technology eases compliance with
national standards and specifications including the ANSI X9.95-2005
specification for Trusted Time Stamp Management and Security,
HIPAA, and Sarbanes-Oxley.
Table of Contents
I
II
III
ProofDoc Product Overview
System Requirements
Quick-Start Installation and Setup Guide
(Windows 2000, XP, and Vista)
IV
Using ProofDoc, Basics
V
Searching for Past ProofMarks
VI
VII
Validating a File
Uninstalling ProofDoc
VIII
Troubleshooting and Support
IX
Frequently Asked Questions
I
ProofDoc Product Overview
ProofDoc digitally “seals” documents with a time-based cryptographic
tamper indicator (called a “ProofMark”). ProofMark seals are
portable, self-contained, independent, and indelible, giving you the
highest level of assurance over the authenticity of your electronic
business records. A ProofMark can be applied to any electronic
record in any file type that is placed into a designated folder on your
computer.
In the ProofDoc system, new RSA cryptographic keypairs are
continually generated and destroyed, with each keypair—a public
key and a private key—being active for only a few minutes at a time.
As records are stored or archived in a designated folder, they are
automatically digitally signed (or “ProofMarked”) by the active time
interval’s RSA private key. When a time interval is about to end and
a new one begins a new key pair goes “on duty” and the old private
key is destroyed.
Using ProofDoc means that you will know—to the second—when a
record was checked in (“sealed”) and whether or not someone has
tampered with it. ProofDoc provides self-validating proof of time and
proof of state with cryptographic tamper detection. Best of all, you
won’t need an outside certification authority or trusted third party to
validate a ProofMarked document because ProofMarks can be verified
independently by anyone.
For a more detailed technical explanation of the patented ProofMark
Transient Key Technology, we invite you to download a free
“ProofMark Technical Overview” whitepaper at:
http://www.proofspace.com/downloads.php
II
System Requirements
512MB RAM; Windows 2000, XP, or Vista; a connection to the Internet
(preferably high-speed); and 80MB of hard-drive space. Internet
Explorer or Firefox browser, with pop-up-blockers disabled for the
Proofspace.com domain.
III
Quick Start Installation
and Account Setup Guide
The ProofDoc system requires that you install a program that runs
on your computer. Your desktop program interacts with the Internet
ProofMark system that resides on our servers.
Once you’ve downloaded the installation file (called “proofdocsetup.
exe”), double-click this file and it will extract to a convenient
location that you designate. This will start the installation process.
During installation, you will be prompted to create a folder; we
suggest creating the folder in your Program Files folder. (In Windows,
you will find this folder by navigating to C:\Program Files on your
hard drive. The installer will select this as the default location for
the program, but you may create a folder in another location if you
prefer.)
You will then be prompted to create your account by selecting a
username and password. Please keep this information in a secure
location as you will need it later to sign in. As part of the setup
process, you will also need to create a web folder. Select your
operating system below and follow the instructions provided.
Creating a Web Folder in Windows 2000
(Windows 2000 screenshot of installer)
1. To set up your web folder using Windows 2000, go to Start > Control
Panel > Network Connections.
2. Click “My network places” on the bottom, left-hand side of the
window.
3. Then, select “Add a network place” under Network Tasks on the lefthand side of the window. This will launch Windows’ New Connection
Wizard to walk you through the process of creating a web folder.
4. Simply follow the Wizard’s steps by clicking Next at the first screen.
5. Click “Choose another network location” under service providers.
6. In the blank space under “Internet or network address”
provide the name of your web folder by entering the following:
http://localhost:8080/proofdoc/users/USERNAME
(In place of USERNAME, put the username you created earlier.)
7. You will then be asked for your username and password.
8. You will then be asked to name the web folder (or network place)
you created.
9. You will be prompted to open the network place when you finish the
installation. Uncheck the checkbox if you don’t want to do this.
Creating a Web Folder in Windows XP
1. To set up your web folder using Windows XP, go to Start > Control
Panel > Network and Internet Connections.
2. Click “My Network Places” on the top left-hand side.
3. Then, select “Add a network place” under Network Tasks on the top
left-hand side. This will launch Windows’ New Connection Wizard to
walk you through the process of creating a web folder.
Chapter III Quick Start Installation and Account Setup Guide
4. Simply follow the Wizard’s steps by clicking “Next” at the first
screen.
5. Click “Choose another network location” under Service providers.
Chapter III Quick Start Installation and Account Setup Guide
6. In the blank space under “Internet or network
address” type this as the name of your web folder:
“http://localhost:8080/proofdoc/users/USERNAME”
(In place of USERNAME, put the username you created earlier.)
7. You will then be prompted for your username and password.
Chapter III Quick Start Installation and Account Setup Guide
8. Next, you will be asked to name the folder (or network place) you
created.
9. The wizard will finish and you will be prompted to open the network
place when you finish the installation. Uncheck the checkbox if you
don’t want to do this.
Chapter III Quick Start Installation and Account Setup Guide
Creating a Web Folder in Windows Vista
1. To set up your web folder using Windows Vista, in “Computer” rightclick an open area on the right side of the Window, then select “Add
a Network Location.”
2. When the Add a Network Location Wizard appears, click Next.
3. When you are prompted, “Where do you want to create this network
location?” choose a custom network location and click Next.
4. When asked to specify the location of your web
site, type this as the name of your web folder:
http://localhost:8080/proofdoc/users/USERNAME
(In place of USERNAME, put the username you created earlier.)
5. You will then be prompted for your username and password.
6. You will then be asked to name the folder (or network place) you
created.
7. The wizard will finish and you will be prompted to open the network
place when you finish the installation. Uncheck the checkbox if you
don’t want to do this.
Chapter III Quick Start Installation and Account Setup Guide
IV
Using ProofDoc
Congratulations! You’ve now created a ProofDoc account and a
ProofDoc web folder. To make this folder easily accessible, create a
shortcut to your ProofDoc web folder on your desktop.
You can now begin using ProofDoc.
ProofMarking a file:
Double click the ProofDoc web folder shortcut on your Desktop. When
prompted, enter the username and password that you selected when
you created a ProofDoc account.
Now copy the file you want to ProofMark into the web folder on your
desktop by simply dragging and dropping the file into the web folder
(or by using the Cut, Copy, and Paste functions of Windows).
Copy a file from your desktop.
Paste the file into your ProofDoc web folder.
Chapter IV Using ProofDoc
10
Once the file has been successfully copied to your web folder, it will
be automatically ProofMarked by our system. The file will reside
on your desktop while the ProofMark will remain in our Forensic
Repository on our servers.
That’s it.
Chapter IV Using ProofDoc
11
V
Searching for Past ProofMarks
Searching:
If you’d like to find out whether a file has been ProofMarked or to
see the date it was entered into the ProofMark Forensic Repository,
go to the ProofDoc Search and Administration page on the web. (To
get to this page, click on the ProofDoc icon that was placed on your
desktop during installation or open a Browser window and enter the
URL: http://localhost:8080/proofdoc/ and log in using your username
and password). In the search dialog, you can modify your search
by selecting a radio button or adding in optional data about specific
ProofDoc records.
All: Searches through the Forensic Repository for all
ProofMarks.
Read: Searches for ProofMarks based on the date and time the
record was last viewed.
Write: Searches based on the date that a ProofMark was added to the Forensic Repository.
Delete: Searches for ProofMark records that have been deleted
from the Forensic Repository.
User: Limits your search to a specific user.
(This is an optional search field.)
12
URL: This is the specific location of the file on your computer
as captured by the ProofDoc database.
(This is also an optional search field.)
ProofDoc Events
Your search results will show up in a ProofDoc Events table such as
the one shown above.
On the left side of the table, under the URL column, you’ll see the
name of the ProofMarked file, an icon indicating its file type (Word
Document, Excel file, text file, PDF, or any other file type), and its
location on your desktop.
The Version column indicates the various iterations of a file. Each
time you modify a file and save it into your web folder, you will see
a new version number. The first version of a file is listed as 1.0, the
next will be 1.1, 1.2, and so on.
The Method column indicates a specific action that has been taken by
a user in relation to the ProofMarked file. You’ll see Read, Write, or
Delete listed under this column. (Note that a record of the action will
remain after a file has been removed from the ProofDoc web folder
on your desktop.)
The Subject column lists the username of the person who took one of
the aforementioned actions.
Chapter V Searching for Past ProofMarks
13
The Date column indicates the date a file’s ProofMark was uploaded,
deleted, or modified.
Under the ProofMark column, you’ll see options to either show or
verify. Show will simply show you the ProofMark itself while verify
will let you validate a file.
Chapter V Searching for Past ProofMarks
14
VI
Validating a File
The folder you create on your desktop during ProofDoc installation
is in fact a network folder that is communicating with our remote
ProofMark server to issue and keep track of ProofMarks. (Our servers
are collectively also known as the “ProofMark Forensic Repository”.)
Once generated, the ProofMark itself contains all the elements to
prove the authenticity of your document and the time and date it
was sealed and checked into the folder. Sealing a file is as simple as
dragging and dropping it into the ProofMark folder.
Your ProofMarks are archived by and remain in the Forensic
Repository while the files themselves reside on your desktop. None
of your documents are ever copied or transmitted to our servers, so
ProofSpace never actually sees the content of your files.
Using “Verify” to Validate a File
To verify whether a file has been altered or tampered with, you can
use the Verify feature to compare it with the original at the time
it was sealed. Simply click the word “Verify” on the search results
screen as listed the ProofMark Events section. First click Browse to
select a file from your computer you’d like compare to the original
ProofMarked record. Then click the Verify button. If the file you are
verifying has been altered even slightly since the ProofMark was
issued, you will receive a failed validation report, which may indicate
that you need to more closely examine the file in question.
Validation successful
If the file you are testing for integrity is the same as the filed that
existed at the time the ProofMark was issued, you will get the
message, “Validation Successful” and see a screen like the one shown
below.
15
Validation Successful Screen
Validation failure
In the event that a file you are validating has changed or been
modified since the ProofMark was issued, you will receive a notice,
“Validation Failed.” The new digest of the file does not match the
one preserved in the ProofMark. Even if you change a decimal point
or make a very minor modification to the file, the validation will
indicate “Failure” unless the two documents are identical.
Validation Failure Screen
Chapter VI Validating a File
16
VII
Uninstalling ProofDoc
An uninstaller has been included with the product. To remove the
ProofDoc application, simply navigate to the Windows Control
Panel>Add or Remove Programs. Select ProofDoc from the list and
double click to start the uninstaller.
Once the uninstaller is complete, you may need to manually remove
program folders from the Program Files folder and delete the web
folder you created on your desktop.
17
VIII
Troubleshooting and Support
If you have any trouble with the ProofDoc product, or just have
questions we’re here to help.
Drop us a line at: [email protected] and we’ll try to fix your
problem right away!
18
IX
Frequently Asked Questions
Q:What is a ProofMark?
A: A ProofMark is an intrinsic data-level tamper indicator embedded in or
associated with a data set. It is a cryptographic time stamp that binds
the unique digital fingerprint that particular data (a message digest,
or “hash”) with time sourced from a trusted National Timing Authority,
such as NIST. Like tamper-evident seals on Tylenol bottles, ProofMarks
don’t actually prevent tampering. Instead they discourage tampering by
making it very obvious if data modification occurs.
Q:What is encryption?
A: Encryption is the process of encoding your files and the data associated
with them so that so that they require a special key to be read. Your
data passes through a mathematical formula called an algorithm, which
converts it into encrypted data called ciphertext, scrambled data.
Q:What is a hash?
A: Sometimes called a digital fingerprint, the hash value serves as a
type of “signature” that represents the contents of a longer message.
The hash function serves as a type of tamper-evident seal. The file is
mathematically broken down into a unique string of characters that can
only represent the content of the file. When you verify a file, you are
essentially comparing the hashes. It is nearly impossible to generate
the same hash from two different files regardless of how miniscule the
difference might be.
Q:What does a ProofMark prove?
A: A ProofMark proves that a given piece of data has not changed since
a specific point in time. Furthermore, the time associated with the
ProofMark is, in itself, provable as authentic and valid.
Q:How big is a ProofMark?
A: A ProofMark is a very small data object comprised of a timestamp, a
serial number, a time interval identifier, a digest of the data concerned,
a digest of the last document ProofMarked. The size of the ProofMark
(without the public key) will depend on the hashing algorithm and the
encryption key size. For example, if a SHA1 is used the encrypted digest
will be 20 bytes long. If SHA256 is used, the size increases to 32 bytes.
19
Q:Is the ProofSpace technology compatible to the European
norm TS 102 023 V1.1.1 (2002-04) Policy Requirements for
Time-Stamping Authorities and TS 101 861 V2.1.1 (2002-03)
Time Stamping Profile?
A: The current release of ProofMark does not support these European
specifications, although the next release will support these standards
via a backward compatibility mode specified by ANSI X9.95.
Q:What is the difference between using the ProofSpace
technology and using a TSA (Time Stamping Authority)?
A: According to RFC 3161, the term “TSA” refers to any entity that offers
time service in compliance with standards rather than a specific
technology. In practice, however, the term “TSA” usually is used to
mean an outside third party that issues trusted (signed) timestamps.
The ProofSpace technology does not need to rely upon external Time
Stamping Authorities to generate trusted time stamps, resulting in a
solution that is less expensive, easier to manage, and more secure than
products based on RFC 3161.
Q:What is Transient Key™ Technology?
A: ProofMark’s Transient Key technology is basically public key
cryptography...with a twist. Instead of assigning keypairs to individuals,
in ProofMark’s Transient Key system, keypairs are assigned to specific
time intervals just a few minutes long. As records are stored, they are
signed by the active time interval’s RSA private key. When an interval
is about to expire, it signs the new interval’s RSA public key; the new
keypair goes “on duty” and the old private key is destroyed.
Q:Why did my file fail to be validated?
A: If a ProofMarked record has been changed in any way, or if its
timestamp has been tampered with, the ProofMark will not validate. If
you’ve opened a file or made even a minor change to it, the validation
test will fail. This is because the ProofDoc system measures the exact
file and the data contained within it. Even if the file changes in a very
minor way—if you move a decimal point, for example—it will fail a
validation test.
Q:Why can’t I create more than one username and password?
A: This version of ProofDoc offers just one username and password.
Chapter XI Frequently Asked Questions
20
Q:What happens when my private key expires?
A: In the ProofDoc system, your private key only lasts for only a short time
interval. It serves to link the event of signing a document to a moment
of time so the system can verify the exact time a document was
checked into the system.
Q:How does a ProofMark indicate data integrity?
A: We define “data integrity” to mean that a given piece of data has not
changed over a specified period of time. A ProofMark proves the data
integrity of a record by comparing the message digest on the original
ProofMarked record with a new digest created on the spot, at the time
the verification is requested. If the ProofMark can be decrypted by the
public key of its purported time interval and the digests are identical,
then the current record has not changed since it was originally
ProofMarked.
Q:How does the ProofMark system source trusted time? How
accurate is it?
A: Each ProofMark has a timestamp indicating the time that the ProofMark
was issued. The timestamp is created using Universal Coordinated Time
(UTC), with precision to the nearest millisecond. Within a ProofMark
Server, timestamps are obtained from a trusted Time Source (commonly
via the Network Time Protocol, NTP, although more robust mechanisms
are supported). Times are calculated via a time biasing mechanism,
which obtains the time from the trusted Time Source periodically and
uses a local hardware timer in the interim.
If the Trusted Time cannot be obtained, the ProofMark server will
not issue ProofMarks until the trusted time can be reestablished.
The system clock, which is vulnerable to tampering, is never used
as a source of time. Every timestamp has an associated accuracy, in
milliseconds, which is reported along with the timestamp in every
issued ProofMark. In a typical configuration, accuracy within 100
milliseconds of the Atomic Clock is possible. If the Time Source is not
running within its specified tolerance, a Stale Time Exception occurs,
which prevents the creation of ProofMarks.
To learn more about Trusted Time Stamps, visit:
http://www.proofspace.com/technology/timestamping_2.php.
Chapter XI Frequently Asked Questions
21
ProofSpace, Inc.
900 Clancy Ave NE
Grand Rapids, MI 49503
(312) 933.8823
www.proofspace.com
©2008 ProofSpace, Inc. All rights reserved. ProofSpace, the ProofSpace
logo, ProofDoc, the ProofDoc logo, ProofMark and the ProofMark System
are trademarks of ProofSpace, Inc. All other trademarks are owned by their
respective companies.