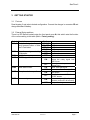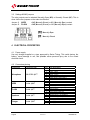
1
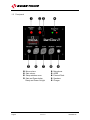
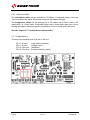
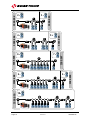
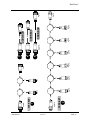
User’s Manual STARTTIME II 3399.502.02 Version 2.1 Edition July 2007 CAUTION Never use any other charger than the supplied or a type approved by Swiss Timing. This could destroy the battery, cause damage to unit, and possible cause personal injury due to fire or/and electrical shock. Lead/Acid batteries may be damaged if discharged, and left unused over a period of time. To avoid this, keep the charger connected at all time during storage. This will assure that the battery is always fully charged, and the unit is ready for use. Protect the equipment against splashing, rain and excessive sun rays. Never use the device if it is damaged or insecure. Verify the selection of the power distribution. Do not open the case; there is nothing that needs servicing inside it. Nevertheless, if the case must be opened, you must call for some qualified personnel. The power supply cable must be disconnected before opening the case. The information contained within this document may be modified without warning. Swiss Timing LTD cannot be held responsible for errors within this document nor for any subsequent nor consequential damages (including loss of profit) arising from its provision, nor performance or use of products described herein, which will be covered by another guarantee, contract or other legal document. During the transport of all Swiss Timing equipment delivered with a reusable carry case, the said case should be used at all times. This is imperative to limit the damage, such as shocks or vibration that can be caused to the units during transport. The same cases should also be used when returning equipment to Swiss Timing for repair. Swiss Timing reserves the right to refuse all guarantee if this condition is not fulfilled. This symbol indicates that this product should not be disposed with household waste. It has to be returned to a local authorized collection system. By following this procedure you will contribute to the protection of the environment and human health. The recycling of the materials will help to conserve natural resources (valid in the EU member states and in any countries with corresponding legislation). TABLE OF CONTENTS 1 INTRODUCTION ...................................................................................... 1 1.1 1.2 2 Concept ...................................................................................................................1 Front panel ..............................................................................................................2 INSTALLATION ....................................................................................... 3 2.1 Operation.................................................................................................................3 2.1.1 Stand Alone Operation (ARES) .......................................................................3 2.1.2 Stand Alone Operation (PowerTime) ...............................................................3 2.1.3 Independent Operation ....................................................................................4 2.2 Cabling the installation ............................................................................................5 2.2.1 External loudspeakers connection u ..............................................................5 2.2.2 Extension cables ..............................................................................................6 2.3 Troubleshooting.......................................................................................................6 3 GETTING STARTED ................................................................................ 7 3.1 3.2 3.3 4 ELECTRICAL PROPERTIES ................................................................... 8 4.1 4.2 5 Power supply ...........................................................................................................8 Connectors pinning .................................................................................................8 MECHANICAL PROPERTIES.................................................................. 9 5.1 6 First use...................................................................................................................7 External Setup-switches..........................................................................................7 Settings NO/NC jumpers .........................................................................................8 Dimensions and weights .........................................................................................9 OPTIONS.................................................................................................. 9 6.1 6.2 6.3 Auxiliary flash ..........................................................................................................9 External loudspeaker 2850.712 ..............................................................................9 Loudspeakers harness cables ................................................................................9 © Reproduction in any manner whatsoever without the written permission of Swiss Timing Ltd. is strictly forbidden. © La reproduction de ce document, sous quelque forme que ce soit, et sans l’autorisation écrite de Swiss Timing Ltd., est strictement interdite. © Die Vervielfältigung oder Wiedergabe in jeglicher Weise ist ohne schriftliche Genehmigung von Swiss Timing Ltd. strengstens untersagt. SWISS TIMING LTD P.O. Box 138, rue de l'Envers 1 2606 Corgémont, Switzerland www.swisstiming.com Phone +41 32 488 36 11 Fax +41 32 488 36 09 [email protected] StartTime II 1 INTRODUCTION 1.1 Concept The StartTime II is the latest edition of the Swiss Timing acoustic start systems. You will find the StartTime II compact and reliable as both the flash and the loudspeaker are integrated in the same case. It is important to position the StartTime II so that deaf athletes see the flash. An additional external flash can also be connected to the StartTime II where it is most necessary. The SPEAKERS output enables one to connect a chain of loudspeakers therefore giving the start signal as close as possible to each athlete. The sound of the start signal must be brought as close as possible to the athlete in order to eliminate delay due to the comparatively slow propagation of sound. The microphone unit enables one to give the start signal and also amplifies verbal commands; the TALK button connects/disconnects the internal microphone. The volume of verbal commands can be controlled on the main device. Two luminous indicators show the status of the system: "device switched on" and a "READY" indication which is controlled from the timing device. The system, when connected to timing devices such as the ARES 21, give a high level of security with the READY indicator. That is to say it may be deactivated from the Control Room if the Timing Technician is not ready to accept a start signal. 3399.502.02 Version 2.1 Page 1 1.2 Front panel n op Fig. 1 1 r n o p q Page 2 q s t u Micro volume Start volume Setup-switches cover Start and Power button Ready and Power On light r s t u v Version 2.1 v Microphone ARES External Flash Speakers Charger 3399.502.02 StartTime II 2 INSTALLATION 2.1 Operation 2.1.1 Stand Alone Operation (ARES) 1. Connect the microphone to connector r. 2. Connect the cable from ARES to connector s. 3. Turn the unit ON by pressing the POWER button q. The power lamp q will lit and the red lamp in the microphone should now be lit. If the ARES is cleared and ready for start, the green lamp would be lit as well. 4. Press the "Talk" button. Adjust the volume button on the StartTime II unit to an appropriate level. 5. Check if READY signal green lamp is on. 6. Press the "Start" button. 7. One signal should sound from the loudspeakers, and the ARES should be activated. If a false start is to be announced, press the "start"-button again within 10 seconds and several signals will be heard (Depending SW1, SW2 and SW6 selections). The level of the start / false start signal can be adjusted on the main unit. Notes: The unit can not be started, if SW5 is set to ON, and the ARES/OSM6 is not cleared. The false start signal is only functional if SW6 is set to ON. If both SW5 and SW6 are set to ON, the system will always announce a false start if the ARES is not cleared and ready for start. 2.1.2 Stand Alone Operation (PowerTime) 1. 2. 3. 4. 5. Set SW5 to OFF (First use only). Connect to connector r. Connect the cable from PowerTime to connector s. Turn the unit ON by pressing the POWER button q. Press the "Talk" button. Adjust the volume button on the StartTime II unit to an appropriate level. 6. When the contenders are ready, start the heat by pressing the "start"-button. If a false start is to be announced, press the "start"-button again within 10 seconds and several signals will be heard (Depending on SW1, SW2 and SW6 selections). After 10 seconds, the system will be ready for a new start. The actual procedure may vary following software version, but the general function is the same. 3399.502.02 Version 2.1 Page 3 2.1.3 Independent Operation It is possible to use the StartTime II without the microphone unit. In this case, it is only possible to carry out starts and false starts with the "Ready" button of the StartTime II. 1. 2. 3. 4. Page 4 Connect the cable from ARES to connector s. Turn the unit ON by pressing the POWER button q. Press the "Ready" button for the start. The start signal can only be given once the "Ready" led is on or if the micro-switch SW5 is on OFF. If a false start is to be announced, press the "Ready"-button again within 10 seconds and several signals will be heard (Depending on SW1, SW2 and SW6 selections). After 10 seconds, the system will be ready for a new start. Version 2.1 3399.502.02 StartTime II 2.2 Cabling the installation 2.2.1 External loudspeakers connection u The minimum recommended load per amplifier is 3.2 Ohms and the maximum load per amplifier is 16 Ohms. It is possible to use a load of 2 Ohms, but will result in increased distortion and loss of output power. Any combination that gives a total load of between 3.2 and 16 Ohms is acceptable. Note the phase (+ sign or Red dot) of the speakers, or loss of sound quality will occur. Note: never connect the two speaker outputs together in any way or connect them to ground. This may cause severe damage to the amplifiers. Examples of loudspeaker connection: 5 Speakers of 16 Ohms each Total load of 3.2 Ohms 6 Speakers of 16 (8) Ohms Total load of 10.6 (5.3) Ohms 8 Speakers of 16 (8) Ohms each Total Load of 8 (4) Ohms 8 Speakers of 4 (8) Ohms each Total Load of 8 (16) Ohms 3399.502.02 Version 2.1 Page 5 2.2.2 Extension cables The microphone cable may be extended to 30 Meters. If extended further, noise and ”hum” may distort the signal. No damage to the unit will happen although. The loudspeaker cables can be extended up to 30 meters with 0.75mm² cable or 50 meters with 1 or 1.5mm² cable. If extended further, loss of sound quality may occur, but no damage will happen. Beware of polarity of speakers, or loss of sound quality will result. See also chapter 6.3 "Loudspeakers harness cables". 2.3 Troubleshooting There are four standard fuses 5x20 mm in the unit: F1 = 1 Ah slow. F2 = 1 Ah slow. F3 = 6.3 Ah slow. F4 = 6.3 Ah slow. Page 6 (Logic and microphone) (Charger input) (Amplifiers) (Located on battery cable) Version 2.1 3399.502.02 StartTime II 3 GETTING STARTED 3.1 First use Read chapter 3 and select desired configuration. Connect the charger in connector v and charge StartTime II battery. 3.2 External Setup-switches There is a DIP-Switch located under the front panel cover p, this switch sets the function of the unit according to this table (Bold = Factory setting): Switch Description SW1,2 Number of signals the unit would generate when a “false start” is activated SW3 SW4 SW5 Type of sound generated by loudspeaker No function READY signal function Position OFF OFF ON OFF OFF ON ON ON ON OFF OFF ON OFF SW6 False start function ON OFF SW7 Microphone buttons positions ON OFF SW8 Power saving ON OFF 3399.502.02 Version 2.1 1 signal 2 signals 3 signals 4 signals Sampled Gunshot Modulated tone Reserved for future use. The unit can not start a heat unless the ready signal from ARES is set The unit can always start a heat (PowerTime) Allow ”false start signal” Never allow ”false start signal” Normal button layout of microphone Swap function of TALK and START buttons Power saving on (Standby in 15 minutes, power off in 90 minutes) No power saving Page 7 3.3 Settings NO/NC jumpers The relay outputs can be selected Normally Open (NO) or Normally Closed (NC). This is done via the two jumpers on the main circuit board. Jumper J1 Jumper J2 ARES FLASH = NC (Normally Closed) or NO (Normally Open) contact = NO (Normally Closed) or NO (Normally Open) contact Normally Open Normally Closed 4 ELECTRICAL PROPERTIES 4.1 Power supply Use only charger supplied or a type approved by Swiss Timing. This could destroy the battery, cause damage to unit, and possible cause personal injury due to fire or/and electrical shock. 4.2 Connectors pinning Description Connector type Microphone DIN 45326 8pFT ARES Tuchel 4pMT FLASH Tuchel 4pFT Speakers Tuchel 4pFT Charger Tuchel 3pMT Page 8 Pin 1 2 3 4 5 6 7 8 1 2 3 4 1 2 3 4 1 2 3 4 1 2 3 Version 2.1 Pin description Line in Ground ”Talk” – switch 12 Volts (Max 40 mAh) ”Start” – switch. Ready signal to Green LED (+) Ready signal to Green LED (-) Not used Ready signal from ARES (-) Start to ARES Start to ARES Ready signal from ARES (+) Power feed for Flash (+12V) Start Out Flash Start Out Flash Power feed for Flash (0V) Speaker Plus (+) of Amplifier #1 Speaker Minus (-) of Amplifier #1 Speaker Plus (+) of Amplifier #2 Speaker Minus (-) of Amplifier #2 Battery (+) Not used Battery (-) 3399.502.02 StartTime II 5 MECHANICAL PROPERTIES 5.1 Dimensions and weights Main unit dimensions: Microphone dimensions: Alarm “low battery”: Protection class: Power: Standby time: Charger: Speakers: Output speakers: Storage temperature: Working temperature: Relative humidity: 400x 205 x 160mm w/o Connectors 30 x 66 x 131 mm. + 10 meter cable Yes IP41 Built in 12 Volt / 6.5 Ah Sealed lead-acid battery 24 Hours (1000 starts). After this, the unit should still be operable for 1 hour. The self-discharge time is approximately 12 months if not in use. An external 12V Lead/Acid battery (car battery) connected to the charger input, could be used if extended operation time is needed. Max. initial current: 1.0 Ah (only for use in dry environment). Load 3.2 - 16 Ohms @13.2 Volts, 3.2 Ohms, 1 kHz Typical : 2 * 13 Watt with < 1 % Distortion Maximum: 2 * 19 Watts with 10 % Distortion -20ºC to +65ºC -10ºC to +65ºC (20%-80%) without condensation 6 OPTIONS 6.1 Auxiliary flash Optical signalling device for the start. Connected directly to the StartTime II, it can be positioned to one's liking near the deaf athlete. 6.2 External loudspeaker 2850.712 For mobile installations. To be positioned near each starting block so that all swimmers hear the start simultaneously. 6.3 Loudspeakers harness cables Harness cables 1.5 mm² are used to link the StartTime II to the loudspeakers. 3399.9xx where xx = 02 - 10 loudspeakers. 3399.502.02 Version 2.1 Page 9 Page 10 3399.910 3399.908 4 4x 1 1 6x 2 4 2 2 Version 2.1 3399.903 3 5x 3 3393.905 3399.902 1 7x 3 3399.907 3399.904 4 3x 8x 9x 4 1 3 1 3399.909 3399.906 2x 10x 1 4 3399.502.02 3399.502.02 Version 2.1 4.9 m. 3399.621 2 4pMC 3399.620 1 4pMC 4.9 m. 4pFC 1m. 4pFC 1m. 5 m. 5 m. 4pFC 1m. 4pFC 1m. 5 m. 0.1m. 4pFC 1m. 4pFC 5 m. 5 4 3 4pFC 1m. 5 m. 4pMC 4pFC 1m. 5 m. 4pFC 1m. 3399.632 20 m. 3399.631 10 m. 3399.630 6 m. 0.1m. 4pFC 4pFC StartTime II Page 11 SWISS TIMING LTD P.O. Box 138, rue de l'Envers 1 2606 Corgémont, Switzerland www.swisstiming.com Phone +41 32 488 36 11 Fax +41 32 488 36 09 [email protected]