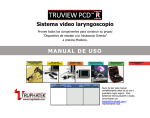
1
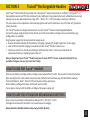
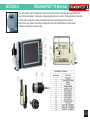
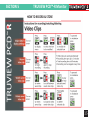
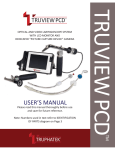
Multi-choice video laryngoscope system
Provides all the components to build your own
“Failed DL-Rescue Device”
at prices you can easily afford.
USER’S MANUAL
Five sizes low profile
optical blades
Soft-feel LED
rechargeable handles
Magnetic release
CCD SonyTM camera
TruflexTM
articulating stylet
Recording monitor compact easy to carry
Multi-purpose
roller stand
Quick connect to any
modular system
4 sizes
Memory shape stylets
1-blade/multiple blade
set options
Please read this manual
thoroughly before use and keep
it safe for future reference.
For technical support or help,
contact [email protected]
or your local dealer.
How to use this User’s Manual
Sections
Page
1.
2.
3.
4.
5.
6.
7.
8.
9.
10.
2-4
5-10
11
12
13-16
17-18
19-20
21
22-23
24
Introduction to the System
Optical Blades
TruLED Rechargeable Handles Camera Data Using the Monitor
Trouble Shooting Hints
Technical Specifications
Warranty Conditions
Accessories
Contact
1
SECTION 1
Introduction to the system
HOW TO CREATE YOUR TRUVIEW PCD™-R
MODULAR VIDEO-LARYNGOSCOPE SYSTEM
2
SECTION 1
Introduction to the System
STEP 1: CHOOSE YOUR OPTICAL BLADES
The Truview PCD™-R system comprises of a range of 5 stainless-steel “low profile” laryngoscope blade sizes with
special narrow tips that enable difficult oral and nasal intubations to be performed using a minimal amount of force
and causing a reduced rate of patient side effects, such as sore throat or soft tissue damage. The Truview PCD™-R
blades contain sophisticated optics that refract the line of vision with the result that an improved Cormack & Lehane
grade of difficulty score is obtained. An oxygen jet spray delivered, via a unique injector, across the blade lenses during
the intubation procedure serves to slow the rate of de-saturation; prevent misting and remove secretions on the lenses
thereby ensuring that a clear visual picture is maintained throughout the entire intubation procedure.
These blades can be used by direct view or by linking them either to a Truview PCD™-R dedicated camera / LCD
screen combination or to most endoscopic HD cameras / LCD screens that are already used in operating rooms.
STEP 2: CHOOSE YOUR RECHARGEABLE HANDLE
The Truview PCD™-R system requires very powerful LED illumination with a bluish-white colour spectrum in order to
give the optimal clarity of view .
It is highly recommended to use TruLED™ re-chargeable handles that were specially designed to provide the
strongest illumination at constant power output levels that can be easily maintained by simple re-charging.
TruLED™ soft feel rechargeable handles, available in standard and mini sizes, provide over 10 hours of continuous use.
They can be easily cleaned by removing the inner core and can be successfully sterilized using all STERRAD™ gas plasma
systems. Various local territory plug options are available.
3
SECTION 1
Introduction to the System
STEP 3: CHOOSE YOUR CAMERA ATTACHMENT
Main Choice : SONY CAMERA
The Truview PCD™-R dedicated camera is based on use of a Sony CCD II Exview HAD CCD™ II with an added
focus lens and presented as a magnetic attachment that easily attaches onto all the blades.
Alternate Choice : STORZ™ or OTHER ENDOSCOPIC CAMERAS
The Truview PCD™-R Optical blades allows attachment to all camera systems used by standard operating room
endoscopes that are fitted with 32 mm standard connection mounts.
STEP 4: CHOOSE YOUR MONITOR
Main Choice : TRUVIEW™ PICTURE CAPTURE DEVICE (PCD) MONITOR
The Truview PCD™-R 5 inch digital LCD Monitor Screen allows recording, storage and viewing of both single images
and video clips taken during intubations.
The lightweight screen easily fits into a clinical jacket pocket and can, thereby, be taken from one operating room
to another or to a main computer to download images and transfer them to patient files or for use during case
demonstrations for teaching and research purposes. The computer will recognize the monitor as if it was a
“memory-storage key”. The installation of complicated software is not required.
A USB cable is used to download from the Truview PCD™-R monitor to another computer while an AV cable can
be used to show images both on the Truview PCD™-R monitor and on a larger monitor screen. The images will
be seen on both monitors at the same time.
Alternate Choice : OPERATING ROOM MONITORS THAT CONNECT TO STORZ™ or OTHER ENDOSCOPIC CAMERAS
Truview PCD™-R Optical blades will easily fit into any 32mm standard C-Mount camera attachments used by most
operating room endoscopic systems. The entire intubation process can be screened throughout the operating room
for training and observation. The data can also be stored for later use.
4
SECTION 2
TRUVIEW PCD™-R Optical Blades
HOW TO CHOOSE THE RIGHT BLADE SIZE
The following table is for guidance purposes only. The correct blade size to use
depends upon numerous clinical parameters and conditions.
The final decision remains the sole responsibility of the clinician.
Blade
Name
Blade Size
Patient’s
Age (years)
Weight
range (Kg)
Weight range
(Pounds)
Neonatal
0
<1
0.8 - 4.0
2 .0 - 9.0
Infant
1
1-3
4.0 - 8.0
9.0 -18.0
Child
2
2-16
8.0 - 60.0
18.0 -132.0
Adult
3
>16
50.0-120.0
110.0 -265.0
Extra
large
4
>16
> 120.0
> 265.0
HOW TO DISINFECT THE OPTICAL BLADES
Check that all parts are clean, positioned properly, that the glass prism in the optical eye-piece
is undamaged, that the view through the optical system is unhindered and that there is blade tip
illumination when the blade is mounted onto the laryngoscope handle.
Always check that the view tube is inserted properly into the groove on the blade.
5
SECTION 2
TRUVIEW PCD™-R Optical Blades
Ensure that batteries in the handle are fully charged. When
plugged in, the green LED at the bottom of the TruLED™ PCD-R
handle lights up to indicate that batteries are fully charged.
Mount the Truview PCD™-R laryngoscope blade onto the
TruLED™ PCD rechargeable handle and ensure that the
laryngoscope blade lights up in the horizontal position.
Before every use, check the optical view tube lenses for
signs of scratches or damage and replace the optical view
tube if necessary.
Tracheal intubation requires specialized training. Only
personnel who have received such training should be
allowed to use Truview PCD™-R blades.
Any piece of medical equipment may transmit infection from patient to patient. Appropriate measures must be
taken to clean, disinfect and sterilize the Truview PCD™-R equipment between patients and to maintain them in
a clean state. Ensure that the Truview PCD™-R blades are clean and free from damage prior to use.
HOW TO PREVENT FOGGING
To prevent fogging and to improve patient safety, connect the Truview PCD™-R blade via the oxygen port to an oxygen
or medical air supply line. Connect oxygen to the blade’s oxy-port from a suitably available oxygen source (wall supply,
cylinder or anesthesia machine) using a standard hospital oxygen single use plastic supply tube and feel that there is a
jet-flow of oxygen over the lens surface.
Oxygen flow guidance:
Blade sizes 0 and 1 - up to 5 liters/minute (*).
Blade sizes 2, 3 & 4 - up to 10 liters/minute (*).
*These oxygen rates are for guidance purposes only. Actual flow rates depend upon numerous clinical and
professional considerations and are to be decided by the treating clinician.
6
SECTION 2
TRUVIEW PCD™-R Optical Blades
Alternatively, the blade can be preheated in water 50°C - 60°C (122°F -140°F) temperature or antifogging solution can
be applied to the lens. For improved control of the endotracheal tube direction, it is recommended to insert a Truflex™
flexible tip stylet or Optishape ™ re-usable stylet into the endotracheal tube prior to intubation. Ensure that the tip of
the stylet is correctly positioned in the ETT and does not protrude past the Murphy eye. Remember to remove the stylet
before entering the ETT into the alveoli.
Do not steam autoclave the optical view tube of the Truview PCD™-R blade. Follow cleaning and maintenance
instructions herein.
HOW TO CLEAN TRUVIEW PCD™-R OPTICAL BLADES
Immediately after use, the Truview PCD™-R laryngoscope blades should be immersed in water to prevent residue
adhering to the instrument. External surfaces should be gently scrubbed in soapy water with a soft brush to remove
encrusted deposits. Do not use abrasive materials such as steel wool.
Rinse blades in de-mineralized water and THOROUGHLY DRY before disinfection and/or storage. Oxygen port can
be cleared and/or cleaned by passing an air or gas jet through the oxygen connector on the blade.
Whereas it is possible to clean the Truview PCD™-R blade in its assembled form, Truview PCD™-R Blade Sizes 2,3,4
have removable FibreClip™ fibre optic light guides and removable optical view tubes that allow even easier cleaning.
However, make sure to reassemble these parts very carefully prior to sterilization procedure.
When reassembling, ensure optical view tube is correctly inserted into groove on blade.
7
SECTION 2
TRUVIEW PCD™-R Optical Blades
HOW TO DISINFECT THE OPTICAL BLADES
Hospital disinfectants, such as Cidex Plus® and Cidex OPA®, may be used. Follow the manufacturers’ guidelines for
recommended exposure times and solution concentration. After exposure to the solution, rinse with de-mineralized
water and THOROUGHLY DRY.
Thermal Disinfectors may also be used for disinfection. Do not use chemical detergents containing caustic or alkaline
ingredients such as bleach, peroxide solutions, sodium hypochlorite etc. that can cause irreparable damage to the
instrument.
HOW TO STERILIZE THE OPTICAL BLADES
It is recommended to sterilize the Truview PCD™-R blades using low temperature reprocessing methods such as
Sterrad® (50S, 100 S, 200NX, 100 NX) plasma systems or Ethylene Oxide (ETO) gas sterilization according to
manufacturers’ recommendations.
DO NOT USE STEAM AUTOCLAVING FOR THESE OPTICAL BLADES
OR EXPOSE THE OPTICAL VIEW TUBES TO TEMPERATURES IN EXCESS OF 95°C (203°F).
Satisfactory sterilization is dependent upon various factors, including the use of various cleaners, sterilizers and
treatment with numerous cleaning chemicals. These factors and variations are beyond the control of Truphatek®
and accordingly, we cannot be held responsible for the cleanliness or degree of sterility of the instruments.
If in doubt, handle in the same manner as endoscopic optical equipment.
8
SECTION 2
TRUVIEW PCD-R Optical Blades
HOW TO CARE FOR THE FIBRECLIP™ LIGHT GUIDE
Disengage entire blade from handle.
Disassemble FibreClip™ by pushing with thumb in an outward direction away from the base of the blade
until the FibreClip™ separates from the blade.
To re-assemble FibreClip™, first place tip of light guide into the opening on the blade. Then press base of
FibreClip™ into the recess on the base of the blade, ensuring it is firmly secured.
Always check that the blade lights up after cleaning or replacing FibreClip™ to ensure proper performance of
the blade. Certain hospital detergents and disinfectants can cause accumulation of residue on the tips of
the FibreClip™ which can be detrimental to the performance and life expectancy of the FibreClip™.
It is recommended to use, at frequent intervals, a non-abrasive material with ethanol or other non-acidic
cleaning solutions to wipe off tip and distal end of the FibreClip™ to prevent residue buildup.
Protect from scratches.
Ultrasonic cleaning and “flash” autoclaving are not recommended and will void warranty.
Repeated autoclaving may reduce light transmission and the life expectancy of the FibreClip™.
9
SECTION 2
TRUVIEW PCD™-R Optical Blades
SUMMARY OF CLEANING, DISINFECTING AND STERILIZATION PROCEDURES
FOR TRUVIEW PCD™-R BLADES:
10
Clean
• Manually clean internal and external surfaces using a soft brush.
• Do not use abrasive materials such as steel wool.
• Immerse in rinse water.
Disinfect
• Soak the device in enzymatic solution per the manufacturers’
recommendations.
Rinse
• If the Truview PCD™-R blades are to be treated in a washing machine,
ensure that the temperature within the program does not exceed
95˚C / 203˚F
• Feel free to use detergents per the washing machine manufacturer’s
recommendation. It is recommended to use detergent with neutral PH level.
Sterilization
• Use Sterrad® plasma systems or Ethylene Oxide Gas (ETO) sterilization per the manufacturer’s recommendations.
• If Truview PCD™-R blade sizes 2, 3 or 4 are to be sterilized in a steam autoclave, remove the optical view tube and set aside to be sterilized
separately as described above. The remaining parts may be placed in a steam autoclave.
• Truview PCD™-R blade sizes 0 & 1 should not be autoclaved.
SECTION 3
TruLed™ Rechargeable Handles
Each TruLed™ Soft Feel Handle is provided with a Santoprene™ sleeve that provides its “soft-feel”. Santoprene™ is a
thermoplastic vulconizate (TPV) that combines the best attributes of vulcanized rubber such as flexibility and very hard
wearing even at very wide temperature range -60°C - 135°C (-76°F - 275°F) showing no cracking or stickiness.
The outer sleeve can be subjected to most cleaning regimes and to both autoclave or any of the Sterrad® gas plasma
system protocols
The TruLed™ handles are designed exclusively for use with TruLed™ Lithium Ion Rechargeable batteries.
Connect the power supply directly into the bottom end of the inner battery cartridge. Various local territory plug
configurations are available.
Plug the power supply into the main electrical supply source.
• Red LED at bottom indicates that the battery is charging. (Flickering of red light might occur at this stage)
• Green LED indicates that charging is completed and the TruLed™ handle is ready for use.
• Continuous (more than 15 minutes) flashing red LED indicates a fault. Contact your local dealer for
replacement battery or regarding repair of the unit.
Always charge both your TruLed™ handles and your Truview PCD™-R screen ,especially before first use
and after storage or non-use for more than 7 days.
HOW TO CARE FOR TruLed™ HANDLES
Remove inner battery cartridge. Battery cartridge can be wiped with a dry cloth. Take care not to scratch protective
glass covering the LED. Outer sleeve may be cleaned, disinfected and sterilized using cold disinfection solutions,
Thermal Disinfectors, Steris®, Sterrad®, ETO and steam autoclave procedures.
Protect battery cartridge from direct contact with water and fire.
Do not open or tamper with the battery cartridge or the power supply unit.
HOW TO CARE FOR LITHIUM ION RECHARGEABLE BATTERIES
Store in cool, dry conditions at temperatures between 0°C - 45°C (32°F - 113°F).
Cartridge stored unused for 6 months or more will require re-charging.
Always discard in suitable container. Keep away from fire & water.
11
SECTION 4 TRUVIEW PCD™-R Camera Attachment
The Sony Exview HAD CCD™ camera has been used to provide a clear true colour image of the epiglottis
HOW TO USE THE TRUVIEW PCD™-R CAMERA
Carefully disengage the PCD™-R dedicated camera head (12) from
the magnetic cradle on the side of the Truview PCD™-R screen.
Make sure to securely connect the PCD™-R camera head (12)
to the eyepiece of the Truview PCD™-R laryngoscope blade.
Ensure alignment of the guiding pins on the Truview PCD™-R
camera head with the matching gaps in the outer ring of the
eyepiece. Point the blade at a suitable surface and check that
you obtain a view on the monitor.
Ensure that Truview PCD™-R LCD screen is fully charged and at
least two LEDs are lit up. Switch on the monitor by pressing
button 2. The monitor will light up after a few seconds.
Use the focus ring (13) to obtain clear, sharp vision at a distance
of 10 to 20mm from the tip of the blade.
Always ensure that optical view tube is correctly inserted into
the groove on the blade.
CONNECTING TO OPERATING ROOM ENDOSCOPES
Truview PCD™-R optical laryngoscope blades can also be
connected to most endoscopic HD monitor camera heads
available in operating rooms that have a 32mm Standard
C-Mount connection.
12
SECTION 5
TRUVIEW PCD™-R Monitor
A 5-inch pocket size TFT Digital LCD picture recording monitor provides the ideal option for
most clinical situations. It provides a large enough picture to use for training while the monitor
is still small enough to be easily transferred from one operating room to another.
The monitor has a built in memory storage that can hold 1,000 photos or 60 minutes
of video recording in 5 minute clips.
TRUVIEW PCD™-R Monitor
13
SECTION 5
TRUVIEW PCD™-R Monitor
OPTIMAL MONITORS + CAMERA SETTINGS
Monitor
• Brightness: 30
• Contrast: 33
• Saturation: 40
Camera
• Backlight compensation method: OFF
• AGC: ON
• Exposure mode: AUTO SHUTTER + IRIS
•
•
•
•
Day & Night: COLOR
ATR set: ON
Move Detection: ON
AWB: AUTO
HOW TO CHARGE THE TRUVIEW PCD™-R MONITOR
Before first use and after storage of the monitor for a period of two weeks or more fully charge the monitor
with power button (2) in “Off” position. This procedure can take up to 2.5 hours.
Fully charged battery will provide 3 hours of continuous use before requiring recharging. All three LEDs will
light up when turning on the screen in a full charge status.
Before every use:
Press power button (2) to “ON” position and check battery status to confirm that at least two battery status
LEDs are lit up.
• If only the red battery status LED is on, then there is 50 minutes of battery charge left.
• When both Yellow (15) and Red LEDs (16) are lit up, there will be nearly 120 minutes of battery charge left.
• During charging of the screen, no LEDs (14,15,16) will light up.
• When the screen is fully charged, all three LEDs will light up.
Do not use the Truview PCD™-R screen while the battery is being charged. Unplug screen from A/C electrical
connection before use. Between uses switch off power button (2) on the monitor to preserve power.
IMPORTANT: At the end of each day ensure power button (2) is in “OFF” position and charge the monitor
and handle.
14
SECTION 5
TRUVIEW PCD™-R Monitor
HOW TO RECORD & STORE
15
SECTION 5
TRUVIEW PCD™-R Monitor
HOW TO RECORD & STORE
16
SECTION 6
PCD HANDLE
Description
Trouble Shooting Hints
Figures
Recommended solution
Blurred or
unfocused
picture
Adjust the white focus ring (13).
Unclear / foggy
image during
intubation
Oxygen port- Check the oxygen port is connected to oxygen
supply line as follows:
About 5 liters of oxygen/minute for blades sizes 1&2.
If 5 l/m rate does not help, gradually and carefully raise the
rate up to 10 liters of oxygen/minute.
For blades sizes 3&4, 10 liters of oxygen/minute.
Anti- fog solution may be applied to prevent misting
The monitor goes
dark during
a procedure
The tongue and/or tissue in posterior lateral pharynx
flopping over end of light bundle.
Ensure the blade was not inserted too deep. Use two fingers
as guideline for approximate insertion depth.
Image is not
fully visible on
the PCD screen
Ensure the front surface of the view tube is completely
clean. If necessary clean the surface with lint free cloth and
alcohol. Ensure that the front surface of the camera head is
clean. If necessary clean it with blow of clean air or use a lint
free cloth and alcohol.
The monitor
is flickering or does
not switch on
Wait 10 seconds to see if the screen stabilizes.
Turn off the screen. Wait several seconds and then turn it
on again. If the screen is still flickering, follow procedure for
obtaining replacement from local dealer.
17
SECTION 6
FibreClip™
OptiShape ™
PCD HANDLE
Description
18
Trouble Shooting Hints
Figures
Recommended solution
Handle does
not light up
Check the handle’s battery is fully charged. Ensure the
green LED at the bottom of the handle lights up to indicate
charging is complete. Make sure that the blade is mounted
correctly on the TruLed™ handle. Do not use other brand of
handles.
Ensure you hear a “click” when the handle is connected
to the blade. If the handle still does not light up, replace
cartridge. Still not working? Contact local dealer.
Light intensity of the
handle decreases
Ensure battery cartridge is completely charged and
is correctly connected inside the handle.
Still not sufficient light intensity?
Replace battery cartridge.
How do I bend
the OptiShape™
The OptiShape™ is a pre-formed stylet. The design is based
on professional literature and extensive research to achieve
its current ideal shape.
The OptiShape™ can be bent into another shape if the
clinician prefers to do so, however, it will return to its
original pre-formed shape after a while.
Fiber Optic Bundle
light failure
Clean the ends of the fiber optic pipe with lint free cloth
and alcohol. Ensure the FibreClip™ is correctly inserted
into the blade. To insert it into the blade: First place the tip
of light guide pipe into blade groove. Then press the base of
FibreClip™ into the recess in the base of the blade ensuring it
is firmly secured.
SECTION 7
Technical Specifications
Truphatek reserves the rights to change specifications of any component
CAMERA:
Image Sensor: 1/3” SONY Exview HAD CCD II™
Image format: PAL,
Horizontal resolution: 540 TV lines
Focus: Manually Adjusted.
STORAGE OF MONITOR:
Store between 0°C-35°C (32°F - 95°F).
Following two weeks or more of storage, recharge
MONITOR while POWER button is in OFF position.
POWER SOURCE:
Built-in Li-Ion 16.8V rechargeable battery
Warnings:
1. Do not charge the monitor while it is in use.
2. Use only FCC/CE approved charger supplied by
manufacturer.
3. Avoid dropping or striking the monitor screen.
4. Do not cover the ventilation outlets (6).
5. The battery of the Truview PCD™-R MODEL PCD 4190
monitor and most other components are not user
replaceable and should be returned to the local dealer.
6. All service and repairs must be performed only by
Truphatek® Authorized Service Technicians.
7. Any attempt to disassembly the Truview PCD™-R
monitor will void the warranty.
OUTPUT:
Analog Composite AV PAL, Digital USB-2.
CONNECTION PORTS:
Total line length of USB port and AV port are
less than 3 meters.
MONITOR:
Please note that the Truview PCD™-R screen is
categorized as a Class A product, according to
FCC standards XRU-4190
Type: TFT digital LCD
Digital: Screen size 5”
Resolution: 640*480
Dot Pitch: 0.2025(h)*0.0675(w)
Brightness: 200cd/m^2
Color Depth: 24Bit
Support storage cards: Built in 2GB TF Card, which
can hold over 1,000photos or 60 minutes video
recording (maximum 5 minutes lengths for each clip).
Video format: AVI 25f/S
Picture format: JPEG
TruLed™ ADULT + TruLed™ INFANT HANDLES
‘Maintenance – Free’ Green System Rechargeable
Laryngoscope Handles with LED light source.
TruLed™ handle and its power supply are compatible
with the ISO 7376 : 2009 International Standard.
19
SECTION 7
Technical Specifications
Safety standards:
TruLed™ is certified as a medical system according to
EN 60601-1, EN 60601-1-1 & ITE 60950-1, (European)
Power supply is not intended for use within the patient
environment, and UL 60601-1, IEC 60601-1-1
& UL 60950-1 (USA). Handle is intended for use
within the patient environment.
•
•
•
Safety information:
Do not disassemble.
Do not short-circuit the battery terminals.
Do not expose the battery to water or fire.
Do not incinerate.
Recycle expended batteries.
Safety Instructions for Medical Equipment:
Environmental Conditions for Transport and Storage
Ambient temperature range: 0°C-45°C (32°F - 113°F)
Relative humidity range: 30-95%
Atmospheric pressure range: 700-1060 hPa
Classification of the Equipment
•
•
20
According to the type of protection against
electric shock:
INTERNALLY POWERED EQUIPMENT.
According to the degree of protection
against electric shock:
TYPE B APPLIED PART
According to the degree of protection
against ingress of water:
IPX0 – ordinary equipment
According to the degree of safety of
application in the presence of flammable
anesthetic mixture with air or with oxygen or
nitrous oxide: Category APG equipment
According to the mode of operation:
SHORT-TIME OPERATION.
Operation time - 5 minutes.
Technical Specifications:
Power Supply
Switching AC/DC power adapter: GFP051T-0505
(for Europe), GFP051U-0505 (for North America)
limited power source
I/P: AC 100-240V 50/60Hz 0.2A
O/P: DC 5V 0.5A
Li-ion rechargeable Battery, 3.7V, with PCM
(Protection Circuit Module) and Recharge module
White LED - Voltage 3.7V, Current 20mA,
Diameter 5 mm
Battery Cartridge Contains:
Li-ion rechargeable battery of 3.7V
Charger and Protection Circuit Module (PCM)
White LED - Voltage 3.7V, Current 20mA,
Diameter 5mm
SECTION 8
Warranty Statement
Truphatek® products and parts , manufactured from
medical grade stainless steel, are unconditionally guaranteed
to be of good quality and free from manufacturing defects in
material and workmanship for a period of 5 years from date of
manufacture, as it appears marked on the product. Replacement
product will be provided without charge for any Truphatek®
products not meeting this warranty, subject to the following
terms and exceptions:
Truview PCD™-R LCD screens with dedicated Picture Capture
Device are guaranteed to perform for a period of 12 months
from date of manufacture, as it appears on the rear panel of the
outer casing of the screen.
FibreClip™ replaceable fibre optic light guides are guaranteed to
perform for a period of 12 months from date of manufacture, as
it appears embossed on the base of each FibreClip™
OptiShape™ metal, reusable, preformed stylets are guaranteed
to perform for a period of 12 months from date of manufacture,
as it appears on the embossed disk on each OptiShape stylet.
Tru-LED™ green system laryngoscope handles with LED light
source are guaranteed to perform for a period of 5 years from
date of manufacture as it appears embossed on each handle.
This guarantee period does not cover the performance of the
rechargeable battery.
Tru-LED™ rechargeable batteries are guaranteed to
perform for a period of 12 months from date of
manufacture as it appears on the battery cartridge.
All of the above guarantees are conditional to the product being
used, cared for, handled, cleaned, disinfected and/or sterilized
according to the manufacturer’s instructions as they appear
in the Instructions for Use that accompany every Truphatek
product.
The above Truphatek® warranty does not cover products that
have been deemed defective due to misuse,
improper cleaning and handling, neglect, accident,
unauthorized repair, unreasonable damage, improper
storage or application or that have worn out after a
reasonable lifetime of use.
Truphatek® will have no obligation under this warranty for:
• Products labeled “Single Use” or “Single Patient Use”
where any attempt has been made to reprocess them.
• Reusable products that have been processed without
following the appropriate use, care, repair and reprocessing
guidelines and instructions provided by the manufacturer
in the Instructions for Use manual.
• Consumables such as bulbs or LEDs.
Truphatek® reserves the right to inspect prior to repair or
replacement any product that is deemed by the customer
to be subject to manufacturing or materials defect.
Truphatek’s obligation shall be that warranty specifically defined
in this statement and shall not be liable for any consequential,
incidental, direct or indirect damages or loss arising out of the
design, manufacture, sale, use or repair of the products.
This warranty is given in lieu of and to the exclusion of any other
warranty or condition either expressed or implied by statute or
otherwise.
21
SECTION 9
22
List of Parts & Accessories
Reorder
Code
Numbers
Description
4144
Blade organizer stand
4132
Hard case (empty)
4131
Soft bag (empty)
410303E
Replacement View Tubes
Picture
SECTION 9
List of Parts & Accessories
Reorder
Code
Numbers
41000
410000
410009
410001
410004
Description
Picture
OptiShape™ stylets for:
Set of 4 optishape stylets
ETT sizes 2.5 to 3.5
ETT sizes 4 to 5.5
ETT sizes 5 to 6.5
ETT sizes 7 to 9
Rechargeable battery
for handle
42143100 Adult
42103000 Infant
4145
421460
Power supply chargers
For screen
For handle
410402
Truview PCD™-R
FibreClip™ in sets
containing 2 FiberClips™
410005
Truflex™ articulating stylet
23
General Information & Contact Details
Corporate Headquarters & Manufacturer
TRUPHATEK INTERNATIONAL LTD
P.O.BOX 8051
NETANYA, ISRAEL 42504
PHONE: +972-9-8851155
FAX: +972-9-8851212
[email protected]
www.truphatek.com
Camera & Monitor Regulatory Certifications
IEC 60950-1:2005 (2nd Edition) + Al:2009 - Emtek Aug16, 2012
EMC Directive 2004/108/EC – Emtek Certification
No. ES1207022001E Aug16, 2012
AUTHORIZED REPRESENTATIVE, EUROPE
MEDES LIMITED
5 BEAUMONT GATE,
SHENLEY HILL, RADLETT,
HERTS WD7 7AR
U.K.
EC
REP
CE Registration number with MHRA: CA 7730
Patent US 8,251,898 B2 granted Aug 28, 2012
24
USER’S MANUAL
PCD-R-01-10/12 41900005