1
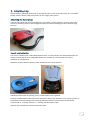
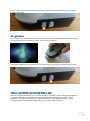
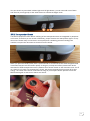
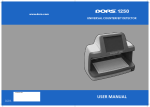
User Manual Doculus Lumus charismaTec OG 1 Your new Doculus Lumus Congratulations for purchasing your new mobile document checking device Doculus Lumus with unique RFID passport transponder check! Your product package contains the following parts: Doculus Lumus: 15 times magnification with quality glass lenses 4 LEDs for incident light including a torchlight mode 4 UV-LEDs with 365 nm 8 LEDs for rotating oblique light RFID reader for passport transponder check Changeable+ right-handedness or left-handedness mode Steady light mode for documentation purposes Accessories: 1 Operation Manual including a short manual in the size of a business card 1 pair of AAA batteries 1 hand strap 1 lens cleaning towel 1 Doculus Lumus business card to hand over to somebody else Optional: Belt case for the device including a side pocket for the short manual and a set of AAA batteries Extra coloured cover Mobile phone adapter Akku batteries When and where to use Doculus Lumus You are the expert! Doculus Lumus helps you to check travel documents, driving licenses, banknotes, signatures and similar for authenticity, whether you are in a train, a car, a plane or even on the countryside. Different light modes reveal the security features very well. With the RFID transponder check you can verify all currently used passport transponders for correct response. 2 Table of Contents 1. Safety Instructions.......................................................................................................................... 3 General Hazards ................................................................................................................................. 4 Optical, Electrical and Mechanical Hazards ..................................................................................... 4 Environmental Conditions .................................................................................................................. 5 Disposal .............................................................................................................................................. 5 Declaration of Conformity .................................................................................................................. 5 Service and Warranty ......................................................................................................................... 5 FCC Notice .......................................................................................................................................... 6 Industry Canada / Industrie Canada ................................................................................................. 6 2. Initial Start-Up ................................................................................................................................. 7 Attaching the hand strap ................................................................................................................... 7 Insert new batteries ........................................................................................................................... 7 Right-handedness/Left-handedness Mode ...................................................................................... 8 3. Button Functions and Areas of Operation..................................................................................... 8 Incident Light Mode............................................................................................................................ 8 UV Light Mode..................................................................................................................................... 9 Oblique Light Mode and Rotating Oblique Light ............................................................................... 9 Torchlight Mode ................................................................................................................................ 10 RFID Transponder Check ................................................................................................................. 11 Steady Light ...................................................................................................................................... 12 4. Energy Management .................................................................................................................... 13 Battery Level ..................................................................................................................................... 13 Automatic Power-Off ......................................................................................................................... 13 5. Service and Maintenance ............................................................................................................ 13 1. Safety Instructions Explanation DANGER: Indicates a hazardous situation that, if not avoided, will result in death or serious injury WARNING: Indicates a hazardous situation that, if not avoided, could result in death or serious injury. CAUTION: Indicates a hazardous situation that, if not avoided, could result in minor or moderate injury. NOTICE: Indicates information considered important but not hazard related. The following safety and danger information is not only for protecting the device, but also your health. You will find specific information in the following chapters of this manual. charismaTec OG shall not be held liable for any damages that result from disregarding the instructions in this manual. Please read all statements carefully! 3 General Hazards WARNING: Endangerment of children and other persons! Improper usage can lead to injuries and damage of property. This product and its package is no toy and may not be used by children. Children cannot assess the hazards that can result from operating electrical appliances and/or packaging material. Always take care to keep the product and the package out of the reach of children. Batteries and accumulators may not be in children hands. Leaked or damaged batteries or accumulators can cause cauterization when touching them. Optical, Electrical and Mechanical Hazards Endangerment by optical radiation and UV radiation (Explanation of risk group marking and explanation corresponding to norm IEC 62471:2006 and supplementary sheet 1 IEC 624712:2009) WARNING: Improper handling with LED light and UV radiation can damage your skin and your eyes! Do not directly look into the LED light. Continuous strong white light can damage your eyes. Direct UV radiation irritates and damages the eyes (danger of blindness). UV radiation irritates and damages the skin (danger of burning and/or induction of skin cancer). WARNING: UV radiation from this product. Exposition can lead to irritation of eyes or skin. Aim light source only to documents or use suitable shielding! WARNING: Possibly dangerous optical radiation. Do not look into the lamp for a longer period during operation. Can be dangerous for the eyes! Endangerment can occur though ultraviolet radiation by improper usage of the device, as well as an endangerment of the retina through blue light. For this device the risk group 2 has been determined, if somebody looks directly from a very short distance into the light source from the wrong side (device held upside down and directly in front of the eyes). Always avoid longer glimpses into the light sources as well as longer exposures of the skin without protection. At correct handling the device is photobiological safe. UV radiation is not visible for the human eye, even at full power the UV LEDs only shimmer slightly blue violet. A function test and the examination of the light intensity can be done easily by aiming the light at white standard paper (no security paper) or white cloths. The optical lighteners are stimulated strongly by the UV light. WARNING: Endangerment of objects and persons! Improper usage can lead to a burning glass effect. Devices that are not in usage have to be covered with a protective cover or have to be kept in a light tight container to prevent the inflammation of objects through focused sun light. WARNING: Endangerment through magnetic field! This device generates a weak magnetic HF field (13.56 MHz) during operation. Please keep some distance to other electronic and especially medical devices. Special caution is necessary at heart pacemakers and implanted defibrillators as well as with hearing aids. WARNING: Exhaustion of the eyes! Certain persons may have a feeling of exhaustion or discomfort after longer usage of magnification systems. Please observe the following remarks to prevent your eyes to become exhausted: Independent from your feeling you should take a break of 10 to 15 minutes each hour. 4 If you feel some discomfort while using the device or after a longer time, interrupt working with the device and consult a doctor. CAUTION: Risk of damage by misuse! Improper usage of the device can lead to damages. The device is not water resistant! Do not immerse the device into water and protect it from water (rain or see water). Do not reach into the device while operating it and to not insert anything into the case. Do not open the device. Improper intrusion can impair the functionality of the device. Use the device only for document checking purposes. Other types of usage can lead to damage of the device. Do not expose the device to extreme heat or cold. Do not use cleaning sprays, aggressive, alcohol-containing or other inflammable solutions. CAUTION: Danger of explosion at improper exchange of the batteries! Pay attention on the correct polarity of batteries or accumulators. Remove batteries and accumulators if the device is not used for a longer time. Always replace all batteries together. Do not short circuit batteries and accumulators. NOTICE: Disposal of used batteries as directed! Do not dispose batteries and accumulators with normal household waste, they should be disposed to collecting containers which are available at every battery vendor. If there is no collecting container near your location, you can also dispose batteries and accumulators at the hazardous waste collection centre of your municipality or send them to us. Environmental Conditions The device may only be operated within the allowed scope of environmental conditions: Surrounding temperature: -20 to +55 °C (approx. 0 to 130 F) Humidity: <75 % relative humidity, non-condensing Disposal Within the EU the device and its accessories have to be collected and disposed separately. Devices that are marked with the crossed-out bin on wheels may not be disposed with normal household waste. Please contact your dealer or dispose the products at the electronic waste collection centre of your municipality. Declaration of Conformity CE Declaration for R&TTE Devices Herewith the manufacturer of the device declares that this device conforms to the requirements and all other policies. A copy of the entire declaration can be provided on demand. RoHS Conformity The product conforms to the requirements of the RoHS directive on the reduction of hazardous substances. Service and Warranty You purchased a high quality product of charismaTec OG that is produced under a strict quality inspection. If there are still some problems with the product or if you have some questions about the usage of the product you will find all contact information on the homepage www.doculuslumus.com. 5 charismaTec OG grants a warranty of 24 months after the date of purchase on material and production of Doculus Lumus. The customer has the right to get rework. charismaTec OG may, instead of reworking, deliver replacement devices. Exchanged devices pass into the ownership of charismaTec OG. Warranty is void if the device is opened by the buyer or other non-authorized third parties. Damages that arise through improper handling, usage, storage or act of nature or other external influences will not be protected by warranty. FCC Notice Note: This equipment has been tested and found to comply with the limits for a Class B digital device, pursuant to part 15 of the FCC Rules. These limits are designed to provide reasonable protection against harmful interference in a residential installation. This equipment generates, uses and can radiate radio frequency energy and, if not installed and used in accordance with the instructions, may cause harmful interference to radio communication. However, there is no guarantee that interference will not occur in a particular installation. If this equipment does cause harmful interference to radio or television reception, which can be determined by turning the equipment off and on, the user is encouraged to try to correct the interference by one or more of the following measures: Reorient or relocate the receiving antenna Increase the separation between the equipment and receiver Connect the equipment into an outlet on a circuit different from that to which the receiver is connected Consult the dealer or an experienced radio/TV technician for help THIS DEVICE COMPLIES WITH PART 15 OF FCC RULES. OPERATION IS SUBJECT TO THE FOLLOWING TWO CONDITIONS: (1) THIS DEVICE MAY NOT CAUSE HARMFUL INTERFERENCE AND (2) THIS DEVICE MUST ACCEPT ANY INTERFERENCE RECEIVED, INCLUDING INTERFERENCE THAT MAY CAUSE UNDESIRED OPERATION WARNING: CHANGES OR MODIFICATIONS NOT EXPRESSLY APPROVED BY THE PARTY RESPONSIBLE FOR COMPLIANCE COULD VOID THE USER'S AUTHORITY TO OPERATE THE EQUIPMENT. Industry Canada / Industrie Canada This device complies with Industry Canada licence-exempt RSS standard(s). Operation is subject to the following two conditions: (1) this device may not cause interference, and (2) this device must accept any interference, including interference that may cause undesired operation of the device. Le présent appareil est conforme aux CNR d’Industrie Canada applicables aux appareils radio exempts de licence. L’exploitation est autorisée aux deux conditions suivantes : (1) l’appareil ne doit pas produire de brouillage, et (2) l’appareil doit accepter tout brouillage radioélectrique subi, même si le brouillage est susceptible d'en compromettre le fonctionnement. 6 2. Initial Start-Up Please read the following information to operate Doculus Lumus for the first time. For your safety please read the above safety instructions on the usage of the device. Attaching the hand strap Take the hand strap out of the packaging box and attach it at the location in the rear part of the device by threading the thin end through the eyelet and then threading the whole strap through the loop. Insert new batteries The device operates with 2 AAA/LR03 batteries with 1.5 volts. Always use alkaline batteries! The usage of accumulators or rechargeable batteries is possible, but could result in incorrect indication of low batteries. Standard version: Slide the battery cover outside and then tilt it upwards. Individual version with 3D printing cover: Tilt the battery cover upwards. Insert the 2 AAA batteries that came with the device. Always pay attention to the correct polarity of the batteries corresponding to the markings within the device. The plus poles of the battery (marked with a +) should match the + marking near the battery clips. Dispose the old batteries normal household waste! 7 Right-handedness/Left-handedness Mode By default the assignment of keys is prepared for right-handedness. In most cases left-handed persons will like to operate incident light, UV light and torchlight with the thumb. To enable this, please conduct the following steps: 1. Shortly press all 4 buttons simultaneously to activate the test and setup mode 2. Then keep the oblique light button held for a few seconds until the light test has finished. The green LED will be kept on shortly to indicate that the setting has been saved. 3. Now you can use the device with the left hand and can operate the incident light with the former oblique light button. All other buttons are mirrored similarly. 7sec To reset the device to right-handedness mode, please conduct the steps again but now keep the original incident light button pressed until the end of the test. 3. Button Functions and Areas of Operation Always place the device directly onto the document to be checked and move your eye very close to the lens to obtain an optimal and distortion-free image. Incident Light Mode Incident light with 4 strong LEDs (bright field illumination) allows you to check even the finest printed details like microtext or nanotext. 8 Use your thumb to press the incident light button with the downward pointing rays to activate incident light mode. UV Light Mode The UV light mode with its 4 strong UV LEDs (365 nm) allows an optimal depiction of UV security inks through the lens as well as from the side from short distance. Press the UV light button marked with a sun symbol with your thumb to activate UV light mode. Oblique Light Mode and Rotating Oblique Light The oblique light mode allows you to identify intaglios, embossing, colour changing Kinegrams or holograms. With the aid of 8 LEDs that successively shine on the document in 45° steps, shadows are created at heightened or deepened features (dark field illumination). Colour changing elements look different depending on the angle of light incidence. 9 Use your forefinger on the oblique light button marked with a ring to activate the oblique light mode. Oblique light starts “on top” at the 12 o'clock position. To run through all 8 oblique light positions successively additionally press one of the buttons on the other side marked with an arrow. Press the right or left arrow button once to move the light one position further clockwise or counter clockwise. Keep the corresponding arrow button pressed to move the light further automatically. Torchlight Mode In certain situations, e.g. at bright sunshine, the normal incident light mode may be too dark. You will need a higher light intensity to shine through water marks as well. The torchlight mode allows an optimal illumination even in a very bright surrounding. 10 Use your thumb to press both incident light and UV light button, you can start with one of them and then let your finger slip to the other button to activate torchlight mode. RFID Transponder Check The RFID transponder check allows verifying of the transponders that are integrated in passports or ID cards. Therefore you can check authenticity, proper function and transponder type in a very short time. Please keep in mind that in some passports a shielding prevents reading from outside. Just open the document to check it from the inside. When you press the RFID button (with a symbol similar to a radio wave) the electromagnetic field is activated and the red LED blinks rapidly. As long as you keep the button pressed the device searches for RFID transponders near it (distance from device bottom to the document max. 3 to 5 cm, about 1 to 2 inch). If a transponder is found, the electromagnetic field is turned off to save energy. The result of the check is indicated as long as you keep the button pressed. Press the RFID button again to start a new search and check. 11 Explanation of the light codes: Red light blinks rapidly: The device searches for a RFID transponder Green light blinks 1 x recurring: An RFID ISO 14443 Type A transponder for valid ICAO documents was found Green light blinks 2 x recurring: An RFID ISO 14443 Type B transponder for valid ICAO documents was found Red and green light blinks 1 x recurring: An RFID ISO 14443 Type A transponder for valid ID cards was found Red and green light blinks 2 x recurring: An RFID ISO 14443 Type B transponder for valid ID cards was found Green and Red lights blink alternately: A transponder was found, but it is no valid passport transponder, e.g. a bank card, credit card or employee card Red light blinks 3 x slowly, although the RFID button has not been pressed or released: This has nothing to do with RFID, it just shows that battery is low (see subchapter “Battery Level“) Steady Light The steady light function is very useful if you want to take a snapshot through the lens with your cell phone or smartphone camera or you do not want to keep the button pressed with your finger. Press one of the light buttons 3 x quickly to activate the steady light function. Steady light stays on for 1 minute if you do not press another button. Steady light is available for all light modes: Incident light mode UV light mode Oblique light mode: After you activated the steady light function for oblique light, you can use the left and right arrow buttons as usual to change the illumination angle. Torchlight mode: Press incident light or UV light button and click the other button next to it 3 times rapidly. 12 3x for UV steady light 4. Energy Management Doculus Lumus ist equipped with intelligent energy harvesting technology, which allows to operate the device for a few months with 1 set of batteries. Battery Level The red LED blinks 3 times slowly after releasing a button if battery is low. Please plan to change batteries soon and carry a set of replacement batteries with you. If the energy in the batteries is too low for proper function of the device, the red LED starts to blink at a button press. Automatic Power-Off If some button is pressed inadvertently (e.g. in a case) or the steady light function has been activated, the device turns off after 1 minute to prevent the batteries from being drowned. 5. Service and Maintenance Clean the device only with a soft moist cloth. Do not use any detergents or solvents since they could damage the device or leave stains on the plastics. Clean the lens only with the accessory lens cleaning towel or a lint-free soft cloth. You can remove finger prints or fatty stains with a cotton bud soaked with isopropyl alcohol. If you move your device from the cold into a warm room, condensate water can blur the lens. Please wait until the lenses are free again before operating the device. If the device got moistly or wet, please remove the batteries and let the device dry at least for a day before operating it. 13