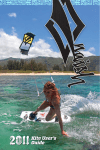
1
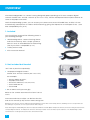
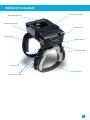
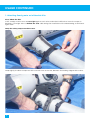
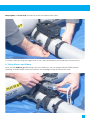
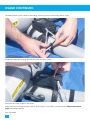
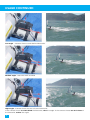
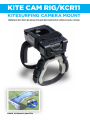
Kite Cam Rig/KCR11
Kitesurfing Camera Mount
Compatible with most inflatable kites and most waterproof compact digital cameras
Attach a Camera to your Kite
THANK YOU for purchasing a KiteCamRig
and welcome to the World of Kitesurfing Aerial Photography and Videography.
2
Index
Overview
1. Included in package
4
2. Not included but needed
4
3. Product Diagram 5
Usage
1. Attaching your KiteCamRig onto an Inflatable Kite
6
2. Taking Aerial Photos and Videos
7
3. Adjusting Camera Angle
9
Camera Tips
11
Kite Compatibility
12
3
Overview
The KiteCamRig KCR11 is a camera housing designed (patent pending) to fit most compact digital
cameras smaller than 112 x 65 x 25 mm (4.4 x 2.5 x 1 inch), like the waterproof Pentax Optio cameras W
series or Olympus SW series.
With the KiteCamRig system, you can mount your camera onto most inflatable kites, and let it shoot
automatically aerial photos or videos while kitesurfing, giving the impression of helicopter shots. (See
Kite Compatibility List, p. 12)
1. Included
You should have received the following items in
your CamRig package:
l1
KiteCamRig KCR11 : camera housing (water and shock resistant) with a straps system to attach it onto an inflatable kite for kitesurfing.
(See if your kite is compatible p. 12 )
l1
safety Velcro strap
lThis
Instruction Manual
2. Not Included but Needed
You have to purchase separately:
l1
Waterproof Digital Camera
smaller than 112 x 65 x 25mm (4.4 x 2.5 x 1in)
For example :
- Pentax Optio W series,
- Olympus SW series,
- Panasonic DMC-TS1, TS2, FT1, FT2,
- Casio Exlim Ex-G1
- Canon D10
lSD
or SDHC card (up to 32 gb.)
Refer to the camera User Manual to learn how to
use it.
Some extra advices and tips can be found at the
end of this manual (p. 10) and on www.camrig.com
Disclaimer: Use at your own risk. Although the KiteCamRig comes with several safety devices, CamRig.com is not responsible for
the damages on your kite or loss of your camera while using it.
Note: Although the KiteCamRig has been mostly tested with the Pentax Optio waterproof cameras, it has been designed to fit most
compact digital cameras. A waterproof camera is obviously a better choice for water sports activities. The KiteCamRig is water
resistant but is not designed to protect the camera from water.
4
Product Diagram
Cover Velcro Strap
KiteCamRig Cover
KiteCamRig Body
Cover Latch
Back Strap
ts. (Seekites
latable
Elastic Band
Strap Pegs
Plastic Leg
Front Strap
Short Velcro Cuffs
5
Usage Continued
1. Attaching Camrig onto an Inflateable Kite
First, inflate the kite.
If the canopy and the strut are too tight against each other and make it difficult to insert the straps in
between, you might want to deflate the strut a bit during the installation of the KiteCamRig, and inflate it
again after.
Wrap the safety strap around the strut.
Wrap tightly the back strap around the central strut of the kite, between the leading edge and the valve.
6
Wrap tightly the front strap around the central strut, behind the valve.
If a strap is way too long, you might want to cut a few centimeters at each end (but not too much!).
2. Taking Photos and Videos
Once you are ready to go kitesurfing, turn your camera on, start shooting in photo mode (interval
shooting) or video mode. Insert the camera in the CamRig housing and close the cover.
7
Usage continued
To better prevent your camera from falling, attach its leash to the safety Velcro strap.
Wrap the cover Velcro strap around the cover for extra safety.
Usage continued
Now you are ready to go on the water.
After your first shooting session, look at your images : most likely, you will need to adjust the camera
angle for better framing.
See next page.
8
3. Adjusting the Camera Angle
On the Front Strap, open the short Velcro cuffs above and below the peg for each plastic leg,
adjust the leg position to a different hole to modify the length of the leg.
Then wrap again the Velcro cuffs around the plastic legs. This modifies the angle of the camera with the
strut. The next page shows how it affects the framing of the photos/video.
9
Usage continued
Low angle - Camera shoots too far behind kitesurfer
Medium angle - kitesurfer well centered
High Angle - Camera shoots too far in front of kitesurfer
If the camera shoots too far behind the kitesurfer, raise the angle. If the camera shoots too far in front of
the kitesurfer, reduce the angle.
10
Camera Tips
Tip #1 :
Don’t wait to be at the beach to learn how to use
the camera!
When you will be about to launch your kite, you
won’t have much time to figure out the menus and
settings of your camera. Refer to its User Manual
to learn how to use it.
1. Shooting Photos
The Pentax Optio W series is so far the only
waterproof compact digital camera with an
interval shooting mode, that lets it shoot
automatically up to 1000 photos (up to 12 Mp)
while you are kitesurfing. This makes it the
best choice for Kitesurfing aerial photography.
Therefore this manual focuses on this model.
Unfortunately the interval can not be shorter than
10 seconds, so you just have to be lucky to get
shot at that perfect right moment when you are
jumping. Still, you end up with 100s of photos,
most of them very similar and hopefully some
really cool ones.
Since the kite moves a lot while kitesurfing, you
might need to stabilize and rotate your clip in
post-processing using an editing software with
such special effect tools. A tutorial is available on
www.camrig.com
3. General Tips
Try to keep the lens clean. It’s not always easy
when you are on the beach, but if it’s too dirty, find
a smooth cloth or something to clean it. No blurry
photos.
Rinse the camera with clear water after the ocean.
Dust the rubbery flap for the battery. If sand get’s
in the way, the camera might not be as waterproof
anymore.
Although these compact digital cameras are
supposed to be waterproof up to 9 feet deep, it’s a
good idea to use them above the water only. Do
not submerge them for too long. Their watertight
body does not age well with sand and dust.
One bug with the Interval Shooting mode on the
Pentax Optio: when using the minimum interval
of 10 seconds, it’s difficult to interrupt it once
started, without pulling out the battery. (Still,
try not to open the water-tight flap with wet and
sandy fingers... )
Once you start the Interval Shooting mode, to
make sure it is set up properly, wait for the second
photo to be shot before placing the camera in its
mount.
2. Shooting Videos
Make sure you start the camera correctly and do
not turn it off by accident while inserting it inside
the KCR11.
Zoom : make sure the options Optical and
Digital Zoom in Rec Setting menu are turned off.
Otherwise, the zoom is still active while shooting
and its buttons might get pressed accidentally
inside of the KCR11.
11
Kite Compatibility
1. No Stitches between Strut and Canopy
below Valve
You can attach the KiteCamRig to your kite only if
the central strut is not completely stiched to the
canopy near the leading edge.
If there is not enough clearance to insert both
straps of the KiteCamRig around the strut, from
the leading edge up to a few inches after the valve,
then you might need a Strut Brace (available at
www.camrig.com).
2. Compatibility with kites by brands and models
So far, KiteCamRig installation has been checked with the following kites :
Brand
Model
Year
Compatible
Best
Bularoo
2007
Yes!
Best
Waroo
2006-2008
Yes! (deflate a bit first)
Cabrinha
All models*
Any*
Yes!
Catapult
Jocker
2007
Yes!
Caution
Mayhem
2009-2010
Yes!
Caution
Spit Fire 1&2
2007-2008
Needs Strut Brace
Core
GT
2010
Yes!
Eclipse
Thruster
2007-2008
Yes!
EH
Beast, EZE
2008
Yes!
F-One
Bandit
2008-2010
No.
Flexifoil
Ion, Ion2
2006-2007
Needs Strut Brace
GK
Sonic, Vsonic, Trix
2006-2008
Yes!
Naish
Helix, Cult
2008-2010
Yes!
Naish
Shockwave, Torch
2007
Needs Strut Brace
North
All models*
Any*
Yes!
Ocean Rodeo
All models*
Any*
Yes!
Slingshot
Rev
2008-2010
Yes!
Slingshot
Fuel, Octane
2006-2007
No.
Slingshot
Turbo Diesel, Turbo2
2006-2007
Yes!
[All models*], [Any*] means all tested models for that brand were compatible so far.
12