1
Photo Safe II
Portable Photo Storage with Memory Card Reader
User’s Guide
Note
Digital Foci, Inc. reserves the right to make improvements and/or changes to the products and programs
described in this User’s Guide at any time without notice. Please read the entire User’s Guide before operating
the device.
Digital Foci, Inc. assumes no responsibility for errors or omissions in this User’s Guide. Nor does Digital Foci,
Inc. make any commitment to update the information contained herein.
Trademarks
Photo Safe II and Digital Foci are trademarks of Digital Foci, Inc.
All names and products mentioned within this document are registered trademarks of their respective
companies.
©2008 Digital Foci, Inc. All rights reserved. This publication is intended for sole use by the owner of the
associated device. Neither this publication nor any part of this publication may be printed and distributed,
electronically distributed, reproduced, translated, or reduced to any other electronic medium or machine
readable form without the prior written permission of Digital Foci, Inc.
Digital Foci, Inc., 3111 Via Mondo, Rancho Dominguez, CA 90221 USA
Limited Warranty
As the original purchaser of this product, you receive these warranties from Digital Foci,
Inc.
Your Photo Safe II (hereafter referred to as “Device”) will be free from defects in material
and workmanship and will perform in substantial compliance with your user documentation
accompanying the Device for 1 year from the purchase date providing proper use of the
Device.
Your warranty rights will be honored so long as you read and follow your user
documentation for all aspects of operating the Device. Any unauthorized or improper use of
the Device may cause your warranty to become void.
If there is a problem or defect with your Device, please contact Digital Foci, Inc.
Disclaimer
This limited warranty is the only warranty Digital Foci, Inc. makes for the Device. To the
extent allowed by Law, no other warranty applies, whether expressed, implied, or statutory,
including any warranty of merchantability, of fitness for a particular purpose, or of
non-infringement. This warranty does not cover accidental damage, wear and tear, or
consequential or incidental loss. Under no conditions is Digital Foci, Inc. liable for loss of
or damage to, a computer; nor loss of, or damage to, programs, records, or data; nor any
consequential or incidental damages, even if Digital Foci, Inc. has been informed of their
possibility.
Additional Rights
Some states or countries do not allow exclusion or limitation of incidental or consequential
damages, or limitations on the length of an implied warranty, so the above limitations or
exclusions may not apply to you. This warranty gives you specific legal rights, and you may
also have other rights which vary from state to state or country to country.
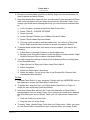
Caring for Your Photo Safe II
To keep Photo Safe II in good condition and working properly, follow these basic
guidelines:
•
Keep Photo Safe II in its carrying case for safe transport and storage.
•
Do not drop, jar, bump, shock or expose Photo Safe II to severe vibration.
•
Do not handle or shake Photo Safe II while data is being transferred.
•
Do not operate or store Photo Safe II in dusty environments.
•
Do not leave Photo Safe II under direct sunlight, in a parked car, or in other
situations where the temperature may be above 140°F (60°C).
•
To prevent risk of short circuit and damage, do not expose Photo Safe II to
liquids, precipitation or moisture.
•
To avoid bodily injury or damage to internal components, do not take apart
Photo Safe II.
•
Never force the USB cable if it does not plug in smoothly. Instead, examine
the head of the cable to make sure that the plug orientation is correct.
•
Never force insertion of the memory card if it does not insert smoothly.
Instead, examine to see if the memory card is facing the correct direction.
•
Run file management tools such as Scan Disk, Disk Defragmentation, and
other similar tools periodically to keep Photo Safe II performing at its best.
•
Do not insert or remove memory cards or the USB cable while Photo Safe II
is accessing data.
Photo Safe II
User’s Guide
Table of Contents
1.
2.
3.
4.
5.
Welcome!........................................................................................................................5
1.1.
Ways to Use Photo Safe II .............................................................................................. 5
1.2.
Photo Safe II Features ..................................................................................................... 5
1.3.
System Requirements for Computer Connection.................................................... 6
1.4.
Package Contents............................................................................................................. 6
1.5.
Supported Memory Card Formats................................................................................ 6
1.6.
Device Layout .................................................................................................................... 7
Powering Photo Safe II ...............................................................................................9
2.1.
Installing the Battery........................................................................................................ 9
2.2.
Charging Photo Safe II Battery ..................................................................................... 9
2.3.
Power On/Off...................................................................................................................... 9
2.4.
Battery Saving Feature.................................................................................................... 9
Copying Files from Memory Card to Photo Safe II ...........................................10
3.1.
Copying Photos From Memory Card to Photo Safe II........................................... 10
3.2.
Understanding Backup Folder Name Assignments .............................................. 14
3.3.
Accessing and Deleting Your Copied Files on Photo Safe II .............................. 14
Accessing Photo Safe II on Your Computer .......................................................15
4.1.
Connecting Photo Safe II to Your Computer ........................................................... 15
4.2.
Locating and Copying Your Backed Up Files to Your Computer....................... 17
4.3.
Deleting Files from Photo Safe II Hard Drive on Your Computer ....................... 17
4.4.
Safely Disconnecting Photo Safe II from Your Computer.................................... 19
Using Additional Features .......................................................................................21
5.1.
Copying from MS/SD/MMC/xD Card to CF Card ..................................................... 21
5.2.
Deleting Memory Card with Photo Safe II ................................................................ 22
5.3.
Checking Remaining Hard Drive Space.................................................................... 22
5.4.
Reformatting Photo Safe II ........................................................................................... 23
5.5.
Creating and Using Multiple Partitions on Photo Safe II...................................... 24
Page iv
Revision 3.25-1
Photo Safe II
User’s Guide
6.
Frequently Asked Questions ..................................................................................26
7.
Troubleshooting and Technical Support .............................................................29
8.
Appendix – Technical Specifications ...................................................................32
Page v
Revision 3.25-1
Photo Safe II
User’s Guide
1.
Welcome!
Congratulations on purchasing your Photo Safe II – Portable Photo Storage with
Hard Drive and Memory Card Reader.
1.1. Ways to Use Photo Safe II
Ways to use Photo Safe II:
Save precious vacation photos (or files of any format) directly from digital
camera memory cards so you can free up memory card space and keep
snapping away
Easily get your set of photos from your friends’ and family members’ digital
cameras
Use Photo Safe II as an external hard drive for backing up your computer
Access all popular memory card formats and transfer files between
computers and memory card supported devices
1.2. Photo Safe II Features
One touch photo backup directly from your digital camera memory card
without a computer (copies all formats, including RAW files and video files)
Built-in memory card slots directly support CF Type I (including Extreme III,
IV, UDMA cards), SD (including SDHC), miniSD, MMC, MS, MS Duo, MS
PRO Duo, and xD-Picture card
Fast copy speeds - can copy a full 1GB card in approximately 3.5 minutes
Backlit LCD screen displays operational status, active partition, remaining
hard drive capacity, battery life
Copy status indicator displays percentage completed, copy confirmation,
and number of files copied
Automatic sequential folder numbering: For each copy, Photo Safe II creates
a unique folder name indicating media card type and copy sequence per
card type to keep you organized
Rubber covers for memory card slots to protect slots from dust
High-speed USB 2.0 connection for fast uploads and downloads to and from
your computer
LED indicators show data access status for memory card and hard drive
User-removable Li-Ion battery rechargeable via computer USB port or
external power adapter
Functions as external hard drive and memory card reader when connected
to computer
PC & Mac compatible
Page 5
Revision 1.1
Photo Safe II
User’s Guide
Supports multiple partitions on hard drive
Auto shut off function saves battery power
1.3. System Requirements for Computer Connection
1) Computer running on any of the following operating systems:
o Windows Vista, XP, 2000 (SP4)
o Macintosh OS 10.0 & later
o Linux 2.4 & later
2) One available USB Port
1.4. Package Contents
Before using your Photo Safe II, check that your package contains the following
items:
Photo Safe II
Rechargeable Li-ion battery
Dual-plug USB cable
AC power adapter
Carrying Case
Quick Start Guide
1.5. Supported Memory Card Formats
Photo Safe II has been tested to support the following memory card formats:
CompactFlash® (CFTM) Type I
Memory StickTM, MS PRO, MS Duo, MS PRO Duo
SD Card (SDTM), SDHC, miniSD
MultiMedia CardTM (MMC), RS-MMC
xD-Picture card
Page 6
Revision 1.1
Photo Safe II
User’s Guide
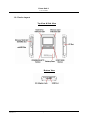
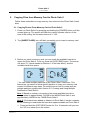
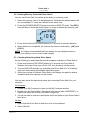
1.6. Device Layout
Top View & Side View
Bottom View
Page 7
Revision 1.1
Photo Safe II
User’s Guide
Back View
Page 8
Revision 1.1
Photo Safe II
User’s Guide
2.
Powering Photo Safe II
2.1. Installing the Battery
Follow these instructions to install or replace the battery:
1. Remove the battery cover by pressing down at the top of cover and sliding it
towards the bottom of the device.
2. Insert the Li-Ion battery into the battery compartment by matching the gold
connectors on the left.
3. Replace the battery door and make sure it is closed firmly.
2.2. Charging Photo Safe II Battery
For best battery performance, charge the new battery for 7 hours with the
included 5V AC power adapter.
The on-screen battery icon will flash to indicate that the battery is charging.
When the battery is fully charged, the battery icon will stop flashing and show 3
full bars.
Note: If the battery does not charge automatically (i.e. battery icon is not flashing)
when connected to the AC adapter, press the [POWER] button to start the
charging operation.
It takes approximately 2 hours to fully charge an empty battery with the AC power
adapter. On a full charge, Photo Safe II has a battery life of approximately 80
minutes with continuous use.
Note: You can also charge the battery via USB power by connecting Photo Safe
II to your computer if you are not accessing the hard drive. Note that it takes
approximately 10 hours to charge an empty battery with one USB port connected
and 5 hours with 2 USB ports connected.
2.3. Power On/Off
To turn on Photo Safe II, press and hold the [POWER] button until the screen
lights up. If you are turning on Photo Safe II with AC power connected, you might
need to press and hold the [POWER] button for up to 10 seconds.
To turn off Photo Safe II, press and hold the [POWER] button until the screen
turns off.
2.4. Battery Saving Feature
Photo Safe II has a power saving feature that conserves battery power.
If no button has been pressed and there is no activity for 2 minutes, Photo Safe II
will turn off automatically. This feature is disabled when the device is connected
to the computer or when an {ERROR} message is shown on the screen.
Page 9
Revision 1.1
Photo Safe II
User’s Guide
3.
Copying Files from Memory Card to Photo Safe II
Follow these instructions to copy memory card content to the Photo Safe II hard
drive.
3.1. Copying Photos From Memory Card to Photo Safe II
1. Power on Photo Safe II by pressing and holding the [POWER] button until the
screen lights up. The screen will flash the current firmware version. At the
time of the writing, the firmware version is V. 3.25.
2. The {INSERT CARD} icon will flash, prompting you to insert a memory card.
3. Before you insert a memory card, you can check the available hard drive
space on Photo Safe II. To do so, press the [COPY/EXE] button. The screen
will show ‘P1’ (which stands for Partition 1 of the hard drive*) and the
available hard drive space.
* You can create multiple partitions on the Photo Safe II hard drive. This
feature lets you select to which specific partition to copy your memory card
content for different copy tasks. For instructions on how to create and use
multiple partitions, please refer Section 5.5. Creating and Using Multiple
Partitions on Photo Safe II.
Note 1: Based on industry conventions, the actual available hard drive
storage space is approximately 74.5GB for the 80GB Photo Safe II, and
approximately 149GB for the 160GB Photo Safe II.
Note 2: If files have been added or deleted on Photo Safe II via the computer,
do the following to recalculate the hard drive space available on Photo Safe II.
1) Press and hold the [COPY/EXE] button for 5 to 10 seconds until you see
the 'HD' icon show up on the screen.
Page 10
Revision 1.1
Photo Safe II
User’s Guide
2) The red HDD LED will light up, indicating that Photo Safe II is
recalculating its available hard drive space.
3) When the process is finished, Photo Safe II will display the available hard
drive space.
4. Open the card cover and insert the memory card into its designated slot with
the label side of the card facing up.
Photo Safe II has three different memory card slots, each designed to support
a specific set of memory card formats. On the cover of each card slot you can
see the text labels of the memory card format for that slot:
1) CF: supports CompactFlash Type-I format.
2) MS/xD/SD/MMC: supports Memory Stick, xD-Picture card, SD Card,
SDHC (High-capacity) card, and MultiMedia Card.
3) MS Duo/MS PRO Duo/miniSD: supports MS Duo, MS PRO Duo, miniSD
and RS-MMC card.
Insert the memory card into its designated slot with the front of the card facing
forward. Push the card in gently until you feel a slight ‘click’ when the memory
card connectors make contact with Photo Safe II.
Note: When copying from memory card to Photo Safe II, make sure that only one
card is inserted for each copy.
Warning: Take special care to insert the memory card in its designated slot. If the
memory card does not slide in easily, double-check that you are inserting it in the
correct slot and in the correct manner.
Please pay special attention when you insert and remove the CF card. As a
comparison, most digital SLRs are designed with full CF card slots. They can
allow this because the CF card slot typically inserts perpendicular to the camera
body and can support a full-depth CF card slot with ejector button. Because
Photo Safe II is designed to be as compact as possible for user’s convenience,
the CF card slot has a less deep opening.
Insert and remove the CF card with extra caution when using the device:
1) Inserting the CF card - The CF card should slide smoothly into the CF
Page 11
Revision 1.1
Photo Safe II
User’s Guide
card. If you feel any abnormal resistance, do not force the CF card any
further to avoid the possibility of bending one or more CF card slot pins. In
this case, simply retract the CF card slot and reposition it for insertion.
2) Removing the CF card - When removing the CF card from the CF card
slot, take caution to pull out the CF card straight and not at an angle.
Pulling (or twisting) the CF card out of the slot at an angle may cause the
CF card slot pins to become bent as the CF card is removed. This will
cause difficulties the next time you try to insert the CF card as the CF card
slot pins may not be able to align with the holes on the CF card.
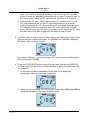
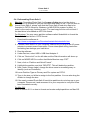
5. Once the memory card is inserted, Photo Safe II will display the memory card
type and amount of data on the card. The {COPY} icon will flash, indicating
that Photo Safe II is ready to copy.
In the above example, it is indicating that a CF card is inserted and the space
used on the card is 439MB.
6. Press the [COPY/EXE] button to start the copy task. Both the red HDD LED
and blue Card LED will blink to indicate that data is being accessed and copy
is in progress.
1) As the copy operation progresses, Photo Safe II will display the
percentage of the total copy task completed.
2) When copy is completed, you will see copy confirmation {OK} and {100%},
indicating that data on the card has been copied.
Page 12
Revision 1.1
Photo Safe II
User’s Guide
Note: The actual transfer time depends on various factors such as type and
speed of the memory card and number of files. As an estimate, It takes
approximately 5 minutes to copy a full 1GB regular speed CF card to Photo Safe
II; and approximately 3.5 minutes to copy a full 1GB Ultra II SD card to Photo
Safe II.
7. While the 100% is displayed on the screen, press and hold the [COPY/EXE]
button to view the copy details. The screen will toggle between:
1) The total number of files copied, and
2) The folder number created for this card format to which the files are
copied.
For each copy, a new folder will be created by Photo Safe II to copy the files.
Previously backed up files will not be over-written. All files on the card will be
copied in their original file name, file format, and folder structure without any
alterations.
The created folder and all copied subfolders and files will be located in the
FILES folder on the Photo Safe II hard drive.
See Section 3.2 Understanding Backup Folder Name Assignments for details
how the folder names will be organized on Photo Safe II.
8. Once the copy is complete, you may remove the memory card from Photo
Safe II.
Note: To safely remove memory cards from Photo Safe II, take special
precaution to ensure that there is no data being written to or read from the
memory card.
9. Turn off the device by pressing and holding the [POWER] button until the
LCD turns off. Photo Safe II also has a battery saving feature that turns the
device off automatically after 2 minutes of inactivity.
Note: In the unlikely event that the data backup fails, the copy operation will stop
and the {ERROR} icon will be displayed. The auto-off feature will be disabled
and the {ERROR} message will remain on the display. If the device runs out of
battery while the {ERROR} message is displayed, the {ERROR} message will be
lost.
Page 13
Revision 1.1
Photo Safe II
User’s Guide
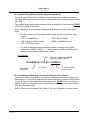
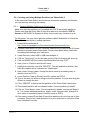
3.2. Understanding Backup Folder Name Assignments
For each copy, Photo Safe II creates a unique folder name indicating memory
card type and copy sequence number for each card type to help you easily locate
your files.
The created folder and copied contents will be located in the folder named FILES
on the Photo Safe II hard drive.
Every new folder is automatically assigned an 8-character folder name with 2
parts.
•
The first 2 characters are letters that indicate the type of memory card
copied:
o CF = CompactFlash
o SD = Secure Digital
o MS = Memory Stick formats
o MMC = MultiMedia Card
o XD = xD-Picture Card
•
The next 5 characters are sequential numbers, starting from ‘00001’
(followed by ‘00002’, ‘00003’, …), that indicate in which the folders were
created for the specific card format copied.
For example:
Folder is created in the FILES
directory on Photo Safe II
HARDDISK:\ FILES \ CF00003 \
Photo Safe II
Hard Drive
CF format
3rd folder created
of this format
3.3. Accessing and Deleting Your Copied Files on Photo Safe II
You cannot browse through the copied files or delete the copied files directly on
Photo Safe II. To access or delete files from the hard drive, connect Photo Safe II
to your computer. The copied files are located in the FILES folder on the Photo
Safe II hard drive. Delete the files on Photo Safe II just as you do for the files on
your computer hard drive.
Refer to Section 4 Accessing Photo Safe II On Your Computer for more details.
Page 14
Revision 1.1
Photo Safe II
User’s Guide
4.
Accessing Photo Safe II on Your Computer
Once connected to your computer, Photo Safe II becomes a portable hard drive
and a multi-format memory card reader/writer. You can access and transfer files
on Photo Safe II and the inserted memory cards.
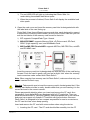
4.1. Connecting Photo Safe II to Your Computer
IMPORTANT: To ensure a stable power supply, it is recommended to always use
the AC adapter when connecting Photo Safe II to your computer.
Connect Photo Safe II to your computer with the included USB cable. Plug the
Main USB connector to the USB Port on your computer. Plug the mini-USB
connector to the USB Port on Photo Safe II.
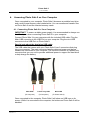
Special note about the dual-plug USB cable:
The USB cable that comes with your Photo Safe II has 2 connectors that plug
into your computer. The main connector handles data and power and always
needs to be connected to your computer. The second connector is a power-only
connector that you can use to provide additional power to support the hard drive
or help charge the battery.
Main USB
Power Only USB
Mini-USB
(To Computer)
(To Computer)
(To Photo Safe II)
Once connected to the computer, Photo Safe II will show an USB icon on its
screen. While it is connected to the computer, the buttons on Photo Safe II will be
disabled.
Page 15
Revision 1.1
Photo Safe II
User’s Guide
On Windows:
Your computer will automatically recognize Photo Safe II and show three devices
on your computer:
•
Two removable devices (corresponding to the supported memory card
formats)
•
One hard drive (with device label ‘HARDDISK’)
These three devices will function like any other storage device on your computer.
You can now access files on Photo Safe II and the memory cards through your
computer to transfer files among your Photo Safe II, the inserted memory cards,
and your computer.
The 3 devices will be listed in consecutive order: (Drive letters may vary based on
your specific computer configuration.)
(G:) CompactFlash memory card slot
(shown as a removable disk)
(H:) MS/xD/SD/MMC/MS Duo/MS PRO Duo/miniSD card slot*
(shown as a removable disk)
(I:) Photo Safe II hard drive**
(default label is ‘HARDDISK’)
* The MS/xD/SD/MMC (upper left) slot and the MS Duo/PRO Duo/miniSD (lower
left) slot cannot be accessed at the same time. Do not insert cards into both slots
at the same time.
** If ‘HARDDISK’ does not show up, make sure that the AC adapter is connected.
On Mac:
Your computer will automatically recognize Photo Safe II and a “HARDDISK”
icon* will show up on the desktop.
The two removable devices (corresponding to the supported memory card
formats) will appear on the desktop only if a memory card is inserted.
You can now access files on Photo Safe II and any inserted memory cards
through your computer to transfer files among your Photo Safe II, the inserted
memory cards, and your computer.
* If ‘HARDDISK’ does not show up, make sure that the AC adapter is connected.
Page 16
Revision 1.1
Photo Safe II
User’s Guide
4.2. Locating and Copying Your Backed Up Files to Your Computer
The files you copied from your memory card will be located in the folder named
FILES on the Photo Safe II hard drive. For each copy, Photo Safe II creates a
unique folder name indicating memory card type and copy sequence number for
each card type.
For detailed information on the folder names, refer to Section 4.3. Understanding
Backup Folder Name Assignment.
Follow the instructions below to copy the backed up files to you computer.
On Windows:
1. Double click My Computer to open up the My Computer window.
2. Double click the Photo Safe II hard drive (with device label ‘HARDDISK’).
Next double click on the FILES folder to locate your copied files.
3. Right-click the folders you want to copy, and select Copy.
4. Next, double click My Computer again to open up another My Computer
window.
5. In this second window, browse to the target location that you want to copy
your files to. Right click within the window, and select Paste.
6. Your files will be copied from the Photo Safe II hard drive to the location you
specified on your computer.
On Mac:
1. Double click the HARDDISK icon on the desktop to access the Photo Safe II
hard drive.
2. Double click the Macintosh Hard Drive icon to open it. Browse to the folder
location to which you want to copy the files.
3. To copy files, drag files from your Photo Safe II Hard Drive to the Macintosh
Hard Drive.
4. Your files will be copied from the Photo Safe II hard drive to the location you
specified on your computer.
4.3. Deleting Files from Photo Safe II Hard Drive on Your Computer
You can delete the files saved on your Photo Safe II hard drive by connecting it to
your computer. Delete the files on Photo Safe II just as you do for the files on
your computer hard drive.
Follow the instructions below to copy the backed up files to you computer.
On Windows:
1. Connect Photo Safe II to your computer. Double click My Computer to open
up the My Computer window. Double click the Photo Safe II hard drive (with
device label ‘HARDDISK’) to access the files on Photo Safe II.
Page 17
Revision 1.1
Photo Safe II
User’s Guide
2. Browse to the files/folder you’d like to delete. Right click the files/folders you
want to delete and select Delete.
3. Note that deleted files might still be in the Recycled Folder and take up Photo
Safe II storage space until you delete them from the Recycled Folder. If you
change your mind about deleting the items, you can recover the deleted files
by:
1) In My Computer, browse to the Photo Safe II hard drive
2) Select TOOLS > FOLDER OPTIONS
3) Select View tab
4) Under Files and Folders, go to Hidden Files and Folders
5) Select “Show hidden files and folders”
6) This way you’ll be able to see the hidden files. You will see a ‘Recycled’
folder. Right click the files you’d like to recover, and select Restore.
4. To delete these ‘hidden files’ and return hard drive space, you may do the
following:
1) Follow Step (1) through (5) above to show hidden files.
2) Browse in the ‘Recycled’ folder to locate the files you’d like to delete. Right
click the files you’d like to delete, and select Delete.
5. You can change the settings to delete the files directly without sending them
to the Recycled folder:
1) Right click on the ‘Recycled’ folder under Photo Safe II
2) Select Properties
3) Select the Photo Safe II hard drive
4) Select the option: ‘Do not move files to the Recycle Bin. Remove files
immediately when deleted’.
On Mac:
1. Connect Photo Safe II to your computer. Double click the HARDDISK icon on
the desktop to access the Photo Safe II hard drive.
2. To delete files, drag files from your Photo Safe II Hard Drive to Trash, or
select the item and press Command-Delete.
3. Note that deleted files will be in the Trash Can and take up Photo Safe II
storage space until you empty Trash. If you change your mind about deleting
the item before you choose Empty Trash, you can recover the deleted files
by:
1) Click the Trash icon in the dock.
2) Drag the item out of the Trash.
4. To empty Trash, choose Empty Trash from the Finder menu. (Note: you need
to have Photo Safe II connected to your computer when you empty Trash).
Page 18
Revision 1.1
Photo Safe II
User’s Guide
4.4. Safely Disconnecting Photo Safe II from Your Computer
To properly disconnect Photo Safe II from your computer, disable the device
before unplugging it from the computer.
The method to disable the device will vary based on the operating system of your
computer. Refer to the instruction manual of your computer for details on how to
do this.
Warning: Unplugging Photo Safe II before properly disabling it increases the risk
of disrupting data transmission between Photo Safe II and your computer. This
might crash your computer and Photo Safe II and cause data loss.
Disabling devices in Windows:
1. Locate the ‘Safely Remove Hardware’ icon in the icon tray at the lower
right-hand corner of your computer screen. You can move the mouse pointer
over the icons until you see the ‘Safely Remove Hardware’ label.
2. Double-click on this icon to open the ‘Safely Remove Hardware’ window.
3. Select the hardware device named ‘USB Mass Storage Device’.
4. Click on the Stop button and a confirmation window will appear.
5. Click OK at the confirmation window to confirm the action.
6. Close the ‘Safely Remove Hardware’ window by clicking on the Close button.
7. You will see a confirmation message telling you that it is safe to remove the
device. Click ‘OK’ to confirm.
8. Now it is safe to unplug Photo Safe II from your computer.
As an alternate method of disconnecting Photo Safe II from your computer, if
your computer does not successfully disable the device from the ‘Safely Remove
Hardware’:
1) Make sure that there is no data being written to or from Photo Safe II.
2) Manually turn off Photo Safe II by pressing and holding the Power Button
for 3 seconds. This will safely shut down the Photo Safe II hard drive.
3) Unplug USB connection between Photo Safe II and your computer.
Page 19
Revision 1.1
Photo Safe II
User’s Guide
Disabling devices in Mac:
You can eject Photo Safe II from Mac by the following ways:
1. Dragging the Photo Safe II hard drive disk icon into the Trash Can;
2. Use the eject icon in Finder window sidebar; or
3. Go to Finder Menu > File > and select Eject Photo Safe II hard drive
If you get the message saying that the hard drive is in use, please check the
setting of the Mac OS Energy Saver. It might be that the Energy Saver is
attempting to put the hard drive to sleep, and the error message comes up
because the computer is trying to put Photo Safe to sleep.
In this case, do the following:
1. Go to Menu > System Preferences > Energy Save > Sleep, and uncheck “Put
the hard disk to sleep when possible.”
Page 20
Revision 1.1
Photo Safe II
User’s Guide
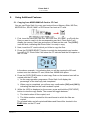
5.
Using Additional Features
5.1. Copying from MS/SD/MMC/xD Card to CF Card
You can use Photo Safe II to copy card content from a Memory Stick, MS Duo,
MS PRO Duo, SD/HC, MMC or xD-Picture Card onto a CF card.
1. First, insert the card (MS, MS Duo, MS PRO Duo, SD, MMC, or xD) with the
files you want to copy into the corresponding card slot. Photo Safe II will
display the memory card type and amount of data on the card. The {COPY}
icon will flash, indicating that Photo Safe II is ready to copy.
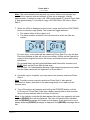
2. Next, insert the CF card to which you’d like to copy the files.
3. Press the [POWER/SELECT] button to switch the designated copy location
from HD to CF. Photo Safe II will show the CF indicator and the free space on
the CF card.
In the above example, it is indicating that you will be copying the SD card
content onto the inserted CF card, which has 386MB free space.
4. Press the [COPY/EXE] button to start copy. Data on the inserted card will be
copied onto the CF card.
1) As the copy operation progresses, Photo Safe II will display the
percentage of the total copy task completed.
2) When copy is completed, you will see copy confirmation {OK} and {100%},
indicating that data on the card has been copied.
5. While the 100% is displayed on the screen, press and hold the [COPY/EXE]
button to view the copy details. The screen will toggle between:
1) The total number of files copied, and
2) The folder number created for this card format to which the files are
copied.
The created folder and all copied subfolders and files will be located in the
FILES folder on the CF card.
Page 21
Revision 1.1
Photo Safe II
User’s Guide
5.2. Deleting Memory Card with Photo Safe II
You can use Photo Safe II to delete all the data on a memory card.
1. Insert the memory card in its designated slot. Note that the delete feature will
not be available if 2 cards are inserted at the same time.
2. Press the [POWER/SELECT] button to switch to DELETE mode. The {DEL}
icon will flash to show that Photo Safe II is ready to delete the memory card.
3. Press and hold the [COPY/EXE] button for 3 seconds to start the deletion.
4. When deletion is completed, you will see the screen confirmation - {OK} and
{100%}.
NOTE: It is highly recommended that you always use your digital camera to
format your memory card to ensure data integrity.
5.3. Checking Remaining Hard Drive Space
Do the following to recalculate the hard drive space available on Photo Safe II.
1. Press and hold the [COPY/EXE] button for 5 seconds on Photo Safe II.
Release the button when you see the 'HD' icon shows up on the screen.
2. The red HDD LED will light up, indicating that Photo Safe II is "re-initiating"
itself and recalculating its available hard drive space.
3. When the process is finished, Photo Safe II will display the partition and its
available hard drive capacity on the screen.
You can also check the hard drive space by connecting Photo Safe II to your
computer.
On Windows:
1. Double click My Computer to open up the My Computer window.
2. Double click the Photo Safe II hard drive (with device label ‘HARDDISK’). In
Right click within the window, and select Properties.
3. You will be able to view the Used Space and Free Space of your Photo Safe II
hard drive.
On Mac:
1. Right click the Photo Safe II hard drive icon on the desktop.
2. Select Get Info.
Page 22
Revision 1.1
Photo Safe II
User’s Guide
5.4. Reformatting Photo Safe II
Warning: Formatting Photo Safe II will erase all data stored on the device.
Photo Safe II is provided to you pre-formatted and ready to use. If you do wish to
format Photo Safe II, please note that the Photo Safe II hard drive has to be
formatted in FAT32 format for Windows (or MS-DOS file system for Mac), in
order for the card copy function to work. The card copy function will not work if
the hard drive is formatted as NTFS file format.
For Windows: You may use a partition software called SwissKnife to format the
Photo Safe II hard drive in FAT32 format.
1. Download the software at:
http://www.compuapps.com/Download/swissknife/swissknife.htm.
2. Connect Photo Safe II to your computer. Make sure you plug in the AC power
adapter to prevent power interruption. Power interruption during hard drive
formatting can damage your hard drive.
3. Run the software.
4. Under Devices, select USB > USB Host Adapter 3.
5. Click on “Device Info” on the left side and the Disk information will show up
6. Click on MORE INFO to confirm that Model Number says “PST”
7. Next, click on “Partition and Quick Format”.
8. Highlight the partition and click “DELETE”. This will delete the partition.
9. Next, under Volume Label, change the drive name to something easy to
identify (such as PhotoSafe).
10. Leave Partition Type as Primary and File system as FAT32.
11. Type in the size you’d like to assign to the first partition. You can also drag the
divider to change the size.
12. If the newly created Photo Safe II hard drive partitions do not show up on your
computer. Disconnect it and reconnect it to your computer to verify that it has
been formatted correctly.
For Mac OS:
Refer to section 5.5.1 on how to format and create multiple partitions on Mac OS.
Page 23
Revision 1.1
Photo Safe II
User’s Guide
5.5. Creating and Using Multiple Partitions on Photo Safe II
In the case that Photo Safe II encounters an erroneous operation and freezes,
you can reset by removing the battery.
5.5.1. Creating Multiple Partitions on Photo Safe II
Make sure that the partitions are formatted with FAT32 as primary partitions.
Please note that the Photo Safe II hard drive has to be formatted in FAT32
format (or MS-DOS File System for Mac) for the card copy function to work.
For Windows: You may use a partition software called SwissKnife to format the
Photo Safe II hard drive in multiple partitions.
1. Download the software at:
http://www.compuapps.com/Download/swissknife/swissknife.htm.
2. Connect Photo Safe II to your computer. Make sure you plug in the AC power
adapter to prevent power interruption. Power interruption during hard drive
formatting can damage your hard drive.
3. Under Devices, select USB > USB Host Adapter 3.
4. Click on “Device Info” on the left side and the Disk information will show up
5. Click on MORE INFO to confirm that Model Number says “PST”
6. Next, click on “Partition and Quick Format”.
7. Highlight the partition and click “DELETE”. This will delete the partition (the
hard drive space will be indicated as ‘Unallocated’.
8. Next, under Volume Label, change the drive name to something easy to
identify (such as PST1).
9. Leave Partition Type as Primary and File system as FAT32.
10. Type in the size you’d like to assign to the first partition. You can also drag the
divider to change the size.
11. Click “CREATE” to format the first partition of the Photo Safe II hard drive.
12. The created partition will be indicated under “Current partition(s) details”.
13. Click on “Free Space” under “Current partition(s) details” and repeat Steps 8
to 11 to create additional partitions. Again, under Volume Label, change the
drive name to something easy to identify (such as PST2).
14. If the newly created Photo Safe II hard drive partitions do not show up on your
computer. Disconnect it and reconnect it to your computer to verify that it has
been formatted correctly.
Page 24
Revision 1.1
Photo Safe II
User’s Guide
For Mac OS:
1. Connect Photo Safe II to your Mac with the USB cable. Please make sure you
have AC power plugged in.
2. On Mac, select Finder > Applications > Utilities > Disk Utility. Double-click to
open the Disk Utility application.
3. In Disk Utility, select the appropriate drive for Photo Safe II, and click on the
Partition tab.
4. From the Volume Scheme pop-up menu, choose the number of partitions
you'd like to create.
5. Click each partition and type a name* for it, choose a format**, and type a
size. You can also drag the divider between the partitions to change their
sizes.
*This is the name that will show up under the drive icon on your desktop.
**For memory card copy function to work, you must format the drive in
MS-DOS File System.
6. Click on the Partition Button in the lower right corner of the window.
7. The created drives should now appear in the list of disks and volumes. You
will also see the volumes in the sidebar of Finders window.
5.5.2. Using Multiple Partitions on Photo Safe II
1. Press the 'ENTER' button once, and Photo Safe II will show you the first
partition and its remaining hard drive space.
2. Then, press the 'POWER/SELECT button to toggle between the partitions on
the hard drive.
3. Once you see the desired partition, insert your memory card into Photo Safe
II and start the copy task.
4. Your memory card content will be copied to the specific partition you selected.
Page 25
Revision 1.1
Photo Safe II
User’s Guide
6.
Frequently Asked Questions
Questions about capacity, memory card, USB port:
How many photos, music, and video files can I store on Photo Safe II?
80GB (actual storage space 74.5GB): ~ 31,000 pictures
160GB (actual storage space 149GB): ~ 62,000 pictures
*Photo capacity based on 5-mega-pixel photos (approximately 2.4 MB each);
Will I need a memory card adapter to access any of the supported memory
card formats?
Photo Safe II directly reads from and writes to: CompactFlash Type I
(including Extreme III, IV, UDMA), MultiMedia Card, SD Card, SDHC
cards, miniSD, Memory Stick, MS PRO, MS Duo, MS PRO Duo, and
xD-Picture Card.
Can I download RAW images or video files into Photo Safe II?
Photo Safe II can copy and store any type of file formats. The files will be
copied in their original file names with any alternations. You can retrieve
the original files you copied onto Photo Safe II by connected it to a
computer. However, please note that you cannot view pictures on its
screen. Photo Safe II has a text-based LCD screen where you can view
file information, copy progress, copy confirmation etc.
Can I transfer photos from the camera to Photo Safe II via USB 2.0 port?
No you will not be able to transfer files from the camera to Photo Safe II
via USB. You may, however, insert the digital camera memory card
directly into Photo Safe II to transfer the files.
Questions about copy speed, copy confirmation, copy file name, copy
options, delete files:
What is the copy speed from a memory card to Photo Safe II?
The actual copy speed depends on a variety of factors including the type
of memory card that you are using, the size of the files, and the number of
files that you are copying.
As a benchmark, It takes approximately 5 minutes to copy a full 1GB
regular speed CF card to Photo Safe II; and approximately 3.5 minutes to
copy a full 1GB Ultra II SD card to Photo Safe II.
Can I copy a specific folder or file from my memory card to Photo Safe II?
No, you can only copy the content of the entire memory card.
If I copy the same memory card a second time, does it write over my data
on the hard drive?
No, when you copy the same memory card a second time, a new unique
folder will be created for the second copy. For example, the first copy will
Page 26
Revision 1.1
Photo Safe II
User’s Guide
save files in folder name 'CF00001', and the second copy will save files in
folder name 'CF00002' etc.
Can I copy data from one memory card to another directly?
Photo Safe II can only copy data from the memory card to the Photo Safe
II hard drive. You will not be able to copy data from the Photo Safe II
directly onto a memory card without a computer. However, if you have
Photo Safe II connected to a computer, you can use the computer to copy
and past files from the Photo Safe II hard drive to a memory card.
Can I delete my copied files directly on Photo Safe II?
You cannot delete files on the Photo Safe II directly. To manage the data
on your Photo Safe II hard drive, you can do this with your computer with
Photo Safe II connected by USB. Once connected, your computer will
automatically recognize Photo Safe II and show 2 removable devices (for
the card slots), and 1 hard drive. To access the Photo Safe II hard drive,
double click on the drive labeled ‘HARDDISK. The files you copied from
memory cards to Photo Safe II will be located within the default FILES
folder. You can delete files or photos on the Photo Safe II hard drive as
you would on other drives on your computer.
Questions about battery, AC power, USB power:
How long is the battery life of Photo Safe II on a full charge?
A full battery charge is capable of up to 80 minutes of continuous
operation. It can copy a 512MB regular speed CF card 18 times on a full
charge (9 GB of data), and a 1GB Ultra II SD card 16 times on a full
charge (16GB of data) with a few days of shelf time in between. This
translates to approximately 60 minutes of battery life with shelf time in
between.
Is the battery rechargeable?
Yes, you can recharge the battery either with the included AC power
adapter or via USB power. Please note that charging via AC power
adapter will be faster.
Is the battery user-removable?
Yes, you can easily replace the battery by removing the front battery door
of Photo Safe II.
Is it O.K. to recharge at any level of remaining charge i.e. must it be
depleted before recharge?
With the current Lithium-Ion battery technology (the same that Photo Safe
II uses), the result called "memory-effect" is not a problem. In early
rechargeable batteries (the Nickel-Metal-Cadmium), when you charge the
battery at the 1/2 way point, you 'reset' the total capacity of the battery to
the point where you started to recharge it.
With Photo Safe II, it is safe to recharge it at anytime, and you should
Page 27
Revision 1.1
Photo Safe II
User’s Guide
avoid depleting the battery completely before recharging. Please also
note that it is beneficial to avoid storing a lithium-ion battery at full charge.
A Li-ion battery stored at 40% charge will last many times longer than one
stored at 100% charge. Storing the battery in a cool place when not in use
will also prolong its battery life.
Will I be able to use the included AC adapter to charge the Photo Safe II
battery while I'm traveling in Europe, where the voltage is not 110V?
The standard AC power adapter that comes with your Photo Safe II can
support power ranging from 100 to 240 volts. This will allow you to use the
AC power adapter worldwide.
Since the plug type on the standard AC power adapter is the North
American standard, you may need a different plug adapter when traveling
outside of North America.
Can Photo Safe receive power from the USB port?
Yes, Photo Safe II runs on USB power when connected to your computer.
You can also charge the Li-Ion battery via USB power by connecting
Photo Safe II to your computer.
Questions about USB connection, OS compatibility, using Photo Safe as
external hard drive & card reader:
My computer only has USB 1.1 ports available. Can Photo Safe II still be
connected?
Yes, Photo Safe II is backward compatible with USB 1.1. Just note that
the copy speed will be slower with a USB 1.1 port.
Can I use Photo Safe II as an external hard drive or memory card reader?
Yes, when connected to the computer, you can use Photo Safe II as an
external hard drive to back up data on your computer. In additional, you
can use it as a memory card reader to read from you memory cards or
copy data from your computer on the card.
How can I help maintain the data on Photo Safe II?
•
There are two ways you can help maintain your Photo Safe II contents.
- First, make sure to keep Photo Safe II away from hot and dusty
environments. Be careful not to drop or bump Photo Safe II. Do not
touch or move Photo Safe II while it is transferring data or connected to
your computer.
- Second, periodically run Error-checking, Scan Disk, Defragmentation,
and other hard drive maintenance programs on Photo Safe II. Your
computer should have adequate tools included with its operating system
software. Check the instruction manual of your computer for details.
Page 28
Revision 1.1
Photo Safe II
User’s Guide
7.
Troubleshooting and Technical Support
My computer does not recognize Photo Safe II.
•
Make sure that the Main USB connectors are properly connected to your
computer and the Mini USB connector is properly connected to Photo
Safe II.
•
Plug in the AC power adapter to Photo Safe II. Photo Safe II might not be
getting enough power from your USB port.
•
Try different USB ports. On some computers, the USB ports are not all the
same. There might be one main USB port and the other are extensions
running off the main USB port. If you are using a desktop computer, we
recommend the USB ports on the back of the computer as they are more
stable.
•
Try a different USB cable. The USB cable might have malfunctioned.
•
If the above does not help, restart your computer and try again.
•
Also, check to see if there is a drive conflict between any network drives or
other devices connected to your computer and your Photo Safe II hard
drive. When your Photo Safe is connected to your computer, it will look for
the first available drive letter and use 3 consecutive letters. The first two
will be for the 2 memory card slot (for example G: and H:) followed by the
one for the hard disk (in this case, it will want to use I: for the hard drive). If
I: is already taken by another device, the hard disk might not show up.
•
If this is the case, you can manually change the drive mapping for the
Photo Safe hard drive by following these steps in Windows:
o Right-click on the My Computer icon and select MANAGE.
o In the 'Computer Management' window, select 'Disk Management'
under the 'Storage' grouping.
o Locate the device 'Volume' for the Photo Safe hard disk and right
click on it to select 'Change Drive and Letter Paths...'.
o Select Change and pick an available drive letter.
o This will manually assign a drive letter to your Photo Safe hard
disk.
I tried to copy from a card to Photo Safe II and I know I have enough space
on the hard drive. The copy task started, but stopped in the middle of the
copy task and shows an {ERROR} message.
•
If the copy progress reached a certain % then stops, one likely causes is
that there are some files/directories on the card that were corrupt,
interrupting the copying process.
•
To test this, please reformat the memory card in your camera. Please note
to back up your pictures before formatting the card as it will delete all on
Page 29
Revision 1.1
Photo Safe II
User’s Guide
the files on the card. After you re-format the card, please take some
pictures in your camera and try the copy function again to see if Photo
Safe II is now functioning properly. It is recommended that you reformat
your memory card in the camera on a regular basis to maintain data
integrity.
My Photo Safe II froze and would not respond. How do I reset it?
•
To reset Photo Safe II, please remove the battery from the battery
compartment. Photo Safe II will reset the operating system. You can then
replace the battery and power on Photo Safe II and return to normal
operations.
When disconnecting Photo Safe II from my computer, I get a message
saying that the device was disconnected in an unsafe way.
•
You did not properly disable Photo Safe II before disconnecting it from
your computer. This might cause data loss or cause your Photo Safe II to
freeze. Refer to Section 4.5 Safely Disconnecting Photo Safe II From Your
Computer for details instructions on safely disconnecting Photo Safe II.
I am a Mac user, I try to dismount Photo Safe II hard drive from my
computer and I get a message that “The device is in use and could not be
ejected” but I do not have any application open.
•
If you get the message saying that the hard drive is in use, please check
the setting of the Mac OS Energy Saver. It might be that the Energy Saver
is attempting to put the hard drive to sleep, and the error message comes
up because the computer is trying to put Photo Safe to sleep. In this case,
do the following:
Go to Menu > System Preferences > Energy Save > Sleep, and uncheck
“Put the hard disk to sleep when possible.”
I am a Windows user, I deleted the files from Photo Safe II but found that
the files are only deleted from the directory, but the storage space is not
returned. How can I free up the hard disk space on my Photo Safe?
•
One possible reason for the situation is that the deleted files still exist in
the ‘Recycled’ folder on your Photo Safe II. To check for these ‘hidden
files,’ you may do the following:
1) In My Computer, select the backup folder under Photo Safe II
2) Select TOOLS > FOLDER OPTIONS
3) Select View tab
4) Under Files and Folders, go to Hidden Files and Folders
5) Select “Show hidden files and folders”
This way you’ll be able to see the hidden files. You will see a ‘Recycled’
folder, and you can access this folder and delete these files from your hard
drive.
•
You can change the settings to delete the files directly without sending
Page 30
Revision 1.1
Photo Safe II
User’s Guide
them to the Recycled folder:
1) Right click on the ‘Recycled’ folder under Photo Safe II
2) Select Properties
3) Select the Photo Safe II hard drive
4) Select the option: ‘Do not move files to the Recycle Bin. Remove files
immediately when deleted’.
I am a Mac user, I deleted the files from Photo Safe II but found that the files
are only deleted from the directory, but the storage space is not returned.
How can I free up the hard disk space on my Photo Safe II?
•
In Mac, any files or folders you deleted (drag to the Trash) will remain
there until you empty the Trash. To free the disk space, you need to empty
the Trash by following these instructions:
1) Connect Photo Safe to your Mac with the USB cable.
2) On Mac, select Finder > Empty Trash.
This will delete your deleted files in the hidden '.trash' folder and Photo
Safe II disk space will be returned
I reformatted my Photo Safe II hard drive, and the copy function no long
works.
•
Please note that the Photo Safe II hard drive has to be formatted in FAT32
format (or MS-DOS File System for Mac) for the card copy function to
work. If you do wish to format the Photo Safe II hard drive at any point
(note that formatting delete all data on the hard drive), make sure it is
formatted in FAT32 format. When formatted in NTFS file system, the
Photo Safe II hard drive can still work as an external hard drive when
connected to the computer, but the card copy function will not work.
•
Please Refer to Section 5.4 Reformatting Photo Safe II for instructions on
how to reformat Photo Safe II.
Technical Support
If you are still having trouble using your Photo Safe II, please contact Digital Foci,
Inc. technical support Digital Foci at [email protected].
Page 31
Revision 1.1
Photo Safe II
User’s Guide
8.
Appendix – Technical Specifications
Model No.
PST-251
Hard drive
5400rpm 2.5” SATA hard drive
LCD display
2” text/icon LCD screen with backlight
Memory cards supported
CompactFlash Type I
MultiMedia card, RS-MMC,
SD card, SDHC card, miniSD card,
Memory Stick, MS PRO, MS Duo, MS PRO Duo,
xD-Picture Card
Computer interface
USB 2.0 (compatible with USB 1.1)
Transfer rate
PST-251 to computer: Up to 60 MB/sec
Memory card to PST-251: Up to 5.0 MB/sec*
(* Copies a full 1GB CF card in about 3 1/2 minutes)
Copy status indicator
Percentage completed, copy confirmation, number of files
copied, sequence number of created folder
Operational status indicator
Memory card type, active partition,
remaining hard drive space, battery life
LED indicators
Data access status for memory card and hard drive
External power
100-240V AC to 5V/2.5A DC
Battery power
User-replaceable rechargeable Li-Ion battery
Rechargeable via USB or external power adapter
Battery life
Approximately 80 minutes
(Copies a 1GB CF card 16 times on a full charge)
Auto shut-off
Yes (after 2 minutes of inactivity)
OS compatibility
Windows Vista, XP, 2000 (SP4)
Macintosh OS 10.0 & later
Linux OS 2.4.x & later
File system support
FAT32
Supports multiple partition
Yes
Dimensions
4.6" (L) x 3.0" (W) x 0.8" (H)
Weight
0.6 lb. (with hard drive and battery)
Page 32
Revision 1.1
Photo Safe II
User’s Guide
FCC Rules and Regulations – Part 15
This device complies with Part 15 of the FCC Rules. Operation is subject to the following
conditions:
1. This device may not cause harmful interference.
2. This device must accept any interference received, including interference that may cause
undesired operations.
The device has been tested and verified to be within the energy emission limits for Class B digital
devices as defined in Part 15 of the FCC Rules. These limits are designed to provide reasonable
protection against harmful interference in a residential situation. This device generates, uses, and
can radiate radio frequency energy and, if not installed and used in accordance with the
instructions, may cause harmful interference to radio communications. Installed correctly, it
probably will not interfere with your radio or TV. However, we do not guarantee the absence of
interference.
If you modify the device in any way, without approval from Digital Foci, Inc., your device may violate
FCC regulations. Violation of FCC regulations may cause the FCC to void your rights to use the
modified device.
If you suspect this device is causing interference, power off and on the device while your radio or
TV is showing interference. If the interference disappears when you turn the device off and
reappears when you turn the device on, something in the device is causing interference.
To reduce interference, try these suggestions:
• Change the direction of the radio or TV antenna.
• Increase the separation between the device and radio or TV.
• Connect the device into an outlet on a circuit different from that to which the radio or TV is
connected.
If these suggestions don’t help, consult your computer dealer or an experienced radio/TV
technician for more suggestions.
Page 33
Revision 1.1
3111 Via Mondo, Rancho Dominguez, California, 90221 USA
Copyright 2008 Digital Foci, Inc. All rights reserved.