1
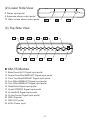
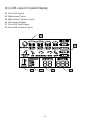
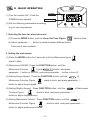
XM 7S Drum Module
User Manual
INDEX
A. PRODUCT FEATURES................................................................. 1
B. SAFETY INSTRUCTIONS............................................................. 1
C. SETTING UP THE XM DRUM MODULE CONNECTOR............... 2
D. CONTROL ELEMENTS INTRODUCTION..................................... 2
E. BASIC OPERATION....................................................................... 5
F. TONE PARAMETER CHART.......................................................... 7
G. TROUBLE SHOOTING.................................................................. 8
H. RESTORE FACTORY SETTING.................................................... 8
POWER
MODE
FUNCTION
CD IN
PHONE OUT
MAIN OUT
A、PRODUCT FEATURES
1. Operation functions shown in graphical display for easy operation, even beginners will find
this module easy to use.
2. Excellent for beginners or advanced players.
3. Perfectly presents meticulous punch and speed linear figures in all spectrums, sensitivity
adjustable according to personal requirements.
4. 6 different ready-to-use drum set tones available to choose from.
5. Each single drum has 3 sounds available and can be set independently Drumhead / Hoop / RIMSHOT.
6. Built-in standard metronome, click sound can be set freely to serve as music background
instrument.
7. Equipped with professional MIDI function.
8. The module comes with 2 OUTPUT portals and 1 INPUT portal; the drummer can monitor
the whole stage easily with 1 set of earphone.
9. CD player/MP3/iPod…etc. can be connected to the module INPUT and play
background music.
10. The XM drum module is compatible and can be connected to any other brand drum module.
11. Switch Control Pedal can be connected to the module and swiftly change between different
drum set tones.
12. Crash cymbal can be muted; Ride and other extended cymbals have both SURFACE and
BELL sounds.
13. Module supports and can be extended up to 16 drums/cymbals with Y-cables.
B、SAFETY INSTRUCTIONS
*
Please read the instructions carefully before use:
1. The appliance should not be used near water (e.g. near a bathtub, washbowl, kitchen
sink, laundry tub, in a wet basement, or near a swimming pool etc.) or outdoors in rainy
days, any fluid that leaks into the device would damage the components inside.
2. To avoid signal interference, please do not use this device beside other electric appliances
(e.g. TV, Radio…etc).
3. Please hold the cable plug while pulling off the plug, do not pull the cable hard, which would
damage the cable and plug.
4. Before connecting the module to other electric appliances, (e.g. computer, speaker etc.),
please turn off the power of each appliance. Also, turn all volume controls down to 0 before
turning these appliances on / off.
5. Please stop using the module if there is any problem with the power cable, to avoid accidents
such as fire or electric shock.
6. Do not open the device casing or make any change to the component in the device by
yourself, doing so might damage the component. Should you find the device malfunction,
please stop using it and send it to our maintenance.
-1-
C、SETTING UP THE XM DRUM MODULE CONNECTOR
D、CONTROL ELEMENTS INTRODUCTION
(1) Front View
1. POWER: Power ON/OFF button
2. ▲MODE: Mode button
▼FUNCTION: Function button
3. LCM: Liquid Crystal Display
4. CD IN: Signal input volume control.
5. PHONE OUT: Earphone output volume control.
6. MAIN OUT: Master volume output control.
7. VALUE+-: Parameter edit button.
-2-
(2) Lower Side View
8. Stereo input portal
9. Earphone stereo output portal
10. Main volume stereo output portal
(3) Top Side View
BD
SD
FT
T2
T1
RD
CR
►XM-7S Module
HH
HHC
11. Bass Drum/AUX1 Signal input portal
12. Snare Drum/Rim/RIMSHOT Signal input portal
13. Floor Tom/Rim/RIMSHOT Signal input portal
14. Tom 2/Rim/RIMSHOT Signal input portal
15. Tom 1/Rim/RIMSHOT Signal input portal
16. Ride/China Signal input portal
17. Crash STEREO Signal input portal
18. Hi-Hat/AUX Signal input portal
19. Hi-Hat Control Signal input portal
20. MIDI IN portal
21. MIDI OUT portal
22. AC9V Power input
-3-
AC 6V
MIDI IN MIDI OUT
(4) LCM Liquid Crystal Display
23. Drum Set Figure
24. Metronome Figure
25. Metronome Function Figure
26. Parameter Display
27. Drum Set Tone Figure
28. Drum Set Function Figure
-4-
E、BASIC OPERATION
POWER
MODE
(1) Turn the module ON:Push the
MODE
FUNCTION
POWER button upward.
FUNCTION
CD IN
(2) Set the following parameters according
PHONE OUT
MAIN OUT
to your own requirement.
1. Selecting the tone for whole drum set:
(1) Press the MODE button, until the Drum Set Tone Figure
starts to blink.
(2) Adjust parameter +- button to switch between different tones.
There are 6 sets available.
2. Setting the metronome:
(1) Press the MODE button for 2 seconds, until the Metronome figure
starts to blink.
(2) Metronome ON/OFF: Press the FUNCTION button, until the
Metronome Function
Figure
blinks, and press
parameter + button to turn ON, and press parameter - button to turn off.
(3) Setting Tempo Speed:Press the FUNCTION button, until the
Metronome Function Figure
of
starts to blink, and press parameter +-
button to adjust tempo speed.
(4) Setting Rhythm Accent:Press FUNCTION button, until the
Function Figure
of Metronome
starts to blink, and press parameter +-
button to adjust rhythm accent.
(5) Setting Metronome Volume:Press FUNCTION button, until the
Metronome Function Figure
of
starts to blink, and press parameter +-
button to adjust metronome volume.
-5-
(6) Metronome Tone: Press FUNCTION button, until the
Metronome Function Figure
of
starts to blink, and press
parameter +- button to choose the tone.
3. Setting individual Drum / Cymbal:
(1) Press the MODE button, until the
of Drum Set Figure starts to blink,
you can select the individual Drum / Cymbal which you would like to edit in
following 2 ways:
① Press the MODE button, until the Drum / Cymbal figure you would like to edit
starts to blink.
② Hit the drum / cymbal you would like to edit, the module will detect the signal
automatically, and that certain figure starts to blink.
(2) Press the FUNCTION button to adjust following functions:
►Adjust Volume (VOL):Press FUNCTION button until the
figure starts to blink, then press parameter +- button to adjust volume.
►Adjust Sensitivity (SEN):Press FUNCTION button until the
figure starts to blink, then press parameter +- button to adjust sensitivity, the
bigger the number, the more sensitive it becomes.
►Adjust Drum Set Tone GROUP:Press FUNCTION button until the
figure starts to blink, then press parameter +- button to switch between different
drum set tones.
►Adjust Drum Set TONE:Press FUNCTION button until the
figure starts to blink, then press parameter +- button to select your desired
tone. (Please see tone parameter chart on page【7】)
►MIDI function switch:Press the FUNCTION button for 2 seconds until the
figure starts to blink, then press the parameter + button to turn ON the MIDI IN
portal on top of the module; press the parameter - button to turn OFF.
PS:The MIDI OUT portal always stays ON status.
-6-
F、TONE PARAMETER CHART
Group
TONE
-7-
G、TROUBLE SHOOTING
Q & A:
Q: I plugged my module to the socket and turned on the module, but the LED is dark
and there is no sound?
A:Please check if the socket is working normally, and the module plugged correctly.
Or is it poor wire contact at the power input or positive and negative poles reversed.
Q:The LED light is on but can not hear anything through the speaker?
A:Please check if the main volume is adjusted too low.
H、RESTORE FACTORY SETTING
1. Turn the module off, keep pressing the 4 buttons on the panel at the same time, and
turn on the module, when REC shows on the lower right corner of the LCM, release
the 4 buttons.
2. Reboot the module again.
WARRANTY
1.If the product shows any defects under normal use as described in this manual within
the period of 1 year from the original date of purchase, XM shall, at its discretion, repair
and maintain the product at no charge.
2. If the product requires maintenance and replace parts over 1 year from the original date
of purchase, XM may, at its discretion, charge the customer for the additional cost of the
replacement parts, maintenance at no charge.
3. Any damage or malfunction to this product caused purposely, by indiscretion or operation
that did not follow this manual is not covered by warranty. XM may, at its discretion, charge
the customer additional cost for parts and maintenance.
-8-