1
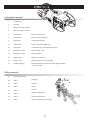
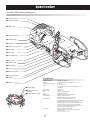
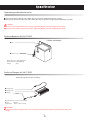
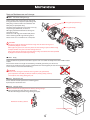
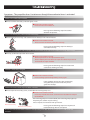
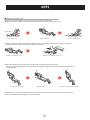
TUSA Underwater Vehicle
Instruction & Riding
Manual
SAV-7 EVO2
Thank you for purchasing a TUSA underwater vehicle.
The TUSA underwater vehicle is revolutionary new underwater vehicle equipped with
functions and features that set it apart from previous models and other brands.
Hands-free riding with the scooter saddle (PATENTED)
Hands-free is an innovative riding style that allows an operator to steer the scooter with body movement; much
like a seal.
This inline body placement is more streamlined to effectively decrease fatigue, reduce air consumption, and
extend your dive time. Go further, get there faster, and have a lot more fun along the way.
The hands-free riding style increases your options while diving.
You are no longer limited to the hands-on riding style required by other vehicles.
The possibilities are endless.
Variable speed control
Quick and smooth speed control is now at your fingertip.
Speed adjustments are made via an accelerator lever that changes
the rotational speed of motor while vehicle is in use.
Adjustments are very smooth, allowing user to fine tune speed.
These enhancements are a significant improvement on the TUSA vehicle
series.
This new design provides a far more advanced control system than is
available on other underwater scooter.
The TUSA underwater vehicle is not a heavy burden
The hands-free riding style decreases fatigue, reduces air consumption, and extends your dive time.
In the past some divers have become fatigued from the energy and effort required to hold and steer an
underwater vehicle.
In addition to being a potential source of fatigue, the traditional hands-on riding style requires the user to place
themselves above the vehicle rather than inline.
Improvement in transportation options
The TUSA underwater vehicle improves your ability to transport items underwater.
Your hands are free to carry what you need.
Additionally, fold out wings on both sides of the saddle are available for towing
the divers or attaching other items of equipment.
The innovative TUSA underwater vehicle challenges divers to create and find
new techniques and methods of use.
Go out and enjoy diving with this great new generation diving product.
If you want more information about TUSA DPV, please check the website.
1
http://www.tusa.com
Instruction manual
1
Introduction
2
Contents
3
Before reading the manual
4
Main warnings and notes
5
Specification
Each part name/spec
6
Specification
Exclusive battery/charger
7
Preparation
Charging the battery
9
Preparation
Battery warranty/ Battery care
10
Preparation
Check before use (confirming operations)
13
Operation and use
Entry method/Exit
14
Operation and use
How to operate
15
Maintenance
Maintenance after use
16
Maintenance
Note on maintenance and storage
17
Trouble shooting
The propeller doesn't rotate even through the throttle
lever is activated
Riding manual
18
For the safety diving
20
STEP 1
Stopping
22
STEP 2
Take off
24
STEP 3
Riding
26
STEP 4
Turning
27
STEP 5
Advanced operations
28
STEP 6
Advanced operations
29
STEP 7
Advanced operations (Carrying)
2
Items with the following headings marked with this symbol " " describe scuba diving
techniques and how to handle diving equipment.
These sections must be completely understood, so be sure to read them with special care.
DANGER
Failure to read understand and obey the instructions under this heading may lead to accidents that may result
in serious injury or death.
CAUTION
Failure to obey the instructions under this heading may lead indirectly to accidents that result in serious injury,
death and or serious damage to equipment.
WARNING
Failure to obey the instructions under this heading may lead to minor accidents and/or damage to equipment.
DANGER
● It is extremely important that scuba divers using this product have undergone theoretical and practical training
given by an internationally-recognized entity providing diving instruction.
Due to safety considerations, those who have not obtained a C-Card (attesting to the completion of training)
from an entity providing diving instruction must not under any circumstances use this product.
(This does not apply to those using this product during training, under the supervision of an instructor attached to
an entity providing diving instruction.)
Amateurs lacking knowledge of basic scuba diving techniques risk serious injury or death.
● Never scuba dive alone. Always dive under the buddy system.
Diving alone could lead to serious injury and death.
● Due to the speed of the TUSA underwater vehicle depth & pressure change may happen faster than usual.
The diver must be aware at all times with regards the status of his depth and direction and carefully monitor his
ascent rate as rapid surfacing and collisions could cause serious injury or death.
Please practice driving at low speed until you become accustomed to the handling of the scooter.
CAUTION
● Make sure you are in good physical condition before you scuba dive.
If you begin to feel anxious, cold, tired or unwell, do not over exert yourself and stop your dive.
● Never take alcohol or medicines (especially a nasal spray or medicine for a cold) before scuba diving.
Those who are in poor physical shape or suffer from a chronic ailment should consult a doctor before
considering diving.
WARNING
● Before deciding to use your scooter in an adverse environment or special situation please consult with a
qualified instructor at the place of purchase prior to undertaking your dive.
3
CAUTION
Please only use our purpose-built battery and purpose-built
charger.
Otherwise there is a danger of an explosion and fire.
CAUTION Please do not change, remodel or disassemble.
There are dangers of the explosions and of fire if the electric
circuit is tampered with. There are dangers of damage and
water leaks in the body and circuits.
Please do not touch unnecessarily any moving parts
CAUTION (especially the propeller).
There is danger of injury.
CAUTION Please do not touch the electrodes etc.
There is danger of electric shock because of high currents and
voltage.
Please do not drive the scooter to the surface as there are
CAUTION dangers caused by rapid ascent.
The rapid pressure decrease associated with a rapid ascent
may cause decompression disease or embolism.
CAUTION
Hydrogen gas is generated from the battery while charging.
There are possibilities of poisoning and fire.
Please only charge the battery in a well-ventilated area and
keep it away from an open flame.
Please ensure that string, hose, hair or foreign objects do not
become entangled in the propeller. Remove the battery
CAUTION
before attempting to disentangle any items should the
propeller become obstructed.
There is a possibility of injury.
CAUTION Please do not jump into water with the scooter.
The inertia and weight of the scooter is dangerous and could
cause injury.
CAUTION Please do not throw the scooter from a high place.
The inertia and weight of the scooter is dangerous and could
cause injury.
Please do not enter with the scooter when you are boat diving.
CAUTION Have the scooter passed down to you.
The inertia and weight of the scooter is dangerous and could
cause injury.
If your scooter has stopped abnormally or been for repair
CAUTION please do not run it for a long distance until after you have
confirmed it is safe.
An unknown fault or unfinished repair may cause an unexpected
accident.
WARNING Please execute a thorough check prior to use.
An accident may be caused by a malfunction after it enters the
water.
WARNING
The seal part on the propeller shaft is damaged by frictional
heat, and there is a possibility of water leakage.
Please do not run the scooter for more than five seconds out
of water.
Please take careful note of your surroundings and
WARNING circumstances prior to preparing your equipment on land
and in the water.
Equipment and materials may be damaged by unexpected
operation.
WARNING
Please disconnect the battery terminal when the scooter is
not in use.
Unexpected operation due to the switch being accidentally
operated may cause an unexpected accident.
WARNING
Please check the main body O-rings for impurity and dust
before usage.
There is a possibility of water leakage by imperfect sealing,
which may cause damage and an unexpected accident.
WARNING
Please do not use other than the specified silicone grease
lubricant supplied by Nippon Sensuiki.
Damage may be caused to the materials the scooter is made
from by using lubricants other than what Nippon Sensuiki Co.,
Ltd. supply. This in turn may cause an unexpected accident.
The above-mentioned table does not mention all prevention matters that could cause danger and injury.
Please carefully read and follow the instructions whenever you see the " " symbol in this book.
4
The SAV-7 EVO2 name of each part
● Propeller cover
● Propeller screen
● Clamp ring
● Pitch control dial
● Propeller Assy
● Propellers
● Clamp ring lock lever
● Body Assy
● Head Assy
● Locking buckle
● Wing arms
● Starter switch
● Main switch
● Grips
● Battery indicator
● Accelerator lever
● Saddle
Specification
Length and width
Weight
Submerged unit weight
Speed
● Handle
●Battery plug
●Water leak sensor
terminal
●Water leak alert lump
Active depth
Active range
Body
Motor
REV reducer
Speed adjuster
Safety devices
Accessories
: 720mm × 340mm
: 21.3kg with battery and single hand unit
: 860g ※1
: 0~4.5km/h ※1
It depends on the divers posture, physique and
equipment.
: approx 70m
: 7200m ※1
: Shock resistant ABS resin
: 24V Brushless motor
: Ring epicyclical gear speed reducer
: Rotational speed control
: Variable pitch-type propeller (3 steps)
: Sensation current shut-down device
Thermal switch function automatically shuts down
operations when internal temperature rises.
Water leakage sensor function turns on warning
lamp when water enters the motor or battery
housing and automatically shuts down operations.
: Water-cooling motor deployment
: O-ring seal for the main body
: O-ring seal for the propeller end of the body
: Silicone grease
※1:In use of lithium ion battery
509
Separately purchased accessories
● Lithium ion Battery 20Ah for SAV-7 EVO2 (Use only batteries supplied by Nippon Sensuiki)
● Charger for Lithium ion Battery for SAV-7 EVO2 (Use only the specific charger supplied by Nippon Sensuiki)
CAUTION
● Please never use other batteries than those supplied by Nippon Sensuiki. (Supplied separately)
● Please never use other chargers than those supplied by Nippon Sensuiki. (Supplied separately)
Exclusive Batteries for SAV-7 EVO2
Lithium ion battery
● Grip
● Battery socket
Outer dimensions: 174X125X165mm
Normal Capacity: 20Ah (DC25.6V)
Weight:
9.5kg
Exclusive Chargers for SAV-7 EVO2
Battery charger for Lithium ion Battery
● Charger plug
● Charger body
● AC plug
Outer dimensions: 170mm x 90mm x 50mm
Output:
DC25.6V
Input voltage:
AC100 - 240V 50 - 60Hz
CAUTION
● Please refer to the handling manual that is attached to each product explaining usage of the battery and
charger.
106
Charging the battery
CAUTION
● In this page, it explains only the Lithium ion battery and SAV-7 EVO2 as an example.
■STEP1 Preparation for charging.
● Please stand the scooter vertically on the propeller cover.
Make sure it's on a flat stable surface so that it cannot fall over and cause
damage to the propeller cover and blades.
● If the scooter is wet, wipe all moisture off completely.
■STEP2 Unfasten the locking buckles.
● Unfasten four locking buckles on the body seal.
A locking mechanism is attached to the locking buckle to prevent it from
releasing as a result of unexpected shocks.
① First, while pushing the square button in the center of
the locking buckle, lift the end of the buckle.
② Next, after releasing the buckle hook, flip the buckle
downward. Release all four parts.
■STEP3 Removing the battery housing.
● It may be difficult to remove the battery housing (head Assy) due to negative pressure inside the body caused
by contact with the O-ring, temperature variation and other factors.
In this case, place the buckle latch under the locking hook and apply pressure with your thumb while pushing
upwards. Do this on both sides of the scooter concurrently to break the seal and easily release the
battery housing (head Assy).
Push the hook with arms.
If it is hard to remove head Assy・・・
●Hook
Remove the head Assy.
●Arms
If with the single hand unit,
unnecessary to disassemble
the single hand unit when
removing the head assy.
WARNING
Precautions concerning the handling of the battery housing (head Assy) after removal.
● Silicone grease has been applied to the seals on the battery housing. Sand and other debris easily stick to this.
Be careful to avoid this situation.
● Water leakage is caused almost entirely by sand or other debris adhering to the seal area.
● Please put the battery housing (head Assy) in a safe clean place lying
down on the ribs located on its base.
● Please do not place it on sand or on rocks etc.
711
Remove the connector
■STEP4 Releasing the battery connector plug.
● Hold and squeeze the release levers on both sides of the battery connector
plug and pull upwards.
CAUTION
● Altering the battery connector plug in any way is very dangerous and should not
be done. Any alterations will cause unexpected trouble.
■STEP5 Removal of the battery.
● Hold the grip of the battery firmly and lift it away from the body.
Place in on a clean and dry flat stable surface.
WARNING
● The battery is quite heavy, so be careful not get your fingers pinched or to
drop it onto your feet.
■STEP6 Connecting the exclusive charger to begin recharging.
CAUTION
● You must use the correct exclusive charger suitable for the type of battery being used.
Please refer to the handling manual that is attached to each product about the battery.
① First, connect the AC (alternating current) plug of the charger to a domestic outlet.
② Next, connect the socket from the battery to
the plug on the charger.
The charging will automatically start upon
DC25.6V
connection after the power is turned on
at the domestic outlet.
AC100~240V
CAUTION
● The connector is polarized, so when connecting, insert in a direction so it will smoothly enter the connector
receptor.
Charging time of the charger
The color of LED2 will indicate when charging is completed.
Charging : Red light
Finished : Green light
FUSE
● The red is changed into green as the charge progresses.
● A green lamp shows when the battery connector is not
connected (open circuit) but the power is on.
LED2 LED1
LED1:
Power ON: Red
LED2:
Charging : Red
Finished : Green
■STEP7 Disconnect the charger when charging is completed.
The battery charger automatically changes into trickle
charge mode after charging is complete however please
avoid leaving the charger connected after the charge
lamp becomes green.
① At first, turn the power off and remove the
AC plug from the domestic outlet.
② Next, remove the plug of charger.
■STEP8 Charge completion.
CAUTION
● Please do not set the battery into the scooter for at least 30 minutes after completing the charge.
Please do not use if the battery become high temperature.
128
● In case of using with exclusive battery for SAV-7 EVO2 sold in the past
except lithium-ion battery, please set a battery changeover switch
to Lead-Acid/Ni-MH as illustrated.
Lead-Acid/Ni-MH
LE
AC ADI
&
Ni D
-M
H
Usage of batteries except Lithium ion battery (SAV-7 EVO2)
Warning
● Even if it is equipped with Lead-Acid battery or Ni-MH battery
in full charge and turn on a main switch, battery indicator does not
always display FULL(Green LED won't turn on)
Li-ion
Battery select switch
About battery warranty and care (all DPV)
Warranty covers if its capacity becomes less than 50% within 3 month from the date of
purchase according to proper usage.
HOW TO CARE BATTERY
●Battery is not charged when delivered so that charge it when in use.
●If the battery is not in use for a long period, it may affect a lost of capacity by
self-discharging.
●If storage temperature is over 25℃(77°F), charge once for every 2 month.
Even if not exceed over 25℃(77°F), charge once for every 3 month.
●Directly contact us when fuse is cut off.
●Do not over discharge until a propeller won't turn or slowly turn around.
(Do not continue using by resetting main switch for VDS.)
●Moreover, a protective circuit is equipped in the lithium-ion battery inside.
When this circuit stops to discharge, be careful as you can not reset by turning main switch on again.
Only it can be reset by re-charging the battery. In addition, even if VDS circuit does not operate,
this protective circuit may stop to operate.
Warning
●Never throw the battery into water, keep it under
Temperature range for battery
dry, shady and cool circumstance when not use.
USE
: -20℃~60℃ ( -4 ~140°F)
●Never keep the battery beside high temperature
source examples: fire, heating machine and ect.
STORAGE : -10℃~45℃ (14 ~113°F)
●Never upside down the positive and negative.
CHARGE :
0℃~45℃ (32 ~113°F)
●Never cut the battery in socket directly
●Never throw the battery into fire or heating machine.
●Never connect the positive and negative of battery with metal.
●Never knock, throw or trample the battery.
●Never cut through the battery with nail or other edge tool.
●Never use or keep the battery under the high temperature. Otherwise it will cause
battery heat, get into fire or lose some function and reduce the life.
●Never use the battery under strong static and strong magnetic field, otherwise it will
destroy the protecting device.
●If battery leaked, the electrolyte get into eyes, please don¡¦t knead, please wash
eyes by water and send to hospital. Otherwise it will hurt eyes.
●If battery emit peculiar smell, heating, distortion or appear any unconventionality
during using, storage or charging process, please take it out from device or charge
and stop using.
●If the pole of the battery plug was duty, please clear it before using.
913
Checking before use. (setting)
■STEP1 Set the battery.
① Please set the fully charged battery in the body housing in the correct position.
WARNING
● Please only use a fully charged battery otherwise damage will be caused.
Also check again that the correct charger was used with the correct battery.
② Next, the battery socket is connected with the body plug.
(Please always remove the connector when not in use or during travel to your destination.)
Connect the socket to right way.
③ At this time, confirm that the warning lamp isn't on.
Please do not use the scooter if the warning lamp is on as this may indicate a water
leak has occurred.
Water Leak Alert Lamp
■STEP2 Set the battery housing (head Assy).
① Check the switch of "Battery Selection Switch"
to same position as the battery type.
② Place the battery housing (head Assy) carefully in
position taking note that the ribs on the underneath
of the scooter match up.
● avx has no sticker of "Battery Selection Switch",
please check the switch to ①Lithium ion side.
LE
AC ADI
Ni D
-M
H
● Please confirm that there is no debris adhering to the O-ring, O-ring groove or O-ring connecting surface.
Also confirm that there are no scratches and that an appropriate amount of silicone grease has been used.
②
①
①Lithium ion
②Lead-Acid/Ni-MH
Battery Selection Switch
■STEP3 Checking the housing seal.
Do not set wrong side!
WARNING
● After setting the housing, confirm that there is a uniform space of
about 0.5mm between the battery housing (head Assy) and the motor
housing (body Assy).
If the space is less than 0.5mm or if the two parts are joined, there is the
possibility of the O-ring coming out of the O-ring groove.
Confirm that this not the case before proceeding.
■STEP4 Checking the locking buckle.
● Please confirm that all four locking buckles are securely locked.
10
Check no gap after setting
Check before use. (confirming operations)
■STEP1 Turning on the main switch.
① Check your surroundings.
Always confirm that nothing can obstruct or become entangled in the propeller.
② Place the scooter vertically on a level surface.
③ Turn on the main switch. It is located on the right hand grip.
■STEP2 Checking the battery indicator light.
● Confirm that all lights are illuminated. (i.e. Green, yellow, and red)
●In case of using Lead-Acid / Ni-MH battery, green LED does not
always turn on even if at full charge.
Lights the Battery indicator
About battery indicator
● It is necessary to synchronize the battery indicator for each type of battery (Lithium ion or LEAD-ACID /
Ni-MH) to ensure an accurate display of the remaining battery life. (Refer to STEP 2 on page 15)
● The display accuracy may be affected by an exhausted battery and ambient temperature.
Please refer to the battery indicator as a rough guide only.
●Indicator operates following by battery voltage at propeller pitch 2 with full throttle.
Please note that it can not be measured accurately because the battery voltage is recovered
gradually when the motor Is stopped.
■STEP3 Operate the motor.
① Push up the accelerator lever.
② Slowly push up and down on the accelerator lever.
③ Confirm rotational speed changes are occurring
with vertical motion.
④ Also, confirm the sound of propeller for check.
Push the accelerator
lever up and down.
Check the noise
⑤ Check the battery indicator for battery condition with turning on the motor.
● Red : empty
● Yellow
● Blue : full
All colors are tuned on after full charged, then changed
color with consumption.
Check the indicator
⑥ Take all pressure off the accelerator lever.
⑦ Confirm the rotation of the propeller has stopped completely.
11
■STEP4 Turn off the main switch.
● Move the main switch to off position.
● Confirm that all battery indicator lights are off.
WARNING
● If switch is left on the standby current will continue to flow.
It is possible that damage will occur from over discharge of the battery.
Main switch OFF
■STEP5 Using the variable pitch propeller.
● Lay the scooter down on a level surface.
● Pull and turn the pitch control dial knob to make adjustments
to the propeller angle.
● Push the dial back after speed selection.
Lay the scooter down on a level surface
Pitch selection
Acceleration purpose
(need more power for pulling a heavier person or weight - reduces battery life)
Standard purpose
(most efficient setting)
Low speed purpose
● SAV-7 EVO2 DPV: Confirm that pitch operation moves smoothly through the three stages.
● SAV-7 EVO2 DPV: Recommended position is Pitch 2 or 3 because of law consumed power.
Pull the pitch dial
Choose the speed level
with pulling dial
WARNING
● Do not miss the check before diving in order to prevent from serious injury.
17
12
Entry method
■STEP1 Entry from shore.
The scooter is very light when in the water - just slightly negative. While hands free riding it's very easy to use the
scooter in shallow water even up to waist deep. You don't need to stay on the bottom in shallow water.
You can enjoy cruising along the surface quite comfortably until you find a deeper area you would like to dive to.
Waist deep ・・・
Moving along the surface !
or underwater !
CAUTION
●Never jump into the water with scooter from a boat or any other elevated location.
Never throw the scooter, as it is potentially very dangerous. Please refer to the boat entry method for further
instruction.
Don't throw the scooter
Don't jump from a high place with the scooter
■STEP2 Entry from boat and other elevated areas.
● Please secure the scooter by a lanyard or rope in the water or hand it to the diver after he or she has entered the
water.
● When passing the scooter to a diver already in the water please lower the scooter in so the diver can easily grasp
a handle or grip.
CAUTION
● Please turn off the main switch so that the propeller cannot operate by mistake when passing it to a diver.
● Do not enter from a boat or other elevated position while holding the scooter.
Do not enter the water while holding the scooter
Please turn off the main switch
Exit
■STEP1 Beach
Its recommended to drive the scooter up to waist deep water and leave it close to or on the edge the shore.
The scooter is heavy when out of water. It is strongly recommended that you remove your diving equipment on
the shore prior to lifting the scooter.
■STEP2 Boat
Securely attach the scooter with a rope or lanyard to the boat.
Lift the scooter from the water after the diver has exited.
1813
How to operate.
■STEP1 Accelerator operation
TUSA underwater scooter speed is controlled by the rotational speed of the propeller with the accelerator unit
and by adjustment of the propellers pitch. The rotational speed of the propeller rises when the accelerator lever is
pulled up. The rotational speed decreases when the accelerator is pushed down.
Pull out accelerator
Push down accelerator
Overload protection safety sensor
TUSA underwater scooter has a built-in safety device that protects the motor if overloading occurs.
For example if rope gets wound around the propeller shaft the scooter will automatically stop.
The scooter safety sensor protects the diver's safety from rotation rebound if the propeller becomes entangled or
otherwise obstructed.
The scooter is equipped with a safety sensor to protect the motor from burn out and deterioration caused by
overloading.
If the safety device is activated, turn off the main switch once and it will be reset.
After resetting, the motor should works as usual.
CAUTION
● If the motor has stopped please carefully check for debris that may be obstructing or entangled in the propeller
area. Please ensure the debris is completely cleared away prior to resetting and reactivating the motor otherwise
damage may occur.
VDS (Voltage Detection System)
TUSA underwater scooter has a built in VDS (Battery Voltage Detection System to minimize potential damage
done to your battery due to over discharge. When the battery reaches 20 volts the propeller
and motor will stop. On the SAV-7 EVO2, battery indicator will turn red. If you continue use of
the Scooter after the battery reaches over 20 volts the Scooter electronics will sense the battery voltage drop
and the (VDS) will automatically shut off power to the motor.
To continue using the Scooter please turn off the main switch and turn on the main switch again. If the voltage
has increased the Scooter motor will work again. If the battery voltage has not recovered the (VDS) will
automatically shut off to the motor.Using the Scooter below 20 volts may shorten the life span of the battery.
Concerning with Li-ion battery, if a protective circuit in the battery works, it is impossible to work the scooter
again. If the red lump of indicator is not light, go to the exit point. It can be reset by re-charging the battery.
1419
Maintenance after use.
Please wash with tap water after use. Make sure to flush sand and other debris from around the propeller, switch,
accelerator unit, and locking buckles.
■STEP1 Avoid salt build-up - desalt after use.
● Stand the scooter upright, and flush with tap water from your hose all salt, sand
and debris. Take special care to efficiently wash the switch part of the accelerator unit,
as this is a critical moving part during operation.
● With the scooter laid horizontally slowly rotate the propeller manually and wash using
a hose all the joints and seam in and around this area.
● If possible, you can "desalt" the scooter in a large water tank if the
diving store has this facility.
CAUTION
● Please do not activate the scooter until confirming that the surrounding area is safe and that
no other equipment is in the tank as the propeller generates turbulence.
Please never put your hand near or in the rotating propeller.
A water tank that has not been refreshed may itself have excess salt and in this case will
not provide a sufficient rinse.
■STEP2 Disassembling the propeller Assy.
CAUTION
● Please remove the battery from the scooter before working
on the propeller area.
① Pull up the two clamp lock levers in order to unlock the
clamp ring.
② Next, the clamp ring can be
unlocked by rotating counter
clockwise and matching the oval
mark on the clutch/propeller housing,
Then pull out the propeller housing.
Pull clamp lock lever toward
self and turn clamp ring.
Remove propeller Assy
■STEP3 Check and cleaning of propeller Assy.
● Check to see if any water leakage has occurred
inside the propeller Assy.
● If a little water is present please desalt it away,
drain completely.
WARNING
● A small amount of water leakage (a teaspoon or
so) is not abnormal and will not harm the operation
of the scooter. However, if the propeller Assy is full of
water then discontinue using the scooter as the
propeller Assy area and rear seals of the scooter
need to be overhauled before any further use.
In general many scooters have leakage weakness around the
sealing area on the propeller shaft. If a seal becomes worn
water can infiltrate the motor compartment and cause major
damage. Scooter have greatly
improved this area of weakness in comparison
to other scooters. We specially designed a
double sealing system for the propeller shaft by
building a small watertight compartment
between the first seal and the second seal.
Even if water leaks into this area through
the first seal into this compartment further
Propeller Assy
leakage into the motor compartment is prevented. (PATENTED)
■STEP4 Set the propeller Assy.
● Please drain all water completely.
● Please check the O-ring, O-ring groove, and O-ring surface and remove any
dust, sand or debris. Check for any scratches or damage to the O-rings and
confirm an appropriate amount of silicone has been applied.
● Installation of propeller Assy is the inverse order to "Remove the propeller Assy".
Please note that the propeller shaft needs to be seated correctly before
pushing the propeller assembly down and relocking the clamp ring into position.
You can find the right position by pushing down gently on the propeller Assy
while slowly spinning the propeller manually.
● Please confirm the clamp ring is seated down correctly and that the O-ring is not protruding.
20
15
Note on Maintenance and storage.
■STEP1 The main sealing O-rings.
There are four main sealing O-rings. Two large
O-rings between the top cover (head Assy) and
body Assy, and two smaller ones between the
body Assy and propeller Assy.
You must replace these O-rings if they are in any
way damaged, deformed, or creased.
We highly recommend that these O-rings be
changed annually.
Please use an O-ring pick made of soft plastic
when removing the O-ring from the groove.
Please never use a screwdriver or a sharp tool.
●O-rings for propeller Assy
●O-rings for body
CAUTION
● The grease used for lubrication of the O-rings must be the silicone grease
specified by Nippon Sensuiki.
Other types of grease can cause the plastic in the housing to split and for O-rings
to expand which may cause serious leakage to occur.
Please note that the damage caused by the use of grease other than that specified
by Nippon Sensuiki will avoid any warranty.
■STEP2 Body
Impact absorbent acrylonitrile-butadiene-styrene resin is used for the body of the SAV-7 EVO2 scooter
saddle.
This material excels in strength and durability, and looks great after years of service.
However, the material may be seriously compromised and damaged if you use the wrong lubricants
and or cleaners. Please note the following.
CAUTION
● Please never use organic solvents such as gasoline, oil, petroleum,
grease (Vaseline included), alcohol, the toluene, methyl, ethyl, ketones,
and acetones nor strong detergents, etc.
■STEP3 Accelerator unit
Please execute "Desalt" process on all moving parts.
Especially the accelerator lever.
■STEP4 Storage notice
● Please disconnect the plug from the battery during storage.
● Please keep the box the scooter is delivered in.
This box will help prevent damage during transport.
Remove the battery socket
Please keep the package
21
16
Symptoms : The propeller doesn't rotate even though the accelerator lever is activated.
Check1 : The scooter won't activate.
● Please confirm the battery indicator lights are on.
● Action when trouble is found.
Please turn the main switch on.
Please go to the following step if the scooter
still does not operate.
Check2 : The battery may not be connected correctly.
● Please open the head assy and confirm that the battery lead is not connected.
● Action when trouble is found.
Please connect the battery connector correctly.
Please go to the following step if the battery is
connected correctly.
Check3 : Can you push the red accelerator unit switch button on the side of the scooter main body down firmly?
● Visually confirm the operation of the switch.
● Action when trouble is found.
Normal operation can be expected after repair..
Please request your local dealer to repair the scooter if you do not
understand the repair method.
Please go to the following step if the accelerator
seems to be working correctly.
Check4 : Is the battery charged?
● Action when trouble is found.
Please recharge your existing battery and try again.
If the symptom still persists after another fully
charged battery has been tried then please
go to the next step.
Check5 : The water sensor may have been activated.
● Please open the head Assy cover, and confirm the warning lamp is on.
● Action when trouble is found.
Please dry around two sensor screws that are located on the top of
the bulkhead.
If the warning lamp has not turned off, or the warning lamp lights up
frequently, the scooter may be leaking.
Please request a full overhaul with your dealer.
Water leak alert lamp
Water leak sensor terminal
Please go to the following step if this sequence of
troubleshooting doesn't correspond.
Please advice the dealer that the scooter is not operating even after all the above points were addressed and
checked.
2217
For the safety diving.
● Equalization ears.
Ears are equalized in the same way as for regular diving. However, the speed will cause water pressure
changes faster. Therefore, ears must be equalized faster and more frequently than usual.
As the diver's face is often turned upward when in a riding position, it is best to draw the chin back when
equalizing the ears in order make the auditory canal open up more easily.
● Buoyancy adjustment.
Because the diver's hands are freed up during hands-free riding, the diver is able to operate the inflator and
exhaust valve as the diver normally would. Because the body is horizontal when riding the scooter, its position
can be kept stable by discharging air using the exhaust valves located at the shoulders or hips.
● Using fins as a stabilizer.
During hands-free riding, fins are used as stabilizers.
The diver should try to keep the fins positioned near the center of the propeller cover during regular or high speed runs, keeping fins even with the propeller shaft of the scooter. The water current created by the
propeller will hit the fins. This will help counter the force that pushes the scooter to rotate in a counterclockwise
direction (rotation torque). When running at a slow speed, the upper body will lift slightly, causing the knees
to lightly bend. In this case, the diver must try to keep the fins horizontal to the propulsion direction, so that,
here too, they can act as a stabilizer.
DANGER
● Never scuba dive alone. Always dive under the buddy system. Diving alone could lead to serious injury and
death.
● Due to the speed of the scooter depth & pressure change may happen faster than usual.
The diver must be aware at all times with regards the status of the diver's depth and direction and carefully
monitor the diver's ascent rate as rapid surfacing and collisions could cause serious injury or death.
Please practice driving at low speed until you become accustomed to the handling of the scooter.
● There are screen on the propeller cover for preventing from entangling wire and seaweeds.
However, do not dive with the scooter at the seaweed area.
Characteristics of the TUSA underwater scooter
■ Speed control
The TUSA underwater scooters are a multipurpose underwater scooter equipped with an innovative
"accelerator-based gear-less drive mechanism".
● Shifting gears while running.
On former underwater scooters, the gears could only be shifted by manually changing the pitch of the
propeller while the scooter was in a stationary position.
Having to stop each time to change the speed was difficult and inconvenient.
● To overcome this problem, the TUSA underwater scooter is now equipped with a mechanism that changes the
revolution speed of the motor. Now the gears can be shifted while running, eliminating the need to stop each
time.
The mechanism that changes the motor's revolution speed has made "gear-less" speed change possible.
Speed is no longer changed in phases by manual adjustment of the propellers pitch.
● Propeller pitch conversion mechanism.
The TUSA underwater scooter is also equipped with a propeller pitch conversion mechanism.
Please refer to the pitch selection on page 12.
NOTE
In this book, it utilizes only the SAV-7 EVO2 diagram as an example.
Basic operation for another TUSA underwater scooters are same as the SAV-7 EVO2.
23
18
■ Scooter saddle
● Handle
The Grips on either side of your scooter can be used for take off,
stopping and turns. The Grips should NOT be used for carrying the
scooter on land. To carry vehicle on land, grasp both saddle handles
or with one hand grasp handle bar of Single Hand Unit (see below).
● Saddle
To minimize underwater resistance and to allow for effortless under water maneuvering, the scooter is designed to be steered
hands-free. In doing so, the saddle helps to hold the diver in place,
and allows the diver to steer the scooter freely. Even relatively sharp
turns are made possible when riding hands free.
● Accelerator lever
The accelerator lever functions are same way as the gas pedal on
an automobile.
The revolution speed goes up when pushed up, and goes down
as the lever returns to its original position.
● Wing arms
Wing arms are used on the scooter for triple (refer to page 28)
(three-person) rides.
The grips are used to pull the two guest divers. By attaching a
karabiner onto the hole in the wing arms, they can also be used
to carry underwater equipment.
→ To loosen the knobs, the wing arms are pulled out.→
WARNING
● Do not carry the scooter with one
hand when using saddle to transport
vehicle on land.
Grip
Knobs
Grasp saddle handles with
both hands and lift vehicle
to carry on land.
● Verify that prop cover stay is firmly
in place and single hand unit properly
installed before attempting to
lift vehicle by handle bar.
■ Hands-free riding. (PATENTED)
Hands-free riding is a new riding style in which the diver uses one's body instead of one's hands to steer
the scooter.
This frees up the diver's hands. Different from past scooters that were steered using both hands, the diver steers
the scooter using one's entire body. This greatly reduces the amount of physical strain put on the diver.
It allows for "long-distance travel" and "extended diving time", enabling the diver to explore greater distances and
diving environments that may have been impossible in the past.
There are great benefits to being able to drive hands-free.
Scooters that need to be steered by hand end up becoming like a piece of baggage itself underwater.
Divers who thought, "Using a scooter keeps me from being able to carry anything else underwater", will now be free
to take what ever they want on their dive.
Because different items of underwater equipment can be attached to the scooter using the wing arms, the carrying
capabilities are vastly improved.
● Long-distance travel is made possible.
The SAV-7 EVO2 can travel underwater distances of around 7,200 meters when a Li-ion battery is used.
Since it takes over 110min to cover 7,200 meters when traveling nonstop, a diver can easily travel continuously
over the time span of a regular single dive. For leisure diving, in which the diver uses the scooter only to travel
between certain diving spots, it can easily run for two dives.
CAUTION
● Battery duration may vary depending on how it has been stored or used. Do not use a battery that is old or
damaged on outside, as its power could suddenly drop, or it could have an extremely short running time.
24
19
1. Positioning for hands-free riding
The diver positions the scooter between the legs so the scooters propeller shaft and the axis of the diver's body are
lined up.
As the scooter moves forward, the body will naturally be pushed from behind.
The diver does not need to grip or force oneself to sit on the scooter.
Just wait as the scooter will naturally push the body.
Good posture:
Pushed by the scooter.
Bad posture:
The diver and the scooter will not be able to move as one,
which will throw the diver off balance and prevent a
smooth takeoff.
2. Stopping
The point to be cautious of when stopping is adjusting your balance when there is no longer any forward-moving
force. Without momentum, the diver's body will become unsteady. You must adjust and attain your balance. If there
is no place to land, you may need to adjust your buoyancy.
■ Landing
① Stop the propeller by lowering the accelerator lever.
② Using the same hand that moved the accelerator lever, take hold of the grip on the saddle unit.
Hold the scooter with your hand and also grip it between your knees.
SPEED
MIN
Push accelerator lever down
Hold the scooter with your hand
Grip the scooter between your knees
WARNING
● In the case of dry suit diving, please pay attention of air volume in the suits.
It is possible to blow the air from the suit or sudden surfacing.
Please put the air in the suit shorter than usual for diving with the scooter.
③ After the scooter stops, and while maintaining left
and right balance, allow the weight of the scooter
to move the body to an upright position.
Land on the ground in a standing position.
Once the feet touch the ground
25
20
Remove the scooter
■ Moving to hovering mode.
① Reduce speed by shifting the accelerator lever to the low-speed position.
② Once the speed is reduced and the weight of the scooter can be felt, adjust buoyancy.
SPEED
4~5
Turn to Pitch 4 or 5
Adjust buoyancy
Turn to minimum speed
③ Using the same hand that moved the accelerator lever, take hold of the grip on the saddle unit. Hold the
scooter with your hand and also grip it between your knees.
Hold the scooter with your hand
Grip the scooter between your knees
④ After the scooter stops, maintain left and right balance and go into hovering mode.
Do this by adjusting buoyancy once again while allowing the weight of the scooter to bring the body into an
upright position.
Rise with scooter's weight
Adjust buoyancy
Bring the body into an upright position
Repeating steps 1 and 2 will reduce the amount of buoyancy shift that occurs at the point in which the scooter
reaches a complete stop, making for easier maneuvering.
2621
3. Take off
● Learning to be pushed by the scooter.
The key to successful takeoff is to learn to be pushed by the scooter. If the diver is too eager to move forward,
the diver and the scooter will not be able to move as one, which will throw the diver off balance and prevent
a smooth takeoff.
● Counter balancing the rotation torque.
Right after takeoff, the diver will feel the scooter rotate in a counterclockwise motion relative its forward movement.
This is due to the rotation torque of the propeller. As a way of countering this movement, the diver can twist one's
upper body to the right. Another simple technique is for the diver to imagine taking off in the direction of "11:00
(forward to the left)". This will naturally twist the diver's body to the right, which will reduce the effect of the rotation
torque. Once a stable forward motion is achieved, the rotation torque will become weaker.
● Preventing sand disturbance.
The water current caused by the propeller is more far-reaching than one might imagine. At take off, the diver
must be aware of what is behind the diver, so as not to hit other divers with a slipstream coming from the propeller.
Taking off from a landing position will disturb the sand underneath. Kick to move slightly off the seabed and
sufficiently tilt forward before turning on the propeller.
■ Taking off from a landing position.
① Hold the scooter in an upright position on the seabed.
② Approach the scooter from behind, and position the body above the saddle of the accelerator unit.
Upright position
Approach the scooter
③ Pull the scooter up to a riding position by taking hold of the handle of the saddle unit.
④ Firmly grip with the knees to hold the scooter.
Up to a riding position
Grip with the knees to hold the scooter
⑤ From there, lean forward, and kick off the seabed in order to avoid disturbing the sand.
Taking off from a landing position will disturb the
sand underneath.
Kick to move slightly off the seabed and sufficiently
tilt forward before turning on the propeller.
Lean forward
Kick off the seabed
⑥ After moving away from the seabed with the entire body tilted forward to around a 45-degree angle, pull the
accelerator lever for takeoff.
SPEED
27
22
4~6
■ Taking off from a hovering position.
① Take hold of the accelerator unit and bring the scooter directly below the body.
② Pull the scooter up to a riding position.
Bring the scooter directly below the body
Pull the scooter up
③ Start the scooter at slow-speed by pulling the accelerator lever slightly.
The scooter itself will move toward the body, eliminating any sense of instability.
Be careful not to be pushed suddenly upward by the scooter.
Be careful not to be
pushed suddenly upward!
SPEED
4~6
Start the scooter at slow-speed
④ While adjusting the body to reach a horizontal position, gradually build up speed and take off.
⑤ Once stabilized, the key is to make your buoyancy slightly negative, or to descend in the water to
create negative buoyancy.
The body to reach a horizontal position
Create negative buoyancy
28
23
Riding
■ Surface riding
Riding at the water's surface is also possible with the scooter. By wearing equipment designed for skin
diving (mask, snorkel, and fins, and appropriate amount of weight on the hips), the diver can easily move around
the water's surface.
Normal riding
Back riding
Head first riding
Pay attention of
equalizing ears !
■ Slow speed riding (propeller pitch = 2 or 3 ; accelerator position = 4 - 6)
● The power generated
by the scooter
● The force of positive buoyancy
Direction
● Diver's negative buoyancy
Upturn
When riding at slow-speed, it is necessary to
adjust your buoyancy slightly using a buoyancy
compensator (B.C.).
In doing so, the diver's legs will sink due to the
weight of the scooter, making the upper body rises
up slightly.
In order to balance out the upward force caused
by the lowering of the scooter and the diver's
negative buoyancy, the revolution speed of the
propeller and the angle of the scooter must be
adjusted.
Speed up
Making turns using the body to help steer is not as effective when riding at low-speed.
To make a left or right turn, lean the upper body while in an up upright angle / position in the direction of the turn,
and the scooter itself will begin to move in that direction.
29
24
■ Normal-speed riding (propeller pitch = 2 ; accelerator position = 6 - MAX)
There is increased stability in the forward motion when riding at a normal speed, and therefore, the scooter will not
sink even when there is a certain level of negative buoyancy.
Because the diver's entire body is being hit with an appropriate amount of water current, using the body as a rudder
for steering and hands as breaks is very effective thus providing a high level of freedom in underwater movement.
Therefore, when riding in an area where water depths vary,
buoyancy that is perfectly neutral can actually prove to be
a hindrance. However, in traveling long distances through
water with constant depth, it is better to attain neutral
buoyancy, since this will improve battery efficiency and
make it easier for the diver to stay underwater.
Please refer to Page 31
for more explanation
Under normal speed, the diver can make left or right turns easily by
using the body as a rudder for steering and the hands as breaks.
The diver must try to maintain directional control while moving forward
by bending your body at the waist towards the target or direction
you intend to travel.
■ High-speed riding (propeller pitch = 1 or 2 ; accelerator position = MAX)
Similarly, in high-speed riding, having slightly negative buoyancy will make it easier to maintain control.
Riding form is very important for high-speed riding.
The diver should be aware of the surrounding water current, and keep the frontal body area as low profile as
possible. Also, the diver should try to reduce drag and may obtain increased speed by holding one fist out in front
of the body.
SPEED
MAX
Good posture of high-speed riding
At high speed, the difference between Pitch 1 and Pitch 2 is very subtle.
At Pitch 1, the maximum level of efficiency cannot be achieved unless the divers equipment is low profile and body
posture is good.
The turning radius becomes larger at high speed, and therefore the diver must be careful of obstacles.
30
25
Turning
Steering with your body. (Using your upper body as a rudder)
The diver's entire body, from the top of one's head to the tips of one's fins, is used as a rudder. It is especially effective to
use the upper body, as you will be propelled in the direction to which your body is bent.
■ Open turn
The diver arches one's body back while thrusting one's chest forward.
The scooter will curve toward the diver's back in a large
circular motion.
With open turns the diver feels safe because the diver is able to see
where the diver is going while turning.
■ Closed turn
The diver bends forward at one's stomach. This allows for a sharp turn.
However, it is difficult for the diver to see where the diver is going,
or judge the depth of water.
This turn is also used to go into a drift mode.
■ Compulsive turn
Turn with holding the grip and move the scooter by grip compulsively for
adjustment of turn.
This way makes smoother like car driving during turn.
■ Hand brake
The diver creates resistance on either side of the diver by "holding the palm of a hand against the water current",
or "holding an arm away from the body".
This will reduce the speed on the side that the resistance is created, causing the scooter to veer toward that direction.
This technique is used to make slight adjustments in the direction to which the scooter is already moving.
Holding on arm away from the body
Open both arms for reduce the speed
31
26
Advanced operations
■ Drifting
A resistant brake using the diver's upper body
in the same manner as with a closed turn
Running at high speed
Gradually adjusts the position ...
The diver enters a turning point without slowing down and
applies a resistant brake using one's upper body in the same
manner as with a closed turn. Once the diver's head is turned to
the desired direction, the diver slowly extends one's body
and gradually adjusts the position of the scooter to face that direction.
When doing this, the diver should slide one's upper body sideways to
gradually move toward the traveling direction.
Because this technique allows the diver to determine which way the diver
is going soon after entering a turn, it is useful for situations in which the diver
suddenly sees a target to aim toward.
■ Hairpin
This is a technique in which the accelerator is briefly shut off before or during a turn, allowing the diver to drastically
reduce the radius of a turn.
It is used when the diver needs to change directions on the spot, much like making a flip turn in swimming.
In the same manner as making a closed turn, the diver turns one's body at a slight angle and applies the brakes
using upper body resistance.
Once the body begins turning, the accelerator is shut off, reducing the propulsive force of the scooter to zero for a time.
While using the momentum to change the direction of the scooter, the diver shifts one's upper body to face the
desired direction and then stretches one's body in that direction. After the scooter has
changed directions, the diver switches the accelerator back on to start up again.
SPEED
MIN
Using the momentum to change
the direction of the scooter
SPEED
3227
UP
Advanced operations
■ Tandem (two-persons ride)
The pilot diver boards the scooter at the regular position. The guest diver takes hold of the grip located on the
backside of the scooter.
In doing so, it is not necessary to hold on tightly. It is enough to hook on a few fingers. If the guest diver holds the
grip too tightly, he will constrain the movement of the scooter, making it difficult for the pilot diver to steer.
Hold of the grip located on the backside of the scooter
Grip
■ Triple (three-persons ride)
The pilot diver boards the scooter at the regular position. The two guest divers open and grip the wing arms of the
saddle.
The guest divers should position themselves underneath and horizontal to the pilot diver.
This will stabilize the overall movement. As for left and right positioning, the guest divers should try to stay in the
water current created by the pilot diver. Such positioning will keep the propulsion resistance from increasing
drastically, allowing for faster travel.
Wing arm
Grip the wing arms
■ Train (riding with four or more persons)
Four or more persons can ride together by linking up vertically like a train. The pilot diver starts the scooter at low
speed. The first guest diver takes hold of the pilot diver's ankles. As soon as the first guest diver attaches oneself, the
pilot diver increases the speed to stabilize the overall balance.
When the pilot diver pulls the accelerator, the scooter will not speed up right away.
While waiting for the speed to increase, the third and forth divers take hold of ankles of the diver in front of them.
The scooter has enough power to pull five to six persons, but having that many will make certain maneuvers such as
turning difficult. It will obviously slow the speed down, and making sharp turns will be impossible.
Riding with many divers should be seen not as a mode of transportation, but as a form of recreation.
Hold both ankles of the front diver
2833
Advanced operations (Carrying)
The wing arms of the scooter are used to carry underwater equipment.
The diver opens both the left and right wing arms of the accelerator unit.
Karabiners attached to any equipment you want to carry are hooked onto the holes in the wing arms.
■ Distribution of underwater weight
As a general rule, the underwater weight of equipment that is attached to the wing arms should be evenly
balanced between the left and right sides.
When it is not possible to distribute the weight evenly, it is best to attach the load that is slightly heavier onto the
right wing arm, since the rotation torque turns toward the left (counterclockwise) relative to the direction in which
the scooter is traveling.
■ Underwater resistance
The diver must take into consideration not only the underwater weight of an object being towed, but also the
underwater resistance.
When an object that causes great resistance is towed underwater and is attached to just one side of the scooter,
it could throw the scooter off balance when moving forward.
WARNING
● Equipment that could get caught in the propeller is not suitable for carrying.
● Practice keeping attached equipment as close as possible to the scooter body otherwise your ability to turn and
take off effectively may be reduced.
● The wing arms are designed to sustain underwater weight. Equipment that is able to be carried underwater
could damage the wing arms if it is brought on land while still attached. Therefore, remove the equipment from
the wing arms before bringing the scooter out of the water.
Wing arm
Karabiners are useful.
Carrying
Those ways are just one of idea for riding the scooter.
We hope you create a new idea of riding the scooter.
There are more idea of riding way unlimitedly.
34
29
TUSA (TABATA USA, INC.)
2380 Mira Mar Ave., Long Beach, CA 90815, U.S.A.
Toll Free: 800-482-2282 T: 562-498-3708 F: 562-498-1390 (Country Code: 1)
[email protected]
TABATA CO., LTD. JAPAN
1-3-17 Higashikomagata, Sumida-ku, Tokyo, Japan 130-0005
T: 03-3624-2816 F: 03-3623-9902 (Country Code: 81)
www.tabata.jp
TABATA MFG. JAPAN (IBARAKI FACTORY)
651-2 Industrial Park, Hitachiomiya City, Ibaraki, Japan 319-2134
T: 0295-53-3133 (Country Code: 81)
TABATA AUSTRALIA PTY. LTD.
4D James Ruse Business Park, 6 Boundary Road, Northmead, NSW 2152
T: (0)2-9890-4555 F: (0)2-9890-5222 (Country Code: 61)
T.E.C. (TABATA EUROPE CORPORATION) B.V.
Den Brielstraat 2b, 1055 RV, Amsterdam, The Netherlands
T: 020-58-11-280 F: 020-58-11-285 (Country Code: 31)
TABATA MFG. (TAIWAN) CO., LTD.
54-8 Hsutsogang, Nankang Vil., Tayuan Hsiang, Tao Yuan Hsien, Taiwan R.O.C.
T: 03-386-5100 F: 03-386-5103 (Country Code: 886)
tusa.com
3954500002