1
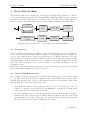
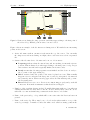
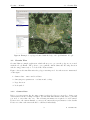
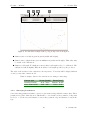
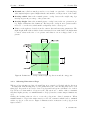
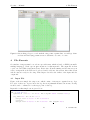
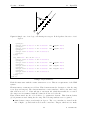
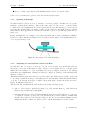
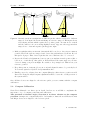
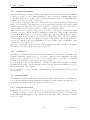
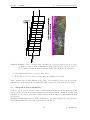
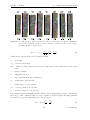
Geoniss Manual January 2013 Initial release © Kanardia d.o.o. Geoniss manual SVN revision 3503 Geoniss — Manual Contact Information Publisher and producer: Kanardia d.o.o. Ulica heroja Rojška 70 SI-3000 Slovenia Email: [email protected] A lot of useful and recent information can be also found on the Internet. See http://www. kanardia.eu for more details. Copyright This document is published under the Creative Commons, Attribution-ShareAlike 3.0 Unported licence. Full license is available on http://creativecommons.org/licenses/by-sa/ 3.0/legalcode web page and a bit more human readable summary is given on http: //creativecommons.org/licenses/by-sa/3.0/. In short, the licens gives you right to copy, reproduce and modify this document if: you cite Kanardia d.o.o. as the author of the original work. you distribute the resulting work only under the same or similar license to this one. This document refers to the Google Earth software in several places. Google Earth software is courtesy of Google, ©Google 2012. Credits Special credits are given to Aerovizija represented by Mr. Matevž Lenarčič, who came up with the original idea of extending Nesis with a movable platfrom, to 2B Geoinformatika represented by Mr. Andrej Bilc, who passed a lot of his geodetic knowledge to us and gave many suggestions and requests for improvements and to Geodetska družba represented by Mr. Marjan Kotar who gave the initial finantial contribution to the Geoniss project. Revision History The following table shows the revision history of this document. All older versions of the document can be found on the Internet. Revision 1.0 Date 1 January 2013 Description Initial release Document File GeonissManual-100.pdf The documents can be downloaded from: http://www.kanardia.eu © Kanardia 2013 Geoniss — Manual CONTENTS Contents 1 Introduction 2 2 Work With the Nesis 2.1 Preparation . . . . . . . . . . . . . . . . . . . . . . . . . . . . . . . . . . . . . 3 3 2.2 Before Takeoff Operations . . . . . . . . . . . . . . . . . . . . . . . . . . . . . 3 2.3 Flight Operations . . . . . . . . . . . . . . . . . . . . . . . . . . . . . . . . . . 4 2.4 Shooting Leg Points . . . . . . . . . . . . . . . . . . . . . . . . . . . . . . . . 2.4.1 Approaching Stage . . . . . . . . . . . . . . . . . . . . . . . . . . . . . 6 6 2.4.2 Shooting Stage . . . . . . . . . . . . . . . . . . . . . . . . . . . . . . . 7 After Landing Operations . . . . . . . . . . . . . . . . . . . . . . . . . . . . . 7 2.5.1 7 2.5 Combining Pictures into a Plan . . . . . . . . . . . . . . . . . . . . . . 3 Using Geoniss Plan 8 3.1 Defining a Survey Polygon in Google Earth . . . . . . . . . . . . . . . . . . . 8 3.2 Transferring the Polygon into Geoniss Plan . . . . . . . . . . . . . . . . . . . 8 3.3 Geoniss Plan . . . . . . . . . . . . . . . . . . . . . . . . . . . . . . . . . . . . 3.3.1 Camera Data . . . . . . . . . . . . . . . . . . . . . . . . . . . . . . . . 9 9 3.3.2 Surveying Parameters . . . . . . . . . . . . . . . . . . . . . . . . . . . 10 3.3.3 3.3.4 Selecting Direction of Legs . . . . . . . . . . . . . . . . . . . . . . . . Creating the GML Output . . . . . . . . . . . . . . . . . . . . . . . . 11 12 4 File Formats 13 4.1 Input File . . . . . . . . . . . . . . . . . . . . . . . . . . . . . . . . . . . . . . 13 4.2 Output File . . . . . . . . . . . . . . . . . . . . . . . . . . . . . . . . . . . . . 16 5 Installation & Calibration 5.1 17 Aircraft Installation . . . . . . . . . . . . . . . . . . . . . . . . . . . . . . . . 17 5.1.1 5.1.2 Opening in Fuselage . . . . . . . . . . . . . . . . . . . . . . . . . . . . Adjusting for the Reference Pitch and Roll . . . . . . . . . . . . . . . 18 18 Compass Calibration . . . . . . . . . . . . . . . . . . . . . . . . . . . . . . . . 19 5.2.1 Position in Airplane . . . . . . . . . . . . . . . . . . . . . . . . . . . . 20 5.2.2 Calibration . . . . . . . . . . . . . . . . . . . . . . . . . . . . . . . . . Geoniss Offset . . . . . . . . . . . . . . . . . . . . . . . . . . . . . . . . . . . . 20 20 5.3.1 Preparing Test Legs . . . . . . . . . . . . . . . . . . . . . . . . . . . . 20 5.4 Assembling Photos of Individual Leg . . . . . . . . . . . . . . . . . . . . . . . 21 5.5 5.6 Airspeed & Pitch Sensitivity . . . . . . . . . . . . . . . . . . . . . . . . . . . . Mass Correction . . . . . . . . . . . . . . . . . . . . . . . . . . . . . . . . . . 22 24 5.2 5.3 1 © Kanardia 2013 Geoniss — Manual 1 1. Introduction Introduction This manual provides information about the Geoniss device, which is an extension of the Nesis system. We begin with two sections, which describe how to work with the Geoniss. A workflow from surveying area preparation up to getting shooting results are explained. A very important step, which explains how to get a final geodetic product from the pictures and shooting results is just briefly mentioned and you should contact geodetic firms or geodetic professionals about the details. Next section describes the file format represented by the gml extension in details. This is important to understand, since the geodetic firms will need to extract the information from this files and they may even prepare surveying areas in their own software for you. Installation section comes at the end. Here detailed installation requirements are given and calibration procedure is explained. Please do not underestimate the installation efforts, especially installation and calibration of electronic compass. It is important to emphasize, that the precision of the complete system is governed by the precision of the electronic compass (Magu). Geoniss system consists of a set of complex electronic devices: Nesis is used for the user interface and serves as main computer. Magu is electronic compass and used to obtain correct heading. Geoniss is name for a moving platform, which is used to put camera into correct heading. In most cases, Daqu (engine monitoring box) is also present, but it is not interested from surveying perspective. All these devices must work closely together and you need to know how to use them. Thus we strongly recommend you to carefully read this manual. Trough the manual we assume that you are familiar with the Nesis user interface system. Therefore, we recommend to read the Nesis User’s Manual, before you proceed with this one. Picture on the Front Page Picture on the front page shows Geoniss platform with the Hasselblad 50 MP camera installed. This camera is not a part of the system and must be purchased separately. Other cameras types may be used as well – Geoniss supports most medium and small formats cameras. It is important that you contact your airplane producer and your aviation authorities before purchasing the Geoniss system. You need to discuss your idea with them and make sure that changes needed on aircraft are feasible and supported by the producer and allowed by your legislation. You also need to verify if the authorities will allow you to do the aerial work with your aircraft and Geoniss on board. Unless you are an geodetic organization, you should also contact one or two such firms, your potential clients, about compatibility of Geoniss system with their system, their software and any problems that can arise from here. 2 © Kanardia 2013 Geoniss — Manual 2 2. Work With the Nesis Work With the Nesis Work with Geoniss can be divided into several steps, starting with preparation of the surveying area, transferring this area into Nesis, making a flight and taking pictures, retrieving information about the pictures (position, altitude, time, etc.) and post-processing this information together with actual pictures in the camera. Figure 1 illustrates typical workflow. Google Earth Geoniss Plan Input File *.gml Text file Before flight Copy to Nesis Internal file *.gss Binary file Third party SW Postprocess Combine pictures and output file Output file *-out.gss Text file Land Copy to USB Fly Shoot the points Figure 1: Typical workflow for one shooting session and file transition. 2.1 Preparation Before each flight, a surveying area must be defined and prepared in a proper form. This can be done in several ways and using different software tools. Kanardia provides a simple tool Geoniss Plan, which is able to import polygons from Google Earth application, but other custom designed tools may be used as well. The result of the preparation is an xml based file with typical gml extension. This file stores coordinates of the points organized into several legs, where pictures should be shoot. The file must be copied into an USB key onto the orthophoto folder. Description of the input format is given in its own section starting on page 13 and work with the Geoniss Plan is explained in section 3 on page 8. 2.2 Before Takeoff Operations Before taking off, survey area (in form of points organized in legs) stored in a gml file must be copied into Nesis. Nesis reads the orthophoto folder of the USB key and searches for files with the gml extension. One or more of these files are then selected and transfered into Nesis internal flash drive. This is the typical procedure: 1. Start Nesis and switch to the Geoniss page. If you do not see Geoniss page, rotate top left knob to switch to the modern view, press OK/Menu (bottom knob), select the View button and then select Geoniss from the list. 2. Press the OK/Menu button to show the menu and then press the Open button. A list of available files will be shown in a new window. First, files that are already on the Nesis internal flash drive are listed. They have gss extension. Files from the USB stick with the gml extension follow. Figure 2 illustrates an example. 3 © Kanardia 2013 Geoniss — Manual 2.3 Flight Operations 3. Select a file from the dialog. In most cases, a file with gml extension from USB stick will be selected. In this case the selected file from USB key will be transferred into a binary form and stored using the same name but different extension (.gss) in Nesis internal flash drive. Any existing file with the same name in Nesis flash drive will be overwritten without a warning. When you select a file with gss extension, an internal file gets loaded. You do not need an USB stick for this, since the file was already transfered in the past. This is typically used in cases, where you need to continue an unfinished session or when you need to repeat some missed shoots later on. 4. Repeat steps 2-3 to transfer as many gml files from USB stick into Nesis as you wish. 5. After the last file was transfered, it is save to remove USB stick. All operations during the flight will be recorded into internal binary file and USB stick is not needed. Figure 2: An example of the file open dialog for Geoniss files. First, files from internal flash drive are listed (gss extension) and files found on the USB stick follow (gml extension). Selected file becomes immediately active and any previously active file is deactivated. This means that the last opened (transfered) file is also the active one. All this operations are also possible during flight. There is no need to remove USB stick from Nesis, but you will find manipulating Nesis much easier with the USB stick removed. Each time Nesis is started or restarted, the last selected file automatically becomes active. You can deactivate it by issuing the File|Deactivate command. 2.3 Flight Operations Once correct Geoniss file is active and with Geoniss page selected on the screen, you need to select active shooting leg. Each file may consist of many legs. Nesis displays only three shooting legs at time: previous, active and next. All other legs are not visible. Switching between legs is quick. When menu buttons are not visible on the screen, press the OK/Menu button first. Then keep pressing Previous or Next buttons until the required leg becomes active. When you work on a large area with many legs, it is wise to plan a sequence of legs and record this sequence on a peace of paper. This will help you to choose right leg during the flight. 4 © Kanardia 2013 Geoniss — Manual 2.3 Flight Operations Figure 3: Nesis screen during shooting operation. Aircraft is approaching to the first point of the selected leg. Marked point is active, but not locked. Figure 3 shows an example of the Geoniss screen during action. We marked some interesting points on the screen. 1. Active file name without extension is shown in the top left corner. You can make shootings at several areas during one flight, where each area is stored in a separated file. 2. Status of the Geoniss device. Geoniss can be in one of four states. Preparing indicates that Geoniss is busy and is searching for internal reference position. This is always done when approaching to the first point of a leg. Preparation takes some time and is typically finished in 15-20 seconds. Ready means that Geoniss preparation was finished and the device is ready to shoot points on the approaching leg. Idle is activated after the points of the active leg has lost focus. This normally happens a few seconds after the last point of active leg was passed. Geoniss sets into neutral position. When a new leg approaches, Geoniss wakes up and goes into the Preparing state. Error indicates a severe error. Device is not functioning properly and you should contact us. In normal circumstances, this should never happen. 3. Number of shoots taken (picture index). Normally this starts with zero, but when an existing internal file is loaded where some shoots were already made, these shoots are taken into account and numbering continues from the last recorded value. 4. Name of the previous leg – a leg, which will become active after the Previous button is pressed. 5. Name of the active leg. There may be two colored circles with a number on top of the active leg rectangle. A number besides the white circle tells how many points in the 5 © Kanardia 2013 Geoniss — Manual 2.4 Shooting Leg Points legs still need to be shoot (were never shoot before). A number besides red circle tells how many points were missed and you need to consider to repeat the shooting of this leg. 6. Name of the next leg – a leg, which will become active after the Next button is pressed. There are more items on this screen denoted by letters A-C. They are covered in the next section. 2.4 Shooting Leg Points The fun part of the operation is taking the pictures (shooting points) of the selected leg. This consists of two stages: approaching stage and shooting stage. 2.4.1 Approaching Stage During the approach stage you are approaching to the first point on the active leg. This point can be on either side of the leg, which means that shooting can be made in both directions. Usually you will approach to the first point from a distance, which must be large enough to give Geoniss enough time for the preparation state (15-20 seconds) and more importantly, to allow you to get aligned to the leg direction. The alignment is essential for successful shooting stage. This requires some skill and training. Closer you are to the first point, more aligned you should be. From figure 3 you see that you need to align three lines: A Line at your position shows the shooting direction of the selected leg. B Line of the selected leg. This line is always parallel to the previously mentioned line. The perpendicular distance between lines indicates your offset from the ideal line. In ideal case, both lines overlap. C Guide line is also important, since it gives you a reference for the correct track. You can have lines A and B perfectly overlapped (for a short moment), but your track is still wrong and you need to correct it. In the illustrated example on page 5, it is evident that current position A is right of the ideal line B. Intersection of lines B and C gives you a virtual point, where the aircraft position will be on ideal line, if persits in this direction. Slightly before this point is reached, aircraft must turn left to correct the angle between lines B and C. As soon as first point of the leg is identified by Nesis (the first point enters into the search radius and you are approaching from reasonable direction), Geoniss switches into the preparing state. Please note that this takes about 15-20 seconds. This implies a minimal distance for a new leg. Normally, you will need more than 20 seconds to get well aligned, so this is not a serious limitation. 6 © Kanardia 2013 Geoniss — Manual 2.4.2 2.5 After Landing Operations Shooting Stage Shooting stage starts when you are close enough to the active point and it it becomes locked. Shooting stops after the last point in the leg was passed. The locked point is illustrated by a thick circle around the point. It is of most importance to keep your airplane level in both roll and pitch during this stage. Geoniss is able to correct for the wind induced angle, but not for the roll neither for pitch. Numbers beside white and red dots are changing during the shooting stage. In ideal case you will end with no white and no red dots above the active line. This tells you that all points were shoot within the limits. Important: this does not tell you that roll and pitch were correct – it is possible to shoot at perfect position with completely wrong roll. 2.5 After Landing Operations Once all the points in the area were shoot and you are satisfied with the results, you can copy the recordings made in Nesis to an USB key. Remember, the internal data format used by Nesis is a binary format optimized for speed. This format is not appropriate for postprocessing. So Nesis will save this result back in more versile XML form (with the gml extension). 1. Insert USB key into Nesis. 2. Select the Geoniss screen and press the OK/Menu button. 3. Press the File and then To XML buttons. This creates the final (output) file on the orthophoto folder on your USB key. The name of the file is extended with the -out to preserve the original (input) files intact. For example, if the input file was Celje.gml, then the internal working file is Celje.gss and the final output file will be Celje-out.gml. Note that final output file can be also used as an input file. Nesis will also import all shooting point results. This may be usefull in cases where you need to make an additional flight on existing points (maybe some points were missed or pictures are not clear. . . ). If Celje-out.gml is given in input, Celje-out-out.gml is on the output. 2.5.1 Combining Pictures into a Plan Taking aerial pictures (shooting points) is just one half of the story. Combining the pictures into detailed and precise plan is the other half. There are many different ways to get this second half done, but in any case you need a geodetic firm or a professional to make the final processing. This involves detailed knowledge about geodetic science (geodesy) and knowledge about various special softwares used during this process. It is beyond this manual to cover this topic and you are urged to contact one such geodetic firm or professional for further details. 7 © Kanardia 2013 Geoniss — Manual 3 3. Using Geoniss Plan Using Geoniss Plan Input gml file, which is needed by Nesis and defines shooting points, can be prepared using Google Earth1 and Geoniss Plan applications. Google Earth is used to define a survey polygon. The polygon is then exported (using copy/paste) into Geoniss Plan, where it is further processed. 3.1 Defining a Survey Polygon in Google Earth Please refer to the Google Earth Manual for any details about this application. Here we will define only the minimal steps, which are needed to obtain a survey polygon. 1. Start the application and zoom to the area of the interest. 2. Use the Add|Polygon command to start defining a polygon. 3. Insert or move the polygon points until the complete surveying area is covered. 4. Once the polygon is complete, you may want to change settings in the Style, Color tab. Experiment with the values. We recommend values around 40% for the Area Opacity. The settings have visual effects only, and zero effects on Geoniss Plan. 5. Set a name for the polygon and press OK to make it complete. 6. You may organize the polygons in a tree structure, for your convenience. Figure 4 shows an example of surveying area enclosed by a polygon. In one of buildings shown on the figure Nesis and Geoniss were made. 3.2 Transferring the Polygon into Geoniss Plan Transferring to Geoniss Plain is trivial and is described in next steps. 1. Start both applications (Google Earth and Geoniss Plan) if not already started. Switch to Google Earth. 2. In Places tree select the polygon you have created and press the right mouse button. 3. In a drop down menu, select the Copy command. This command copies polygon in KML format onto the clipboard. 4. Switch to Geoniss Plan and select the Edit|Paste command. This command will take the data from clipboard and parse it to show the polygon points. The polygon stored in KML format has many attributes. All of them are ignored and only the Document|Placemark|Polygon|outerBoundaryIs|LinearRing|coordinates is used.2 1 2 You may consider to obtain the Google Earth Pro for the enhanced precision and other features that may help you. Pro version is not required for the work with Geoniss. You may take a look at one of the KML data. Since this is pure text data, you can use any text editor to view it. Open the editor, simply paste the data and study its content. 8 © Kanardia 2013 Geoniss — Manual 3.3 Geoniss Plan Figure 4: Example of a polygon defined with the help of Google Earth, © Google. 3.3 Geoniss Plan Geoniss Plan is a simple application, which allows you to process the polygon you created with the Google Earth. The goal is to get a gml file, which defines the shooting direction and shooting points ready to be loaded into Nesis software. Figure 5 shows Geoniss Plan after the polygon was imported. Several areas are enumerated on the figure. 1. Camera data – sensor and focal data. 2. Surveying area parameters – resolution and overlap. 3. Legs direction. 4. Lock symbol. 3.3.1 Camera Data Before you can generate the shooting points for selected polygon, you need to define your camera and select the working resolution. Geoniss Plan will remember this data, so generally you need to enter this only once. The following information is required for each camera. Please refer to the camera manual or contact your camera sales representative for the details. Please note that each camera should be calibrated individualy. 9 © Kanardia 2013 Geoniss — Manual 3.3 Geoniss Plan Figure 5: Geoniss Plan example with a polygon imported from figure 4. Camera sensor resolution given in pixels (width and height). Camera sensor physical size given in millimeters (width and height). This value may be result of the calibration. Camera focal length. For highest accuracy, this focal length needs to be calibrated. The calibrated result is slightly different from the focal length specified by the producer. The table 1 shows data for the cameras we use in practice. Your data will be sligtly different even if you use same camera model. Table 1: Sample data for the cameras we are using for surveying. Camera type Hasselblad 50 MP Nikon D800 36 MP 3.3.2 Sensor [pixels] 8176 x 6132 7360 x 4912 Sensor [mm] 49.056 x 36.792 35.93 x 23.98 Surveying Parameters Some surveying parameters must be given for each session along with the camera data. These parameters together define the area, which will be covered with one shot, number of all points needed to cover the area and distance between the points in a leg and distance between the legs. 10 © Kanardia 2013 Geoniss — Manual 3.3 Geoniss Plan Ground res. tells how much ground is covered with one pixel side. Selecting large value implies higher required flight altitude and smaller overall precision of the result. Overlap width defines the nominal picture overlap between the neighboring legs. Overlap is given in percentage of the picture size. Overlap height defines the nominal picture overlap between the two pictures in one leg. Figure 6 illustrates the definitions. The larger the overlap is, more pictures will be needed to cover the area, while small overlaps may lead to white spots. Values on the right are derived from the camera data and surveying parameters. The flight height AGL tells at which elevation measured from earth surface the flight must be made, what is the size of one picture and what is a non-overlapped size of one picture. Figure 6: Definitions of overlap, width, height, leg direction and shooting point. 3.3.3 Selecting Direction of Legs When a polygon is imported into Geoniss Plan, it is oriented for North-South leg direction – heading 360. This heading may be suboptimal and some other heading may lead to less flying legs. In general, it is better to have long legs and less legs in total than a lot of short legs. Please note that number of legs is not the only criterion to consider. Other constraints may have higher priority over minimal number of legs (obstacles, terrain, airspace limitations, etc.) Change the heading value in order to rotate the polygon into desired orientation. When minimal number of legs is the main criterion, select an orientation which leads to minimal width of polygon on the screen. Figure 7 illustrates such orientation for the polygon from figures 4 and 5. 11 © Kanardia 2013 Geoniss — Manual 3.3 Geoniss Plan Figure 7: Orientation of the polygon, which leads to minimal number of legs to be flown. Selected heading is 99. The opposite heading yields the same results. 3.3.4 Creating the GML Output Once the leg direction is selected, we can generate the shooting points. To do this, the headign must be locked by pressing the Lock button on the toolbar or by selecting the Edit|Lock command. When locked, heading can not be changed anymore. To cover the locked polygon with the shooting points organized in legs, select the Edit|Auto cover command. For our polygon, this gives a situation presented on figure 8. Geoniss Plan assumes that all legs will be parallel. Based on this, it calculates bounding rectangle from the given polygon and covers the resulting polygon with shooting points. All points whose areas fall completely outside the polygon, are not selected as shooting points. Once the polygon area is covered with points, save the result issuing the File|Save or File|Save As commands. This will produce a file with gml extension, which is ready to be transfered into Nesis. 12 © Kanardia 2013 Geoniss — Manual 4. File Formats Figure 8: Our working polygon covered with shooting points organized into several legs. Camera data and surveying parameters were taken into account, of course. 4 File Formats Geoniss list of targets must be stored in a special format, which is based on XML (extensible markup language). Nesis expects gml extension for this input file. The input file is then copied onto an USB key and inserted into Nesis. Once Nesis is running and Geoniss screen is active, an input file from USB can be selected and loaded into the system. After that, Nesis and Geoniss are ready for shooting. This chapter describes the format of the input and the output file. 4.1 Input File Figure 9 shows a simple shooting scene, which consist of 10 targets organized in two legs. For each of these two legs we know the leg direction (azimuth measured from true North), its label, and coordinates for each target point on the leg. Input file for this simple case is given below: 1 3 5 7 <? xml v e r s i o n=” 1 . 0 ” ?> <s h o o t v e r s i o n=” 2 ”> <p a r a m e t e r s cone=” 45 ” e r r o r=” 20 ” l i n e l e n g t h=” 10000 ” r a d i u s=” 1500 ” /> <l e g name=”L1” d i r e c t i o n=” 3 8 . 5 ”> <t a r g e t l a t=” 4 6 . 2 5 6 8 9 6 ” l o n=” 1 5 . 0 9 5 9 8 2 ”> </ t a r g e t> <t a r g e t l a t=” 4 6 . 2 5 7 2 7 5 ” l o n=” 1 5 . 0 9 6 4 2 6 ” l i n e l e n g t h=” 200 ”> 13 © Kanardia 2013 Geoniss — Manual 4.1 Input File Figure 9: Simple case of two legs, each having five targets. Both legs have direction of 38.5 degrees. 9 11 13 15 </ t a r g e t> <t a r g e t l a t=” 4 6 . 2 5 7 6 6 1 ” l o n=” 1 5 . 0 9 6 8 5 4 ” l i n e l e n g t h=” 200 ”> </ t a r g e t> <t a r g e t l a t=” 4 6 . 2 5 8 0 3 7 ” l o n=” 1 5 . 0 9 7 2 9 3 ” l i n e l e n g t h=” 200 ”> </ t a r g e t> <t a r g e t l a t=” 4 6 . 2 5 8 4 1 6 ” l o n=” 1 5 . 0 9 7 7 3 5 ”> </ t a r g e t> </ l e g> 17 19 21 23 25 27 29 <l e g name=”L2” d i r e c t i o n=” 3 8 . 5 ”> <t a r g e t l a t=” 4 6 . 2 5 9 8 9 6 ” l o n=” 1 5 . 0 9 5 9 8 2 ”> </ t a r g e t> <t a r g e t l a t=” 4 6 . 2 6 0 2 7 5 ” l o n=” 1 5 . 0 9 6 4 2 6 ” l i n e l e n g t h=” 200 ”> </ t a r g e t> <t a r g e t l a t=” 4 6 . 2 6 0 6 6 1 ” l o n=” 1 5 . 0 9 6 8 5 4 ” l i n e l e n g t h=” 200 ”> </ t a r g e t> <t a r g e t l a t=” 4 6 . 2 6 1 0 3 7 ” l o n=” 1 5 . 0 9 7 2 9 3 ” l i n e l e n g t h=” 200 ”> </ t a r g e t> <t a r g e t l a t=” 4 6 . 2 6 1 4 1 6 ” l o n=” 1 5 . 0 9 7 7 3 5 ”> </ t a r g e t> </ l e g> </ s h o o t> Listing 1: Input GML File Each file must start with the <?xml version="1.0"?>. This is a requirement of the XML syntax. Element <shoot version="2"> follows. This element starts the description of the shooting scene (legs and targets). The element must have version attribute. And for the time being, this version is set to 2. Nesis will ignore any input file, which has invalid shoot version. Shooting scene is terminated with the </shoot> at the end of the file. First element inside the shoot block has to be parameters element. This element defines global parameters used during the shooting. The following attributes are recognized: cone defines a target search angle in degrees. The cone centerline is oriented in the line of flight – ground track is used as the center line. Targets, which are not inside 14 © Kanardia 2013 Geoniss — Manual 4.1 Input File this cone, are ignored. radius defines the target search radius in meters from current aircraft position. This works together with the cone parameter. These two parameters help Nesis to build a list of potential targets in the direction of the flight. error is the radius in meters used to define circles around the target points. When a shoot is made within this circle, the circle on the screen appears green, otherwise it appears red. line length given in meters defines length of guide line drawn on the screen (in a scale). The line is drawn in both directions from the active target and helps pilot to find correct azimuth for flying into the target. After the parameters element, any number of leg elements may follow. Legs represent an array of individual targets that need to be shoot within one aircraft pass. In most cases all targets within a leg follow a straight line, however, it is possible to construct legs, which targets follow some shallow curve. Each leg element must have a name attribute and optional direction attribute. name defines a leg name. This name is shown on the screen during flight and it helps pilot to select correct leg for shooting. Only one leg can be active at the time. direction given in degrees defines the shooting direction of the leg. When targets within the leg are all in a straight line, they share the same direction. Shooting of the leg can be made in opposite direction as well. Nesis takes care for this automatically. Several target points are included within one leg element. Each target point must have lat and lon attributes, other attributes are optional. lat defines the target latitude given in decimal degrees. Northern latitudes are positive. lon defines the target longitude given in decimal degrees. Eastern longitudes are positive. line length (optional) is guiding line length in meters. When given, it overrides the length given in parameters element. This comes handy when targets are not in a straight line, but they follow a curve instead. direction (optional) given in degrees defines the shooting direction of the target. When given, it overrides the direction specified by the leg element. This comes handy when targets are not in a straight line, but they follow a curve instead. In this case, each target will typically have slightly different direction. Like in a straight case, Nesis takes care for the opposite direction as well and flight can be made from either side. This completes the description of the file input format. 15 © Kanardia 2013 Geoniss — Manual 4.2 4.2 Output File Output File On the output, the format is identical to the input format with some extension for the target element. Each target element gets one or more result elements. An example is given below. In this example, the target was shoot twice. 2 4 6 8 10 <t a r g e t l a t=” 4 6 . 2 5 6 8 9 3 ” l o n=” 1 5 . 0 9 5 9 8 1 ”> < r e s u l t a l t=” 2 0 6 . 1 6 ” a l t −gps=” 2 5 8 . 3 3 ” d a t e=” 1 3 . 1 1 . 2 0 1 2 ” i n d e x=” 5 ” l a t=” 4 6 . 2 5 6 9 1 2 ” l o n=” 1 5 . 0 9 5 9 5 0 ” r o l l =” 1 . 3 2 ” p i t c h=” −2.45 ” time=” 11 : 4 0 : 3 4 . 9 9 2 ” /> < r e s u l t a l t=” 2 1 4 . 3 7 ” a l t −gps=” 2 3 8 . 7 2 ” d a t e=” 1 3 . 1 1 . 2 0 1 2 ” i n d e x=” 12 ” l a t=” 4 6 . 2 5 6 4 5 3 ” l o n=” 1 5 . 0 9 5 6 5 2 ” r o l l =” 1 . 0 8 ” p i t c h=” −1.33 ” time=” 11 : 4 5 : 4 2 . 1 0 5 ” /> </ t a r g e t> Listing 2: Output GML File Results for all shoots (but no more than 10) of the target are listed. Each is enclosed in the result element with the following attributes: alt is the QNH (baro corrected) altitude at the moment of the shoot; alt-gps is altitude obtained from the GPS system; date is the date given in day, month, year format (dd.mm.yyyy); time is time of the shoot in hour, min, decimal seconds format; lat is the longitude of the aircraft at the time of the shoot given in decimal degrees; lon is the longitude of the aircraft at the time of the shoot given in decimal degrees; roll is the roll angle given in decimal degrees taken from Nesis inertial unit. Right bank is positive; pitch is the pitch angle given in decimal degrees taken from Nesis inertial unit. Nose up is positive. yaw is the azimuth (true heading) of the airplane decimal degrees taken from Nesis inertial unit. index is a shoot index and increases with the each shoot. First shoot should start with 1. The index is used to make easier identification of pictures taken from the camera. Please note, that the XML format may be extended with more attributes and elements in the future versions of the Nesis and Geoniss software. 16 © Kanardia 2013 Geoniss — Manual 5 5. Installation & Calibration Installation & Calibration This section explains how Geoniss must be installed into an aircraft and which steps must be taken, to get the maximal precision from the Nesis and Geoniss. It is very important to follow the sequence exactly as explained here, otherwise significant degradation in results may occur. The section starts with the installation in the aircraft. Here, only rough guidelines are given, since exact details varies from one aircraft to aircraft significantly. Sections about the AHRS leveling and compass calibration follow. Finally, section about Geoniss offset calibration is given. Be prepared, that this process may last for several days and be ready for some trial and error – especially when searching for compass position and calibration. 5.1 Aircraft Installation Geoniss can not be installed anywhere in an aircraft. Its position must be chosen carefully. It may also happen that certain aircrafts can not be easily adapted for the installation for various reasons. The following aspects should be considered. Geoniss should be installed at the bottom part of fuselage, where curvature of the fuselage is low. The bottom part of Geoniss should not be too far from the bottom of fuselage. A care must be taken not to position the Geoniss hole on the exhaust gases path. Exhaust gases would make lens dirty very quickly and pictures unclear. Geoniss must be level in roll. Since it is difficult to make fixation points with adequate precision, some means for fine tuning the Geoniss roll position regarding to the airplane axis must be provided. Geoniss must be also level in pitch. Airplane pitch changes with indicated airspeed and aircraft weight. This means that Geoniss mounting position will be perfect for one indicated airspeed and weight only. Thus, it is important to select the nominal flying speed and then adjust the Geoniss level according to this selected airspeed. Geoniss should be easily accessible – you should be able to place and remove the camera without difficulties. Movement of the Geoniss internal disk together with camera must not be blocked by any means. You should consider weight and balance. Weight of Geoniss with camera is not neglectable and when its position is far forward or backward from the center of gravity, this may pose a problem for aircraft stability. During takeoff from grass airstrips on wet days, some dirt may be sprayed beneath the fuselage. The opening for Geoniss should avoid places, where dirt is likely to appear. Geoniss requires its own 12 V power supply. 17 © Kanardia 2013 Geoniss — Manual 5.1 Aircraft Installation It is good that a pilot has at least minimal visual control over the Geoniss. Some of above mentioned topics are elaborated in next subsections. 5.1.1 Opening in Fuselage Geoniss should be placed as close to fuselage bottom as possible. In this case we get the smallest opening in the fuselage. But at the same time, we also need to consider ability to make some level adjustment in roll and pitch and the fact that fuselage bottom is never perfectly flat. Additionally, care must be taken for the camera focal length. It is not advised that camera lenses appear in free stream, they should be protected by fuselage (rain, insects, sand, etc.). Figure 10 illustrates one example of Geoniss placement, where these demands are fulfilled. Please note, that camera lens almost never protrude from Geoniss bottom significantly, however, exceptions may occur. Figure 10: Placement of Geoniss in fuselage. 5.1.2 Adjusting for the Reference Pitch and Roll Geoniss has only one degree of freedom – it can rotate around its vertical axis and can effectively correct the wind induced angle. However, it is rigidly fixed to roll and pitch. While there is nothing to be done regarding roll (except to align it perfectly to the wings), pitch may vary significantly. Changes in pitch are caused by changes of aircraft mass and changes of airspeed. This means that Geoniss can be fixed for reference pitch only. This reference pitch corresponds to one airspeed (indicated airspeed actually) and one aircraft mass. When aircraft flies faster or slower or if aircraft is heavier or lighter, then pitch angle deviates from the reference. Figure 11 illustrates this effect. The Geoniss fine adjustment in pitch is then done in the following steps. 1. Choose your reference (indicated) airspeed v0 and aircraft mass m0 , that will most likely be used during surveying flights. 2. The internal reference level of Nesis instrument is most probably different. So you need to adjust it. On the ground, put your aircraft in the position, which you think that matches the position for the reference airspeed. (Do not worry, if this is slightly wrong.) Adjust the Nesis to this level. Please, refer to the Nesis manual about the details. 18 © Kanardia 2013 Geoniss — Manual 5.2 Compass Calibration Figure 11: Aircraft can fly in a straight line at different pitches, which correspond to different airspeed. Left figure shows aircraft flying at reference airspeed. Mid figure shows slower flying aircraft which requires more positive pitch. Geoniss is not vertical and the camera focal cone is facing slightly forward. Opposite effect appears when airspeed is too fast and negative pitch appears, right. 3. Make a test flight with your aircraft. Aircraft should be as close to the reference mass as possible. Fly at the reference airspeed and observe the pitch indicated by Nesis. Record this pitch on paper. This observed pitch is the error, which needs to be corrected. 4. Repeat the Nesis level adjustment, but now put your airplane in such position (lift or lower nose or tail wheel), that pitch on Nesis indicates the same angle as you have observed during your previous flight. Be careful, to keep wings level. This is now your reference position. 5. Keep this position of aircraft (do not move it) and adjust Geoniss to be perfectly level. You can use spirit level (bubble level) instrument here. 6. Finally, you need to adjust electronic compass (Magu) to this reference position as well. Better the Nesis/Geoniss/Compass adjustment is made, better the overall precision of the system will be. Once all three devices are aligned to the reference pitch, you can continue with the compass calibration. 5.2 Compass Calibration Nesis User’s Manual cover this topic in detail, but here we would like to emphasize the importance of good compass positioning and calibration. The precision of Geoniss angle correction is in direct relation to the compass precision. An imprecise compass will yield to bad results, no matter how well Nesis, Geoniss and Magu devices were aligned to the reference pitch. 19 © Kanardia 2013 Geoniss — Manual 5.2.1 5.3 Geoniss Offset Position in Airplane Each aircraft has a lot of magnetic disturbances inside the aircraft and sometimes it is difficult to find a good place for the compass installation. Since compass is of ultimate importance for Geoniss operation, it is worth to put some effort in finding such spot. A simple hand-held compass can be used in search for such spot. Search away from any parts that may contain iron or any other magnetic material (Cobalt, Nickel or ferromagnetic compounds) and, for God’s sake, away from any device which contain permanent magnets (all electro-motors, servos, pumps . . . ) and away from electronic devices, which consume strong electrical current or produce electromagnetic fields. Turn you avionics on (radios, transponders, etc.), allow electronics to warm up and start searching for a spot. When you find a candidate for such spot, check it with a hand-held compass first. Here you need to observe two things. The compass needle should not deviate, if the compass is moved around the spot and the needle should point to a direction, which is close to magnetic North direction measured outside of the aircraft. The needle should also not react (too much) to the radio transmission. So, press “push to talk” to transmit a couple of times and observe the needle. After a spot was found, fix the electronic compass (Magu) and make it aligned to Nesis and Geoniss as it was described in section 5.1.2 on page 18. 5.2.2 Calibration In addition to the instructions from Nesis User’s Manual, we would like to emphasize, that standard hand-held compass is not good enough to make the final adjustment. An army grade or better compass is needed – you need a compass, where you are able to repeatedly read the aircraft magnetic angle within one degree precision. Be persistent here and repeat calibration or adjust the offset until the magnetic heading indication in the Nesis compass calibration window in any direction is within one degree of direction measured with compass. If you are unable to get good results, you should try to find another spot and repeat the process again. 5.3 Geoniss Offset Determination of the Geoniss Offset is the last step in the calibration process. In this step you verify the results and make small final adjustments. If the verification results are good enough, the process is complete and system is ready for use. 5.3.1 Preparing Test Legs In this last step you need to take areal photos of several legs organized in a star. You need to fly leg 0, 45, 90, 135 – all in both directions. Each direction should have at least 10 points with a minimum 30% height overlap. Figure 12 shows a star example and directions that need to be flown. 20 © Kanardia 2013 Geoniss — Manual 5.4 Assembling Photos of Individual Leg Figure 12: Idea of the test directions organized in a star. We need only four legs, where each leg is shoot in both directions. 5.4 Assembling Photos of Individual Leg After the flight is complete, photos of individual legs must be combined together into one big picture per leg direction. Since geodetic accuracy is not needed here, the resolution of photos may be reduced to make the assembling easier. For each picture representing one direction, draw correction angle just like it is shown on figure 13. Please note, that the ideal reference line connects pictures’ centers. In ideal case with no errors, the reference line is vertical. But when some small error is present – Geoniss was not aligned with this ideal line – misalignment steps are introduced in the picture and ideal line is tilted to some degree. This tilt angle is the required correction angle for this picture. These angles can be positive (clockwise correction) or negative (counterclockwise correction). The error you see in those pictures is a sum of installation error, compass calibration error and error of mathematical model of the Earth magnetic field declination and inclination. Because it is impossible to separate these errors, some final error will always remain. The final error, should be limited into -2 to +2 degree range. Each leg direction (eight directions in total) should be analyzed as shown on the figure 13. In practice, actual assembly is not so clear as in theoretical case shown on the left size of the figure. An estimate is required to draw the correction angle. When all directions are analyzed, overage error is entered as the Geoniss correction. Figure 14 is an example, where all directions are put together. In practice, you should put each picture on one page, print all pages and draw an estimate correction line on the paper. Then you measure angle between vertical and the correction line. The average value of all errors is the Geoniss correction. 1. Open the Nesis setup page. 2. Select the Service icon to swith into the service mode. 3. Enter your specific service password when asked. 21 © Kanardia 2013 Geoniss — Manual 5.5 Airspeed & Pitch Sensitivity Figure 13: Example of the correction angle. In this case correction angle is about 3 degree clockwise (positive). This means that Geoniss platform was rotated about 3 degrees counterclockwise from the ideal line at the time when shoots were made. 4. Select the Offset icon to open the offset dialog. 5. In the dialog, select Geoniss icon and enter the calculated correction. This completes the Geoniss calibration procedure. If you want for some reason repeat the calibration, you should put the Geoniss offset value back to zero and start all over again. 5.5 Airspeed & Pitch Sensitivity Section 5.1.2 on page 18 describes some consideration regarding pitch and figure 11 shows an error induced by incorrect pitch. This subsection will reveal some details about this error and what we can expect, when survey flight is made with an airspeed or mass different from the reference. Assuming straight flight under normal conditions, we can derive an algebraic expression (1), from which deviation from reference pitch can be calculated. 22 © Kanardia 2013 Geoniss — Manual 5.5 Airspeed & Pitch Sensitivity Figure 14: A composition of all leg directions. On top, directions are given. Estimated corrections are shown on the bottom. Average overall correction of 0.5 degree clockwise should be applied here. 2g ∆α = α − α0 = S ·ρ·a m m0 − 2 v2 v0 (1) Values in the expression have the following meaning: α . . . pitch angle. α0 . . . reference pitch angle. ∆α . . . difference (this is what we are interested in) between the actual and reference pitch angle. g . . . gravity constant. S . . . wing planform area. a . . . slope of the lift wing lift coefficient Cl . m . . . actual mass of the aircraft. v . . . actual airspeed of the aircraft. m0 . . . reference mass of the aircraft. v0 . . . reference airspeed of the aircraft. If we assume standard ultralight airplane with a reference mass 420 kg, gravity constant 9.81 m/s2 , slope of lift coefficient 0.092 per degree, density of air 1.225 kg/m3 and wing planform area 10 m2 , we get next simplification for ∆α in degrees. ∆α = 17.41 23 m m0 − 2 v2 v0 (2) © Kanardia 2013 Geoniss — Manual 5.6 Mass Correction Example: Say that our v0 is 150 km/h (41.67 m/s), m0 = m is 420 kg and let height about ground be 500 m. What happens when we fly 20 km/h more and less from reference airspeed. In the first case (v = 170 km/h) we get negative pitch difference. Nose will be almost one degree down and the error on ground will be tan(−0.932) · 500 = −8.13 meters. ∆α = 17.41 420 420 − 47.222 41.672 = −0.932 (3) In a similar way we get result for the second case, where v = 130 km/h. The pitch difference is positive and larger than in first case. Error on the ground is tan(1.397) · 500 = 12.19 meters. 420 420 − ∆α = 17.41 2 36.11 41.672 5.6 = 1.397 (4) Mass Correction Effects of flying heavier or lighter from the reference mass (m 6= m0 ) can be corrected with the speed. From expression (1) we can realize that pitch difference will be zero as long as the 0 term vm2 − m stays zero. Thus, the term can be reorganized into (5). v2 0 r v = v0 m m0 (5) Example: Say that our mass is 460 kg and reference mass is 420 kg. Reference airspeed is 150 km/h. From (5) we can calculate airspeed, which will compensate the increase in the mass. The compensating speed is 157 km/h. r v = 150 460 ≈ 157 420 24 (6) © Kanardia 2013