1
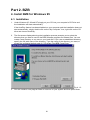
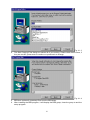
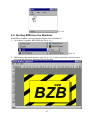
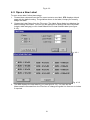
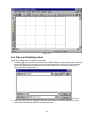
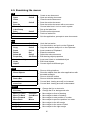
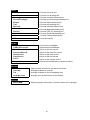
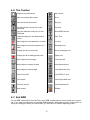
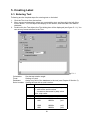
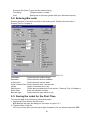
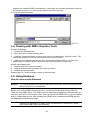
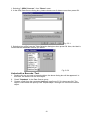
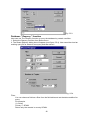
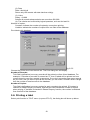
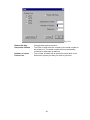
PART 2. BZB
10
4. INSTALL BZB FOR WINDOWS 95................................ 10
4-1. INSTALLATION.................................................................. 10
4-2. STARTING BZB FROM THE WINDOWS ................................ 12
4-3. OPEN A NEW LABEL ......................................................... 13
4-4. OPEN AN EXISTING LABEL ................................................ 14
4-5. EXAMINING THE MENUS ..................................................... 15
4-6. THE TOOLBAR ................................................................. 17
4-7. EXIT BZB ....................................................................... 17
5. CREATING LABEL ...................................................... 18
5-1. ENTERING TEXT ............................................................... 18
5-2. ENTERING BAR-CODE ....................................................... 19
5-3. SAVING THE LABEL FOR THE FIRST TIME ............................ 19
5-4. DRAWING WITH BZB’S GRAPHICS TOOLS .......................... 20
5-5. USING DATABASE ............................................................ 20
5-6. PRINTING A LABEL............................................................ 23
Part 2. BZB
4. Install BZB for Windows 95
4-1. Installation
1. Under Windows 95, 98 and NT simply put your CD into your computer’s CD Drive and
the installation will start automatically.
If the AutoPlay feature has been disabled on your computer and the installation does not
start automatically, simply double click on the “My Computer” icon, right click on the CD
drive and choose AutoPlay.
2. The first screen displayed during the installation process prompts you to select the
directory that you want to use for the BZB Software program and related files. You can
create a new directory or use one on your hard disk. If you use an established directory,
specify the full path name of the directory. Type the name of the directory you want, or
accept the suggested default path of C:\Program Files\BZB Press Enter.
Fig. 4.1.2
3. You can create a new program folder or use one on your system and then press enter.
10
Fig. 4.1.3
4. The Start Copying Files dialog box shows all of your setting. Please check these items, if
they are correct, press enter to continue or press back to change.
Fig. 4.1.4
5. BZB than copies all necessary files from the BZB disks.
6. After installing the BZB program, it will display the BZB group, close the group to end the
setup program.
11
Fig. 4.1.5
4-2. Starting BZB from the Windows
After BZB is installed, you can start the program from Windows 95.
1. Go to Start, Programs, BZB, BZB (see Fig. 4.2.1) .
Fig. 4.2.1
2. BZB displays the opening screen (see Fig. 4.2.2). To start a new label, click the icon or
pull-down the File menu and select New command.
12
Fig. 4.2.2
4-3. Open a New Label
To open a new label, follow these steps:
1. Choose New command from the File menu to start a new label. BZB displays a blank
page with the default setting. The guideline shown in the label, it helps you to easily
design the label.
2. Choose the Label Setup from the File menu. The Label Setup dialog box displays the
default setting of the label. You can use the dialog box to specify the size of the label
(height, width and gap) or click Load Default Size to load a default label (see figure
4.3.2).
Fig. 4.3.1
Fig. 4.3.2
3. The BZB displays the new label for you (see figure 4.3.3). You can use the
Measurement command from the File menu to change the guide line from mm to inches
if required.
13
Fig. 4.3.3
4-4. Open an Existing Label
Open an existing label file, follow these steps:
1. Choose Open command from the File menu. BZB displays the Open dialog box, showing
the list of BZB files on your disk. If the list of file names is too many to fit in the window,
scroll bars appear at the right of the list, and you can click on an arrow to scroll up or
down the list (see figure 4.4.1).
Fig. 4.4.1
2. When you find your file, highlight it and click OK button in the open dialog box; or just
double-click the filename with the left mouse button.
14
4-5. Examining the menus
File
New
Open
Close
Save
Save As_
Measurement
Label Setup
Print_
Recent File
Ctrl+N
Ctrl+O
Ctrl+S
Ctrl+P
Cut
Copy
Paste
Delete
Select All
Properties_
Toolbar
Status Bar
zoom In
zoom Out
Object
Line Color_
Fill Color_
Move To Front
Move To Back
Move Forward
Move Back
⇒ Choose label size in inch or metric system
⇒ Set up the label size
⇒ Print the active document
⇒ Previous loaded file
⇒ Undo the last action
Ctrl+X
⇒ Cut the selection and put it on the Clipboard
Ctrl+C
⇒ Copy the selection and put it on the Clipboard
Ctrl+V
⇒ Insert contents of Clipboard
Del
⇒ Erase the selection
Ctrl+P
⇒ Select the entire document
Alt+Enter ⇒ Edit drawing object properties
Ctrl+Z
⇒ Insert new linked or embedded object
⇒ Edit linked objects
⇒ Convert object to different type
Insert New Object
Links_
Object
View
Grid Lines
Show Objects
Create a new document
Open an existing document
Close the active document
Save the active document
Save the active document with a new name
⇒ Quit the application; prompts to save documents
Exit
Edit
Undo
⇒
⇒
⇒
⇒
⇒
G
⇒ Show or hide guidelines
⇒ Show the objects from the other applications with
bounded rectangle
⇒ Show or hide the toolbar
⇒ Show or hide the status bar
⇒ Current label viewing area will be increased
⇒ Current label viewing area will be decreased
⇒ Change the line or text color
⇒ Change the fill or background color
Ctrl+Plus
⇒ Move object to front of drawing
Ctrl+Minus ⇒ Move object to back of drawing
Plus
⇒ Move object to next position in z-order
Minus
⇒ Move object to previous position in z-order
Align Center
⇒ Move object to the left margin
⇒ Move object to the center of label
Align Right
⇒ Move object to the right margin
Align Left
15
Draw
Select
Line
⇒ Choose the point tool
⇒ Choose line drawing tool
Rectangle
Round Rectangle
Ellipse
Text
Barcode
⇒ Choose rectangle drawing tool
⇒ Choose round rectangle drawing tool
⇒ Choose ellipse drawing tool
⇒ Choose text drawing tool
⇒ Choose barcode drawing tool
Maxicode
PDF417
Royal Mail
⇒ Choose Maxicode drawing tool
⇒ Choose PDF 417 drawing tool
⇒ Choose Royal Mail drawing tool
Postnet
⇒ Choose Postnet drawing tool
⇒ Insert bitmap file
BitMap
Dbase
ODBC Connect
ODBC Disconnect
First Record
Previous Record
Next Record
Last Record
Go To
⇒ Connect to a database
⇒ Disconnect the database
⇒ Move to the first record
⇒ Move to the previous record
⇒ Move to the next record
⇒ Move to the last record
⇒ Move to the certain record
Requery
⇒ Requery the database by certain condition
Window
New Window
Cascade
Tile
Arrange Icons
⇒ Open another window for the active document
⇒ Arrange windows as overlap
⇒ Arrange windows as non-overlapping tiles
⇒ Arrange icons at the bottom of the window
Window
About BZB
⇒ Display program information, version number and Copyright
16
4-6. The Toolbar
Create a new document
Last record
Open an existing document
Go to…
Save the active document
Requery
Cut the selection and put it on the
Clipboard
Print tool
Copy the selection and put it on the
Clipboard.
About BZB Version
Paste the objects in the clipboard to
screen.
Point Tool
Move object to next position in z-order
Line tool
Move object to previous position in zorder
Rectangle tool
Change the line or text color
Round rectangle tool
Change the fill or background color
Ellipse tool
Move object to left margin
Insert text tool
Move object to center of label
Insert barcode tool
Move object to right margin
Insert Maxicode tool
Zoom in/out tool
Insert PDF417 tool
First record
Insert Royal Mail tool
Previous record
Insert Postnet tool
Next record
Bit Map
4-7. Exit BZB
To exit BZB, choose Exit from the File menu. BZB verifies that you have saved your current
file. If you have not saved the current file, BZB displays a dialog box giving you the option to
save your changes. When you leave BZB, you will return to window opening screen.
17
5. Creating Label
5-1. Entering Text
Following are the simplest steps for entering text on the label:
1. Click the Text icon from the tool bar.
2. Move mouse to the position where you want adding text, and then click the left of the
mouse button. The Text object will display on the screen, and the Text is the default
character.
3. Double-click the Text object, the Text dialog box will be displayed (see figure 5.1.1). You
can set any format relevant to the Text.
Orientation:
Fixed:
Database:
Serial number:
fig 5.1.1
Set the text rotation angle.
Setting a fix text.
Assign any field of the database to the text (see Chapter 2 Section 5).
Setting the text with a serial number.
Syntax xx^nn±value^xx
xx : any character or number (option)
nn : start of the serial number
± : increase or decrease by step value
value : step value
Example 19^89+1^
Result
1990
1991
10^998+2^a
10000a
10002a
ps^0+1^.
ps1.
ps2.
1900
1901
10998a
10000a
ps9.
ps0.
18
Prompt at Print-time: Typing the text when printing.
Text string:
Typing character, number.
Font:
Setting text of the fonts (please refer your Windows manual).
5-2. Entering Bar-code
Entering barcode in the label is similar to the entering text. Please refer the section “
Entering Text” in Chapter 4.
Fig. 5.2.1
Orientation
Readable
X dimension
Wide / Narrow Ratio
Height:
Data source:
Enter Data:
Barcode type:
Set the barcode rotation angle.
Set the barcode human readable
Set the barcode narrow width.
Set the barcode wide / narrow ratio.
Height of barcode (unit: mm).
These items are described in the section “ Entering Text” in Chapter 4.
Enter the barcode contents.
Set the barcode type which to use,
5-3. Saving the Label for the First Time
To save the label for the first time, follow these steps:
1. Choose the Save As from the File menu.
BZB displays the Save As dialog box, as shown in figure 5.3.1.
2. Type the name of the file.
You can use any name you like (up to eight characters). Do not add an extension; BZB
19
supplies the extension DRW automatically. In this case, you are saving the label format to
the current directory. You can choose another directory if you like.
3. Click OK to save the label.
Fig. 5.3.1
5-4. Drawing with BZB’s Graphics Tools
Drawing a rectangle
1. Choose the Rectangle tool.
2. Move the cursor into the drawing area.
3. Press the mouse left button to anchor one corner of a flexible box. Drag the cursor. The
flexible box stretches from the anchor point to the mouse position.
4. When you are satisfied with the box size, release the mouse button. If you don’t like
something you created, select it with the arrow tool and press the Delete key.
Modify the rectangle size
1. With the point tool, select the shape.
2. Drag an endpoint until the shape is the size you want.
3. Release the mouse button.
Drawing the line, round rectangle, ellipse is the same way.
5-5. Using Database
How to connect with Database
Remark: You should already have installed the ODBC driver files, which are supplied with
Microsoft Office or your Database.
Before you use the ODBC Connect function, you should use Windows Control Panel to
install the new ODBC driver. The ODBC driver is appended to application software that you
use (such as FoxPro, Access and more). When you install the ODBC driver, you must define
one or multiple data source. After installing the ODBC driver, please execute BZB and link
the database file as following steps.
Remark: Regarding to installation of ODBC driver and definition of data source, please
refer to the ODBC Help from Windows.
20
1. Selecting " ODBC Connect " from "Dbase" menu.
2. In the SQL Data Source dialog box, please choose one of data sources than press OK.
Fig. 5.5.1
3. Selecting one of file from the Table Selection dialog box then press OK. Now, the label is
connected with database file that you select.
Fig. 5.5.2
Linked with a Barcode / Text
1. Double click on your text or barcode object, the above dialog box will be appeared. In
this case, we double click the text object.
2. Check "Database" in the Data Source group.
3. Choose a field from the connected database (see figure 5.5.3), then press OK. The
object is connected with specify field. Repeat steps 1 through 3 to connect the others
object.
21
Fig. 5.5.3
Database " Requery " function
User can use The Requery function to query the database by certain condition.
1. Select the Requery function from Dbase menu.
2. The Dbase Requery dialog box will appear (see figure 5.5.4). User can either load an
existing query file or create a new query and than save it.
Fig. 5.5.4
Filter:
You can choose a field as a filter from the field table and set the data condition for
query.
For example:
(1). String
Country = ‘SPAIN’
Return only the records in country SPAIN.
22
(2). Date
Date > #m/d/yy#
Return only the records with date late than m/d/yy.
(3). Value
Salary > 21000
Selects all records whose salaries are more than $21,000.
(4). The criteria can be linked by logical operators, such as And and Or.
Number of copies:
Constant- Indicate the number of copies by users when printing.
Variable- Indicate the number of copies from one field of the database.
Print labels with database
Fig. 5.5.5
Choose the Printer icon from the tool bar. The Print dialog box will display.
Number of Records:
This field is defined as how many records will be printed out from linked database. For
example, if "Number of records" is entered as "5", then 5 labels will be printed out from
current record to next four records in sequence. If you don’t remember how many records
do you have, and you want to print all the records, you can enter a number which is larger
than the number of total records in the database.
Number of Copies:
This field is defined as how many copies for each records to be printed. If Constant is
checked in Dbase Requery functions, and the user can indicate the number of copies
when printing. If Variable is checked in Dbase Requery function, the number is obtained
from one field of the database.
5-6. Printing a label
Select print function in "FILE" menu (or press CTL+P), the dialog box will show up below.
23
Fig. 5.6.1
Rotate 180 Deg.
Sequential Counter
Number of copies
Printer Port
: Change data printing direction.
: This field is used to set the number of the serial number to
be printed out. The serial number will be automatically
increased or decrease as defined.
: The number of labels will be printed for each label count
Selects the printer port that you wish to print from
24