1
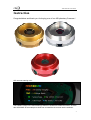
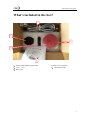
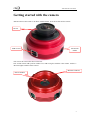
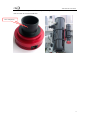
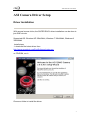
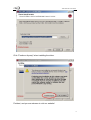
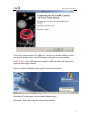
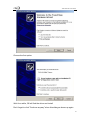
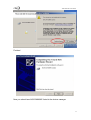
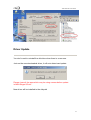
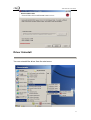
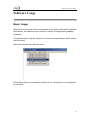
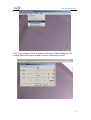
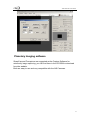
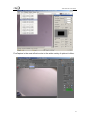
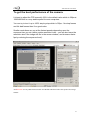
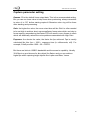
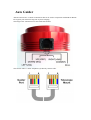
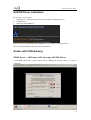
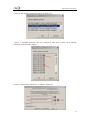
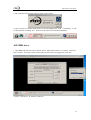
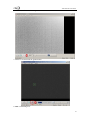
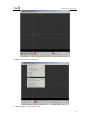
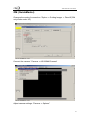
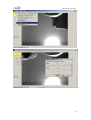
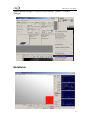
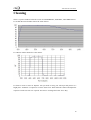
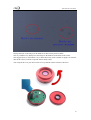
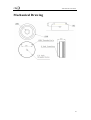
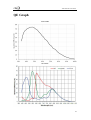
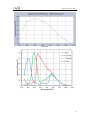
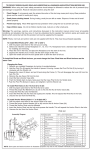
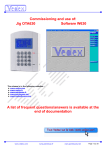
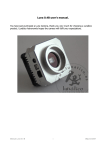
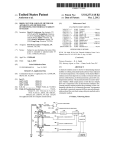
ASI Cameras User Guide
Revision 1.3
Nov, 2013
All material in this publication is subject to change without notice and is
copyright Zhen Wang Optical company.
ASI Cameras User Guide
Table of Contents
ASI Cameras User Guide..............................................................................................................1
Instruction .........................................................................................................................................3
What's included in the box? ..............................................................................................................4
Getting started with the camera ........................................................................................................5
ASI Camera Driver Setup .................................................................................................................7
Driver Installation .....................................................................................................................7
Driver Update..........................................................................................................................12
Driver Uninstall.......................................................................................................................13
Software Usage ...............................................................................................................................14
Basic Usage.............................................................................................................................14
Planetary Imaging software.....................................................................................................17
To get the best performance of the camera. ............................................................................19
Capture parameter setting .......................................................................................................20
Auto Guider ....................................................................................................................................21
ASCOM Driver .......................................................................................................................22
Guider with PHD Guiding ......................................................................................................22
Auto Guider with MaxIm_DL ................................................................................................29
Other Third part software support...................................................................................................34
PHD Guiding ..........................................................................................................................34
GM (GuideMaster)..................................................................................................................35
MaxIm-DL ..............................................................................................................................37
MetaGuide...............................................................................................................................38
Astroart ...................................................................................................................................39
Cleaning.........................................................................................................................................40
Mechanical Drawing.....................................................................................................................43
QE Graph ......................................................................................................................................44
2
ASI Cameras User Guide
Instruction
Congratulations and thank you for buying one of our ASI planetary Cameras!
ASI cameras naming ruler:
The software usage is the same although different cameras have different sensor. So here
take ASI120MC as an example to show how to install the driver and use the software.
3
ASI Cameras User Guide
What's included in the box?
1
2
4
3
5
1:2-metre USB and ST4 guider cable
3:1.25” cover
5:Driver CD
2: M42-1.25” nosepieces
4:ASI Camera body
4
ASI Cameras User Guide
Getting started with the camera
ASI120 camera comes with a 150 degree wild-field lens. It can be used an all sky camera.
CS lens
USB 2.0 Port
ST4 Guider
PORT
You can see the sensor after unscrew the lens.
New asi120 camera add a protect window. It is a IR-CUT glass with the color camera. And it’s a
AR coated glass with the mono camera.
M42X0.75 Thread
Protect Window
5
ASI Cameras User Guide
Attached the 1.25” nosepieces and insert to your telescope’s focuser.
You are ready for your first light now!
1.25” nosepieces
6
ASI Cameras User Guide
ASI Camera Driver Setup
Driver Installation
With several mouse clicks, the SUPER EASY driver installation can be done in
just ONE minute.
Supported OS: Windows XP 32bit/64bit, Windows 7 32bit/64bit, Windows 8
32bit/64bit
Install steps:
1. download the latest driver from
http://www.zwoptical.com/Eng/Software/index.asp
or CD-ROM, run it.
Choose a folder to install the driver
7
ASI Cameras User Guide
Click "Continue Anyway" when installing the driver.
Finished, and you are welcome to visit our website!
8
ASI Cameras User Guide
Then Plug in the camera to a USB port, You can try another USB port if the
one plug in doesn't work. Intel CPU based computer is recommended.
And DO NOT use a USB extension cable or USB hub which will affect the
speed of fast image transfer.
Wait for a while, Windows will prompt "found new hardware"
Windows XP will prompt a driver install Wizard dialog
Windows 7 and 8 will install the driver automatically
9
ASI Cameras User Guide
Choose the first option
Wait for a while, OS will find the driver and install
Don't forget to click "Continue anyway" when this dialogue shows up again.
10
ASI Cameras User Guide
Finished
Now you should see ASI120MM/MC listed in the device manager
11
ASI Cameras User Guide
Driver Update
You don't need to uninstall the old driver when there is a new one.
Just run the new downloaded driver, it will auto detect and update
Please close all the apps which may be using camera before update.
ie:MSN Skype QQ etc..
New driver will be installed to the old path
12
ASI Cameras User Guide
Driver Uninstall
You can uninstall the driver from the start menu
13
ASI Cameras User Guide
Software Usage
Basic Usage
Because it is using one of the most popular driver types in the world (Windows
Directshow), the camera can be used on a variety of image/video grabbing
softwares.
The easiest way to test the camera is to use the amcap software which comes
with the driver
Select the camera from Devices menu.
If this dialog show up it means the camera is not connected or not recognized
by windows.
14
ASI Cameras User Guide
Please check the driver installation and verify that the camera is listed under
Device Manager
You should see an image if everything is fine
15
ASI Cameras User Guide
Click "Video Capture Filter" to change setting and "Video Capture Pin" to
change Resolutions(you can add or remove resolutions you like).
16
ASI Cameras User Guide
Planetary Imaging software
SharpCap and Firecapture are suggested as the Capture Software for
astronomy image capturing. you can find them in the CD-ROM or download
from the website.
Both are easy to use and very compatible with the ASI Cameras.
17
ASI Cameras User Guide
FireCapture is the most effective due to the wider variety of options it offers.
18
ASI Cameras User Guide
To get the best performance of the camera.
It is best to adjust the FPS manually. 80% is the default value which is 30fps at
1280X960.this is a very stable speed for most computers.
You can try to turn it up to 100% step by step which is 35fps。No drop frames
and No bad frames then it’s a good value.
Smaller resolutions can run at the fastest speeds depending upon the
exposure time you set (within certain resolution limits – you can also lower the
resolution size if the image still fits in the screen window, and choose a faster
fps by reducing the exposure time!).
And DO NOT use any USB extension cable or USB hub which will affect the speed of fast image
transfer.
19
ASI Cameras User Guide
Capture parameter setting
Gamma: 50 is the default linear output data. This is the recommended setting.
But you can use lower value to help focus when previewing. always remember
to return it to “50” before starting capture! Otherwise onion ring will be there
after stacking and processing.
Gain: the higher the value, the more noise there will be. But it is often needed
to be set high to achieve short exposures/faster frame-rates which can help to
freeze seeing: remembering that faster FPS will result in more frames to stack
which will drastically reduce the noise problems associated with High Gain.
Exposure: the shorter the value, the faster the fps achieved. Fps is usually
calculated like this: fps = 1000 ÷ exposure time (in milliseconds, mS). For
example, 20mS provides 1000 ÷ 20 = 50FPS.
But there are limits to USB2.0 bandwidth and the sensor’s capability. Usually
30-40fps is a good choose for dim object like Saturn and you can achieve
higher fps when capturing bright objects like Jupiter and Mars, Venus.
20
Auto Guider
ASI120 cameras have a Guider Control Port that can be used in conjunction with PHD or Maxlm
DL to guide your mount for long time exposure imaging.
The image below summarizes how the Guider Port defines.
The connect cable is a 6P6C telephone-style directly connect cable.
ASI Cameras User Guide
ASCOM Driver Installation
We provide 3 ways to guide.
1. WDM driver + ASICamera ST4 telescope ASCOM Driver(suggested way)
2. ASI SDK driver
3. ASICamera ASCOM Driver
The first way is recommended because WDM driver to get image is faster than others.
Driver the mount though the ST4 telescope ASCOM driver.
Guider with PHD Guiding
WDM driver + ASICamera ST4 telescope ASCOM Driver
1. Open PHD and click the "camera" button. Select “WDM-style webcam camera” in "Camera"
combo box
22
ASI Cameras User Guide
2. Click "setup" button to choose the camera you want to use
3. Select a reasonable resolution. The first 640x480 is bin2 mode if there are 2 640x480
resolutions, after that click "connect"
4. Select “ASI ST4 Telescope Driver” in “Mount” combo box
23
ASI Cameras User Guide
5. The connected camera can be show by click “setup” button
6. Click "connect" to connect mount, then you can start guiding now. Click “Cam Dialog” to call
out the parameter set dialog. You’d best set it the same as the duration under PHD
ASI SDK driver
1. Open PHD and click the Camera button. Select “ZWO ASI Camera” in "Camera" combo box,
click "connect", and select camera if more than one ASI cameras are plugged in, click "Ok"
2. Select " On-camera " in "Mount" combo box
24
ASI Cameras User Guide
3. then you can start guiding now.
.
ASICamera ASCOM Driver
1. Open PHD and click the Camera button. Select "ASCOM Camera" in camera combo box.
25
ASI Cameras User Guide
2. Select “ASI Cameras ASCOM driver” and click “Properties”
3. ASI ASCOM driver will detect automatically which camera is connected and show it in the
combo box. Set parameters and click OK
4. Select “On-camera” from the mount combo box.
5. Click the refresh button to get image.
26
ASI Cameras User Guide
6. Now can see the star in the image.
7. Choose a star and Click the guider button.
8. PHD is calibrating now.
27
ASI Cameras User Guide
9. PHD start guiding after calibrating.
10. Enable Graph to see the guiding result.
28
ASI Cameras User Guide
Auto Guider with MaxIm_DL
1. Select Camera from the toolbar of MaxIM_DL
2. Click “setup camera” from the Camera2
29
ASI Cameras User Guide
3. Camera Model select “ASCOM” and click “Advanced”. you can choose “video” if connect
though the WDM driver.
30
ASI Cameras User Guide
4. Select "ASI Camera ASCOM driver" from the popup dialog and click "properties". Click Ok
after setting a reasonable gain value.
5. Connect now
6. Shift to the Guide page and Click “start” to expose one image.
31
ASI Cameras User Guide
7. choose a bright start and click it to be a “Guide Star”
8. Click “Setting” to make sure that Autoguider output is “Guider Relays". Then MaxIm_DL
will use the ST4 port on the camera to guide. Or choose “ASCOM” driver to connect “ASICamera
ST4 telescope driver” if you connect camera though WDM driver.
9. select “Calibrate” and click Start.
32
ASI Cameras User Guide
10.There is a cross red line when calibrate successful. Select “Track” and click Start to start guide.
11. Click “Graph” to show the guiding result.
33
ASI Cameras User Guide
Other Third part software support
These software all can be used with ASI Camera though the WDM interface.
PHD Guiding
Select ASI camera from WDM menu
34
ASI Cameras User Guide
GM (GuideMaster)
Changes the mode of connection: "Option -> Guiding Imager -> DirectX"(GM
only works under XP)
Connect the camera: "Camera -> ASI120MM Camera"
Adjust camera settings: "Camera -> Options"
35
ASI Cameras User Guide
36
ASI Cameras User Guide
MaxIm-DL
Connect the camera: "Setup Camera -> Camera Model (Video DS) -> Source"
Click "connect" in Camera Control window
37
ASI Cameras User Guide
Adjust camera settings in Camera Control window: "Option -> Camera
Settings"
MetaGuide
38
ASI Cameras User Guide
Astroart
CCD plug-in required http://www.msb-astroart.com/ccd_en.htm
Web cams, video cameras (DMK, Meade LPI, Celestron NexImage, etc.)
39
ASI Cameras User Guide
Cleaning
There is a protect window before the sensor in ASI120MM/MC, ASI034MC, ASI130MM camera.
It’s an AR-AR coated window before the mono camera.
It’s a IR-cut window before the color camera.
It’s better to clean a sensor at daytime. You just need to setup your telescope and point it to a
bright place. A Barlow is required to see these dusts clear. Then attach the camera and adjust the
exposure to make sure not over exposed. You can see an image like below if it’s dirty.
40
ASI Cameras User Guide
The big dim spot on the image are the shadows of dusts on the protect window.
The very small but very dark spot in the image are the shadows of the dusts on the sensor.
The suggested way to clean them is try to blow them away with a manual air pump. To clean the
dust on the sensor you need to open the camera body at first.
You can open the cover just unscrew the cover by hand in counter-clockwise direction.
41
ASI Cameras User Guide
The sensor is an optical device. All precautions must be taken to prevent dust or scratches on the
input window. If there is dirt that doesn’t come off with the air pump, here is the step to clean it.
Equipment
• Ethanol.
• Cleaning medium (wipes, optical paper, cotton buds).
• Filtered blow-off gun (preferably with static charge neutralizing capability).
• Area protected from electrostatic discharges and equipped with ground straps.
Preparations
• Wear vinyl gloves or finger cots without talcum powder.
• Make use of anti-ESD equipment: Ground straps, ionizers etc.
Recommendations
• Never clean with a dry cleaning medium.
• Soak the cleaning medium with alcohol and do not pour it directly on the window.
• Clean the window only if necessary.
Operating Procedure
• Clean the glass window with an air-jet (using the blow-off gun).
• If stains or dust remain;
– Soak the cleaning medium with alcohol and wipe the glass window in a single movement
From one side to another.
– Always use a clean part of the cleaning medium for each new attempt.
– Adapt the speed of the wiping action to let alcohol evaporate without leaving traces.
– Optionally, use the blow-off gun to clean the window once more.
42
ASI Cameras User Guide
Mechanical Drawing
43
ASI Cameras User Guide
QE Graph
ASI120MM
ASI120MC
44
ASI Cameras User Guide
ASI130MM
ASI034MC
45