1
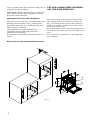
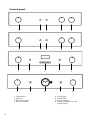
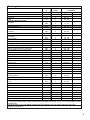
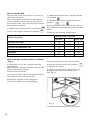
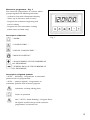
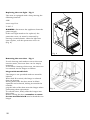
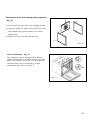
Your Style...Your Life
Multifunctional ovens
FFB 4ST S
FFB 5M S
F FA 5 M 1 S
F FA 9 M 1 X S
F FA 9 M 5 X S
F FA 5 E 1 X S
F FA 5 E 5 X S
F FA 9 E 1 X S
F FA 9 E 2 X S
F FA 9 E 3 X S
F FA 9 E 5 X S
F FA P B 9 E 5 X S
F FA P B 6 0 0 4 X W / B L
Table of contents
Technical specifications
3
Installation instruction
3-5
Control panel
6
Description of cooking functions
7-8
Cooking table
9
Using the grill
10
Using the rotisserie
10
Minute minder
11
End of cooking 120’
11
Analog programmer
12
Analog timer
12
Electronic programmer
13-19
Replacing the oven light
20
Removing the oven door
20
Optional
21
Cleaning and maintenance
22
1
INSTALLATION INSTRUCTION
Thank you for choosing one of our products. It will offer you many years of
excellent performance. Please carefully read the instructions and suggestions
contained in this manual for correct use of our products.
Technical details
This appliance conforms to the standard
regarding suppression of radio reception
interference.
Voltage regulations
230 V a.c. - 50 Hz / 220 V a.c. - 60 Hz
Muffle dimensions:
Height :
340 mm
Length :
440 mm
Depth :
390 mm
Volume :
59 lt
Voltage of heating elements
Static oven 1:
- Lower heating element : 1,3 kW
- Top heating element : 0,9 kW
- Maximum input of heating element : 2,65 kW
Static oven 2:
- Lower heating element : 1,3 kW
- Top heating element : 0,9 kW
- Grill element : 1,35 kW
- Maximum input of heating element : 2,25 kW
Built-in installation
IMPORTANT: The unit must be correctly
installed in accordance with Manufacturers
instructions and by qualified person.
Maintenance and service must be carried
out after the power supply has been
disconnected.
ELECTRICAL CONNECTION: Make sure
that the voltage supply is the same as what
is on the rating plate which can be found on
the lower part of the front of the oven.
The oven must be connected at the back
using a cable with minimum section of 1.5
mm, providing an omnipole switch in
compliance with current regulations with a
contact opening distance of at least 3 mm.
Warning: this appliance must be earthed.
Fan oven :
- Fan heating element : 2,3 kW
- Grill heating element : 1,35 kW
- Maximum input of heating element : 2,38 kW
Our company declines any liability for failures in the earth connection of for earth
connection that is not in compliance with
the regulation in force.
Fan-Multifunction oven:
- Lower heating element : 1,3 kW
- Top heating element : 0,9 kW
- Grill element : 1,35 kW
- Maximum input of heating element : 2,28 kW
Oven preparation and pre-use
Before using the oven, thoroughly clean the
inside with non-abrasive soap and
lukewarm water. Fit the rack and drip pan
in their runners. Once you have completed
the operation, bring the oven to maximum
temperature for approximately 20 minutes
in order to eliminate any remains of
manufacturing grease, oil or resins that can
produce unpleasant smells during cooking
Multifunction oven :
- Lower heating element : 1,3 k W
- Top heating element : 0,9 kW
- Fan heating element : 2,3 kW
- Grill element : 1,35 kW
- Maximum input of heating element : 2,38 kW
DQGYHQWLODWHWKHURRP.
3
Once you have done this operation, the oven is
ready for the first cooking.
CAUTION: ALWAYS KEEP CHILDREN
OFF THE OVEN WHEN HOT.
IMPORTANT: Each time you want to clean the
oven, make sure the warning light is off and
the oven is disconnected.
Important notices for the installation:
The oven can be built into a standard 600 mm
housing Unit as shown in fig. 1 when builtunder the work top, or in a tall housing unit
when built-in a column.
This appliance must be installed by a
competent person and with particular
attention to ventilation.
In both cases ventilation provisions must be
made.
This being a gap at the back of the housing
unit between 85 and 90 mm as indicate in
fig.1. The fixing of the oven in the cabinet is
made by 4 screws “A” that are on the corner
of the oven door-frame.
When placing the oven in the housing unit, do
not use the oven door as a lever for lifting the
oven.
Do not put excess pressure on the open door
once opened.
Slot-in unit for fan and multifunction oven
A
A
A
Fig. 1
4
A
Slot-in unit for static oven
580-583
90
470 min.
90
A
A
A
A
465
470 min.
.
580-583
90
Fig. 1a
5
Control panel
7
5
6
2
1
4
5
6
2
1
1
6
1
1.
2.
3.
4.
6
Thermostat
Selector
Electronic timer
End of cooking
3
6
5
8
2
5
5.
6.
7.
8.
2
Green light
Yellow light
Minute minder
Analog programmer and
Analog timer
Selector functions:
DEFROSTING
The oven and the green light will stay on during this and all the following
functions.
The fan motor comes on, but there is no heat. The oven door should be kept
in the close position. Recommended use: for defrosting frozen foods in
general, this will help cut down the defrosting time by about on third of the
normal time.
TRADITIONAL OVEN COOKING
By turning the thermostat knob, a desired temperature of 50°C to 250°C
can be selected. The yellow light will go off when the oven has reached the
desired temperature. It is recommended that the oven is pre-heated before
introducing the food.
MULTIFUNCTION
The fan and the circular element come on. The heat is diffused by the fan to
give an even temperature in the oven by adjusting the thermostat, a desired
temperature of 50°C to 250°C can be obtained.
It is not necessary to pre-heat the oven before introducing the food.
CENTRAL GRILL ELEMENT
By turning the thermostat knob, a desired temperature of 50°C to 250°C
can be selected, keeping the door closed.
Recommended use: for grilling smaller items of food.
DOUBLE GRILL ELEMENT
By turning the thermostat knob, a desired temperature of 50°C to 250°C
can be selected, keeping the door half-open or closed. In the latter case the
use of the grill deflector is not necessary.
Recommended use: for grilling larger area of food.
SEMI FORCED AIR CONVECTION
The thermostat has to be set at the desired temperature between 50°C and
250°C. The fan and the grill element allow a fast and deep cooking for
particular food. It is recommended that the oven be pre-heated for a few
minutes.
SEMI FORCED AIR CONVECTION WITH LOWER ELEMENT
The thermostat has to be set to the desired temperature. It is not
recommended that you have to pre-heat the oven.
Recommended use: for warming or very slow cooking of food.
7
Selector functions:
TRADITIONAL COOKING + FAN
By turning the thermostat knob, a desired temperature of 50°C to 250°C
can be selected, keeping the door closed. This cooking mode integrates
natural convection and ventilation.
Cooking mode suited to bake bread, pizzas and lasagne.
It is recommended that the oven be pre-heated
LIGHT ONLY
BOTTOM ELEMENT ONLY
Select the desired temperature between 50°C and 250°C.
Suitable for very slow cooking and warming up of food.
TOP HEATING ELEMENT
Select the thermostat temperature from 50°C to 250°C.
For keeping cooked food warm or gently reheating.
GRILL + TURNSPIT
By turning the thermostat knob, a desired temperature of 50°C to 250°C
can be selected, keeping the door closed.
When the grill is in use the turnspit automatically is on.
SEMI FORCED AIR CONVECTION WITH LOWER HEATING ELEMENT
The fan will come on with the lower heating element.
The thermostat has to be set to the desired temperature. It is not
recommended that you have to pre-heat the oven.
Recommended use: for warming or very slow cooking of food.
PIZZA FUNCTION
This kind of cooking is ideal for pizza and vegetable dishes.
With this function, lower heating element, circular heating element
and fan motor work at the same time.
8
Cooking table
Temp.
°C
Insertion*
guide
Cake in mould with beaten mixture
Panettone or focaccia
175
2
55 - 65
Focaccia
175
3
60 - 70
Cake
Pie in mould (short pastry)
Pie base
175
3
60 - 70
200
200
200
3
3
3
8 - 10
25 - 35
25 - 35
180
200
3
3
30 - 45
25 - 35
Choux pastry
200
200
3
2
10 - 15
35 - 45
Biscuit pastry
200
3
15 - 20
Lasagne
225
2
40 - 50
Slowly cooked roast (ex. roast veal)
Fast cooked roast (ex. roast beef)
200
200
2
2
120 - 150
60 - 90
Meatloaf
200
2
30 - 40
Goose 6,6 lb
200
200
2
2
120 - 180
150 - 210
Roast chicken
200
2
60 - 90
Turkey 11 lb
175
2
about 240
Hare
Leg of roe
200
200
2
2
60 - 90
90 - 150
Leg of deer
175
2
90 - 180
Vegetable
Baked potatoes
220
2
30 - 40
Vegetable pudding
200
2
40 - 50
Fish
Trout
Grey mullet
200
200
2
2
40 - 50
40 - 50
Pizza
240
3
10 - 20
Type of food
Pie base with ricotta cheese
Pie base with fruit
Cake in mould with raised mixture
Pie base
White bread (2,2 lb of flour)
Small pastries
Puff pastry
Cooking time
in minutes
Suggested
Personal
Meat (cooking time per cm. of thickness)
Poultry
Duck 3,3 lb
Game
Grill
Pork chops
4
8 - 12
Sausages
4
2
10 - 12
Grilled chicken
Roast veal on spit (1,3 lb)
Chicken on spit
25 - 35
50 - 60
60 - 70
* The guide number refers to the lowest level (excluding the bottom, since it is not possible to insert
the drip-pan)
THE GIVEN ABOVE DATA ARE INDICATIVE BECAUSE THE COOKING TYPE AND TIME VARIES WITH THE FOOD
QUANTITY AND QUALITY
9
How to use the grill
Lay the food in the wire shelf or, in a tray in
case of small pieces.
The rack must be positioned in the highest
runner possible and the grease drip pan in
the runner below. Close the door and turn on
the element as follows:
A. Static oven: adjust selector on position
B. Fan oven: adjust selector on position
C. Multifunction-Fan oven : adjust selector
on position
D. Multifunction oven :adjust selector on
position
,
,
Each kind of food (fish, poultry etc.) has to
be turned over to permit the grilling on both
sides.
Under are few cooking suggestions:
Cooking time in minutes
Top side
Under side
Dishes for grilling
Slices of thin meat
Slices of meat of medium thickness
Slices of thin descaled fish
Fish (e.g. trout ,salmon)
Sausages
Toast
How to use the rotisserie (where available)
- Fig. 2
It is possible, to use the rotisserie and the
grill together.
Meat has to be inserted onto the skewers and
blocked by the two clamps.
Proceed now as follows:
A) Fit the tip of the spit in the hollow shaft of
the motor on the back of the oven.
6
8
10
15
12
5
D) Fit the drip pan in the lowest runner.
E) Set the selector to the grill position
to operate the motor.
F) At the end of cooking, tighten the spit
handgrip and take it out of the oven.
(See Fig. 2).
B) Rest the support in the spit groove.
C) Unscrew and remove the handgrip.
Fig. 2
10
4
5
8
12
10
2
.
Programming your oven with mechanical
60 minutes timer - Fig. 3
The regulating knob (Fig. 3) must be turned in
a clockwise direction until it reaches the 60
minutes position and then turned to the
desired time by turning the knob in a counter
clockwise direction.
The oven will not be turned off automatically.
A minute counter ringing will advise that the
cooking time is over.
Fig. 3
Programming your oven with electrical 120
minutes cut-off timer - Fig. 4
The function of the programming timer is to
turn on the oven for a pre-determined amount
of time.
1. OPERATING
After having set the oven switch knob at the
desired temperature, turn the timer knob in a
clockwise direction to the desired cooking time
(maximum 120 minutes).
When the timer will return to position "O“, a
minute counter ringing will advise that the
oven will automatically turn off.
Fig. 4
2. MANUAL POSITION
If the cooking time is longer than the 2 hours
programme, or if you wish to use the oven
manually, to turn it off when you desire, turn
the knob to position
(Fig. 4).
11
Analog programmer - Fig.5
Regulate time by pressing and turning the
knob "A" anti-clockwise.
Select the beginning of cooking time by
pulling and turning the knob "A" anticlockwise until the index "B" coincides with
the desired time of cooking beginning.
Select the end of cooking time by turning the
knob "A" anti-clockwise until the desired time
(max 180’) coincides with the fixed index
(corresponding to XII).
At the end of cooking the oven automatically
stops and a bell sounds until the knob "A" is
turned to the symbol
.
Fig. 5
B
A
If you want to use the oven excluding the
programmer (manual running) turn the know
"A" until the symbol
coincides with the
fixed index.
Analog timer - Fig.6
Setting the clock: to set the clock, press and
turn the knob “A” in a clockwise or
anticlockwise direction.
Fig. 6
12
A
Electronic programmer - Fig. 7
The electronic programmer is a device which
groups together the following functions:
- 24 hours clock with illuminated display
- Timer (up to 23 hours and 59 min.)
- Program for automatic beginning and
end of cooking
- Program for semi-automatic cooking
(either start or finish only).
Description of buttons
“ TIMER ”
Fig. 7
“ COOKING TIME ”
“ END OF COOKING TIME ”
“ MANUAL POSITION ”
“ ADVANCEMENT OF THE NUMBERS OF
ALL PROGRAMS ”
“ TURNING BACK OF THE NUMBERS OF
ALL PROGRAMS ”
Description of lighted symbols
« AUTO » - (flashing) - Programmer in automatic
position but not programmed.
« AUTO » - (always lighted) - Programmer in
automatic position with inserted program.
Automatic cooking taking place
Timer in operation
and « AUTO » (both flashing) – Program Error.
No lighted symbol except clock numbers:
programmer on manual set.
13
Digital clock
Clock numbers show hours (0-24) and
minutes.
Upon immediate hooking up of the oven or
after a blackout, three zeros will flash on
the programmer panel.
To set the hour it is necessary to push
simultaneously the
+
buttons and
AT THE SAME TIME to push the [+] button
or [-] until you have set the exact hour.
The regulation speed depends on the pressure
exercised on the [+] [-] buttons.
Manual cooking without using the
programmer
To use manually the oven, that is, without
the auxiliary programmer, it is necessary to
cancel the flashing «AUTO» by pushing
the
button.
If «AUTO» is always flashing (it means a
cooking program is still memorized) it is
necessary to cancel the inserted cooking
program by pushing the
button until
setting the clock on zero.
Automatic cooking (start and end)
1) Set the length of cooking time by pushing
the
button.
2) Set the end of cooking time by pushing
the
button.
3) Set temperature and cooking program by
using the thermostat knob and the selector
knob.
14
After this setting the symbol «AUTO» will
flash, this means the oven has been
programmed.
An example: cooking lasts 45 minutes and
is expected to stop at 14.00.
- Push
until having set 0.45.
- Push
until having set 14.00.
After having finished the setting, the clock
hour will appear on the panel and «AUTO»
symbol will flash permanently. This means
the cooking program has been memorized.
At 13.15 h. (14.00 h. minus 45 minutes )
the oven turns on automatically.
During cooking time the
button and
«AUTO» are flashing.
At 14.00 h. the oven turns off automatically,
a buzzer goes on until it is stopped by
pushing the
button.
Semi-automatic cooking
Timer = buzzer
A. Set the length of cooking time
The timer program consists only of a buzzer
which may be set for a maximum period of
23 hours and 59 min.
To set the timer, push the
button and,
at the same time, [ + ] or [ - ] until you read
the desired time on the display.
After the setting, the clock hour and the
symbol will appear.
B. Set the end of cooking time
A) Set the length of cooking time by pushing the
button. The oven will turn
on immediately.
«AUTO» and the
symbols will light.
When the set cooking time has elapsed,
the oven will turn off, a buzzer will ring
until it is stopped as above described.
B) Set the end of cooking time by pushing
the
button. The oven will turn on
immediately. «AUTO» and
will light.
At the set time, the oven will turn off and a
buzzer will ring until it is stopped as above
described.
The cooking program may be seen at any
moment by pushing the corresponding
button.
The cooking program may be cancelled at
any moment by pushing the
until zero
appears on the display. Then by pushing
the
button the oven can work
manually.
The countdown will start immediately and
may be seen at any moment on the display
by simply pressing the
button.
At the end of the set time, the
symbol
will turn off and the buzzer will ring until it
is stopped by pressing the
button.
ATTENTION! An energy blackout makes the
clock go to zero and cancels the set
programs.
After a blackout three zeros will flash on the
panel and cooking can be programmed once
again.
15
USING THE ELECTRONIC PROGRAMMER
A Temperature
B Automatic programme
C Duration and manual mode
D Minute minder
F
U
N
C
T
I
O
N
Timer
Cooking duration time
Cooking end time
Minus setting
Plus setting
Setting the clock
Switch the oven on; 00.00 will appear in blinking mode on the display.
the display. To set the clock, simultaneously press the duration
and end of cooking
keys together. Using the +/- keys on the right,
select the time of day required. With the key “+” the time increases,
with the key “-” the time decreases at a speed directly proportional to
the duration of the pressure exerted on the key. When the time is stored,
the point between the hours and the minutes will stop blinking
approximately 7 seconds after the last operation. To update the
time, repeat the operation.
16
Manual operation
Press duration
and end time button
together. If an automatic
program is on the “AUTO” symbol (B) will be erased, the pot
symbol (C) is illuminated. Any programme which has been previously
set is cancelled.
Semiautomatic operation with cooking duration
Select cooking duration function
and set required duration with
the +/- keys on the right. “AUTO” (B) and cookpot (C) symbols appear.
If time of day = cooking end time the relay output and the cookpot
symbol (C) are switched off. The audible signal sounds.
The symbol “AUTO” (B) blinks. The cooking will be finished.
Semiautomatic operation with cooking end time
Select cooking end time function
and set required end time
using the +/- keys on the right. The “AUTO” (B) and cookpot (C)
symbols appear. Turn the switch knob and the thermostat knob to
the cooking function and to the desired temperature.
If time of day = cooking end time the oven doesn’t heat any longer
and the cookpot symbol (C) are switched off. The audible signal
sounds and “AUTO” (B) blinks.
Fully automatic operation
1) Set the length of cooking time by pushing the
button and the
+/- keys on the right.
2) Set the end of cooking time by pushing the
button and the
+/- keys on the right.
3) Set temperature and cooking program by using the thermostat
knob and the selector knob.
After this setting the symbol “AUTO” (B) will appear, this means
the oven has been programmed. When the time in the display is the
same of the cooking start time the cookpot symbol (C) will appear
and the oven will start to work.
Cooking Start Time= Cooking End Time – Cooking Duration Time
An example: cooking lasts 45 minutes and is expected to stop at
14.00.
- Push
and “+” key on the right until having set 0.45.
- Push
and “+” key on the right until having set 14.00.
After having finished the setting, the clock hour will appear on the
panel and “AUTO” symbol (B) will flash permanently. This means
the cooking program has been memorized.
17
At 13.15 h. (14.00 h. minus 45 minutes ) the oven turns on
automatically. During cooking time the cookpot button (C) and
“AUTO” (B) switch on.
At 14.00 h. the oven turns off automatically, “AUTO” (B)
flashes. The cookpot button (C) switches off and a buzzer goes
on until it is stopped.
Minute counter
Select the minute counter function
. The fixed time is set at
5 min.; to change it, press the keys +/- on the right. When the point
between the hours and minutes and the symbol begin to blink,
it means that the countdown has begun. The display shows the
hour and the minutes of the countdown; by pressing the
symbol
you can choose whether to display the countdown
or the time.
Audible signal
The audible signal sounds at the end of a minute counter
cycle
or of a cooking programme
for a period of 7
minutes. To turn it off just press any program input key (the first
three on the left ).
You can also regulate the sound level of the audio signal,
selecting a more pleasing level, by pressing the symbol “-” on
the right for about 2 seconds when you see the time on the display.
Program start and control
Press the cooking duration key
or the end-of-cooking time
key
to know the remaining time period.
Input error signal
When a data input is mistaken the audio signal sounds and the
symbol “AUTO” (B) flashes.
Cancelling a program
A program can be cancelled pushing at the same time the button
and
.
18
Switch functions
The following functions can be set by turning the switch knob.
The following will be shown on
the display:
Light
190°C
50°C
190°C
250°C
165°C
165°C
165°C
Defrost
The temperature shown on the display can be changed via the keys
+/- on the left. Increase or decrease is in 5°C steps, from a minimum
of 40°C to a maximum of 250°C. The symbol °C will blink until
the required temperature is reached.
19
Replacing the oven light - Fig. 8
The oven is equipped with a lamp having the
following features:
25W
screw cap E-14
T 300° C
WARNING: disconnect the appliance from the
power supply.
lf the oven light needs to be replaced, the
protective cover «A» must be removed by
turning it anticlockwise. After the light has
been replace, refit the protective cover «A».
(Fig. 8).
Fig. 8
Removing the oven door - Fig. 9
To aid cleaning and make access to the oven
interior easier, the oven door can be simply
removed.
To facilitate cleaning of the oven, the door can
be removed via the hinges as follows:
hinges with movable bolt
The hinges A are provided with two movable
bolts B.
When bolt B is raised, the hinge is released
from its housing.
Having done this, the door must be lifted
upwards and removed, sliding it towards the
outside;
grip the sides of the door near the hinges when
performing these operations.
To refit the door, firstly slide the hinges into
their slots.
Before closing the door, remember to rotate
the two movable bolts B used to hook the two
hinges.
20
B
A
Fig. 9
Installation of the self-cleaning liners (optional)
-Fig. 10
1) Fix the wall (A) with four auto-tapping screws.
2) Lean the walls (C ) against the side of the oven
and refasten the guides which were earlier
taken away.
3) Replace the accessories into the oven.
Fig. 10
Oven accessories - Fig. 11
The appliance can be equipped with lateral
guides which have to be fixed on the oven side.
Slide oven shelves and trays on lateral guides.
Lateral guides can be removed by a light
downwards pressure on device A.
Fig. 11
21
Cleaning and maintenance
Important: The cleaning of the
appliance must be carried out after the
power supply has been disconnected.
How to clean the oven: The cleaning of
the oven, with no self-cleaning panels,
has to be carried out after cooking,
whilst the oven is still lukewarm (not
hot), so that the food spillages on the
oven surface can be removed easily.
Remove the lateral guides, pulling their
front side and unhooking them.
Wipe the inside of the oven by using
a damp cloth with a diluted ammonia
product; rinse and dry the oven.
In case of persistent marks, leave a
soaking ammonia cloth at the bottom
of the oven muffle for some hours with
the door closed; then wash away with
warm water and liquid detergent.
Rinse and dry carefully. For external
parts, use a soft cloth and soapy water
water, rinse and dry carefully.
Do not use abrasives, bleach or coarse
cleaning material.
The Manufacturer declines responsability for damages to persons or things
due to a bad or improper installation of the appliance.
Owing to our policy of continuous improvements, we reserve the right to
adjust and modify our product without prior notification.
22