1
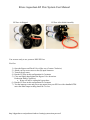
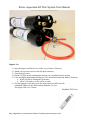
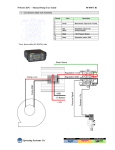
Ettore Aquaclean EZ Pure System User Manual Manufactured in the USA by RHG Products Co. www.rhgproducts.com (303)-663-1779 The EZ Pure System (D) Above consists of the following components as shipped: 1) 2) 3) 4) A) B) C) Carbon and Sediment Filter RO Membrane #1 RO Membrane #2 DI Cartridge Outlet Fitting Inlet Fitting Bypass Hose and Flush Valve Initial Assembly Component Parts as Shipped Locate the A) Output Water B) Input Water C) Bypass Water and Flush Valve Components 1) Select the (A) Output Water Bib, with the Male Garden hose fitting and insert it into the End of the housing Labeled DI Cartridge (Supplied bib may have longer hose attached than depicted) 2) Select the (B) Input Water Connector, with the Female Garden hose fitting and insert into the end of the housing labeled Carbon Filter. (Supplied bib may have longer hose attached than depicted) 3) Select the (C) Bypass Water and Flush Valve and locate the loose tube that is attached to the side of the RO Membrane, insert the tube into the Bypass Valve. http://rhgproducts.com/products/window-cleaning/systems/non-powered/ Ettore Aquaclean EZ Pure System User Manual EZ Pure As Shipped EZ Pure After Initial Assembly You are now ready to use your new RHG EZ Pure. First Use: 1) 2) 3) 4) 5) Open the Bypass and Flush Valve all the way (Counter Clockwise) Attach your tap water source to the (B) input connector Turn on the tap water. Run the EZ Pure in this configuration for 3 minutes. Close and lightly hand tighten the Bypass Valve down into Production Mode (Clockwise) a. Water will still be exiting the bypass hose 6) Run the EZ Pure in this configuration for 5 minutes. 7) Test the input tap water and pure water output from your EZ Pure with a handheld TDS meter the initial output reading should be 3 or less. http://rhgproducts.com/products/window-cleaning/systems/non-powered/ Ettore Aquaclean EZ Pure System User Manual Regular Use 1) 2) 3) 4) 5) Open the Bypass and Flush Valve all the way (Counter Clockwise) Attach your tap water source to the (B) input connector Turn on the tap water. Run the EZ Pure in this configuration until any air is expelled from the system. Close and lightly hand tighten the Bypass Valve down into Production Mode (Clockwise) a. Water will still be exiting the bypass hose b. Allow 30 Seconds or so for system to settle. 6) Test the input tap water and pure water output from your EZ Pure with a handheld TDS meter the initial reading should be 3 or less. Test output TDS every 3 hours. Handheld TDS Tester http://rhgproducts.com/products/window-cleaning/systems/non-powered/ Ettore Aquaclean EZ Pure System User Manual Low Water Flow Low water flow is generally caused by low input water pressure. 1) Test the tap water pressure to see if during water production the PSI of the input water flow is 60 psi or more. 2) If the pressure is lower than that consider the use of a booster pump to raise the imput tap water pressure. 3) Booster Pumps are recommended for Water pressure below 60psi. A 110v Booster Pump can be attached in front of your EZ Pure to boost input water flow. There are many pump configurations and the Wayne pump picture below is commonly available and is rated to provide a 40psi boost. Be careful when working with any electrical device around water, use a GFCI extension cord to help assure your safety. Should the added pressure from a pump not provide adequate pressure, then your RO Membrane may need testing and replacement. http://rhgproducts.com/products/window-cleaning/systems/non-powered/ Ettore Aquaclean EZ Pure System User Manual Replacing Cartridges As indicated in the general overview the Carbon Filter and DI Cartridge will require regular replacement. Perform this one housing at a time to preserve the correct connections as you replace filters and cartridges/ Steps to follow: 1) Select the housing to be replaced. 2) Disconnect the fittings from the housing. Simultaneously: a. Push the grey collar toward the housing b. Pull the tube from the collar. 3) The tube will become loose as shown 4) Tug at the housing to remove it from the holding clamps 5) Insert the new housing in the clamps (B) and reconnect the tubing (A). Your EZ Pure is now ready to for the First Use Startup procedure (again) http://rhgproducts.com/products/window-cleaning/systems/non-powered/