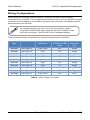
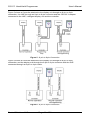
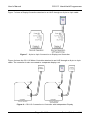
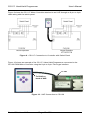
1
Hand-Held Programmer Document Number: 000434A Revision: B CS1171 Hand-Held Programmer User's Manual Warranty For warranty information please refer to the following website: http://www.controls.com/index.php/support/warranty Disclaimer Control Solutions LLC reserves the right to update this manual at any time without notice. This manual supersedes all previous issues, which must no longer be used. Control Solutions LLC reserves the right to change this product without any notification. Control Solutions LLC and the Control Solutions logo are trademarks of Control Solutions LLC. All other brand and product names, company names, and logos are trademarks or registered trademarks of their respective companies. All materials contained within this manual, in printed or electronic format, are protected by copyright laws and other intellectual property laws. © 2011 Control Solutions LLC, Aurora, Illinois, USA. All rights reserved. Control Solutions LLC 2520 Diehl Road Aurora, Illinois 60502 Tel: (630) 806-7062 Fax: (630) 806-7065 Web: www.controls.com Control Solutions LLC Page 2 of 56 User's Manual CS1171 Hand-Held Programmer Table of Contents Page Warranty .................................................................................. 2 Disclaimer ................................................................................ 2 Introduction ............................................................................. 7 Purpose ...................................................................................................... 7 Scope.......................................................................................................... 7 Revision History .......................................................................................... 7 Precautions ................................................................................................. 7 Terms.......................................................................................................... 8 Definitions ................................................................................................... 8 References ................................................................................................. 8 Audience ..................................................................................................... 8 Product Description ................................................................ 9 Overview ..................................................................................................... 9 Features...................................................................................................... 9 Additional Features ................................................................................... 10 Specifications............................................................................................ 10 Kit Content ................................................................................................ 10 CS1171 Hand-Held Programmer .......................................... 11 Unit Layout................................................................................................ 11 Display ................................................................................................ 11 Input and Navigation ........................................................................... 12 Cable Interface .................................................................................... 12 Wiring Configurations ........................................................... 13 Using the Hand-Held Programmer ....................................... 17 Menus and Parameters............................................................................. 19 Main Menu ................................................................................................ 21 Indoor Mode Sub-Menu (Drive Mode 2).................................................... 29 Meters Sub-Menu ..................................................................................... 31 Advanced Sub-Menu ................................................................................ 32 Options Sub-Menu .................................................................................... 35 Functions Sub-Menu ................................................................................. 38 Page 3 of 56 Control Solutions LLC CS1171 Hand-Held Programmer User's Manual Debug Sub-Menu ...................................................................................... 40 Parameter Information .......................................................... 45 Troubleshooting and Diagnostics ........................................ 51 Contacting Customer Service .............................................. 53 Parameter Setting Worksheet............................................... 55 Control Solutions LLC Page 4 of 56 User's Manual CS1171 Hand-Held Programmer List of Tables Page Table 1 - Abbreviations and Acronyms ............................................................. 8 Table 2 - CS1171 Product Specifications ....................................................... 10 Table 3 - Package Contents ........................................................................... 10 Table 4 - HHP Navigation ............................................................................... 12 Table 5 - CSLLC Motor Controllers ................................................................ 13 Table 6 - Modifying a Parameter .................................................................... 17 Table 7 - Accessing a Sub-menu.................................................................... 18 Table 8 - HHP Main Menu Parameter Reference ........................................... 46 Table 9 - HHP Indoor Mode Sub-menu Parameter Reference ....................... 46 Table 10 - HHP Meters Sub-menu Parameter Reference .............................. 46 Table 11 - HHP Advanced Sub-menu Parameter Reference ......................... 47 Table 12 - HHP Options Sub-menu Parameter Reference ............................. 48 Table 13 - HHP Functions Sub-menu Parameter Reference .......................... 49 Table 14 - HHP Debug Sub-menu Parameter Reference............................... 50 Table 15 - Troubleshooting URL..................................................................... 51 List of Figures Page Figure 1 - Precaution Blocks............................................................................. 7 Figure 2 - CS1171 Hand-Held Programmer ..................................................... 9 Figure 3 - HHP Front ...................................................................................... 11 Figure 4 - HHP Back....................................................................................... 12 Figure 5 - 8-pin to 8-pin Connection ............................................................... 14 Figure 6 - 8-pin to 4-pin Connection ............................................................... 14 Figure 7 - 8-pin to 4-pin Connection to Display and Controller ....................... 15 Figure 8 - CS1115 Connection to Controller with Independent Display .......... 15 Figure 9 - CS1117 Connection to Controller with Switch Panel ...................... 16 Figure 10 - HHP Connection to CS1108......................................................... 16 Figure 11 - Menus and Parameters ................................................................ 19 Figure 12 - Throttle Scale ............................................................................... 23 Figure 13 - Throttle Deadband........................................................................ 23 Figure 14 - Throttle Failband .......................................................................... 24 Figure 15 - Ramp Shape Curve ...................................................................... 25 Figure 16 - Current Parameter Relationships ................................................. 26 Figure 17 - Charging Time Conversion ........................................................... 43 Page 5 of 56 Control Solutions LLC CS1171 Hand-Held Programmer User's Manual This page intentionally left blank Control Solutions LLC Page 6 of 56 User's Manual CS1171 Hand-Held Programmer Introduction Before using the Hand-Held Programmer (HHP) please read this entire manual carefully to become familiar with the features, benefits and operation. Purpose This manual is intended to provide the information you will need to connect and use the CS1171 HHP. Scope This manual explains how to connect the CS1171 to various motor controllers. In addition it describes the CS1171 layout, buttons, menu items and usage. It also provides general care and maintenance as well as basic troubleshooting tips. Revision History Revision B Update The format and information in this document has been enhanced and updated to provide a more user friendly experience. Precautions This document contains hazard statements for your safety. Hazard statements are provided where safety consequences to personnel, equipment, and operation may exist. Failure to follow these statements may result in serious consequences. A standard set of icons are used to draw your attention to the appropriate type of statement. Refer to Figure 1 for sample icons and statements. A warning statement indicates the presence of a hazard that can cause severe injury or death. Warning A caution statement indicates the presence of a hazard that can or will cause minor injury or property damage. Caution This symbol is used whenever there is relevant supplemental information. Figure 1 - Precaution Blocks Page 7 of 56 Control Solutions LLC CS1171 Hand-Held Programmer User's Manual Terms Table 1 defines the abbreviations and acronyms used in this document. Abbreviation – Acronym Definition CSLLC Control Solutions Limited Liability Company EM Electromagnetic or Electromechanical HHP Hand-Held Programmer LCD Liquid Crystal Display LED Light Emitting Diode PCB Printed Circuit Board POD Power on Demand PWM Pulse Width Modulation RJ Registered Jack Table 1 - Abbreviations and Acronyms Definitions None References Number Description DOC0000466A CS1108 PWM Motor Controller User's Manual DOC0001877A CS1125 PWM Motor Controller User's Manual -- HHP Error code url: www.controls.com/index.php/support/troubleshoot/hhp Audience This document was prepared for individuals that use the CS1171 HHP to program motor controllers or technicians performing maintenance on a motor controller. Control Solutions LLC Page 8 of 56 User's Manual CS1171 Hand-Held Programmer Product Description This section of the document provides an overview of the CS1171 HHP, supported features, specifications and kit content. Overview Control Solutions' CS1171 Hand-Held Programmer was designed to offer field programmability to the end user, dealer, and distributor of CSLLC Programmable Motor Controllers, or products containing them. See Figure 2. Figure 2 - CS1171 Hand-Held Programmer Features The HHP serves as a valuable tool providing the following features: Flexibility of use Custom tailored driving characteristics Debugging features Special features to better match product performance with the customer Page 9 of 56 Control Solutions LLC CS1171 Hand-Held Programmer User's Manual Additional Features The CS1171 supports auto shut-off to conserve battery power and prevent inadvertent operation. This feature works by automatically powering down the HHP whenever the controller powers down. Specifications Table 2 lists select specifications for the CS1171 HHP. Specification Value LCD Interface Unit 16 x 2 Characters/Lines Input Voltage 16 - 60 Volts (DC) Unit Size 3.6 x 5.75 x 1.125 Inches Unit Weight 4.8 (139) Ounces (Grams) Table 2 - CS1171 Product Specifications Kit Content Table 3 provides a list of the items that may be included when purchased as a kit. Quantity Item 1 CS1171 Hand-Held Programmer 1 User's Manual 1 Plastic hard shell foam-lined carrying case 1 8-pin to 8-pin 48" HHP Interface Cable 1 8-pin to 8-pin 5" HHP to Y-Adapter Cable 1 8-pin to 4-pin HHP Interface Cable* 1 CS1303 Y-Adapter * Included with dealer kit Table 3 - Package Contents Please note the actual kit contents vary and are dependent upon the kit you purchase. Control Solutions LLC Page 10 of 56 User's Manual CS1171 Hand-Held Programmer CS1171 Hand-Held Programmer This section of the document describes the HHP layout, navigation and interface. Unit Layout The programmer contains a Liquid Crystal Display (LCD) and five button keypad on the front of the unit, and one RJ45 port on the back. See Figure 3 and Figure 4. Two line LCD display Five button keypad Figure 3 - HHP Front Display Information is output to the user through the 16 character x 2 line LCD display located on the front of the unit. Page 11 of 56 Control Solutions LLC CS1171 Hand-Held Programmer User's Manual Input and Navigation The user can review and configure controllers by navigating through a series of menus and options. Navigation is performed using the keypad buttons located on the front of the unit. Table 4 describes the function of each HHP keypad button. Button Meaning This button only serves to power up or power down the unit. With most applications, the HHP will power up with the system. This button is used to navigate to the Main Menu or set a parameter. This button is used to scroll down through the menu list or decrement the current parameter. This button is used to scroll up through the menu list or increment the current parameter. This button is used to access a lower level menu or select a parameter to modify. Table 4 - HHP Navigation Cable Interface The RJ45 port is located on the top middle back of the HHP unit. See Figure 4. RJ45 Port Figure 4 - HHP Back Control Solutions LLC Page 12 of 56 User's Manual CS1171 Hand-Held Programmer Wiring Configurations When using a non-display (refer to Figure 5 - Figure 9), the HHP must be directly connected to the controller. If the programming connector style is an 8-pin (RJ45 Telco type connector) and the display is connected to the same 8-pin connector, the display must be disconnected to use the HHP. An intelligent display e.g. CS1151A or CS1161 must be used in conjunction with the HHP when using the CS1303 Y-Adapter or the HHP will not function. The CS1155 is not an intelligent display. Table 5 lists the wiring configurations for Control Solutions motor controllers. Controller Type Configuration Programming Connector Programming Connector PCB Label Motor Controller Type CS1103 See Figure 5 8-pin Telco JP2 Single CS1106 See Figure 6 4-pin JP1 Single CS1107 See Figure 7 4-pin J16 Single CS1108 See Figure 5 8-pin Telco JP1 Single CS1109 See Figure 5 8-pin Telco JP1 Single CS1112 See Figure 6 4-pin JP1 Single CS1115 See Figure 8 4-pin J2 Single CS1117 See Figure 9 4-pin J16 Quad CS1125 See Figure 5 8-pin Telco JP2 Single CS1126 See Figure 5 8-pin Telco JP2 Dual Table 5 - CSLLC Motor Controllers Page 13 of 56 Control Solutions LLC CS1171 Hand-Held Programmer User's Manual Figure 5 shows a Controller attached to the display unit through an 8-pin to 8-pin connection, the HHP through an 8-pin to 8-pin connector and the CS1303 Y-adapter connected to the HHP, intelligent display unit and the controller. Figure 5 - 8-pin to 8-pin Connection Figure 6 shows a Controller attached to the display unit through an 8-pin to 8-pin connection and the display unit through the 8-pin to 8-pin connector with the HHP connected through an 8-pin to 4-pin cable. Figure 6 - 8-pin to 4-pin Connection Control Solutions LLC Page 14 of 56 User's Manual CS1171 Hand-Held Programmer Figure 7 shows a Display/Controller attached to an HHP through an 8-pin to 4-pin cable. Figure 7 - 8-pin to 4-pin Connection to Display and Controller Figure 8 shows the CS1115 Motor Controller attached to an HHP through an 8-pin to 4-pin cable. The controller is also connected to a separate display unit. Figure 8 - CS1115 Connection to Controller with Independent Display Page 15 of 56 Control Solutions LLC CS1171 Hand-Held Programmer User's Manual Figure 9 shows the CS1117 Motor Controller attached to an HHP through an 8-pin to 4-pin cable along with the switch panel. Figure 9 - CS1117 Connection to Controller with Switch Panel Figure 10 shows an example of the CS1171 Hand-Held Programmer connected to the CS1108 PWM Motor Controller using the 8-pin to 8-pin Telco type interface. To JP1 To RJ45 on back of HHP Figure 10 - HHP Connection to CS1108 Control Solutions LLC Page 16 of 56 User's Manual CS1171 Hand-Held Programmer Using the Hand-Held Programmer Follow the directions below to prepare and use the CS1171 HHP. 1. Insert one end of the interface cable into HHP's 8-pin jack (RJ45). 2. With the controller turned off, connect the other end of the cable to the controller's programming port – refer to the Wiring Configurations section for details on your specific controller. 3. Turn on the Hand-Held Programmer by pressing the Power/Enter button, or by turning on the Controller using the key switch. You must have an 8-pin connector on your controller to be able to use the HHP Power/Enter button for power-up. 4. If the HHP is compatible with the controller version, upon powering up the HHP, a splash screen CS Programmer CS1171C OEM Vxxx (for the OEM version) or CS Programmer CS1171R DLR Vxxx (for the Dealer version) is displayed for five seconds, followed by the Main menu. If the controller generates a fault code, the first menu item will be the controller’s fault code followed by FWD speed. If no fault code is present, the first menu item is FWD speed. Powering up the controller with a fault code will not inhibit HHP functionality. If the controller version is incompatible with the HHP version, the HHP will display BAD REV! See user manual for three seconds, and then the controller firmware version will be displayed FW rev h xxx FW l xxx, and HHP functions will be disabled. (See www.controls.com/index.php/support/troubleshoot/hhp for error code explanations.) 5. To modify a parameter: Step 1 Action Scroll through the Main menu using + to scroll up, and – to scroll down, until the parameter you wish to change is reached The parameter will blink when selected 2 Press > to select the parameter value 3 Press the + to increment/toggle the parameter or – to decrement/toggle the parameter value 4 Press < to save the value to the controller Table 6 - Modifying a Parameter As a parameter's value is modified, it is continuously updated to the controller so that its effect can be verified immediately. If power is lost to the controller or the HHP Page 17 of 56 Control Solutions LLC CS1171 Hand-Held Programmer User's Manual Power/Enter button is pressed before the parameter is saved, the parameter may revert back to its previous value. (Refer to Menus and Parameters and Parameter Information for details on specific parameters). You can rapidly scroll through menu parameters or increment/decrement parameter values by pressing and holding the + or – buttons. 6. To enter a menu other than the Main menu: Step 1 Action Scroll through the Main menu using + to scroll up, and – to scroll down, to the sub-menu you wish to enter Sub-menus are easy to recognize by the > after the menu name; when selected, the sub-menu name will blink 2 Press > to enter the sub-menu The first entry in all sub-menus is a return to the < Main menu item 3 Repeat the steps listed in the Table 6 to change a parameter within the sub-menu 4 Press + to scroll up to the < Main menu item 5 Press < to return to the Main menu Table 7 - Accessing a Sub-menu Refer to Menus and Parameters and Parameter Information for details on the specific menus. 7. When finished using your HHP, it can be turned off by: Pressing the Power/Enter button on the HHP, Disconnecting it from the controller or Y-Adapter, or Turning off the controller power. Control Solutions LLC Page 18 of 56 User's Manual CS1171 Hand-Held Programmer Menus and Parameters Main Menu (pg 21) Indoor Mode Menu (pg 29) Meters Menu (pg 31) FAULT CODE! FWD speed RVS speed Min speed FWD accel FWD decel FWD>RVSdcl RVS accel RVS decel RVS>FWDdcl Motor comp Indoor mode > Throtl scl Deadband Failband Push speed Hold time Ramp shape Comp rspns Brake time Keyoff dcl Batt res Timeout Flash V Full V Cur lim lo Cur lim hi Cur time Meters > Advanced > Options > Functions > Debug > HHP Cntrst < Main In FWD In RVS In FWD In FWD In FWD In RVS In RVS In RVS In mot < Main menu Hours Low Batt Overtemps Tht Faults Chg Nofloats Options Menu (pg 35) < Main menu RVS beep Uni rvs beep Beep error Soft qstop Debug volts CHG to DRV Diagnostics Brake diag Fast curlim Step curlim Flsh chrgstrt Fast chgled Moment key Timed key Accel drive Tht lmt bst Acl lmt bst Soft decel Qstop hi Indoor hi Unidir thrt 0V tht neut AnIn throt MaxSpd thrt Invert thrt menu spd spd acl dcl dch acl dcl dch cmp Functions Menu (pg 38) < Main menu Clr flt log Recall Init Recall Fact Save to Mem1 Recall Mem1 Save to Mem2 Recall Mem2 Save to Mem3 Recall Mem3 Save to Mem4 Recall Mem4 Save to Mem5 Recall Mem5 Save to Mem6 Recall Mem6 Save to Mem7 Recall Mem7 Debug Menu (pg 40) Advanced Menu (pg 32) < Main menu Fwd Plg Tm Rvs Plg Tm Regen off Idle push Creep spd In CRP spd Seq chrg led Save boost Flash qstop Fail dbstrt Fail qstop Serial throt Analog throt Sertht throt Invrt sertht Rollbck A Double pull In/Out cur Shabat Full e2 sel Misc 1&2 Misc 3&4 Misc1 invert Misc2 invert Misc3 invert Misc4 invert Shutdown V EMBrake V < Main menu Fault Code Fault Log Product ID FW rev h FW rev l Serial # > PWM Speed Throt V Throt val Throt center Throt fault Short ckt Off push Max speed Analog in Throt flags Battery V Temp Current A Buttons Indoor pin Indoor mode QStop pin Quick stop Brk rel pin Brake rel Charging Keyswitch Reverse pin Reverse Chrge time Charge mode Figure 11 - Menus and Parameters The above menu is from an "OEM" HHP. The descriptive information on the following pages can be used for both a Dealer and OEM HHP. See Parameter Information for additional parameter information. Page 19 of 56 Control Solutions LLC CS1171 Hand-Held Programmer User's Manual This page intentionally left blank Control Solutions LLC Page 20 of 56 User's Manual CS1171 Hand-Held Programmer Main Menu Parameter Description FAULT CODE! If the Hand-Held Programmer is powered up and the controller generates a fault code, the first menu item is the controller’s fault code. When a fault code is displayed e.g. 12h, the > button can be pushed to momentarily display the text associated with the error code e.g. Em-brake Open. When no fault code is present, the first menu item will be FWD speed. Powering up the controller with a fault code will not inhibit Hand-Held Programmer functionality. FWD speed Sets the percentage of the maximum forward speed allowed to the motor when the throttle has reached the full forward position and speed control is set to full speed. RVS speed Sets the percentage of the maximum reverse speed allowed to the motor when the throttle has reached the full reverse position and speed control is set to full speed. Min speed Sets the minimum percentage of speed for forward/reverse throttle when the Enhanced Deluxe Display Pot or ANIN input is at its lowest setting. If set to 0, and Enhanced Deluxe Display Pot is turned all of the way down, the forward/reverse speed is 0. FWD accel Sets the amount of forward acceleration. The higher the percent value, the faster the forward acceleration. FWD decel Sets the amount of forward deceleration. The higher the percent value, the faster the forward deceleration. FWD>RVSdcl Sets the amount of forward deceleration during a forward-toreverse direction change of throttle. The higher the percent value, the faster the forward deceleration during a forward-to-reverse direction change of the throttle. RVS accel Sets the amount of reverse acceleration. The higher the percent value, the faster the reverse acceleration. RVS decel Sets the amount of reverse deceleration. The higher the percent value, the faster the reverse deceleration. RVS>FWDdcl Sets the amount of reverse deceleration during a reverse-toforward direction change of throttle. The higher the percent value, the faster the reverse deceleration during a reverse-to-forward direction change of the throttle. Page 21 of 56 Control Solutions LLC CS1171 Hand-Held Programmer User's Manual Parameter Description Motor comp Sets the motor compensation which is the calibration value used to compensate speed control for varying terrain, also known as Power On Demand (POD). Set to 0 for no speed control compensation. Setting this parameter too high can result in an over compensated drive motor that may behave erratically. Please seek advice from your manufacturer or dealer before attempting to calibrate this parameter. This Warning feature should typically only be used by the manufacturer. To calibrate: Step Indoor mode > Action 1 Set Motor comp to 0 2 Set FWD speed to 50% 3 Drive at full throttle on flat terrain and measure vehicle speed 4 Drive at full throttle on a moderate incline and increase the Motor comp until the vehicle’s speed matches the speed measurement in step 3 5 Verify that PWM is not 100% (monitor PWM in the Debug menu) 6 Is PWM is 100%? If yes, reduce FWD speed and continue with step 3 If no, continue with the next step 7 Reduce the Motor comp value by 20% to allow for temperature tolerance of the motor and controller See Indoor Mode Sub-Menu on page 29. Indoor Mode is also referred to as Drive Mode 2. Control Solutions LLC Page 22 of 56 User's Manual CS1171 Hand-Held Programmer Parameter Description Throtl scl Sets the throttle scale which determines the throttle pot voltage needed for full speed, and sets the amount of throttle movement necessary to obtain full throttle. See Figure 12. Figure 12 - Throttle Scale Deadband Sets the throttle pot range that the controller determines as neutral (See Figure 13). Figure 13 - Throttle Deadband Page 23 of 56 Control Solutions LLC CS1171 Hand-Held Programmer User's Manual Parameter Description Failband This is an area above the Throttle Scale value that disables the motor (See Figure 14). Throttle Failband provides a safety feature to protect against throttle shorts to ground or 5V, which could lead to dangerous runaways. Figure 14 - Throttle Failband Push speed Sets a percentage of the maximum allowable speed (PWM) to manually move the unit by releasing the electromagnetic brake. Increasing the percentage makes the unit easier to push. To work properly, the following conditions must be met: The key switch must be off The EM brake must be manually released Idle push set to off OR The key switch on The EM brake is manually released The throttle is idle Idle push is set to on Hold time Sets the spasticity control which is used to filter unwanted fast changes in throttle input, or to smooth out the throttle feel. Higher hold time results in a more relaxed and filtered throttle response range. Control Solutions LLC Page 24 of 56 User's Manual CS1171 Hand-Held Programmer Parameter Description Ramp shape Sets the shape of throttle curves. This value is used to determine the ratio of linear to logarithmic shape on the throttle curve. A higher ramp shape value results in a more progressive throttle response when changing throttle inputs. A setting higher than 3 will usually roll off low end throttle response too far and is not recommended. Figure 15 shows the ramp shape curve with the ramp shape settings of 0, 1, 2, and 3. Figure 15 - Ramp Shape Curve Comp rspns Sets the Compensation Response in percent. A boost is progressively applied when surmounting obstacles such as inclines, doorway thresholds, bumps, etc. This boost is set by the parameter Motor comp. A higher value of Comp rspns results in a faster boost response time. Brake time Sets the nominal amount of time from when the motor PWM=0 until the EM Brake is de-energized. This prevents EM braking before a complete stop. Keyoff dcl Sets a filter constant for key switch off or active quickstop condition. The higher the percentage, the faster the deceleration when the key switch is turned off while driving, or quickstop is asserted. Page 25 of 56 Control Solutions LLC CS1171 Hand-Held Programmer User's Manual Parameter Description Batt res Sets the resistance of the power wires. It’s used to compensate the battery display for wiring drop at high current. It is typically calculated in milliohms: Batt res value/3485.1485 = Resistance in ohms Timeout The length of time before the controller powers down after inactivity. When set to 0, the controller will not timeout. Flash V Sets the point when the battery voltage reaches the desired low voltage threshold. When the battery voltage reaches the value set by Flash V, an LED is flashed. The Flash V value is in volts. Full V Sets the desired point when the battery voltage level is considered to be fully charged. When using a multi-segmented LED, this voltage value indicates a full battery on the display. Full V is displayed in Volts. Cur lim lo Sets the Current Limit Lower Bound, maximum current allowable (in Amps). After the Current Limit Upper Bound threshold time is exceeded (Cur time) the motor controller will limit the maximum current to this value which protects the motor and supporting components. Due to tolerances in the drive system, it is recommended to verify the current limit. See Figure 16. Setting the current limit value too high can result in damage to the motor controller, as well as other components in the vehicle. Do not set this value higher than the maximum rated current for the Warning motors, cables, batteries, and controller. Figure 16 - Current Parameter Relationships Control Solutions LLC Page 26 of 56 User's Manual CS1171 Hand-Held Programmer Parameter Description Cur lim hi Sets the Current Limit Upper Bound, maximum current allowable (in Amps). When initially current limiting, current will not exceed the upper bound. Due to tolerances in the drive system, it is recommended to verify the maximum current limit. See Figure 16. To verify the maximum current limit: Step Action 1 Stall the drive motor 2 Apply full throttle to the controller and measure the motor current with a calibrated DC clamp meter 3 If the current is: Too high, decrement the Cur lim hi parameter by one Too low, increment the Cur lim hi parameter by one Acceptable, continue with step 6 4 Allow the controller to cool off for a minute or two 5 Go to step 1 6 Stop you have completed this procedure Setting the current limit value too high can result in damage to the motor controller, as well as other components in the vehicle. Do not set this value higher than the maximum rated current for the Warning motors, cables, batteries, and controller. Refer to Table 8 for range values. Cur time Sets the delay time before a controller abruptly drops from the programmed maximum allowable current limit (Cur lim hi) to the lower current limit (Cur lim lo), when Step curlim is enabled. See Figure 16. Meters > See Meters Sub-Menu on page 31. Advanced > See Advanced Sub-Menu on page 32. Options > See Options Sub-Menu on page 35. Functions > See Functions Sub-Menu on page 38. Debug > See Debug Sub-Menu on page 40. HHP Cntrst Adjusts the Hand-Held Programmer’s LCD contrast. 0 = lightest; 50 = default; 100 = darkest Page 27 of 56 Control Solutions LLC CS1171 Hand-Held Programmer User's Manual This page intentionally left blank Control Solutions LLC Page 28 of 56 User's Manual CS1171 Hand-Held Programmer Indoor Mode Sub-Menu (Drive Mode 2) The following Indoor Mode (Drive Mode 2) parameters will only be active if the controller’s IN/OUT input is asserted (5V). If a controller does not have an IN/OUT input, these parameters are not used. Parameter Description In FWD spd Sets the percentage of the maximum indoor forward speed allowed to the motor when the throttle has reached the full forward position and speed control is set to full speed. In RVS spd Sets the percentage of the maximum indoor reverse speed allowed to the motor when the throttle has reached the full reverse position and speed control is set to full speed. In FWD acl Sets the amount of indoor forward acceleration. The higher the percent value, the faster the indoor forward acceleration. In FWD dcl Sets the amount of indoor forward deceleration. The higher the percent value, the faster the indoor forward deceleration. In FWD dch Sets the amount of indoor forward deceleration during a forward-toreverse direction change of throttle. The higher the percent value, the faster the indoor forward deceleration during a forward-to-reverse direction change of the throttle. In RVS acl Sets the amount of indoor reverse acceleration. The higher the percent value, the faster the indoor reverse acceleration. In RVS dcl Sets the amount of indoor reverse deceleration. The higher the percent value, the faster the indoor reverse deceleration. In RVS dch Sets the amount of indoor reverse deceleration during a reverse-toforward direction change of throttle. The higher the percent value, the faster the indoor reverse deceleration during a reverse-to-forward direction change of the throttle. Page 29 of 56 Control Solutions LLC CS1171 Hand-Held Programmer User's Manual Parameter Description In mot cmp Sets the indoor motor compensation which is the calibration value used to compensate speed control for varying terrain, also known as Power On Demand (POD). Set to 0 for no speed control compensation. To calibrate: Step Action 1 Set In mot cmp to 0 2 Set In FWD spd to 50% 3 Drive at full throttle on flat terrain and measure vehicle speed 4 Drive at full throttle on a moderate incline and increase the In mot cmp until the vehicle’s speed matches the speed measurement in step 3 5 Verify that PWM is not 100% (monitor PWM in the Debug menu) 6 Is PWM is 100%? If yes, reduce FWD speed and continue with step 3 If no, continue with the next step 7 Reduce the In mot cmp value by 20% to allow for temperature tolerance of the motor and controller Setting this parameter too high can result in an over compensated drive motor that may behave erratically. Please seek advice from your manufacturer or dealer before attempting to calibrate this parameter. This feature should typically only be used by the manufacturer. Control Solutions LLC Page 30 of 56 User's Manual CS1171 Hand-Held Programmer Meters Sub-Menu The Meters Sub-Menu provides several useful entries that display various statistics. Parameter Description Hours Displays the number of hours the controller has operated. Low Batt Displays the number of hours the unit has operated with the battery voltage level below the low battery threshold. Overtemps Displays the number of over temperature conditions that have occurred. Tht Faults Displays the number of times a throttle failband failure occurred. Chg Nofloats Displays the number of times the charge cycle was ended early. The above counts and timers do not roll over and cannot be cleared. Page 31 of 56 Control Solutions LLC CS1171 Hand-Held Programmer User's Manual Advanced Sub-Menu Parameter Description Fwd Plg Tm The duration of time the motor is reversed after the quickstop input is activated while driving forward. Rvs Plg Tm The duration of time the motor is reversed after the quickstop input is activated while driving in reverse. Regen off Regenerative braking utilizes the fact that an electric motor can also act as a generator. The vehicle's motor is used as a generator during braking, conserving battery power. Setting this menu option to: Idle push On, turns off regenerative braking Off, turns on regenerative braking Idle push allows the unit to be manually pushed and limits the speed to a percentage defined by Push speed. To work properly, the following conditions must be met: The key switch is on The EM brake is manually released The throttle is idle Idle push is set to on Creep spd Sets drive mode 1 creep speed. It is the minimum PWM percentage applied to the motor output after the throttle exceeds Deadband. This setting helps prevent rollback on inclines when the brake releases with minimal throttle applied. This setting should not be set too high to achieve proper low speed control on flat ground. In CRP spd Sets drive mode 2 creep speed. It is the minimum PWM percentage applied to the motor output after the throttle exceeds Deadband. This setting helps prevent rollback on inclines when the brake releases with minimal throttle applied and is active when IN/OUT input is asserted. This setting should not be set too high to achieve proper low speed control on flat ground. Control Solutions LLC Page 32 of 56 User's Manual CS1171 Hand-Held Programmer Parameter Description Seq chrg led When set to On, cycles the battery status LEDs from the bottom segment to the top segment, with charge complete status indicated by flashing the top segment. Setting Seq chrg led to Off disables this feature. The display type used, determines how this option indicates a charge complete status. An intelligent display with the ability to visually represent real time data is required to use Seq chrg led. Save boost When set to On, saves real-time motor compensation (boost) values and automatically reapplies them when stopping and restarting on an incline to prevent rollback. Boost values are not saved through a key switch power cycle. Flash qstop When set to On, while asserting a Quickstop, flashes the status LED on the controller at a constant 2Hz rate. If equipped with a display unit, also flashes the battery LEDs. Fail dbstrt When set to On or Off, it allows the status LED to display the appropriate error code. Fail qstop When set to On, with Quickstop asserted, allows the status LED to display the appropriate error code. Serial throt When set to On, configures the controller to respond to throttle from an Enhanced Deluxe Display. Analog throt When set to On, configures the controller to respond to an analog throttle directly connected to TPOTC input. Sertht throt When set to On, configures the controller to respond to the speed control pot from an Enhanced Deluxe Display as a throttle. Invrt sertht When set to On while Sertht throt is enabled, inverts the operation of the response to the speed control. Rollbck A Speeds up the activation of the EM brake when stopping on an incline. It should be set low enough for acceptable stopping performance on a nominal incline, but should not be set so low that the brake prematurely engages when stopping on flat ground or grass. Double pull When set to On, makes it necessary to activate the throttle mechanism twice to make the vehicle drive. Page 33 of 56 Control Solutions LLC CS1171 Hand-Held Programmer User's Manual Parameter Description In/Out cur When turned On, uses the upper bound current limit setting when in Outdoor mode, and the lower bound current limit setting when in Indoor mode. Shabat When turned On, and properly configured, the motor controller enters indoor mode and uses defined creep speed parameters. Full e2 sel When turned On, allows a section of memory to be accessed that stores creep speed information used by Shabat. Misc 1&2 To configure these pins contact CSLLC, refer to page 53. Misc 3&4 To configure these pins contact CSLLC, refer to page 53. Misc1 invert Inverts the operation state of the Misc 1 input. Misc2 invert Inverts the operation state of the Misc 2 input. Misc3 invert Inverts the operation state of the Misc 3 input. Misc4 invert Inverts the operation state of the Misc 4 input. Shutdown V Voltage level of the battery, that when reached, shuts down the controller. EMBrake V Sets the desired EM brake voltage. The EM brake output is pulse width modulated to achieve values lower than the actual battery voltage. Output is independent of the battery voltage, but can never be higher than the absolute battery voltage. Control Solutions LLC Page 34 of 56 User's Manual CS1171 Hand-Held Programmer Options Sub-Menu Parameter Description RVS beep When set to On, enables a horn beep (if equipped) when the controller is in reverse. Uni rvs beep When set to On, enables a horn beep (if equipped) when the controller is in reverse – for unidirectional throttle only. Beep error When set to On, Beep enables a horn beep (if equipped) when a controller error code is present. The horn will pulse out the error code, similar to the LED modulation for an error code. Soft qstop When set to On, asserting the quick stop input triggers a programmable softer stop. When set to Off, asserting quick stop triggers an abrupt stop. Debug volts When set to On, a sample battery voltage is displayed. This is used for battery related testing and problem diagnosis. Turn off when finished with diagnostics. CHG to DRV When set to On, the controller jumps to drive mode when charging completes. If enabled, the key must be on to jump to drive mode. When set to Off, the controller turns off when charging completes. Diagnostics When set to On, the controller performs general power-up selfdiagnostics. Diagnostics are not performed when powering up in charge mode. Brake diag When set to On, electromagnetic (EM) brake diagnostics are enabled at power-up and also during operation. When set to Off, diagnostics are not performed on the EM brake output. Most applications with an EM brake require this option to be enabled as part of compliance standards. Fast curlim When set to On, the current limit characteristic of the controller will recover quickly in response to motor current, versus a slower cutback and recover. Step curlim When set to On, the current limit decay function changes to an abrupt step function, such that after a time defined by Cur time; the current limit will drop from Cur lim hi to Cur lim lo. When set to Off, current limit will follow a normal linear decay function. See Figure 16. Flsh chgstrt When set to On, the status LED will flash when charging starts. Page 35 of 56 Control Solutions LLC CS1171 Hand-Held Programmer User's Manual Parameter Description Fast chgled A typical charging cycle will go through the following charging modes in order: 1. 2. 3. 4. 5. Pre-charge, Charge Qualification, Bulk Charge, Top-off Charge, and Float. The Fast chgled on/off setting determines when to flash the LED. When set to On, flash will occur at the end of Bulk Charge mode. When set to Off, flash will occur at the end of Top-off charge mode. Moment key When set to On, the system turns On and Off with a pushbutton or momentary contact of the key switch. When set to Off, the unit remains powered up only while the key switch remains closed, and powers down when the key switch contact is opened. Timed key When set to On, the unit will not power down immediately when key switch state indicates power down, but remains on for the duration defined by Timeout. When set to Off, the unit powers down as normal with no delays. Accel drive Used to configure throttle for acceleration control, instead of speed control. When set to Off, the controller interprets throttle as a conventional speed adjustment, where the direction and speed of the unit is determined by the displacement from center and the magnitude of the displacement. When set to On, a throttle displacement indicates acceleration to the controller. The unit accelerates proportional to this displacement, as long as it is present. Deceleration requires an equal and opposite displacement. FWD/REV input controls direction while Accel drive is On, which results in a hard stop when toggling direction. Tht lmt bst When set to On, motor compensation (boost) is limited by the absolute throttle position. Acl lmt bst When set to On, motor compensation (boost) is limited by the acceleration of the throttle position (change in throttle over time). Soft decel When set to On, negative (decelerating) boost is not applied, resulting in a soft deceleration. Qstop hi Depending on the module configuration quickstop can be wired as active (+5 V) or passive (GND). In a passive configuration: When the parameter is On, quickstop is asserted when active. When the parameter is Off, quickstop is asserted when the circuit is closed. Control Solutions LLC Page 36 of 56 User's Manual CS1171 Hand-Held Programmer Parameter Description Indoor hi When set to On, indoor input will be asserted on a high input instead of a low input. Unidir thrt When set to On, the full throttle displacement controls speed only, i.e. 0V to 5V (default forward), and direction is controlled by the FWD/RVS input. When set to Off, throttle displacement overrides the FWD/RVS input and controls speed and direction, i.e. 2.5V to 0V (default reverse) and 2.5V to 5V (default forward). 0V tht neut When set to On, throttle neutral voltage will be 0V (typical 2-wire throttle, foot pedal control). When set to Off, throttle neutral voltage will be 2.5V (typical 3-wire throttle, wig-wag control). AnIn throt When set to On, the controller will respond to an analog maxspeed control directly connected to the AnIn input. AnIn must be enabled. MaxSpd thrt When set to On, the controller will respond to a max-speed control on a Deluxe display. Invert thrt When set to On, throttle actuation is inverted such that a default forward actuation of the throttle results in reverse movement. Page 37 of 56 Control Solutions LLC CS1171 Hand-Held Programmer User's Manual Functions Sub-Menu Parameter Description Clr flt log Clears all faults from the controller’s Fault log. Recall Init Every time the HHP is powered up successfully, it stores the controller’s current configuration. After changing various parameters, but before powering down the Hand-Held Programmer, this option can restore the controller’s original configuration of all parameters. If the HHP power is turned off or lost, memory of the controller’s configuration at the time of the last power-up is lost as well. Recall Fact Restores the factory default configuration of all parameters, if available (See Troubleshooting and Diagnostics on page 51 for details). Save to Mem1 Stores the current configuration of all parameters to the Hand-Held Programmer’s non-volatile memory. Overwrites any configuration currently stored. Values are not destroyed after recalling from memory to allow program-cloning of controllers. Values are only overwritten when Save to Mem1 is used again. Use this feature cautiously when program-cloning, so as not to inadvertently program many controllers with undesired values. Recall Mem1 Restores the Hand-Held Programmer's stored configuration of all parameters from Memory 1. Save to Mem2 Functions the same as Save to Mem1 but stores to Mem2. Recall Mem2 Restores the Hand-Held Programmer's stored configuration of all parameters from Mem2. Save to Mem3 Functions the same as Save to Mem1 but stores to Mem3. Recall Mem3 Restores the Hand-Held Programmer's stored configuration of all parameters from Mem3. Save to Mem4 Functions the same as Save to Mem1 but stores to Mem4. Recall Mem4 Restores the Hand-Held Programmer's stored configuration of all parameters from Mem4. Save to Mem5 Functions the same as Save to Mem1 but stores to Mem5. Control Solutions LLC Page 38 of 56 User's Manual CS1171 Hand-Held Programmer Parameter Description Recall Mem5 Restores the Hand-Held Programmer's stored configuration of all parameters from Mem5. Save to Mem6 Functions the same as Save to Mem1 but stores to Mem6. Recall Mem6 Restores the Hand-Held Programmer's stored configuration of all parameters from Mem6. Save to Mem7 Functions the same as Save to Mem1 but stores to Mem7. Recall Mem7 Restores the Hand-Held Programmer's stored configuration of all parameters from Mem7. Page 39 of 56 Control Solutions LLC CS1171 Hand-Held Programmer User's Manual Debug Sub-Menu Parameter Description Fault Code Displays the controller's current fault code, if present. Will display 00 if no fault present. Fault Log Displays the controller’s most recent fault log. To access the log: Step Action 1 On the HHP from the Main menu, scroll down to the Debug > menu parameter 2 Press > to enter the Debug menu 3 Scroll down to the Fault Log parameter 4 Press > to select the parameter 5 Press + to access the next fault, or – to access the previous fault When a fault code is displayed, the > can be pushed to momentarily display the text associated with the error code. Up to 16 faults can be stored. FF or 00 represent a blank fault log location. (See www.controls.com/index.php/support/troubleshoot/hhp for error code explanations on all controllers) Product ID Displays the controller’s 4-digit CS product identification (e.g. CS1108 would display 1108). FW rev h Displays the firmware revision of the controller. FW rev l Displays the firmware revision of the controller. Serial # > Displays the controller’s serial number. To access the serial number: Step PWM Action 1 On the HHP from the Main menu, scroll down to the Debug > menu parameter 2 Press > to enter the Debug menu 3 Scroll down to the Serial # > parameter 4 Press > to select the parameter 5 Press < to return to the Debug menu Displays in real time, the set PWM duty cycle percent of the drive system output (M1+/M1- motor terminals). Control Solutions LLC Page 40 of 56 User's Manual CS1171 Hand-Held Programmer Parameter Description Speed Displays in real time the speed percentage that the controller attempts to maintain. Throt V Displays in real time the throttle input voltage in volts. There is a two place decimal point that is not displayed on the programmer, so a displayed value of 0100 would equal 1.00V, and a displayed value of 0250 would equal 2.50V. Throt val Displays in real time the absolute throttle percentage from neutral with respect to the throttle input range. Throt center Displays in real time when the throttle is in the center position. Throt fault Displays in real time when there is a throttle fault. Short ckt Displays in real time if there is a short circuit in the motor circuit. Off push Displays in real time, On if the vehicle is being pushed while the key is off and charging mode is off. Max speed Displays in real time the set maximum speed percentage, which can be set by an intelligent display (CS1151A, CS1161). Check Throt flags to see which input is used to set Maximum Speed. Analog in Displays in real time the Analog input voltage relative to the controller’s +5V power supply, in terms of percentage. Throt flags Displays different throttle and max speed option configurations. Enabled = 1, Disabled = 0. They are defined as follows: No. Option(s) Hex Code Description 1 Inverted Throttle 01 Changes the driving throttle actuation so that a normal forward actuation of the throttle results in reverse operation from the controller 2 Max Speed = Analog Input 04 Enables analog input to be used for max speed control 3 Max Speed = Max Speed 10 Enables max speed input to be used for max speed control 4 Max Speed = Serial throt 40 Enables Serial throt input to be used for max speed control 5 1&2 05 (See 1 & 2 above) 6 1&3 11 (See 1 & 3 above) 7 1&4 41 (See 1 & 4 above) Page 41 of 56 Control Solutions LLC CS1171 Hand-Held Programmer User's Manual Parameter Description Battery V If Debug volts is enabled, Battery V displays in real time the battery voltage. Otherwise, it displays the battery capacity. There is a two place decimal point that is not displayed on the programmer, so a displayed value of 0100 would equal 1.00V, and a displayed value of 0250 would equal 2.50V. Temp Displays in real time the temperature of the drive FET transistors. Current A Displays in real time the motor current in Amps. Buttons Each one of the eight bits that make up the hexadecimal value represents one button on a deluxe display. A button pressed = 0, not pressed = 1. They are defined as follows: Bit 8 Bit 7 Bit 6 Bit 5 Bit 4 Bit 3 Bit 2 Bit 1 Break Release Seat Up Head light Seat Down Right Turn Signal Speed Up Left Turn Signal Speed Down If only one button is pressed at a time, the hexadecimal codes displayed will be as follows: Break Release Seat Up Head light Seat Down Right Turn Signal Speed Up Left Turn Signal Speed Down 7F BF DF EF 7F FB FD FE If more than one button is pressed at a time, a combination of bits will be 0 at the same time. There are 255 possible combinations. This feature can be helpful to determine which button(s) may be stuck down on a deluxe display e.g. FF = no buttons pressed, FE = Speed Down, FC = Speed Down and Left Turn Signal, 00 = All Buttons presses. Indoor pin Displays in real time whether the Indoor mode (drive mode 2) is on or off. Indoor mode Displays in real time, On when in Indoor mode (drive mode 2). QStop pin Displays in real time, if the controller is seeing a quick stop input. Quick stop Shows On when Quick Stop is active. Brk rel pin Displays in real time, On when the controller sees a high external brake release input. Brake rel Displays in real time, On when Brake Release is active. Charging Displays in real time, On when Charge Mode is active. Control Solutions LLC Page 42 of 56 User's Manual CS1171 Hand-Held Programmer Parameter Description Keyswitch Displays in real time whether the controller detects a key switch. Reverse pin Displays On when the controller detects an active reverse input. Reverse Displays On when the Reverse input is active. Chrge time Displays elapsed time for the current Charging Mode. Time resets for every Charging Mode change. For Charging Time in hours and minutes, convert from hexadecimal using Figure 17. Figure 17 - Charging Time Conversion Charge mode Indicates current mode of operation while charging. Codes are as follows: 00 = Pre-charge, 02 = Charge qualification/Bulk charge, 04 = Top-Off charge, and 08 = Float charge. Page 43 of 56 Control Solutions LLC CS1171 Hand-Held Programmer User's Manual This page intentionally left blank Control Solutions LLC Page 44 of 56 User's Manual CS1171 Hand-Held Programmer Parameter Information Table 8 - Table 14 provide a listing of the HHP parameters and their read/write (R/W) capability, range, unit of measure and whether the parameter is dynamic. The last column of each table indicates whether the parameter can be modified by the OEM HHP, Dealer HHP, or both. The column key for HHP is: O = OEM only B = OEM and Dealer Main Menu Parameter R/W Range Measure Dynamic HHP Read only 00-FF Hex Y B FWD speed Y 0-100 % N B RVS speed Y 0-100 % N B Min speed Y 0-100 % N O FWD accel Y 0-100 % N B FWD decel Y 0-100 % N B FWD>RVSdcl Y 0-100 % N B RVS accel Y 0-100 % N B RVS decel Y 0-100 % N B RVS>FWDdcl Y 0-100 % N B Motor comp Y 0-240 Decimal N B Indoor mode > – – – – B Throtl scl Y 0-255 Decimal N O Deadband Y 0-255 Decimal N O Failband Y 0-255 Decimal N O Push speed Y 0-100 % N O Hold time Y 0-100 % N O Ramp shape Y 0-15 Decimal N Comp rspns Y 0-100 % N O O Brake time Y 0.00-2.55 – N B % N O Coefficient N O FAULT CODE! Keyoff dcl Y 0-100 Batt res Y 0-255 Timeout Y 0-240 Minutes N B Flash V Y 18-23 Volts N B Full V Y 23.1-26 Volts N B † † Note: Refer to the parameter description on page 26 Page 45 of 56 Control Solutions LLC CS1171 Hand-Held Programmer User's Manual Main Menu R/W Range Measure Dynamic Cur lim lo Parameter Y 1.2-292.5 Amps N HHP O Cur lim hi Y 1.2-292.5 Amps N O Cur time Y 1-253 – N O Meters > – – – – B Advanced > – – – – O Options > – – – – B Functions > – – – – B Debug > – – – – B HHP Cntrst Y 0-100 % N B Table 8 - HHP Main Menu Parameter Reference Indoor Mode Sub-menu R/W Range Measure Dynamic HHP In FWD spd Parameter Y 0-100 % N B In RVS spd Y 0-100 % N B In FWD acl Y 0-100 % N B In FWD dcl Y 0-100 % N B In FWD dch Y 0-100 % N B In RVS acl Y 0-100 % N B In RVS dcl Y 0-100 % N B In RVS dch Y 0-100 % N B In mot cmp Y 0-240 Decimal N B Table 9 - HHP Indoor Mode Sub-menu Parameter Reference Meters Sub-menu Parameter R/W Range Measure Dynamic HHP Hours Read only Low Batt Read only 0-65535.9 Hours Y B 0-255:59 Hours:Minutes Y B Overtemps Tht Faults Read only 0-255 Decimal Y B Read only 0-255 Decimal Y Chg Nofloats B Read only 0-255 Decimal Y B Note: Counters and timers do not roll over or reset. Table 10 - HHP Meters Sub-menu Parameter Reference Control Solutions LLC Page 46 of 56 User's Manual CS1171 Hand-Held Programmer Advanced Sub-menu R/W Range Measure Dynamic HHP Fwd Plg Tm Parameter Y 0.00-10.20 Seconds N O Rvs Plg Tm Y 0.00-10.20 Seconds N O Regen off Y On/off – N O Idle push Y On/off – N O Creep spd Y 0-100 % N O In CRP spd Y 0-100 N O Seq chrg led Y On/off % – N O Save boost Y On/off – N O Flash qstop Y On/off – N O Fail dbstrt Y On/off – N O Fail qstop Y On/off – N O Serial throt Y On/off – N O Analog throt Y On/off – N O Sertht throt Y On/off – N O Invrt sertht Y On/off – N O Rollbck A Y 0.0-621.7 O Y On/off Amps – N Double pull N O N In/Out cur Y On/off – Shabat Y On/off – N O O Full e2 sel Y On/off – N O Misc 1&2 Y 00-FF Hex N O Misc 3&4 Y 00-FF Hex N O Misc1 invert Y On/off – N O Misc2 invert Y On/off – N O Misc3 invert Y On/off – N O Misc4 invert Y On/off – N O Shutdown V Y 3.58-29.94 Volts N O EMBrake V Y 0-45.72 Volts N O Table 11 - HHP Advanced Sub-menu Parameter Reference Page 47 of 56 Control Solutions LLC CS1171 Hand-Held Programmer User's Manual Options Sub-menu Parameter RVS beep R/W Range HHP On/off Measure – Dynamic Y N B Uni rvs beep Y On/off – N O Beep error Y On/off – N O N O Soft qstop Y On/off – Debug volts Y On/off – N B CHG to DRV Y On/off – N O Diagnostics Y On/off – N O Brake diag Y On/off – N O Fast curlim Y On/off – N O Step curlim Y On/off – N O Flsh chgstrt Y On/off – N O Fast chgled Y On/off – N O Moment key Y On/off – N O Timed key Y On/off – N O Accel drive Y On/off – N O Tht lmt bst Y On/off – N O Acl lmt bst Y On/off – N O Soft decel Y On/off – N O Qstop hi Y On/off – N O Indoor hi Y On/off – N O Unidir thrt Y On/off – N O 0V tht neut Y On/off – N O AnIn throt Y On/off – N O MaxSpd thrt Y On/off – N O On/off – N O Invert thrt Y Table 12 - HHP Options Sub-menu Parameter Reference Control Solutions LLC Page 48 of 56 User's Manual CS1171 Hand-Held Programmer Functions Sub-menu Parameter Clr flt log R/W Range HHP Y/N Measure – Dynamic Y N B Recall Init Y Y/N – N B Recall Fact Y Y/N – N B Save to Mem1 Y Y/N – N B Recall Mem1 Y Y/N – N B Save to Mem2 Y Y/N – N B Recall Mem2 Y Y/N – N B Save to Mem3 Y Y/N – N B Recall Mem3 Y Y/N – N B Save to Mem4 Y Y/N – N B Recall Mem4 Y Y/N – N B Save to Mem5 Y Y/N – N B Recall Mem5 Y Y/N – N B Save to Mem6 Y Y/N – N B Recall Mem6 Y Y/N – N B N B N B Save to Mem7 Y Y/N – Recall Mem7 Y Y/N – Table 13 - HHP Functions Sub-menu Parameter Reference Debug Sub-menu Parameter R/W Range Measure Dynamic HHP Fault Code Read only 00-FF Hex N B Fault Log Read only 00-FF Hex N B Product ID Read only – – N B FW rev h Read only 00-FF Hex N B FW rev l Read only 00-FF N B Serial # > Read only – Hex – N B PWM Read only 0-100 % Y *B Speed Read only 0-100 % Y O Throt V Read only 0-5 Volts Y B Throt val Read only 0-100 Y B Throt center Read only On/off % – Y B Throt fault Read only On/off – Y B *Note: Different order to menu items Page 49 of 56 Control Solutions LLC CS1171 Hand-Held Programmer User's Manual Debug Sub-menu Parameter R/W Short ckt Read only Range On/off Measure – Dynamic HHP Y O Read only On/off – Y O Max speed Y 0-100 % Y B Analog in Read only Throt flags Read only Battery V Read only Temp Read only Current A Read only Buttons Read only 00-FF Indoor pin Read only Off push 0-100 % Y B 00-FF Hex Y B 0-99 Volts Y B -20 to +147 C Y B -999.9 to +999.9 Amps Y B Hex – Y B On/off Y B Indoor mode Read only On/off – Y B QStop pin Read only On/off – Y O Quick stop Read only On/off – Y B Brk rel pin Read only On/off – Y O Brake rel Read only On/off – Y B Charging Read only On/off – Y B Keyswitch Read only On/off – Y O Reverse pin Read only On/off – Y O Reverse Read only On/off – Y B Chrge time Read only 0000-FFFF Hex Y B Charge mode Read only 00-08 Hex Y B Note: Bit mapped Table 14 - HHP Debug Sub-menu Parameter Reference Control Solutions LLC Page 50 of 56 User's Manual CS1171 Hand-Held Programmer Troubleshooting and Diagnostics The most current information is always available from the Control Solutions website. Table 15 provides direct links to the web page for CS1171 Error Displays and related troubleshooting information. Product Website URL Hand-Held Programmer http://www.controls.com/index.php/support/troubleshoot/hhp Table 15 - Troubleshooting URL Page 51 of 56 Control Solutions LLC CS1171 Hand-Held Programmer User's Manual This page intentionally left blank Control Solutions LLC Page 52 of 56 User's Manual CS1171 Hand-Held Programmer Contacting Customer Service Customer Service is a top priority at Control Solutions. We are committed to being a leader in our industries, while providing our customers with superior quality, value, and service. We are here to help you find answers to your Control Solutions LLC related questions. If you have any questions, experience technical problems, need any parts or service, contact Control Solutions LLC Customer Service during normal business hours (Mon-Fri, 8am-5pm Central Time) at (630) 806-7062. Page 53 of 56 Control Solutions LLC CS1171 Hand-Held Programmer User's Manual This page intentionally left blank Control Solutions LLC Page 54 of 56 User's Manual CS1171 Hand-Held Programmer Parameter Setting Worksheet Use the following worksheet to document your parameter values. Parameter Value Value Parameter Misc2 invert FWD speed In FWD dcl Misc3 invert RVS speed In FWD dch Misc4 invert Min speed In RVS acl Shutdown V FWD accel In RVS dcl EMBrake V FWD decel In RVS dch Options Menu FWD>RVSdcl In mot cmp RVS beep RVS accel Advanced Menu RVS decel Fwd Plg Tm Beep error RVS>FWDdcl Rvs Plg Tm Soft qstop Motor comp Regen off Debug volts Throtl scl Idle push CHG to DRV Deadband Creep spd Diagnostics Failband In CRP spd Brake diag Push speed Seq chrg led Fast curlim Hold time Save boost Step curlim Ramp shape Flash qstop Flsh chrgstrt Comp rspns Fail dbstrt Fast chgled Brake time Fail qstop Moment key Keyoff dcl Serial throt Timed key Batt res Analog throt Accel drive Timeout Sertht throt Tht lmt bst Flash V Invrt sertht Acl lmt bst Full V Rollbck A Soft decel Cur lim lo Double pull Qstop hi Cur lim hi In/Out cur Indoor hi Cur time Shabat Unidir thrt HHP Cntrst Full e2 sel 0V tht neut Misc 1&2 AnIn throt In FWD spd Misc 3&4 MaxSpd thrt In RVS spd Misc1 invert Invert thrt Indoor Menu -- Parameter In FWD acl Main Menu -- Page 55 of 56 -- Value -- Uni rvs beep Control Solutions LLC NSF ® Registered to ISO 9001