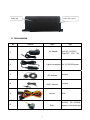
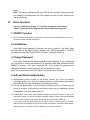
1
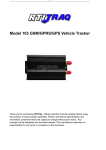
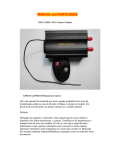
GSM/GPRS/GPS PORTABLE
VEHICLE TRACKER
User Manual TRCPRO
Preface
Thank you for purchasing the tracker. This manual shows how to operate
the device smoothly and correctly. Make sure to read this manual carefully
before using this product. Please note that specification and information
are subject to changes without prior notice in this manual.
Any change will be integrated in the latest release. The manufacturer
assumes no responsibility for any errors or omissions in this document.
Contents
I.
Introduction.............................................................................................................................................
2
1. Main Features ..................................................................................................................................... 2
2. Applications ........................................................................................................................................ 2
3. Hardware Description ......................................................................................................................... 2
4. Accessories ....................................................................................................................................... 4
5. Specifications.................................................................................................................................... 5
II. Installation and operating........................................................................................................................ 5
1. Production installation ........................................................................................................................ 5
2. SIM card installation........................................................................................................................... 6
3. Battery Charging................................................................................................................................. 6
III. Basic functions........................................................................................................................................ 7
1. ON/OFF Function ............................................................................................................................... 7
2. Initialization ........................................................................................................................................ 7
3. Change Password................................................................................................................................ 7
4. Add and Delete Authorization............................................................................................................. 7
5. Single Locating ................................................................................................................................... 8
6. Auto track .......................................................................................................................................... 8
7. Get location in absolute street address ..................................................................................... ......... 8
8. Check the Vehicle State. ..................................................................................................................... 8
9. Check IMEI....................................................................................................................................... 9
10. Terminal (local) Time Setting ........................................................................................................... 9
11. Location Based Service (LBS).......................................................................................................... 9
12 Monitor (Voice Surveillance)............................................................................................................. 9
13. Cut off the Oil and Power System (Option)................................................................................ ...... 9
14. Resume the Oil and Power System (Option) .................................................................................. 10
15. Tracker’s Hardware Resetting......................................................................................................... 10
IV. Alarm Function and settings ................................................................................................................. 10
1. Geo-fence.......................................................................................................................................... 10
2. Movement Alarm .............................................................................................................................. 10
3. Over Speed Alarm............................................................................................................................. 11
4. Shock Sensor Alarm.......................................................................................................................... 11
5. SOS (Option) .................................................................................................................................. 11
6. Low power alarm ............................................................................................................................ 11
V. GPRS Setting ........................................................................................................................................ 11
1. Setting up APN ................................................................................................................................. 11
2. GPRS User Name and password Setup ........................................................................................... . 12
3. IP and Port Setup .............................................................................................................................. 12
4. Modes Switch between “SMS” and “GPRS” ................................................................................... 12
5. GPRS tracking & monitoring platform..................................................................................................... 12
VI. Sleep Function ...................................................................................................................................... 12
VII. Cautions ................................................................................................................................................ 13
VIII.Simple Faults & the Solutions .............................................................................................................. 13
1
IX. LED indicator status .............................................................................................................................14
I.
Introduction
This tracker is a new product based on the GSM / GPRS network and GPS satellite positioning
system, which set multiple functions of security, positioning, monitoring surveillance, emergency
alarms and tracking in its entirety. It can track and monitor remote target by SMS or internet.
1. Main Features
1.1 Waterproof shell
1.2 Built-in large capacity 6000MA battery, long standby time of 60 days.
1.3 Powerful magnets to absorb to vehicle firmly.
1.4 Real-time tracking, retrieve of lost vehicles, cargo.
1.5 Movement alarm, Geo-fence alarm, shock sensor alarm, remote monitoring.
1.7 Support map viewing on mobile phone screen, get absolute address by SMS, GPRS real
time tracking on web based server.
1.8 Built-in high sensitivity GPS and GSM antenna to make it can be used alone without
installation, convenient and quick.
1.9 Support for external GSM antenna, GPS antenna, and external power supply for the
tracker to be installed on the device which can provide power for long-term using.
2. Applications
Applies to: Locating and tracking service for cars, trucks, container trucks, special
vehicles, cargo and criminal investigation officer.
3. Hardware Description
2
3.1 Front face
Built-in GPS
antenna
3.2 Rear face
Built-in
powerful
magnet&
Built-in
GSM
antenna
battery
LED Indicator
3.3 Side face
EXT. Power, Relay
3.4 Side face
3.5 Side face
3
EXT. GPS antenna
EXT. GSM antenna
SIM Slot
USB
ON/OFF
Built-in Mic
Built-in shock sensor
4. Accessories
No.
1
Pictures
Name
Specs
Input: AC 110-220V,
Output DC: 1.5A,12V
AC Adapter
2
3
Lighter car adapter Car 12V OR 24V power
GPS Antenna
3 meters
4
GSM Antenna
2 meters
5
6
Harness
4
Relay
4PIN
12V/40A OR 24V/40A
depends on the vehicle type
5. Specifications
Content
specifications
DIM.
94mm*60mm*38mm
Weight
Network
300g
GSM/GPRS
Band
850/900/1800/1900Mhz
GSM/GPRS Module SIM900B
GPS Module
SIRF3 chip
GPS sensitivity
-159dBm
GPS Accuracy
5m
GPS Start time
45s
Hot status
1s
EXT. power
DC 12 V -24V
Cold status
Operating Current
Sleep Current
4mA±1mA
GSM operating Current
54mA±3mA
GPRS Current(data transfer) 60mA±5mA
Battery
3.7V 6000mA/h Polymer battery
Charge current
1.2A±0.2A
Charge time
5h
Standby time
GSM sleep mode
1500h
Storage Temp.
-40°C to +85°C
Operation Temp.
-20°C to +65°C
Humidity
5%--95% non-condensing
II.
Installation and operating
1. Production installation
1.1 The product is easy to install. The built-in powerful magnet can make it to be directly adsorbed on the
5
iron objects.
1.2 Built-in GPS and GSM antenna, external antenna can be an optional.
1.3 The tracker is waterproof, but please still avoids the long-term placement in the places of
water infiltration.
1.4 If you need an external power supply, cut oil & power system and SOS feature, Please find
4PIN main wire (if optional), wiring diagram is as follows:
Note: Please install SOS button on the hidden place driver can touch.
2. SIM card installation
2.1 Open the waterproof sealant, use tweezers or pointed objects to touch the SIM
card switch lightly, the SIM card slot will pop up, and install the SIM card
correctly, and then put the SIM card slot back.
2.2 Please make sure that the SIM card is GSM network and able to execute the function
of incoming calls display, no calls can be diverted and the PIN code is locked. The
SMS format must be TXT format, and can’t recognize the PDU format.
3. Battery Charging
Please fully charge the product for the first use and charge as following:
3.1 Home charge, find the AC adapter from the accessories and connect 4-PIN plug
into 4-PIN socket, and then connect the other end to mains supply.
3.2 Car charge, find the car lighter charger from the accessories and connect to car cigarette
6
lighter.
Note: The tracker is being charged if the LED is red constantly during the charge,
and charging is finished when the LED change from red to green, and then you
can stop charging.
III.
Basic functions
Note: You don't need to type "+" for all the command in this manual,
"space" means press the space button on the cell phone keyboard.
1. ON/OFF Function
1.1 In the OFF state, switch ON/OFF to ON position, then the three LED will bright flash 1 time, which
means the tracker had been switched on.
2. Initialization
Send SMS "begin+password" to tracker from your cell phone, it will reply "begin
ok" and return to the default factory settings state. (Default password is: 123456).
For example: Send SMS "begin123456" to tracker, it will reply "begin ok".
3. Change Password
Send SMS "password+old password+space+new password" to the tracker from
your cell phone to change the password. For example: Send SMS "password123456
888888" to tracker, it will reply “password OK”, and it means the password has
changed successfully. And please keep the new password in mind.
Note: The new password must be 6 digits, or the tracker can't recognize.
4. Add and Delete Authorization
4.1 Authorization phone number is the phone number you used for tracking,
controlling, alarms, etc, and only 5 phone numbers to be allowed to authorized in
the tracker at most. Add authorization as following two ways:
4.2 For the first authorization, Call and track the tracker device for 10 times from cell
phone in success, it will make the cell phone number as the authorized number
automatically, and reply “add master ok”.
4.3 Authorization: Send SMS “admin+password+space+cell phone number” to set up an
authorized number, the other authorized numbers should be set by the first authorized
number, if the number is successfully authorized, the unit will reply” admin OK” .
If you need to track the target tracker device when it enters into another country, you must
add the country code before the cell phone number, for example, send SMS” admin123456
008613322221111” to the device. Note: 13322221111 will be set up as the
7
authorized number.
4.4 Delete authorization: Send SMS “noadmin+password+space+authorized number”
to delete the authorized number.
5. Single Locating
Any number call the tracker device, it will reply a SMS including the position of
latitude and longitude if don’t set up the authorized number. If authorized number
has set successfully, the device won’t reply SMS including the positioning of latitude
and longitude when the unauthorized number dials up it. Dialing the tracker device
from the authorized number, it will hang up your calling and respond to a real-time
latitude and longitude information as following:
When GPS signal is weak, the position of
latitude and longitude included in SMS is
the position that the tracker received GPS
signals at last. If it is different with its
exact current location, pay attention to
check the time included in the SMS.
6. Auto track continuously
6.1 Limited intervals and times tracking: Send SMS “fix+intervals+time unit+tracking
times+n+password” to tracker. For example: Send SMS “fix030s005n+password” to
tracker, it means tracker will send GPS coordinates each 30 seconds for 5 times. The
intervals and tracking times must be in 3 digits and the maximum value is 255, the
interval must be not less than 20s. Time unit is (s: second, m: minute, h: hour).
6.2 Non-limited
continuously
tracking:
Send
SMS
“fix+intervals+time
unit+***n+password”, For example “fix030s***n+password”, it means tracker will
send GPS coordinates each 30 seconds continuously.
6.3 Cancel automatically locating: Send SMS “nofix+password” to tracker.
7. Get location in absolute street address
You must set up the APN of your local GSM network for the SIM card in tracker first before
using this function, if your local GSM network need user name and password for gprs , please
setup according to the GPRS instructions in chapter V. Send SMS “address+password” to tracker
after setup APN, tracker will reply detailed absolute address including street name.
8. Check the Vehicle State.
Send SMS “check+password” to tracker to check charge status, battery status, GPS
8
status, GSM reception status. For example, send SMS “check123456” to tracker,
and the tracker will reply following information after execute the SMS command:
Power: Power off /charging/charge
finish Battery: 100%
GPS: OK/NO GPS
GSM Signal: 1-32 (The higher digit it shows; the stronger of GSM signals it receives.)
9. Check IMEI
Send SMS "imei+password" to the unit. For example, Send SMS "imei123456" to the
tracker device, an IMEI number in 15 digits will reply to your cell phone.
10.Terminal (local) Time Setting
Send SMS “time+space+zone+password+space+time” to the tracker unit, If succeed,
It will reply “time OK”. For example: Send SMS “time zone123456 8”, 8 is Chinese
time zone, If your country time zone is minus, send SMS “time zone123456 -8”.
11.Location Based Service (LBS)
When the tracker device doesn’t received valid GPS signals, tracker will positioning
by location based service(LBS), the messages includes the GPS coordinates of the
last position in SMS mode, but the LAC in message is the current new position, the
location can be seen by input the LAC code in the menu “Manual Track” of web
platform www.gpstrackerxyz.com, you can also send command “address+password”
to tracker to get the newest absolute address and GPS coordinates as well; tracker
will automatically switch to track by location based service in GPRS mode, and
actualized on the map of web server with LBS mark. And there may be some
inaccuracy with actual location by LBS tracking; the bias depends on GSM reception.
Note: This feature can be used normally in most areas according to the signal of
GSM network. It may not be available in some areas.
12 Monitor (Voice Surveillance)
12.1 The command to switch between Track and Monitor are “tracker” and “ monitor”.
12.2The default mode is “track” (Track mode).
12.3 Send SMS “monitor+password” to the unit, and it will reply “monitor ok!” and
switch to “monitor” mode.
12.4 Send SMS “tracker+password” to the unit, it will reply “tracker ok!” and restore
to “track” mode
13. Cut off the Oil and Power System (Option)
Send SMS “stop+password” to the tracker device, it will reply “Stop engine Succeed” to your
9
cell phone from the tracker device, and stop your car engine as well, at the same time. It
will remain the immobile state until receiving the next SMS command of resuming the oil
and power once receiving SMS command to cut off the oil and power system.
14. Resume the Oil and Power System (Option)
Send SMS “resume+password” to the unit, It will reply “Resume engine Succeed”
and resume your car engine as well, at the same time. It will remain this state until
receiving the next SMS command to cut off the oil and power system once receiving
SMS command to resume the oil and gas system.
15. Tracker’s Hardware Resetting
Send SMS “reset+password” to tracker device to reset the GSM module and GPS
module of the tracker device, it will reply “reset ok”.
IV.
Alarm Function and settings
All the alarms will be send to all the authorized phone numbers once the alarms
are triggered in SMS mode, if the tracker keep in triggered status and alarms are
not be cancelled, tracker will keep sending alarms to authorized phone numbers
every 3 minutes. If tracker works in GPRS mode instead of SMS mode, tracker
will send alarms to web based online system.
1. Geo-fence
1.1 Set up a geo-fence for the tracker device to restrict its movements within a district.
The unit will send SMS to the authorized numbers when it goes out of this district.
Set up: When the unit stays immobile in a place for 3-10 minutes, the user can send
SMS “stockade+password+space+latitude,longitude;latitude,longitude” to unit to set the
restricted district. In case of breach, it will send SMS “stockade!+geo-info” to
the authorized numbers. Tracker will stop sending alarm if tracker returns to
the fence after geo-fence triggered
1.2 Cancel: Send SMS “nostockade+password” to deactivate this function.
2. Movement Alarm
Movement alarm refers to the alarm which will be triggered if tracker device move
beyond a certain distance. (Default distance is 200 meters.)
Setup: when the unit stays immobile in a place for 3-10 minutes, the user can send
SMS “move+password” to the tracker device. It will reply “move ok!”. In case of
breach, movement alarm will be triggered, and tracker will send SMS “Move” along
with a Geo-info to the authorized numbers.
Cancel: Send SMS “nomove+password” to deactivate the movement alarm.
10
3. Over Speed Alarm
3.1 Over speed alarm will be triggered when tracker exceed the speed you setup.
Setup: Send SMS “speed+password+space+speed” to tracker device and it will
reply “speed ok!”, it means you have set up over speed alarm successfully. For
example: “speed123456 080” 080 refers to 80km/h, when tracker’s speed exceed
80km/h, tracker will send SMS “speed+080!+ Geo-info” to authorized numbers.
3.2 Cancel: Send SMS “nospeed+password” to deactivate the over speed alarm.
Remark:The recommended speed should be not less than 30km/h. For below that
rate, it will be effected the accuracy by gps signals drift etc.
4. Shock Sensor Alarm
Setup: Shock sensor alarm is deactivated in default settings. If this function is
needed, please send SMS “shock+password” to tracker device, and tracker will reply
“Shock is activated!”, it means shock sensor alarm has set up successfully. When the
tracker was shocked, it will send SMS “Sensor alarm+Geo-info” to authorized numbers.
Cancel: Send SMS “noshock+password” to deactivate shock sensor alarm.
Note: tracker will send alarm once for each shock, and it stop sending alarm if it
isn’t shocked.
5. SOS (Option)
Long Press the SOS button for 3 seconds, the tracker device will send SMS “help
me!+lat./long. to all the authorized numbers in 3 minutes interval. It will stop sending
SMS “help me” when received a reply from any one of the authorized numbers.
6. Low power alarm
When the battery capacity is below 15%, tracker will send SMS “low
battery+lat./long information to the authorized numbers. And it will stop sending
alarms if external power is connected to charge.
V.
GPRS Setting
User must send SMS via cell phone to set up APN, IP and port before starting
tracking by GPRS. Please setup according to following steps
1. Setting up APN
Send SMS “APN+password+space+APN”, the tracker will reply “APN OK” if
succeeded. For example: Send SMS “ APN123456 CMNET”.
Note: CMNET is the APN of china GSM network, the APN varies with different GSM
11
network operator in different countries, please check with your local GPRS network
operator to get the correct APN.
2. GPRS User Name and password Setup
In most countries, the user name and password involving GPRS login are not
compulsorily necessary, therefore, the entry can be skipped. For those countries
requiring user name and password, please configure as following:
Send SMS “up+password+space+user+space+password”, If succeeded, tracker will
reply “user, password ok!”, for example: send SMS “up123456 jonnes 666666”
Note: 123456 is password of tracker, jonnes is the user name for GPRS login,
666666 is the password for GPRS login.
3. IP and Port Setup
Send SMS “adminip+password+space+IP+space+port”, tracker will reply
“adminip ok” if succeed. For example: send SMS “adminip123456 202.105.131.245
9000”, tracker will reply “adminip ok” if succeed.
Note: 123456 is the password of tracker, and 202.105.131.245 is the ip, 9000 is the port.
4. Modes Switch between “SMS” and “GPRS”
4.1 The default mode is “SMS”.
4.2 Send SMS “GPRS+password” to the unit, and it will reply “GPRS ok!” it means
tracker device has switched to “GPRS” mode.
4.3 Send SMS “SMS+password” to the unit, it will reply “SMS ok!” and restore to
“SMS” mode.
5. GPRS tracking & monitoring platform
5.1 Web based
platform
www.gpstrackerxyz.com.
Configuration
IP:
202.105.131.245 Port: 9000. Please check “software platform user manual”
included in the CD for detailed operation information.
5.2 PC based installation tracking software included in the CD in package.
VI.
Sleep Function
Sleep can save power to extend the standby time, tracker will sleep as following:
1. In the absence of movement, geo-fence, over speed alarm, Successive Locating
Automatically and charging, without any trigger events, and tracker will fall sleep in 5
minutes if tracker get normal GPS signals and doesn’t work in GPRS mode. All
the LED will off during the sleep.
2. Wake up, if any alarms was triggered including shock, incoming calling, SMS,
keyboard pressing, the tracker will wake up to work as normal.
12
VII.
Cautions
1.
2.
3.
Don’t put the unit in overheated or overcooled places.
Handle carefully. Don’t vibrate or shake it violently.
Clear the unit with a piece of dry cloth. Don’t clean in chemicals, detergent.
4.
Don’t paint the unit, this may cause some foreign materials left in between the parts.
5. Don’t disassemble or refit the unit.。
6. Please read the user manual carefully before installation and operation,
learn something more about the voltage range. Otherwise, it won’t work properly or
destroy the product.
VIII.
Simple Faults & the Solutions
Faults
Analyze
Solution
Fail to turn on
1.Press the ON/OFF too short 1.Long press 3 seconds to turn on
2.Battery power is low
2. Connect with charger
1.GSM Antenna is not connect
1.Check GSM antenna connection
NO GSM signals well
2. check SIMCARD installation
2. SIM card is not properly or change SIMCARD.
placed
In existence of an authorized Please delete the authorized number or
Hang up Fail number, an unauthorized number
initialize the unit.
dials up the unit.
Monitor Fail
In existence of an authorized Please delete the authorized number or
number, an unauthorized number
dials up the unit.
GPS Fix Fail
1.Put GPS in an open area
1. GPS reception is poor.
2. GPS antenna is not connected 2.Check connection of GPS antenna
well.
1. APN, IP address and port 1,Configure APN, IP and port again.
GPRS
may be wrong.
2,Active GPRS
Connecting Fail 2.GPRS is not active yet
3. No credit for the SIMCARD 3,Topped up the SIMCARD.
13
initialize the unit.
IX.
LED indicator status
LED Indicator
Status
Green LED flash
Normal
Red LED flash
Power LED
(Red & Green light) Red LED is on constantly
Low power
Charging
Green LED is on constantly
Charging finished
OFF
Searching for GSM network
GSM LED(Green) Flash fast, 1S/times
GSM Mode
GPS LED(Blue)
Flash slow, 3S/times
GPRS Mode
Flash
No GPS reception
ON
Good GPS reception