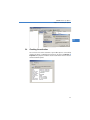
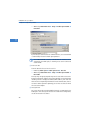
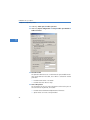
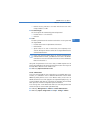
1
LANCOM Systems GmbH Adenauerstr. 20/B2 52146 Würselen Germany E-Mail: [email protected] LANCOM Public Spot Option Internet www.lancom.de . . . c o n n e c t i n g y o u r b u s i n e s s LANCOM Public Spot Option 쮿 110596/0508 쮿 Handbuch Manual 110596_LC-OPTION-PUBLIC-SPOT.ind1 1 30.04.2008 21:41:38 LANCOM Public Spot Option © 2009 LANCOM Systems GmbH, Wuerselen (Germany). All rights reserved. While the information in this manual has been compiled with great care, it may not be deemed an assurance of product characteristics. LANCOM Systems shall be liable only to the degree specified in the terms of sale and delivery. The reproduction and distribution of the documentation and software supplied with this product and the use of its contents is subject to written authorization from LANCOM Systems. We reserve the right to make any alterations that arise as the result of technical development. Windows®, Windows Vista™, Windows NT® and Microsoft® are registered trademarks of Microsoft, Corp. The LANCOM Systems logo, LCOS and the name LANCOM are registered trademarks of LANCOM Systems GmbH. All other names or descriptions used may be trademarks or registered trademarks of their owners. Subject to change without notice. No liability for technical errors or omissions. Products from LANCOM Systems include software developed by the OpenSSL Project for use in the OpenSSL Toolkit (http:/ /www.openssl.org/). Products from LANCOM Systems include cryptographic software written by Eric Young ([email protected]). Products from LANCOM Systems include software developed by the NetBSD Foundation, Inc. and its contributors. Products from LANCOM Systems contain the LZMA SDK developed by Igor Pavlov. LANCOM Systems GmbH Adenauerstr. 20/B2 52146 Wuerselen Germany www.lancom.eu Wuerselen, Mai 2009 110596/0509 LANCOM Public Spot Option Preface Preface Thank you for your confidence in us! The LANCOM Public Spot Option can also be used in a LANCOM WLAN Controller (either as standard or as an option depending on the model) for central management of the option for multiple Wireless Routers or Access Points. Together, these form a network of Public Spots offering access at different locations. Components of the documentation The documentation of your device consists of the following parts: Installation Guide User manual PBX Functions manual Reference manual Menu Reference Guide You are now reading the user manual. It contains all information you need to put your device into operation. It contains all the information you need to activate your option. It also contains all of the important technical specifications. The Reference Manual is to be found as an Acrobat document (PDF file) at www.lancom.eu/download or on the CD supplied. It is designed as a supplement to the user manual and goes into detail on topics that apply to a variety of models. These include, for example: The system design of the operating system LCOS Configuration Management Diagnosis Security Routing and WAN functions Firewall Quality of Service (QoS) 3 EN The LANCOM Public Spot Option upgrades a LANCOM Access Point or LANCOM Wireless Router to a fully functional public wireless LAN access node, known as a "Wireless Public Spot". LANCOM Public Spot Option Preface EN Virtual Private Networks (VPN) Virtual Local Networks (VLAN) Wireless networks (WLAN) Voice communication in computer networks with Voice over IP (VoIP) Backup solutions LANCAPI Further server services (DHCP, DNS, charge management) The Menu Reference Guide (also available at www.lancom.eu/download or on the CD supplied) describes all of the parameters in LCOS, the operating system used by LANCOM products. This guide is an aid to users during the configuration of devices by means of WEBconfig or the telnet console. This documentation was created by … ... several members of our staff from a variety of departments in order to ensure you the best possible support when using your LANCOM product. Should you find any errors, or if you would like to suggest improvements, please do not hesitate to send an e-mail directly to: [email protected] 4 Our online services www.lancom.eu are available to you around the clock if you have any questions on the content in this manual, or if you require any further support. The area 'Support' will help you with many answers to frequently asked questions (FAQs). Furthermore, the knowledgebase offers you a large reserve of information. The latest drivers, firmware, utilities and documentation are constantly available for download. In addition, LANCOM Support is available. For telephone numbers and contact addresses for LANCOM Support, please refer to the enclosed leaflet or the LANCOM Systems Web site. LANCOM Public Spot Option Preface Information symbols Very important instructions. Failure to observe these may result in damage. Important instruction that should be observed. EN Additional information that may be helpful but is not essential. 5 LANCOM Public Spot Option Contents Contents 1 Introduction 1.1 What is a "Wireless Public Spot“? EN 1.2 Public Spots in overview 1.2.1 Open User Authentication (OUA) 1.2.2 Security in the WLAN 1.2.3 Public-Spot Wizards for easy user setup 2 Activating the Option 9 9 10 11 12 13 14 2.1 Prerequisites for installation 14 2.1.1 System requirements 14 2.1.2 Package content 14 2.1.3 Configuration computer with the Windows operating system 14 2.1.4 Up-to-date LANconfig 15 2.1.5 Up-to-date firmware in the LANCOM 15 6 2.2 Online registration 15 2.3 Activating the Public Spot Option 16 2.4 Checking the activation 17 LANCOM Public Spot Option Contents 18 3.1 Basic settings 3.1.1 Local user management 3.1.2 The Voucher Printing Wizard 3.1.3 User administration by RADIUS server 3.1.4 Configuring an external SYSLOG server 18 19 21 25 28 3.2 Extended functions and settings 3.2.1 General 3.2.2 Accounting functions 3.2.3 Interface selection 3.2.4 Customized login page 3.2.5 Enable access without logging on 3.2.6 Station supervision 3.2.7 Security settings 29 29 30 31 32 33 34 34 3.3 Information necessary for access 3.3.1 Information for WLAN access 3.3.2 Information for authentication 36 36 37 3.4 Monitoring the Public Spot 37 4 Access to the Public Spot 38 4.1 Requirements for logging in 38 4.2 How to login 38 4.3 Session information 39 4.4 Logging out of the Public Spot 39 4.5 Advice and help 39 4.5.1 The Public Spot login page is not displayed 40 4.5.2 Login not working 40 4.5.3 It is no longer possible to login 41 4.5.4 The session information window is not being displayed 41 4.5.5 The Public Spot requests a new login for no reason 41 7 EN 3 Setup and operation LANCOM Public Spot Option Contents EN 5 Appendix 5.1 RADIUS attributes 5.1.1 Access request 5.1.2 Accept response 5.1.3 Messages to the accounting server 42 42 42 42 5.2 SYSLOG messages 44 5.3 Further information 5.3.1 The LANCOM Public Spot Implementation Guide 5.3.2 Rights and obligations of Public Spot operators 46 46 46 6 Index 8 42 47 LANCOM Public Spot Option Chapter 1: Introduction 1 Introduction This chapter provides answers to the following two questions: 1.1 What is a "Wireless Public Spot“? Wireless Public Spots are public areas where users have wireless access to a network, typically the Internet, with their own mobile PCs or pocket computers. The most popular demand for these services is from business travellers at airports, in hotels, or at other locations where their mobile computers require access to online content. The public rarely has access to modems, ISDN or broadband connections in areas like this. The solution: WLAN technology Wireless Public Spots make use of the widespread WLAN technologies based on the internationally established IEEE 802.11 standards. WLANs provide fast, uncomplicated network access by radio. All the user needs for a mobile device is an inexpensive WLAN adapter, which is actually standard equipment with most modern notebooks. The bandwidth is sufficient for most applications, even when multiple users are simultaneously logged in to a Public Spot. It is difficult to employ a standard WLAN Access Point as a Public Spot for two main reasons: User authentication is possible only by employing RADIUS/802.11x, so requiring the appropriate infrastructure and configuration. There is no facility for billing / accounting. User authentication As soon as a mobile device moves within range of a base station, the user can enable connections to be established to it spontaneously. However, the problem is that access should not be granted to the public in general, but to certain selected users. Setting up restrictions of this type is the task of a Public Spot. For this purpose, a Public Spot must be in a position to control access to the WLAN on a user basis. For simple Public Spot installations, user data can be locally stored in and managed by the Access Point, or alternatively by a 9 EN What is a "Wireless Public Spot“? What are the properties and functions of a Public Spot? LANCOM Public Spot Option Chapter 1: Introduction WLAN-Controller. Depending on the requirements, some installations employ a direct database connection to a central authentication server in the interests of detailed accounting. Central servers of this type generally work with RADIUS technology. Accounting EN If a Public Spot is not to be available as a free service, it must be possible to record the connection data and charge for the services. Typical methods include: Purchase of a limited amount of online time (pre-paid method), retrospective payment of consumed resources (credit payment), or unrestricted access until a certain time (e.g. checking out of a hotel). For smaller Public Spot installations, accounting functions should be as simple as possible, and they should be implemented directly in the base station. Larger installations should offer the facilities for billing via a RADIUS server. Logging The operation of commercial telecommunications services is subject to national regulations. Certain information is to be recorded and presented to law enforcement agencies upon request. The LANCOM Public Spot Option provides suitable functions for recording user data with RADIUS accounting and SYSLOG. 1.2 Please note that operating a Public Spot (also referred to as a HotSpot) can be subject to legal regulations in your country. Before installing a Public Spot, please inform yourself about any applicable regulations. More information on this subject is available in our white paper "Public Spot - Operators' rights and obligations" available for download from www.lancom.eu. Public Spots in overview The demands placed on a base station operating as a Public Spot can be as varied as the environments where they are employed. A Public Spot offers various functions which will be described in the following. 10 LANCOM Public Spot Option Chapter 1: Introduction Open User Authentication (OUA) The Open User Authentication (OUA) is a method developed by LANCOM Systems. This provides Web-based authentication by means of an online form and is ideal of Public Spot installations. The typical procedure of an online session with OUA 햲 A mobile user with a WLAN-capable mobile device is within range of a Public Spot. After starting the device, its WLAN adapter automatically connects with the base station. Internet access or the use of chargeable services is not yet possible at this stage. 햳 The user starts the Web browser and is automatically forwarded to the Public Spot login page. This page provides detailed information on using the services. Generally, the user purchases a voucher with login data that grants a limited amount of access time to the Public Spot. 햴 The login page enables users to enter their user data (user ID and password). Depending on the configuration, the user data is stored locally or on the RADIUS server. If the login is successful, the user gains access to the Public Spot. Otherwise an error message will be displayed. If a prepaid model is employed, i.e. access is to be granted for a limited period of time only, then the RADIUS server additionally informs the Public Spot about the user's time credit. 햵 The user can log off from the Public Spot at any time. The Public Spot can terminate a session itself if the time credit has expired, if a specified expiry date is reached, or if contact is lost for an extended period. If required, the Public Spot can continuously transmit all important accounting information to the RADIUS server. When the session is terminated, the session data is either output locally or booked to the RADIUS accounting server. OUA can be employed universally The big advantage of the OUA method is that it is completely based on standard protocols. This guarantees that OUA works universally. It functions with any WLAN adapter and it is easily introduced to existing network infrastructures. Extended functions in the WLAN, suchas roaming between different cells, can still be used. 11 EN 1.2.1 LANCOM Public Spot Option Chapter 1: Introduction 1.2.2 Security in the WLAN Wireless LANs are potentially a significant security risk. Wireless Public Spots present similar risks to the operator and users. Security for the operator EN Operators of wireless Public Spots are primarily interested in the security of their own network infrastructure. A LANCOM Public Spot provides operators with a range of security technologies: Multi-SSID, VLAN and virtual routers The public part of the network can be effectively separated from the rest of the network by operating one or more separate radio cells from an access point (Multi-SSID). By employing VLAN technology, these radio cells can also be separated from the operator's private network in the LAN. Apart from that, virtual routing technology (ARF – Advanced Routing and Forwarding) from LANCOM enables each SSID to be given its own security and QoS settings and to be routed to certain destinations. This ensures that guest access is securely and effectively separated from the productive network, even though they share the same infrastructure. With the LANCOM firewall, for example, the available bandwidth in the WAN can be restricted to max. 50%. Access can be restricted to to Web only (HTTP port 80) and name resolution (UDP 53). Further information on Multi-SSID, VLANs and ARF is available in the LCOS Reference Manual. Traffic limit To prevent Denial-of-Service (DoS) attacks and brute-force attacks on the Public Spot, restrictions can be placed on the data transfer volumes available to Public-Spot users who are not yet logged in. Locking access to the configuration With a Public Spot and a WLAN-Controller, access to the device configuration via the Public-Spot interface can be locked. Access to the configuration is then only possible via other management interfaces as specified. Security for the user The primary security concern for users of Public Spots is the confidentiality of their data. Users are also interested in security of user data to avoid abuse. Users are protected by the following security technologies: 12 LANCOM Public Spot Option Chapter 1: Introduction Encryption during the login phase Public Spot users register via secure HTTPS. User names and passwords remain secret. Unlike with private WLANs, data transmissions within a Public Spot are generally not encrypted. LANCOM Systems strongly recommends that sensitive user data should only ever be transferred via encrypted connections, such as the IPsec-based VPN tunnel with the LANCOM Advanced VPN Client or over normal encrypted data connections based on HTTPS. In addition to this, Public Spot users should ensure that a personal firewall is active on their notebooks. 1.2.3 Public-Spot Wizards for easy user setup The Public-Spot Wizard helps you to set up time-limited access to a wireless LAN Public Spot with just two mouse-clicks. All that is required is to set the duration of access; the user name and password are generated automatically and entered into the configuration of the LANCOM device. As a result, a personalized voucher is printed out that contains the information required for a user to register with a wireless LAN Public Spot until their time credit expires. 13 EN Intra-cell blocking This setting in the access point prevents communications between the various WLAN clients associated with the Public Spot. Along with the user's notebook security mechanisms, intra-cell blocking helps to prevent unauthorized access to the resources of Public Spot users. LANCOM Public Spot Option Chapter 2: Activating the Option 2 Activating the Option This brief chapter informs you how to activate the LANCOM Public Spot Option on your LANCOM. You may skip this section if the LANCOM Public Spot Option is already activated on your device as standard. Activation takes place in four steps: EN 햲 Ensuring that the prerequisites for installation are fulfilled 햳 Online registration 햴 Entry of the activating code 햵 Checking the activation 2.1 2.1.1 Prerequisites for installation System requirements Please ensure that you have met all of the requirements to successfully operate the Public Spot: LANCOM WLAN Controller, LANCOM Access Point or LANCOM Wireless Router that supports the Public Spot update. LANCOM Public Spot Option registered. 2.1.2 Package content Please ensure that the Option package includes the following components: LANCOM CD with LANtools, current firmware and electronic documentation Proof of license with a printed license number Manual 2.1.3 Configuration computer with the Windows operating system To install the Public Spot Option you require a computer with the Windows operating system: Windows Vista™, Windows XP, Windows Millennium Edition (Me), Windows 2000, Windows 98 SE, Windows 2000 Server, Windows 2003 Server. Alternatively, activation can be performed via WEBconfig. The computer must have access to the LANCOM device that is to be configured. Access may be via the LAN or via remote access. 14 LANCOM Public Spot Option Chapter 2: Activating the Option 2.1.4 Up- to-date LANconfig The latest version of LANconfig and LANmonitor are available for download from the LANCOM Systems homepage under www.lancom.eu/download/. We recommend that you update these programs before continuing to the installation. Up- to-date firmware in the LANCOM The latest firmware updates are available for download from the LANCOM Systems Web site under www.lancom.eu/download/. Select your device from the list and download the firmware onto your computer. 2.2 Detailed information about updating the firmware is available in the documentation for your LANCOM device. Online registration With the correct firmware version your LANCOM already contains the Public Spot software. All that remains is to activate it. To activate the Public Spot Option in the LANCOM you need an activation code. Please note: The activation code is not included in the package. It will be sent to you on online registration. The Public Spot Option is supplied with a proof of license. This has a license number printed on it. This license number gives you one opportunity to register with LANCOM Systems and to receive an activation code. After successful online registration, the license number of your LANCOM Public Spot Option becomes invalid. The activation code that is sent to you can only be used with the LANCOM as identified by the serial number which you provided at registration. Please ensure that you only want to install the Public Spot on the corresponding device. It is not possible to change to another device at a later date. Necessary registration information Please have the following information at the ready for your online registration: Precise designation of the software option The license number (from the proof of license) 15 EN 2.1.5 LANCOM Public Spot Option Chapter 2: Activating the Option Serial number of your LANCOM (to be found on the underside of the device) Your customer data (company, name, postal address, e-mail address). EN Registration is anonymous and can be completed without specifying personal data. Any additional information may be of help to us in case of service and support. All information is of course treated in the strictest confidence. Online entry of registration information 햲 Start a Web browser and access the LANCOM Systems Web site under www.lancom.eu/routeroptions. 햳 Enter the information as required and follow the instructions that follow. After entering all of the data, you will be sent the activation code for your device and your customer data. If you submit an e-mail address you will receive the data including the activation code via e-mail. Online registration is now complete. Make sure you store your activation code safely! You may need it at a later date to activate your Public Spot Option again, for example after a repair. Help in case of problems If you have problems with registering your software option, please contact us by e-mail at [email protected]. 2.3 Activating the Public Spot Option Activating the LANCOM Public Spot Option is very simple. In LANconfig, mark the appropriate LANCOM (simply click on the entry with your mouse) and select the menu item Device Activate software option. Alternatively, click on the entry for the device with the right-hand mouse key and select Activate software option from the context menu. In the following window, enter the activation code that you received with your online registration. The device will then restart automatically. 16 LANCOM Public Spot Option EN Chapter 2: Activating the Option 2.4 Checking the activation You can check if the online activation of your Public Spot was successful by selecting the device in LANconfig and clicking on the menu item Device Properties. The properties windows contains a tab named 'Info' that lists the activated software options. 17 LANCOM Public Spot Option Chapter 3: Setup and operation 3 Setup and operation This chapter provides you the main information required for setting up and operating a Public Spot. 1. step: Basic settings EN The first step is to make the basic settings. These basic settings are sufficient for the Public Spot to be put into operation. 2. step: Extended functions and settings After the basic settings, we can look to the wide variety of extended functions and settings. Detailed descriptions inform you on how to adapt your device perfectly to its task and its environment. Continuous: Management and monitoring Finally, this chapter informs you of how to keep an overview of the status and activities of your Public Spot. 3.1 Please note that operating a Public Spot (also referred to as a HotSpot) can be subject to legal regulations in your country. Before installing a Public Spot, please inform yourself about any applicable regulations. More information on this subject is available in our white paper "Public Spot - Operators' rights and obligations" available for download from www.lancom.eu. Basic settings The instructions for the basic settings are divided into three separate parts. The first section describes how to set up a Public Spot for local user administration, whereby the users are manually entered into the local user management system. The second section demonstrates the Public Spot Wizard which enables Public Spot users to be defined in a user-friendly manner by employees who do not have extended rights to access the device configuration. The third section describes the central management of user data on a RADIUS server. Each section is self contained and guides you through all of the required configuration steps. You can turn straight to the section which best suits your purposes. 18 LANCOM Public Spot Option Chapter 3: Setup and operation Local user management The following configuration steps help you to set up a Public Spot with local user administration: 햲 Selecting the authentication method When you select the authentication method, you define the information which the user has to enter when logging in to the Public Spot WLAN. To do this, set the authentication to 'Name and password'. LANconfig: Public Spot Registration Registration mode WEBconfig: LCOS-Menu tree Setup Public Spot module Authentication mode No authentication required No authentication is required to make use of the Public Spot. Public Spot – Name and password Authentication for the Public Spot requires the entry of the user ID and password. Public Spot – Name, password and physical address The mobile device's MAC address is checked in addition to the user ID and password. 햳 Selecting the interfaces for Public-Spot operation Here you activate the interfaces that are to be available to registered users. For example, you select the logical WLAN used for Public Spot users here. LANconfig: Public Spot Public Spot Interfaces 19 EN 3.1.1 LANCOM Public Spot Option Chapter 3: Setup and operation EN WEBconfig: LCOS menu tree Setup Public Spot module Port table By activating the authentication for a WLAN interface, its associated SSID is automatically released for Public-Spot operations. On a LANCOM WLAN Controller, individual Ethernet interfaces can be activated for the Public Spot, so allowing access to be restricted to certain VLANs. 햴 Enter user data Enter the data for all users into the user list. LANconfig: Public Spot Public Spot users User list WEBconfig: LCOS menu tree Setup Public Spot module User table The only entry stringently required entry into the user table is the user ID. Entering a password is optional. If you have opted for user authentication including a check of the physical address (MAC address), then enter this value into the corresponding field. With local user administration, there is no need to define a provider. Optionally, you can also set a date on which the user account expires. 햵 Setting the time For session data to be recorded and billed correctly, it is important for the Public Spot's time setting to be accurate. To round off the configuration, set the current time in the device. 20 LANCOM Public Spot Option Chapter 3: Setup and operation LANconfig: Device Set date/time WEBconfig: Extras, Set date and time (or click on the time in the footer of any menu) In order to ensure that the time of the Public Spot remains correct, the device should be set up as an NTP client. That's it! Your Public Spot is now ready to operate. The users specified can login by Web browser. 3.1.2 The Voucher Printing Wizard The Voucher Printing Wizard helps you to set up time-limited access to a wireless LAN Public Spot with just two mouse-clicks. All that is required is to set the duration of access; the user name and password are generated automatically and entered into the configuration of the LANCOM device. As a result, a personalized voucher is printed out that contains the information required for a user to register with a wireless LAN Public Spot for a limited period of time. Public Spot access with a time limit can only be set up if the LANCOM is set with the correct time. LANCOM Public Spot Option A prerequisite for setting up Public Spot access accounts is the activation of the LANCOM Public Spot Option and the extended authentication functions described under 'Local user management'. If authentication is activated for multiple WLAN interfaces, the SSID of the first interface is used. As an alternative to taking the SSID of a defined logical WLAN, a fixed SSID can be defined and printed out on the voucher. This is particularly important if the Access Points are centrally managed from a LANCOM WLAN Controller as the WLAN-Controller itself has no WLAN interfaces. Configuring the Public Spot Wizard Setting up temporary Public Spot access accounts involves the definition of the runtime, user name and a password. Default values for these accesses can be individually adapted. 21 EN LANCOM Public Spot Option Chapter 3: Setup and operation EN LANconfig: Public spot Public spot users WEBconfig: Expert configuration Setup Public- spot-module Add user wizard Default runtime Sets period for which the access is valid. Entires for up to 10 different runtimes can be defined in the table, one of which is selected for voucher generation. Possible runtime values: 1 to 99999 Possible value units: Hours or days User name pattern Sets the pattern for the user name. This pattern can be used to pass on the user names to the provider; for instance: Possible values: Maximum 64 alphanumerical characters Special values: %n inserts a unique number. 22 LANCOM Public Spot Option Chapter 3: Setup and operation Possible values: 1 to 16 characters Default: 6 SSID This SSID is printed out on the voucher in order for the user to register with this logical WLAN. Possible values: Max. 32 alphanumerical characters Default: Blank Special values: If no SSID is entered here, then temporary access accounts will register with the SSID of the first logical WLAN that has activated authentication. Please note that where Public Spots are centrally managed from a LANCOM WLAN Controller, you must enter the SSID as the WLANController has no access to the SSIDs of the Access Points and Wireless Routers connected to it. Along with the parameters for the access data, an HTML template and an image can be uploaded to the device for printing the voucher. The image can be a GIF, JPEG or PNG file of max. 64 KB in size. WEBconfig: Upload certificate or file Create administrator Since it has to be possible for non-IT specialists to set up Public Spot access accounts, it is advisable to have a dedicated administrator account under WEBconfig which permits access to the Wireless Router, Access Point or WLAN-Controller. Access of this type gives the responsible employees (e.g. at a hotel reception) rights that are restricted to the generation of time-limited Pubic-Spot users. All other configuration options are blocked. To set this up, enter a new administrator with user name and password and activate the right to start the Public Spot Wizard only. LANconfig: Management Admin Further administrators WEBconfig: Expert configuration Setup Config Admins 23 EN Default: User%n, generates a user name with the text 'User' and a unique number as a suffix. Password length Sets the length of the automatically generated password. LANCOM Public Spot Option EN Chapter 3: Setup and operation The generation of Public Spot access accounts can be automatically logged with SYSLOG. If every employee uses their own administrator account, the SYSLOG entries can be used to check who created the access accounts. For further information on SYSLOG refer to the LCOS Reference Manual. Setting up Public Spot users and printing vouchers To set up a Public Spot access account, the employee opens a browser and enters the IP address of the Wireless Router or Access Point (for example by means of a link on the desktop) and logs in with the appropriate user name and password. If this administrator access account is configured appropriately, the user is only able to start the Wizard for adding a new Public Spot user. 햲 After starting the Wizard, the only thing to do is to accept the suggested period of validity or enter the desired value and, in the commentary field, identify the user (e.g. a name or the guest's hotel room number). 햳 You then click on Print to print-out the access data. 햴 Finally, click on Save user data to store the data for this access to the device. 24 You will find notices on the rights and obligations that apply to operators of Public Spot accesses in the LANCOM White Paper on the subject under www.lancom.eu. LANCOM Public Spot Option EN Chapter 3: Setup and operation 3.1.3 User administration by RADIUS server The basic setup of a Public Spot operated with central user administration requires just two steps. The following instructions assume that you know the IP address of a functional RADIUS server in the network. 햲 Activate the extended authentication function As described under ’Local user management’ → Seite 19. If authentication with an additional check of the physical address (MAC address) is activated, the Public Spot transmits the MAC address of the user's mobile device to the RADIUS server. The base station does not actually reveal whether the MAC address is being checked or not. For MAC address checks to work without problem, the RADIUS server must be configured accordingly. 햳 Enter information on the RADIUS server When configuring a Public Spot (enable using software option for the LANCOM access points), user registration data can be forwarded to one or more RADIUS servers. These are configured in the provider list. The registration data individual RADIUS servers require from the clients is not 25 LANCOM Public Spot Option Chapter 3: Setup and operation EN important to the LANCOM access point since this data is passed on transparently to the RADIUS server. LANconfig: Public Spot Public Spot users Provider list WEBconfig: LCOS menu tree Setup WLAN Radius accounting Provider Name of the provider for whom the RADIUS server is defined. Auth. server IP address The IP address of the RADIUS server for this provider. Auth. server port The port over which the LANCOM access point can communicate with the RADIUS server for this provider. Auth. server secret Key (shared secret) for access to the RADIUS server of the provider. The key must also be configured on the appropriate RADIUS server. Source IP address Source/sender address sent with RADIUS requests; this is also the destination for the server's response. The following can be entered as the loopback address: Name of a defined IP network. 'INT' for the IP address in the first network with the setting 'Intranet'. 26 LANCOM Public Spot Option Chapter 3: Setup and operation 'DMZ' for the IP address in the first network with the setting 'DMZ'. If the list of IP networks or loopback addresses contains an entry named 'DMZ' then the associated IP address will be used. EN Name of a loopback address. Any other IP address. Acc. server IP address IP address of the accounting server for Public Spot access accounts. Acc. server port The port over which the LANCOM access point can communicate with the accounting server. Acc. server secret Key (shared secret) for access to the accounting server. The key must also be configured on the accounting server. Backup The name of a different provider can be selected as the backup from the current table. Using these types of entries, backup chains linking several RADIUS servers can be easily configured. IP addresses specified here must be static. The base station must also be able to contact the specified destination addresses. For IP addresses outside of your own network, a router that has contact to the destination network must be specified as gateway in the DHCP settings for the base station. This gateway must be defined as the default route in the routing table. In order for the RADIUS server to record the connection data, the information on the accounting server must be specified in full. As an alternative to using a RADIUS accounting server, the connection information from the Public Spot can be output by the SYSLOG function. 햴 Check the general RADIUS settings The generic values for retry and timeout must also be configured. These settings apply to all RADIUS applications. The default values have been set to typical values and usually do not need to be changed. LANconfig: Communication RADIUS WEBconfig: LCOS menu tree Setup RADIUS 27 LANCOM Public Spot Option EN Chapter 3: Setup and operation Timeout [default: 5,000] This value specifies how many milliseconds should elapse before retrying RADIUS authentication. With PPP authentication using RADIUS, please note that the device dialing accepts the RADIUS timeout configured here. Retries [default: 3] This value specifies how many authentication attempts are made in total before a Reject is issued. That's it! Your Public Spot is now ready to operate. All users with a valid account on the RADIUS server can use the Web interface to login to the base station. 3.1.4 Configuring an external SYSLOG server For legal reasons it is necessary to store the user data collected when operating Public Spots. This data can be stored to a SYSLOG server, for example. Some SYSLOG servers are available as free software, for example from www.kiwisyslog.com. To save user data from a Public Spot by means of SYSLOG, the external SYSLOG server has to be configured in the respective Public Spot. Once this is done, messages are sent for logging to the SYSLOG server whenever Public Spot user accounts are created or deleted, and at the beginning and end of WLAN sessions. The message issued at the end of a session—with the source "Login" and the priority "Information"—also includes information on the transferred data volumes and the IP address used. 28 LANCOM Public Spot Option Chapter 3: Setup and operation Extended functions and settings The Public Spot offers a wide range of extended functions, options and parameters, which can be used to adapt it to the specific requirements of the application at hand. In the following sections you will find information about: 3.2.1 Billing of individual users Using a customized login page Connection monitoring of logged-in users and mobile stations Security settings protect the Public Spot General Clear user lists automatically Activating this option causes the expired entries to be deleted from the user table automatically. We strongly recommend that you activate this option. Users of the Public Spot Wizard are generally administrators with restricted rights who are often unable to delete user-table entries themselves. Because the user table has a limited number of entries, outdated entries could potentially restrict the functions of the Public Spot WLAN. Model User table size An Access Point with Public Spot Option 64 LANCOM WLC-4006 with Public Spot Option 256 LANCOM WLC-4025 with Public Spot Option Unlimited LANconfig: Public spot Public spot users WEBconfig: LCOS menu tree Setup Public Spot module Add User Wizard 29 EN 3.2 Further information on the configuration of SYSLOG is to be found in the LCOS Reference Manual. For information on the legal regulations see the white paper "Public Spots - Operators' rights and obligations" LANCOM Public Spot Option Chapter 3: Setup and operation 3.2.2 Accounting functions Commercial operation of the Public Spot function is facilitated by the integrated support of the principal billing models. These billing models can be broadly divided into two categories: EN Retrospective payment for the resources actually used (Credit payment) Service use on a debit payment basis (PrePaid) Billing without a RADIUS server If user administration is handled locally by the base station and a RADIUS server with the accounting function is not available, then the only option for accounting purposes is to set the expiry date for the user account. The expiry-date option allows the Public Spot operator to set a point in time until which the user has free access to the Public Spot. Limiting access to a certain time period is useful for hotel guests or visitors to exhibitions and congresses, for example. The expiry date is entered into the user list: LANconfig: Public Spot Public Spot users User list WEBconfig: LCOS menu tree Setup Public Spot module User table For the purposes of billing by credit payment, the Public Spot can use SYSLOG to output detailed connection information to any computer in the network. Using the appropriate software on the destination computer allows the resources that were actually used (such as connection times or transfer volumes) to be billed precisely. Details on the structure of SYSLOG messages are available in the appendix on Seite 46. Billing via RADIUS accounting server For the purposes of billing via a RADIUS server, the Public Spot can regularly supply the specified accounting server with up-to-date connection information on each active user. Each of these regular message packets to the accounting server contains information about the resources (time, transferred data volumes) consumed by the user since the last message. This means that even in the case of a basestation failure (e.g.due to a power outage), in the worst case only a small amount of accounting information will be lost. 30 LANCOM Public Spot Option Chapter 3: Setup and operation As standard, the periodic messaging of accounting information is deactivated. It is activated by setting a value for the accounting cycle which is greater than 0. This cycle is defined in seconds. This sets the time interval between the regular transmission of connection information to the accounting server. Setting the cycle to 0 deactivates this function. If this is the case, accounting information is sent only at the beginning and end of the session. When accounting on a prepaid basis, the RADIUS server monitors the restrictions on the users (limits on connection times or transfer volumes, expiry date). As soon as a user has used up the prepaid amount, the RADIUS server locks the user account. Subsequent attempts by the user to login will be rejected. Time limits for prepaid models can be monitored by the Public Spot during active sessions. If a time limit is exceeded, the Public Spot automatically terminates the corresponding session. The monitoring of prepaid amounts is possible if the RADIUS server transmits the user's time credit to the Public Spot as the 'Session timeout' attribute at the start of the session. Details on the structure of RADIUS messages are available in the appendix on Seite 44. Preventing multiple logins With this option activated, just one WLAN client can login at a time under a certain user name. This prevents the parallel operation of multiple notebooks. LANconfig: Public spot Public spot users WEBconfig: LCOS menu tree Setup Public Spot module Add User Wizard 3.2.3 Interface selection The user login can be activated separately for each logical network on the device. LANconfig: Public Spot Public Spot Interfaces 31 EN LANconfig: Public Spot Public Spot users Accounting update cycle WEBconfig: LCOS menu tree Setup Public Spot module Accounting cycle LANCOM Public Spot Option Chapter 3: Setup and operation WEBconfig: LCOS menu tree Setup Public Spot module Port table EN Along with the logical WLAN interfaces which Public Spot users directly login to, the logical LAN interfaces (LAN-1, etc.), and the point-to-point connections (P2P-1, etc.) can also be selected. When connected via the LAN or P2P interface, additional access points can be integrated into a LANCOM Wireless Router Public Spot. 3.2.4 Customized login page The operator can customize the login page that users see in the Web browser when they login to the Public Spot. The login page is divided vertically into two frames. The left-hand frame contains all of the information and entry fields required for the user to login. The content of the left-hand frame cannot be changed. The right-hand frame can be customized by the operator. Format and location of the login page The desired content for the right-hand frame should be in HTML format and located on a Web server (HTTP) in your local network or in the Internet. In principle, the defined server could send files of any format to the user for login purposes. However, the HTML format is ideal for presentation in a Web browser. The server must have a static IP address and must be accessible to the Public Spot. For an IP address outside of your own network, a router that has contact to the destination network must be specified as gateway in the DHCP settings for the base station. This gateway must be defined as the default route in the routing table. Design guidelines When designing your customized login page, you should ensure that it is suitable for display inside a frame. For this reason you should avoid using your own frames as far as possible. Also, specialized content such as JavaScript or plug-in elements can lead to an erroneous display in the Web browser. Links can of course be set to any other pages or sites. 32 LANCOM Public Spot Option EN Chapter 3: Setup and operation Configuration in Public Spot Like the other Public Spot pages, the customizable page can be implemented by using the PS templates on an external Web server or locally in Flash. 3.2.5 Enable access without logging on To provide users with access to important information without them having to login (e.g. important contact information) you can define any publicly available Web server. LANconfig: Public Spot Public Spot Web server IP address WEBconfig: LCOS menu tree Setup Public Spot module Free server If the server defined here is not intended to be entirely public, a different path on the Web server can be defined optionally. LANconfig: Public Spot Public Spot Directory WEBconfig: LCOS menu tree Setup Public Spot module Server subdirectory In addition to freely available web servers, you can define other networks and special sites which your customers can access without having to log on. LANconfig: Public Spot Public Spot WEBconfig: LCOS menu tree Setup Public Spot module Free networks Enter the IP address of the server, or of the network with netmask, that your Public Spot users are to be given access to. 33 LANCOM Public Spot Option Chapter 3: Setup and operation Page table Enter the addresses (URLs) of the Web pages to be displayed to users in case of login, error, status display, etc. 3.2.6 Station supervision EN If station supervision is activated, the Public Spot regularly checks to see if the associated mobile stations are still available. If this feature is active, mobile stations that cannot be contacted are logged off after 60 seconds at the latest. If station supervision is deactivated, it may last hours before the Public Spot logs off a mobile station which is no longer available. Station supervision is extremely important for Public Spots operating commercially on a time basis. In installations of this type, users must be assured that they are only paying for the time actually spent using the Public Spot services. If the clients are authenticated by means of a central LANCOM WLAN Controller, clients can be automatically logged off after a certain time of inactivity by means of the parameter "Idle timeout". LANconfig: Public Spot Public Spot Idle timeout WEBconfig: LCOS menu tree Setup Public Spot module Idle timeout) The standard setting for station supervision is off. It can be switched on in the WLAN menu. LANconfig: Wireless LAN Security Monitor stations WEBconfig: LCOS menu tree Setup WLAN Supervise stations 3.2.7 Security settings Compared to a normal base station, the Public Spot has two additional security mechanisms. Employing these mechanisms provides the Public Spot with effective protection from abuse. Traffic limit option In order for clients to login to the Public Spot via a browser, it must be possible for stations which are not yet logged in to transfer data via the access point, for example for DNS requests. With the default settings for the Public Spot, 34 LANCOM Public Spot Option Chapter 3: Setup and operation Unauthorized use of the Public Spot: Certain tools enable a user to pack data into a DNS packet (i.e. to establish a DNS tunnel) and to work with the Public Spot without logging in. Denial- of- Service: The attacker sends large amounts of data to the base station in an attempt to block it. Brute force: The attacker repeatedly tries to access the base station by guessing the login data until successfully breaking in. These risks can be negated by activating the traffic limit option. The traffic limit option is activated by setting a value not equal to 0. This value determines the maximum data quantity in bytes that can be transmitted between the base station and mobile stations that are not logged in. LANconfig: Public Spot Public Spot Maximum data volume WEBconfig: LCOS menu tree Setup Public Spot module Traffic limit bytes A mobile station exceeding this transfer volume is blocked out by the base station, and any further data it sends is rejected without examination. The blocking time can be set separately. WEBconfig: LCOS menu tree Setup WLAN Idle timeout Default: 60 minutes. If station supervision is activated, the block may be revoked sooner. If the mobile station cannot be reached for 60 seconds, the base station removes its entry from the stations table, and thus the blockage with it. On the one hand the optimal value for traffic limit depends on the data volume of the login page. On the other hand, this value has a significant effect on the potential number of failed login attempts per user. Generally, a traffic limit of 60,000 bytes provides effective protection for a Public Spot but allows a sufficient number of login attempts. This value can be adapted to your individual needs, if necessary. The default value of '0' bytes allows an unlimited volume of data. This volume, and the potential blockage after it is exceeded, applies only to the requests before a WLAN client logs in to the Public Spot. 35 EN users who are not logged can transfer any quantity of data related to these services to the base station. The following risks are associated with this: LANCOM Public Spot Option Chapter 3: Setup and operation If a customized login page is used, the data traffic to and from the server does not count towards the traffic limit. Only the data displayed in the right-hand frame of the login page counts towards the data volume. Restrict access to the configuration EN WLAN-based access to a Public Spot's configuration should be prohibited for security reasons. A specialized switch allows access via the Public Spot interface to be restricted to the Public Spot authentication pages only. All other configuration protocols are automatically blocked. WEBconfig: LCOS menu tree Setup Config WLAN authentication pages only 3.3 Please ensure not to place a total block on HTTP(S) access with WEBconfig under Setup Config Access table. Information necessary for access Depending on the configuration of the Public Spot, users are required to enter different items of information in order to gain access. These items are entered into two consecutive phases when accessing the Public Spot: Information on the wireless LAN access is necessary for physical communication between the mobile device and the Public Spot. ?Login data for registering the user with the Public Spot. 3.3.1 Information for WLAN access A maximum of two pieces of information are required to access the WLAN: The network name of the WLAN (SSID) If the Public Spot's base stations are configured for operation as a closed network, the user must know the exact name of the wireless LAN, its SSID. Wireless LAN encryption Although it is possible to provide guest access via encrypted connections, e.g. by using WPA, Public Spots are not generally operated with WLAN encryption. Access requires that users login with their user ID and password. Data security should be ensured by end users themselves, for example by using a VPN client. 36 LANCOM Public Spot Option Chapter 3: Setup and operation 3.3.2 Information for authentication User identifier Password MAC address If the authentication mode for a Public Spot base station has been set to 'MAC+User+Password', you as an operator must know the MAC addresses of the mobile devices employed by your users. A mobile device automatically and continuously transmits its MAC address when communicating with a base station. The user does not have to manually enter this information when logging in, but instead it is communicated just once to the operator before attempting to login. 3.4 Monitoring the Public Spot The Public Spot can be continually monitored with WEBconfig during operations. The station table in the user authentication menu provides an overview of: Users currently logged in to the Public Spot and Mobile stations in the WLAN which are not logged in. The station table is access under LCOS menu tree > Status > Public Spot > Station table. When on display, this table can be regularly updated automatically. Click on the button Monitor this table. 37 EN The user needs to have the following information to hand when logging in: LANCOM Public Spot Option Chapter 4: Access to the Public Spot 4 Access to the Public Spot 4.1 Requirements for logging in EN Mobile device with wireless LAN (WLAN) adapter Operating systems supporting the TCP/IP protocol (automatic IP-address retrieval by DHCP active) Web browser (supporting JavaScript and Frames) Direct Internet access (use of proxy deactivated) WLAN access information (network name, encryption information) Valid user data (user identifier and password) 4.2 How to login 햲 Access the Public Spot's WLAN The different types of mobile devices and WLAN adapters offer various ways of entering the settings required for accessing the WLAN. Many devices require the network name (SSID) of the WLAN to be entered into the configuration program for the WLAN adapter. Other products provide an overview of all of the base stations in the vicinity, and the user merely chooses which one to use. 햳 Start your Web browser. As soon as the Web browser attempts to access any Internet site, the Public Spot automatically intervenes and presents the login page. 38 The actual login page may appear different from the one illustrated. However it looks, the login page will always present the input fields for user ID and password. LANCOM Public Spot Option Chapter 4: Access to the Public Spot 햴 Enter the user ID and password into their fields in full and confirm your entries with Login. To login, you should use a Web browser with activated JavaScript. This ensures that session status information can be displayed in a popup window. 햵 If the login to the Public Spot is successful, an additional window pops up with the main information about the current session. This window is also used for the login. This window should be left open throughout the session (optionally minimized). 4.3 Session information The window with session information is constantly updated. Along with the status and current user ID, the information displayed includes the connection time and the volume of transferred data. 4.4 Logging out of the Public Spot The session information window can be used to logout from the Public Spot. Simply click on the word "here" in the bottom line of text in the window. If the session-information window is not open, you can enter the following into the address line in the browser: http://<IP address of the Public Spot>/authen/logoff/ The Public Spot operator can supply you with the <Public Spot's IP address> upon request. 4.5 The operator can set up the Public Spot to automatically logoff users if they cannot be reached for 60 seconds. In case of doubt, please ask the Public Spot operator if automatic logoff (Station monitoring) is activated. Advice and help The following sections present solutions to the most common problems that may occur when operating a Public Spot. 39 EN LANCOM Public Spot Option Chapter 4: Access to the Public Spot 4.5.1 The Public Spot login page is not displayed EN The Internet access must be set up so that it is directed via the WLAN adapter and not via a dial-up networking connection. To check this, take a look at the connection settings for your Web browser. If you use the Microsoft Internet Explorer, click on Tools > Internet options > Connections and deactivate the dial-up configurations entered there. Internet access must be direct, i.e. without going via a proxy server. In Microsoft Internet Explorer, you can disable the use of a proxy server in the menu Tools > Internet options > Connections > LAN settings.... Ensure that your WLAN adapter can in fact find the Public Spot. Your WLAN adapter gives you the option of searching for local base stations. Check if your WLAN adapter has all of the necessary settings to access the Public Spot WLAN: You probably have to enter the network name for the WLAN. When working with encrypted WLANs, you are also required to enter the corresponding WPA or WEP key. Check that your mobile device is set up for automatic retrieval of an IP address (DHCP). Your device should not have a fixed IP address. 4.5.2 If your mobile device is set up with a fixed IP address, adjusting it for automatic retrieval by DHCP may cause important configuration information to be lost. Ensure that you note all of the values listed in the network settings (IP address, standard gateway, DNS server, etc.). Login not working Ensure that you enter the user data correctly and in full. Ensure that you use the correct capitalization for all entries. Is the CAPS-LOCK key activated on your device? This causes the capitalization to be reversed. Deactivate the CAPS-LOCK key and repeat the entry of your login data. The Public Spot operator may be checking more than just the user ID and password, but also the MAC address (physical address) of your mobile device as well. In this case, ensure that the Public Spot operator is informed of your correct MAC address. 40 LANCOM Public Spot Option Chapter 4: Access to the Public Spot 4.5.3 It is no longer possible to login If the Public Spot breaks off communications after a number of login attampts have failed, you should deactivate your WLAN adapter for at least 60 seconds (or your complete device), and then try again. The session information window is not being displayed To display the session-information window, enter the following line into the address line of your Web browser: http://<IP address of the Public Spot>/authen/status/ The Public Spot operator can supply you with the <Public Spot's IP address> upon request. 4.5.5 The Public Spot requests a new login for no reason When moving into the signal coverage area of another base station (roaming), it is necessary to login again. If you are located in the overlap area between two stations, you may even experience a regular change of connection between the two base stations. The task of the roaming secret is to allow Public Spot sessions to be passed between Access Points without the user having to login again. LANconfig: Public Spot Public Spot users Roaming secret WEBconfig: LCOS menu tree Setup Public Spot module Roaming secret 41 EN 4.5.4 LANCOM Public Spot Option Chapter 5: Appendix 5 Appendix 5.1 RADIUS attributes The RADIUS client module was implemented on the basis of RFCs no. 2865 and no. 2866. EN These specifications define various attributes, some of which are an absolute necessity and some of which are optional. The following provides you with an overview of attributes whcih are transmitted/processed in messages between RADIUS servers and base stations. 5.1.1 5.1.2 Access request Attribut e Meaning 1 User identifier 2 Password 30 User's MAC address (only in the authentication mode 'MAC+User+Password'). The RADIUS server must be adapted to process this application-specific attribute. 32 Base-station name (NAS identifier) 61 Type 19 for IEEE 802.11 (NAS port type) 4 Base-station IP address (NAS IP address) 30 Base-station MAC address in ASCII format (nn:nn:nn:nn:nn:nn) (calling station ID) Accept response Attribut e 27 5.1.3 Meaning Session timeout – Sets the time in seconds after which the session is automatically terminated. Stations whose time has expired have the value 0. These stations can no longer login. Sessions defined without a timeout have no time limit. Messages to the accounting server If a RADIUS accounting server is specified, the base station sends the following messages to it: 42 LANCOM Public Spot Option Chapter 5: Appendix Accounting start request Accounting alive request (user active) A message is sent immediately after login. Regular messages are sent in the cycle time as defined. Accounting stop request EN In all accounting messages Attribut e Meaning 1 User identifier 32 Base-station name (NAS identifier) 61 Type 19 for IEEE 802.11 (NAS port type) 4 Base-station IP address (NAS IP address) 5 NAS port: A base station has no physical ports, and for this reason this attribute is transmitted with the session ID. 30 User's MAC address (only in the authentication mode 'MAC+User+Password'). The RADIUS server must be adapted to process this application-specific attribute. 44 Accounting session ID Regular accounting messages (alive) Attribut e Meaning 42 Accounting input octets (bytes received) 43 Accounting output octets (transmitted bytes) 46 Accounting session time 47 Accounting input packets (received packets) 48 Accounting output packets (transmitted packets) 52 Accounting input gigawords 53 Accounting output gigawords Attributes 52 and 53 are transmitted once the volume in any one direction exceeds 4 GBytes. The sum of attributes 52 and 42 or 53 and 43 respectively are to be interpreted as a 64-bit number. 43 LANCOM Public Spot Option Chapter 5: Appendix Session termination message EN The end of a session is initiated by additionally transmitting attribute 49 (accounting terminate cause). The possible reasons: 5.2 Attribut e Meaning 1 User request (user logged off) 2 Lost carrier (base station lost contact to user mobile station for 60 seconds) 4 Idle time out (the user sent no data to the base station for 60 minutes) 5 Session timeout (user time limit has expired) SYSLOG messages Many of the SYSLOG messages from the base station can be used for the purposes of billing and monitoring. These messages are transmitted even if a RADIUS accounting server is operating in parallel. Generally, the SYSLOG server automatically adds a time stamp to each entry, which can be used to set the time for messages and events. User account messages If a user is created with the Wizard User account '<User-Id>' created (created by <Admin> on <Date> (<Account-Comment>)) If a user is manually created User account '<User-Id>' created (manually added by <Admin>) If a user account expires and is deleted User account '<User-Id>' deleted (account expired) If a user is manually deleted User account '<User-Id>' deleted (manually deleted by <Admin>) 44 LANCOM Public Spot Option Chapter 5: Appendix If a user starts a PublicSpot session: Started session for user '<User-Id>' (IP address is <IP address>) As soon as a mobile station appears in the base station WLAN: Associated WLAN station <macaddr> [%s] If the entry for the mobile station in the base-station access list has a comment, this is appended in brackets. When roaming: Reassociated WLAN station <macaddr> [%s] If a station is denied access to the WLAN due to the MAC address filter: Rejected association from WLAN station <macaddr> If the mobile station cannot be found in the access list and the RADIUS function is activated: Associated WLAN station <macaddr> [start RADIUS] Reassociated WLAN station <macaddr> [start RADIUS] RADIUS request results: RADIUS access check for <macaddr> succeeded RADIUS access check for <macaddr> failed Session termination If a user ends a PublicSpot session: Finished session for user '<User-Id>' (IP address was <IP address>, accounting data: Tx <Tx bytes>, Rx <Rx bytes>, seconds <session duration>) When leaving the WLAN Disassociated WLAN station <macaddr> [%s] At the end of a session, a SYSLOG event reports the resources used by the user: User %s accounting data: Tx %d, Rx %d seconds %d The SYSLOG messages at the start and end of WLAN sessions also log the WLAN client's IP address. Depending on the country where the Public Spot is operated, recording the user's IP address may be a legal requirement. 45 EN Contact initiated by mobile station LANCOM Public Spot Option Chapter 5: Appendix 5.3 5.3.1 Further information The LANCOM Public Spot Implementation Guide EN More information on Public-Spot concepts, application scenarios and installation is available in the "LANCOM Public Spot Implementation Guide" available for download from the LANCOM Systems homepage: www.lancom.eu/download/. 5.3.2 Rights and obligations of Public Spot operators For further information on the legal regulations concerning the operation of a public spot, see the white paper "Public Spots - Operators' rights and obligations" available from the LANCOM Systems homepage: www.lancom.eu/download/. 46 LANCOM Public Spot Option Index Index 30 30 31 16 14 14 25 B Basic settings – see Public Spot Billing – see Accounting Billing of resources –\n see Accounting 12, 35 Brute force attack C Checking the activation Credit payment 17 10, 30 D Data transfer limits –\n see traffic limit 10, Debit payment 12, Denial-of-Service (DoS) attack Dial-up networking connection DNS server Download 30 35 40 40 4 E Encryption 13 13 During the login phase 10, 11, 20, 30 Expiry date F Firmware Frames I Information symbols Internet access IP address Mobile station 4, 15 38 5 11 25, 32 38, 40 J JavaScript 32, 38 L LANconfig 15 Login 38 Requirements 19 With name and password With name, password and\nMAC 19 address 31, 35, 41 Login attempt 11, 36 Login data 37 For authentication 36 For WLAN access 11 Login page 29, 32 Customized login page 32 Design guidelines 32 Frames 39 Logout 11 Loss of contact Also see station supervision M MAC address Messaging cycle N Network infrastructure Network name 20, 25, 37, 40 31 11 36, 38, 40 O Online registration 14, 15 30, 39 Online time 11 Open User Authentication Open User Authentication (OUA) – see Open User Authentication P Package content Password 14 20, 37, 38 47 EN A 9, 10, 20, 29, Accounting Message packets Messaging cycle Activating the VPN Option Activation code Activation of the option 9, 20, Authentication LANCOM Public Spot Option EN Index PrePaid 10, 11, 30, 31 15 Proof of license 20 Provider 38, 40 Proxy settings 9, 25 Public Spot 38 Access to the Public Spot 18 Basic settings 18, 29 Extended settings 18, 37 Management 11 User R RADIUS 10, 11, 27, Accounting server Attribute 11, Authentication server Client function Configuration entries RFC specifications Registration Help in case of problems Restricting access to the configuration 11, Roaming S Security Serial number Session information Window not visible Session termination Standard gateway Station supervision Station table 48 25 30 42 25 42 25 42 15 16 36 41 12, 29, 34 16 11, 27, 30, 39 41 11 40 11, 29, 34, 39 37 4 27, 30, 44 Support SYSLOG T TCP/IP protocol Time limit Time setting Traffic limit Setting the optimal value Transfer volumes U User Login Login data Logout User account User administration Central Local User identifier User list 38 31 20 12, 34 35 30, 35 11, 20, 11, 20, 38 40 39 31 10, 11, 9, 11, 19, 20, 37, 38, 20, 25 30 39 30 W Web browser 32, Windows Supported operating systems Wired Equivalent Privacy (WEP) Key Wireless LAN (WLAN) WLAN access 9, 11, 38, WLAN adapter Wireless Public Spot –\n see Public Spot 38 14 40 11 9 40