1
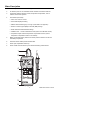
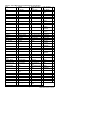
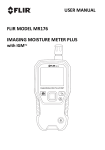
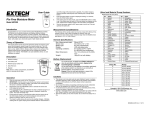
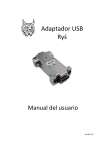
User's Guide
Heavy Duty Wood Moisture Meter
Model 407777
Introduction
Congratulations on your purchase of the Extech 407777 Wood Moisture Meter. This meter
measures the moisture content of wood as a percentage. Measurements are made using
the supplied remote intrusive sensor. Careful use of this meter will provide years of reliable
service.
Warranty
EXTECH INSTRUMENTS CORPORATION warrants this instrument to be free of defects
in parts and workmanship for one year from date of shipment (a six month limited
warranty applies on sensors and cables). If it should become necessary to return the
instrument for service during or beyond the warranty period, contact the Customer
Service Department at (781) 890-7440 ext. 210 for authorization or visit our website at
www.extech.com (click on ‘Contact Extech’ and go to ‘Service Department’ to request an
RA number). A Return Authorization (RA) number must be issued before any product is
returned to Extech. The sender is responsible for shipping charges, freight, insurance
and proper packaging to prevent damage in transit. This warranty does not apply to
defects resulting from action of the user such as misuse, improper wiring, operation
outside of specification, improper maintenance or repair, or unauthorized modification.
Extech specifically disclaims any implied warranties or merchantability or fitness for a
specific purpose and will not be liable for any direct, indirect, incidental or consequential
damages. Extech's total liability is limited to repair or replacement of the product. The
warranty set forth above is inclusive and no other warranty, whether written or oral, is
expressed or implied.
Specifications
General Specifications
Circuit
Custom one-chip LSI microprocessor circuit
Display
Dual function 2000 count (0 to 1999) LCD display
Measurement Range
9% to 30% Moisture Content
Memory Table
9 memory groups for approx. 150 species of wood
Data Hold
Front panel push-button freezes displayed reading
Sample Rate
Approx. 0.8 seconds
Sensor Structure
Remote two-prong intrusive sensor
Memory Record / Recall
Records Maximum/Minimum readings for later recall
Auto Power off
Meter automatically shuts off after 10 minutes
Data Output
RS-232 PC serial interface for use with Model 407001 data
acquisition software and interface cable kit
Operating Temperature
32°F to 122°F (0°C to 50°C)
Operating Humidity
90% Relative Humidity (max.)
Power Supply
9V battery
Power Current
Approx. 5.8mA DC
Weight
0.73 lbs (330g) (including batteries & probe)
Size
Main instrument: 7.1 x 2.8 x1.3" (180 x 72 x 32 mm)
Accessories
Spare pins (10) and protective rubber holster
Probe: 0.9” (23mm) diameter x 6.54" (23mm) length
Range Specifications
Measurement
Moisture content
Range
Resolution
Accuracy
9 to 30%
0.1 %
± (4% + 5d)
Temperature compensation: 32°F to 122°F (0°C to 50°C)
2
Model 407777 Version 2.2 Jan 04
Meter Description
1.
Sensor input: Use caution when inserting the sensor.
2.
PC interface jack: For use with Model 407001 software and interface cable kit
3.
LCD Display: Displays moisture content, temperature compensation, units of
measure, and function symbols
4.
Push-buttons (see below):
• Power: Turn meter on and off
• Hold: Freeze displayed reading
• Material: Select material group 1 through 9 (see Table in the Appendix)
• Record: Track the highest (MAX) and lowest (MIN) readings
• Recall: Review the MAX and MIN readings
• Calibration and ‘+’: Used to calibrate the meter (refer to the calibration section)
• Temperature Adjust: Used for temperature compensation function (refer to
temperature compensation section in this manual)
5.
Battery compartment (back): Remove the rubber protective holster to access the
rear battery compartment
6.
Protective holster: Rubber jacket insulates meter
7.
Sensor pins: Replaceable sensor tips
8.
Sensor handle: Hold the sensor by the handle when taking measurements
1
7
2
3
8
4
5
6
3
Model 407777 Version 2.2 Jan 04
Preparation
1.
Insert the sensor into the sensor input jack on the meter top
2.
Ensure that a fresh 9V battery is installed by powering the unit, observing that the
LCD illuminates, and that the low battery indicator LBT is off. To access the rear
battery compartment, the meter’s protective rubber jacket must be removed.
3.
Remove the rubber pin protector from the sensor pin tips before use.
4.
Note that this meter automatically turns off after 10 minutes to conserve battery life.
To defeat this feature, press the RECORD key to access the data recording mode. In
the recording mode, the automatic power off feature is disabled. For more on the
recording mode, refer to the section ‘Maximum and Minimum Record and Recall’ later
in this manual.
Wood Moisture Measurements
Wood moisture measurements for known wood type
1.
Press the POWER button to turn on the meter.
2.
Use the Material button to select a wood group (refer to the material list in the
Appendix later in this manual). Select group 1 through 9 for general woods or Group 9
for chipboard.
3.
Insert the sensor's test pins into the wood under test.
4.
Insertion should be to at least a 0.08” (2mm) depth for highest accuracy. If this is not
possible, carefully insert the test pins as far as possible without using undue force.
5.
The meter display will now indicate moisture content in %.
6.
If the moisture content is greater then 30% the display will indicate dashes at the top
of the LCD display (
).
7.
If the moisture content is less than 9% the display will indicate dashes along the
bottom of the LCD display ( _ _ _ _ _ ).
Wood moisture measurements for unknown wood type
Note that this method is used for reference only. Measurements of known wood types have
a higher accuracy than measurements of unknown wood types.
1.
Turn ON the meter.
2.
Select Material Group 1 using the Material select button.
3.
Insert the sensor's test pins into the material under test.
4.
Insertion should be to at least a 0.08" (2mm) depth. However, if this is not possible,
carefully insert the test pins as far as possible without using undue force.
5.
The meter display will now indicate moisture content in %.
4
Model 407777 Version 2.2 Jan 04
Wallboard Moisture Measurements
Unlike wood types which have known densities, wallboard does not. Consequently it is not
possible to get an absolute moisture content reading.
The following procedure can be used to make relative or comparative measurements of
the moisture content in wallboard.
1. Turn ON the meter.
2. Select Material Group 1 by pressing the Material Select button.
3. Insert the sensor's test pins into a known dry area of wallboard. Insertion should be to
at least a 0.08" (2mm) depth. The meter display will now indicate moisture content in
%. Note this ‘dry’ reading.
4. Insert the sensor's test pins into the wallboard under test. Insertion should be to at
least a 0.08" (2mm) depth. The meter display will now indicate moisture content in %.
Note this ‘moist’ reading.
5. Compare the ‘dry’ wallboard reading with the ‘moist’ wallboard reading to determine the
moisture content of the wallboard area under test.
Temperature Compensation
o
o
This meter is calibrated for use at ambient temperature: 68 F (20 C). When the
temperature is above or below this value, manual temperature compensation should be
performed to maintain meter measurement accuracy. Follow these steps:
1. Check that the RECORD function is not engaged (‘REC’ display icon is off).
2.
Use the TEMPERATURE ADJUST buttons to increase (left button) or decrease (right
o
button) the temperature display to match the new temperature (in C). The
temperature is adjustable in 1 degree steps.
3.
The value will be stored after 4 seconds. Temperature compensation adjustments are
not stored in memory when the meter is turned OFF however.
Data Hold
To freeze the LCD display reading, press the HOLD key. The 'DH' icon will appear on the
LCD. Press the HOLD key again to return to normal operation (the 'H' hold icon will switch
OFF).
Maximum (MAX) and Minimum (MIN) Record and Recall
To keep track of the highest (MAX) and lowest (MIN) measurements, follow the procedure
below:
1. Press the RECORD button to begin tracking the highest and lowest readings. The REC
display icon will appear on the LCD.
2. Press the RECALL key when it is desired to view the highest reading since the
RECORD button was pressed. The MAX icon will appear on the display and the
reading shown will be the highest reading encountered since the RECORD key was
pressed.
3. Press the RECALL key again to view the lowest reading (MIN).
4. To exit this mode of operation, press the RECORD key again. The REC, MAX, and
MIN icons will switch off.
5
Model 407777 Version 2.2 Jan 04
Battery Replacement
When the low battery indicator LBT appears, the 9V battery should be replaced.
1. Remove the rubber protective holster that surrounds the meter.
2. Remove the battery compartment cover, located on the lower back of the meter, with a
coin or a flathead screwdriver.
3. Replace the 9V battery.
4. Close the battery compartment and affix the protective holster.
RS-232 PC Interface
The Meter includes a PC interface for use with optional Data Acquisition Software and
interface cable kit (Part Number 407001). Operational instructions for the interface and
software are supplied with the optional interface kit.
Calibration
Calibration Verification
1. Ensure that the RECORD function is not engaged (REC icon is not on the LCD).
2. Select Material Group 1 using the Material Select button.
3. Press and hold both the CALIBRATION and the “+“ buttons.
4. The display will begin to count down from 5 to 1.
5. If the meter's existing calibration is correct, the LCD will display "good"
6. If the meter's existing calibration is incorrect, the LCD will display "Err".
7. If the calibration is incorrect follow the steps in the next section to recalibrate.
Calibration Procedure
1. Remove the Meter's protective rubber holster.
2. Select Material Group 1 via the Material Select button.
3. Remove the rear battery compartment cover and locate the VR1 potentiometer that sits
inside the battery compartment on the left side.
4. Press and hold the “+” Calibration button.
5. Adjust VR1 for a display of "18.0".
6
Model 407777 Version 2.2 Jan 04
Appendix - Table of Material Groups (alphabetized) with Group Numbers
Abura
4
Erimado
5
2
Pine, Ponderosa
3
2
1
Meranti, Red (light or
dark)
Meranti, white
Merbau
Afara
Afrormosia
1
6
Fir, Douglas
Fir, Grand
2
2
1
3
Fir, Noble
Gegu, Nohor
Greenheart
Guarea, Black
8
7
3
8
Missanda
Muhuhi
Muninga
Musine
3
8
6
8
1
2
3
Guarea, White
Gum, American Red
Gum, Saligna
7
1
2
Musizi
Myrtle, Tasmanian
Niangon
8
1
3
Baguacu, Brazilian
5
Gum, Southern
2
Oak, Japanese
1
Balsa
1
Gum, Spotted
1
Oak, Tasmanian
3
Bange Wanga
Basswood
Bech, European
Berlina
Binvang
Birch, European
1
6
3
2
4
8
Gurjun
Hemlock, Western
Hickory
Hyedunani
Iroko
Ironbank
1
3
5
2
5
2
Oak, Turkey
Oak, American Red
Oak, American white
Oak, European
Obeche
Odoko
4
1
1
1
6
4
Birch, Yellow
4
Jarrah
3
Okwen
2
Bisselon
Bitterwood,
Blackbutt
Bosquiea
4
5
3
1
Jelutong
Kapur
Karri
Kauri, New Zealand
3
1
1
4
Olive E. African
Olivillo
Opepe
Padang
2
6
7
1
Boxwood, Maracaibo
Cahoma
Camphorwood, E.
African
Canarium, African
Cedar, West Indian
Cedar, Western Red
1
1
3
Kauri, Queensland
Keruing
Kuroka
8
5
1
Padauk, African
Panga Panga
Persimmon
5
1
6
Pine, Radiata
Pine, Carribean,
pitch
Poplar, Black
Pterygota, African
Pyinkado
Queensland
Walnut
Queensland Kauri
Ramin
Redwood, Baltic
(Europe)
Redwood,
Californian
Redwood, Baltic
(Europe)
Rosewood, Indian
Santa Maria
Sapele
Seraya, Red
Silky Oak, African
Silky Oak,
Australian
Spruce, Norway
(European)
Spruce, Sitka
Sterculia, Brown
Stringybar, Yellow
Stringybark,
Messmate
Sycamore
Tallowwood
Teak
Afzelia
Agba
Amboyna
Ash. European
4
8
6
1
Ash. Japanese
Ash. American
Ayan
2
8
3
Larch, European
Larch, Japanese
Larch, Western
3
3
5
5
2
3
Totara
Turpentine
Utile
4
3
8
Cherry, European
8
Lime
4
3
3
9
3
2
Coachwood
Cordia, American light
Cypress, E. African
Danta
Douglas Fir
Elm, English
Elm, Rock
6
5
1
3
2
4
4
Loliondo
Mahogany, West
Indian
Mahogany, African
Makore
Mansonia
Maple, Pacific
Maple, rock
Maple, Queensland
Maple, Sugar
Walnut
Queensland
Walnut, European
Walnut, African
3
Chestnut
Chipboard
Pillarwood
Pine, Maritime
Pine, Nicaraguan
Pitch
Pine, American Long
Leaf
Pine, Corsican
Pine, Yellow
3
4
2
1
1
3
2
Walnut, N. Guinea
Walnut, American
Wandoo
Wawa
Whitewood
Yew
2
1
8
6
3
3
Elm, White
4
Matai
4
Pine, Hoop
Pine, Kauri
Pine, Huon
Pine, Scots
Pine, Lodgepole
Pine, Sugar
Pine, New Zealand,
White
Pine, Parana
8
2
2
1
1
2
1
7
3
1
1
1
4
3
8
6
1
2
1
1
7
3
3
3
3
3
3
1
3
3
5
1
5
3
8
2
Model 407777 Version 2.2 Jan 04
Calibration and Repair Services
Extech offers repair and calibration services for the products we sell. Extech also provides
NIST certification for most products. Call the Customer Service Department for information
on calibration services available for this product. Extech recommends that annual
calibrations be performed to verify meter performance and accuracy.
Support Hotline (781) 890-7440
Tech support: Ext. 200; Email: [email protected]
Repair/Returns: Ext. 210; Email: [email protected]
Website: www.extech.com
Copyright © 2004 Extech Instruments Corporation
All rights reserved including the right of reproduction in whole or in part in any form.
8
Model 407777 Version 2.2 Jan 04