1
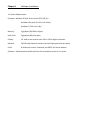
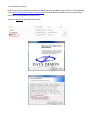
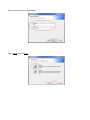
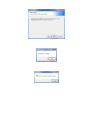
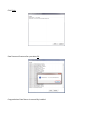
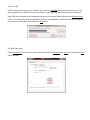
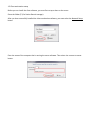
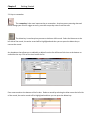
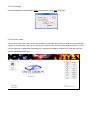
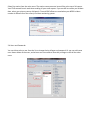
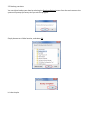
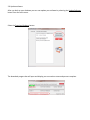
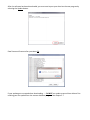
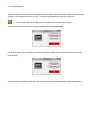
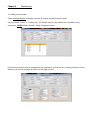
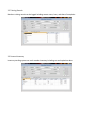
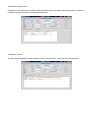
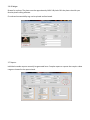
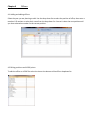
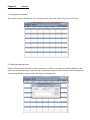
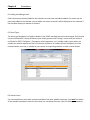
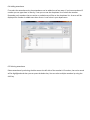
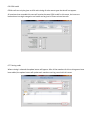
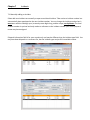
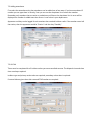
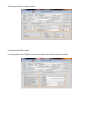
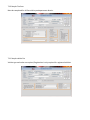
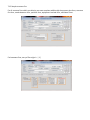
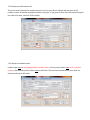
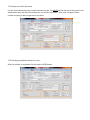
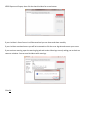
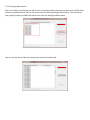
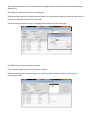
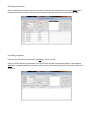
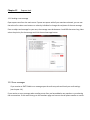
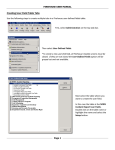
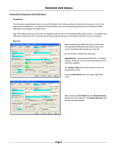
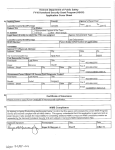
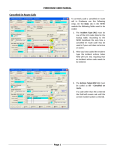
Software Installation
and
User Manual
TABLE OF CONTENTS
Chapter 1
Software Installation
System requirements.……………………………………………………………………………..
Installation and setup………………………………………………………………………………
Link to ADI……………………………………………………………………………………………….
SMTP mail setup………………………………………………………………………………………
Client workstation setup………………………………………………………………………….
Chapter 2
Getting Started
Keys to remember……………………………………………………………………………………
First time login…………………………………………………………………………………………
Fire station setup…………………………………………………………………………………….
Users and Passwords……………………………………………………………………………….
Back-up your data…………………………………………………………………………………….
Update software……………………………………………………………………………………..
Restore Database…………………………………………………………………………………….
Chapter 3
1-1
1-2
1-3
1-4
1-5
2-1
2-2
2-3
2-4
2-5
2-6
2-7
Membership
Adding a new member……………………………………………………………………………
Training records……………………………………………………………………………………..
Personal inventory………………………………………………………………………………….
Qualifications………………………………………………………………………………………….
Journal……………………………………………………………………………………………………
ID badges……………………………………………………………………………………………….
Reports………………………………………………………………………………………….……….
3-1
3-2
3-3
3-4
3-5
3-6
3-7
Chapter 4
Officers
Adding and editing officers……………………………………………………………………
Editing positions and LOSAP points……………………………………………………….
Chapter 5
Calendar
Navigating the calendar ………………………………………………………………………
Adding and editing events ……………………………………………………….………….
Chapter 6
5-1
5-2
Attendance
Adding and editing events ………………………………………………..…………….……
Event types ……………………………………….………………………………………………….
Deleting an event …………………………………………………………………………………
Adding attendance ……………………………………………………………………………….
Deleting attendance ………………………………………………………………………….….
OSHA credit ……………………………………….……..………………………………………….
Training credit ………………………………………………………………………………………
Chapter 7
4-1
4-2
6-1
6-2
6-3
6-4
6-5
6-6
6-7
Incidents
Manually adding an incident …………….…………………….………..…………….……
Importing incidents from ADI ……………………………………………………………….
Adding attendance ……………………………………………………………………………….
All calls ……………………………………….……..……………………………………..………….
Casualties …………………..…………………………………………………………………………
Supplemental information …………………..……………………………………………….
Sample EMS incident …………………………………………………………………….………
Sample MVA with injuries incident ………………………………….……..…….………
7-1
7-2
7-3
7-4
7-5
7-6
7-7
7-8
Chapter 7
Incidents (continued)
Sample HAZ-MAT incident ………………………………………..……………………
Sample general fire incident ……………………………………………….…………
Sample vehicle fire incident ……………………………….…..……………………..
Sample structure fire incident ……………………………………………………….
Sample provided mutual aid …………………………………….……………………
Sample cancelled enroute ………………………………..……………….……………
Sample no call for the month …………………………………….…………….….…
Checking completed incidents for errors ………………………………….….…
Sending incident reports ………………………………………….……………….….…
Chapter 8
7-9
7-10
7-11
7-12
7-13
7-14
7-15
7-16
7-17
Self contained breathing apparatus
Adding a new pack …………………………………………..………………..…………….…
Editing an existing pack …………………………………………..………...…………….…
Deleting an existing pack …………………….…………………..………...…………….…
Adding a maintenance item to an existing pack ……..………...……..……….…
SCBA inventory and maintenance reports …………………………………………...
Adding a new air cylinder ………………………………………….………..…………….…
Air cylinder hydro test due reports …………………………………………………….…
Adding a new mask …………………………..……………………….………..…………….…
Adding a new regulator …………………………..……………………….….…………….…
Chapter 9
Inventory
8-1
8-2
8-3
8-4
8-5
8-6
8-7
8-8
8-9
Chapter 10
Maintenance
Chapter 11
Reports
Chapter 12
Express Text
Sending a text message …………………………..……………………….….…………….…
Error messages …………………………………………………………………………………….
Chapter 13
Frequently asked questions
12-1
12-2
Chapter 1
Software Installation
1-1 System Requirements
Processor: Windows XP with Service Pack3 (SP3) (32-bit).
Windows Vista with SP1 (32-bit or 64-bit).
Windows 7 (32-bit or 64-bit).
Memory:
2 gigabyte (GB) RAM or higher.
Hard Drive:
5 gigabytes (GB) free space.
Display:
19” wide screen monitor with 1024 x 768 or higher resolution.
Network:
10/100 mbps network interface card and high speed internet service.
Email:
A valid email account, Password, and SMTP mail server address.
Software: Adobe Reader and Microsoft dot net frameworks version 3.5 or newer
1-2 Installation and setup
Data Demon can be installed from either the USB thumb drive provided at original sale, or by downloading
it from http://www.bluedevildata.com/downloads.If you download the software you must contact Blue
Devil Data for the password to unzip the file.
Browse for setup.exe and double click the file
Enter your User Name and Organization.
Select typical and click next
Click Finish
Data Demon will restart after you select OK.
Congratulations Data Demon is successfully installed.
1-3 Link to ADI
If ADI is being used to import your incidents, then select the Link ADI button from the main menu. If link
ADI is grayed out, you either don’t have permissions or you did not select a county of primary dispatch.
Next if ADI is not installed on this computer then you must map the data by selecting the Network Setup
button. Else select the path to the ADI log file by either the dropdown or the browse button if the path is
not listed on the dropdown. Then select the Link button.
1-4 SMTP mail setup
Select Express Text from the main menu, and then choose the mail setup tab. Save your settings then Test
the connection.
1-5 Client workstation setup
Before you can install the client software, you must first set up a share on the server.
Share the folder (C:\Fire Station Record manager).
After you have successfully installed the client workstation software, you must select the Network Setup
button
Enter the name of the computer that is running the server software. Then select. the connect to server
button.
Chapter 2
Getting Started
2-1 Keys to remember
The escape key is the most important key to remember. Anytime you are entering data and
either change your mind or trigger an error, press the escape key twice to exit the edit.
The delete key is used anytime you want to delete a child record. Select the blue area at the
left side of the record, the entire record will be highlighted and then you can press the delete key to
remove the record.
Any dropdown that allows you to add,edit,or delete from the list will have a little icon at the bottom or
sometimes the top. Click on the icon to edit the list.
Enter new records at the bottom of the list box. Delete a record by selecting the blue area at the left side
of the record, the entire record will be highlighted and then you can press the delete key.
2-2 First time login
Use the dropdown arrow and select chief. The password is also chief, Click login.
2-3 Fire station setup
You are now at the main menu. Select the computer in the upper left side if you need to contact technical
support, or product sales. Also you can select the see what’s new icon to review software versions, check
out new features, or download documentation. Important messages from Blue Devil Data and technical
tips will also be displayed here.
Select fire station from the main menu. The station name you enter here will be at the top of all reports.
Your FDID entered here is used when sending all your state reports. If you use ADI to receive you incident
data. select your primary county of dispatch. Fire and EMS offsets are used when your NFIRS incident
number is different from the county’s incident numbering system.
2-4 Users and Passwords
You can either select a user from the list to change their privileges and password. Or you can add a new
user. Never delete all the users, and at least one user needs to have the privileges to edit all the other
users.
2-5 Back-up your data
You can either backup your data by selecting the Database Backup button from the main menu or the
system will prompt you every time you exit the program.
Simply browse to a folder location, and select OK.
It is that simple.
2-6 Update software
After you back up your database you can now update your software by selecting the Update Software
button from the main menu.
Select the Download Updates button
The download progress box will open and display your connection status and percent complete.
After the software has been downloaded, you must next import your data into the new program by
selecting the Update button.
Data Demon will restart after you select OK.
If your update gets corrupted when downloading …….DO NOT run update a second time without first
undoing your last update from the restore database program. See chapter 2-7
2-7 Restore Database
There are two main reasons you may want to restore a backup, If data corruption occurs during a software
update or if the database is lost or corrupt. To restore the database you must start. Browse to
“C:\fire Station Record Manager\restore database.exe”,and start the program.
If the corruption occurred during a software update, then select undo update.
If your data was lost or corrupted for all other reasons then select restore backup, and browse for your
latest backup.
If you have client workstation software, you can only restore the server database. Clients have no data.
Chapter 3
Membership
3-1 Adding a new member
Select Add New Member and assign a unique ID number that will never be reused.
You must select “Active” or “Probationary” for member status or the member can’t be added to any
attendance. NEVER delete a member, simply change their status.
Cell phone information must be completed if you are going to use Express Text, including cell phone carrier
Members can receive messages by either text message or email.
3-2 Training Records
Member training records can be logged including course name, hours, and date of completion.
3-3 Personal Inventory
Inventory tracking system can track member inventory including cost and expiration dates.
3-4 Member Qualifications
Designed to track apparatus a member maybe qualified to drive. And track specific equipment a member is
trained to operate. Also when and who approved them.
3-5 Member Journal
The journal was designed to track member activities, achievements, acts of heroism, and discipline.
3-6 ID Badges
Browse for a photo. The photo must be approximately 140 X 140 pixels. Edit the photo size with your
favorite photo editing software.
ID cards and accountability tags can be printed and laminated.
3-7 Reports
Individual member reports can easily be generated here. Complex reports or reports that require a date
range are located in the report wizard.
Chapter 4
Officers
4-1 Adding and editing officers
Select the year you are planning to edit. Use the drop down list to select the position of office, then enter a
member’s ID number or select their name from the drop down list. You can’t select the next position until
you have selected a member for the current position.
4-2 Editing positions and LOSAP points
To edit the officer or LOSAP list select the icon at the bottom of the officer dropdown list.
Chapter 5
Calendar
5-1 Navigating the calendar
The tool bar contains five buttons, View previous month, View next month, Save, Print, and Close.
5-2 Adding and editing events
Double click on the day you want to add a new event or modify an existing event and the dialog box will
open. You can have up to four events per day. If you have an event you don’t want printed on the general
membership calendar, simply uncheck the display on calendar box.
Chapter 6
Attendance
6-1 Adding and editing events
Events that were previously added to the calendar can now have attendance added. If an event was not
previously added to the calendar, you can add a new event here and it will be displayed on the calendar if
the checkbox display on calendar is checked.
6-2 Event Types
The event type dropdown is a fixed list based on the LOSAP standard and cannot be changed. Drills should
not be confused with Training. Drilled are your weekly practice and Training is course that you receive a
certificate for (EMT, Firefighter 1, Emergency vehicle operation, etc.) Standby credit is given when you
standby for another department that is not directly related to an incident (funeral, banquet) not to be
confused with a move up, or standby at your station for impending weather or other natural disaster.
6-3 Delete Events
You cannot delete an event after member attendance has been added to the event. You must first delete
all the member attendance from the event then you can delete the event. (See 6-3 deleting attendance).
6-4 Adding attendance
First select the attendance tab, then attendance can be added one of two ways. If you know members ID
number you can type them in directly, if not you can use the drop down list to select the member.
Remember only members that are active or probationary will be on the drop down list. An error will be
displayed if a member is added more than once or is not active in your department.
6-5 Deleting attendance
Delete attendance by selecting the blue area at the left side of the member’s ID number, the entire record
will be highlighted and then you can press the delete key. You can select multiple members by using the
shift key.
6-6 OSHA credit
OSHA credit can only be given to drills and training all other event types the tab will not appear.
All members that attended this event will receive the same OSHA credit for this event, the hours are
broken down into eight categories and credit can be given in fifteen minute intervals.
6-7 Training credit
When training is selected the update button will appear. After all the members for this training event have
been added, the update button will update each members training record with this event.
Chapter 7
Incidents
7-1 Manually adding an incident
Select add new incident too manually to open a new blank incident. Take notice to incident number has
automatically been populated to the next incident number. You can change the incident number but it
must start with the two digit year, be exactly seven digits long, and be unique, no duplicates. The local
incident number is optional and only used as a reference to the incident number your county dispatch
center may have assigned.
Dispatch information field is for your records only and may be different than the incident type field. You
may have been dispatch to a structure fire, but the incident type may be 611-cancelled enroute.
7-2 Adding attendance
First select the attendance tab, then attendance can be added one of two ways. If you know members ID
number you can type them in directly, if not you can use the drop down list to select the member.
Remember only members that are active or probationary will be on the drop down list. An error will be
displayed if a member is added more than once or is not active in your department.
Apparatus and duty can be logged for each member that received incident credit. If the member never left
the station, then the apparatus would be “Station” and the duty “Standby”.
7-3 All Calls
Times must be completed for all incidents unless you were cancelled enroute. The dispatch time and close
time are always required.
Incident type and primary action taken are required, secondary action taken is optional.
If mutual aid was given then their state and FDID number are required.
7-5 Casualties
For civilian casualties only report structure fire related casualties. You must complete a separate civilian
casualty report for each fire related injury or death. You must complete all fields within each report.
For firefighter casualties only report members of your station. You must complete a separate firefighter
casualty report for each injury or death. You must complete all fields within each report.
7-6 Supplemental information
If ADI is used to import your incident then the supplemental information will contain the dispatcher’s
notes. You can always add your own comments after the dispatcher’s notes.
7-7 Sample EMS incident
7-8 Sample MVA with injuries incident
7-9 Sample HAZ-MAT incident
For spills greater than 55 gallons you must complete the chemical transaction fields.
7-10 Sample Fire form
Must be completed for all fires within you departments district.
7-11 Sample vehicle fire
Vehicle type and make are required, Registration is only required for registered vehicles.
7-12 Sample structure fire
For all structure fires within you district you must complete additionally the property loss form, structure
fire form, smoke detector form, sprinkler form, equipment involved form, and owner form.
For basement fires, story of fire origin is [ -1 ]
7-13 Sample provided mutual aid
This is the same structure fire as above except it is not in your district. Mutual aid was given in this
incident; notice all the tabs related the structure fire gone. If you gave air then check the mutual aid given
box, select the state, and their FDID number.
7-14 Sample cancelled enroute
Incident type must be 611 dispatched & canceled enroute, Primary action taken must be 93 cancelled
enroute, and secondary action taken must be left blank. The enroute time and the on scène time are
optional and may be left blank.
7-15 Sample no call for the month
Use this if your department has a month without any calls. You MUST put the last day of the month in the
dispatch date.box, and check the bottom box “no calls for the month”. Also enter a unique incident
number, anything it does not get sent to the state.
7-16 Checking completed incidents for errors
After the incident is completed click the send to NFIRS button.
NFIRS Exporter will open, then click the check incident for errors button.
If your incident is free of errors it will be saved and you can then send them monthly.
If your incident contained errors you will be instructed to click the error log tab and correct your errors.
If you receive a warning, open the warning log tab and review. Warnings are only asking you to check on
common mistakes. You can send incidents with warnings.
Click OK
7-17 Sending incident reports
After error checks are complete you will see a list of pending incidents that have not been sent to NFIRS. After
you have completed all your calls for the month click the send all pending incident button. This will send all
your pending incidents to NFIRS and delete them from the pending incidents queue.
You can view the sent incidents by selecting the view sent incidents tab.
Chapter 8
SCBA maintenance
8-1 Adding a new pack
Open the SCBA pack maintenance form and click on the add new pack button. Each pack must have a
unique identification number, select or enter the remaining pack information, and then click save.
8-2 Editing a existing pack
Select the pack you want to edit from the equipment list.
8-3 Deleting a existing pack
After selecting the pack, you may only delete an existing pack after all the maintenance items have been
deleted first.
8-4 Adding a maintenance item to an existing pack
After selecting the pack, click add maintenance item and a maintenance log box will pop up. Next select or
enter the remaining fields, and click save & exit.
Edit an existing maintenance item by changing the field directly on the main page.
8-5 SCBA inventory and maintenance reports
Click inventory report to print a list of all your air packs.
Maintenance reports are printed by pack, you must first select an air pack before you can print a
maintenance report.
8-6 Adding a new air cylinder
Open the SCBA cylinder maintenance form and click on the add new cylinder button. Each cylinder must
have a unique identification number, select or enter the remaining cylinder information, and then click
save.
Notice the hydro due date and the retire date, they are important if you run the hydro test due reports.
8-7 Air cylinder hydro test due report
The hydro due dates turn green if they are within 30 days of needing an inspection, and red if the hydro is
past due.
8-8 Adding a new mask
Open the SCBA mask maintenance form and click on the add new mask button. Each mask must have a
unique identification number, select or enter the remaining mask information, and then click save.
8-9 Adding a regulator
Only use this section if your regulators are not part of the air pack.
Open the SCBA regulator maintenance form and click on the add new regulator button. Each regulator
must have a unique identification number, select or enter the remaining regulator information, and then
click save.
Chapter 12
Express text
12-1 Sending a text message
Open express text from the main menu. Express text opens with all your members selected, you can use
the select all or select none buttons or select by individual to change the recipients of the text message.
Enter a subject and message for your text, the message must be between 1 and 160 characters long. Next
select the priority for the message and click the send message button.
12-2 Error messages
If you receive an SMTP failed error message open the mail setup tab and check your mail settings
(see chapter 1-4).
If you receive an error message when sending a text after you have added a new member try unselecting
the new member. If this works then go to the members page and correct the cell phone number or carrier.