1
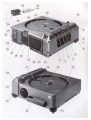
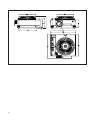
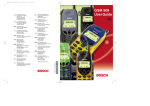
KODAK EKTAPRO 3020 4020 5020 7020 9020 Slide Projector Bedienungsanleitung Instruction Manual Mode d’emploi Manual de Instrucciones Istruzioni per l’uso Projector-Features 1 2 3 4 5 6 7 8 9 Slide change buttons Using the instruction manual (forwards; backwards) Focusing buttons Standby button Lamp economy switch and High Light (EKTAPRO 7020, 9020) Fan (air inlet) Interval Timer (EKTAPRO 5020, 9020) Autofocus - on/off switch (EKTAPRO Switch for slide tray zeroing on/off (EKTAPRO 9020) Operation indicator (LED) and Standby indicator 80 20 Reference arrow: 140 18 27 28 29 30 31 32 33 34 35 36 EKTAPRO 7020 and 9020 Projector These projectors have a built-in dissolver. This special feature and its commands are laid down in a separate manual which you will also find in the box. Centre position indicator of lens mount Tray setting switch 80/140 25 26 &SEPARATE MANUAL Action arrow: 5020, 9020) 10 11 12 13 14 15 16 17 19 20 21 22 23 24 Open the cover flap. Here you will find illustrations of the projector. The figures have also been incorporated into the op-erating instructions to enable quick and exact identification of the individual projector features. Focusing knob for gear rack lenses Retractable handle WARNINGS are framed. Important texts are highlighted in grey. Height adjustment foot Slide tray lock Slide tray transport ring Content Slide gate Slide tray release (140) and lever for slide tray positioning (80) (EKTAPRO 7020, 9020) Air exhaust Lamp module P-Bus in (RS232) (EKTAPRO 4020; 5020; 7020, 9020) P-Bus out (RS232) (EKTAPRO 7020, 9020) ADDRESS Switch (EKTAPRO 7020, 9020) Zero positioning indicator and Line up (EKTAPRO 7020, 9020) Remote control socket Lamp failure indicator (L1, L2) (EKTAPRO 4020; 5020; 7020, and High Light indicator(EKTAPRO 7020, 9020) 9020) Tray positioning index mark Lamp module release Fuse holder (secondary circuit) Voltage indicator Fuse link compartment (primary circuit) Fuse link Fuse (primary circuit) Mains switch (electrical) Module expansion slot AC mains socket (EKTAPRO 7020, 9020) Important Safety Precautions................22 Introduction.........................................23 Switching-on the projector....................24 Operation............................................27 Other projection modes........................30 Service.................................................32 Servicing.............................................33 Accessories.........................................35 Technical Data....................................36 Electrical Approvals and Conformity Mark Electrical Approvals The KODAK EKTAPRO 3020/4020/5020/7020/9020 Slide Projector complies with International Safety requirements and bears the following safety marks: UL (Underwriter Laboratories Inc.) CSA (Canadian Standards Association) VDE (Verband Deutscher Elektrotechniker) CE Conformity Mark To show compliance with EMV-Directive 89/336/EEC and product safety requirements, the slide projector bears the CE mark. EKTAPRO 3020 In case of extreme mains disturbances problems with lamp flashing and/or jamming may occur. In this case please switch the projector off and on again! In case of a jam, please refer also to Possible problems during operation as written in the manual on page 34. (Please keep the tray position in mind before switching on the projector. With the random access function of the IR remote control or the rapid search via the reverse transport button you will easily come back to this position.) EKTAPRO 4020, 5020, 7020, 9020 The projector is correspondingly programmed to prevent it from becoming uncontrollable in the case of severe mains disturbances. Should such disturbances occur, the projector resets itself, i.e. it brings the tray into zero position and resynchronises itself. It is then fully operative again and ready for use. english Radio interference: EEC directive 89/336 Australia standards AS 1044 RFS49 ISSUES July 1989 VCCI Regulations Nov. 1987 Class 2 Part 15 of FCC Rules Subpart J Class B Canadian DOC C 108,8 -M 1983 Class B Note: This digital apparatus does not exceed the Class B limits for radio noise emissions from digital apparatus set out in the Radio Interference regulations of the Canadian Department of Communications. Note: This equipment has been tested and found to comply with the limits for a Class B digital device, pursuant to part 15 of the FCC Rules. These limits are designed to provide reasonable protection against harmful interference in a residential installation. This equipment generates, uses and can radiate radio frequency energy and, if not installed and used in accordance with the instructions, may cause harmful interference to radio communications. However, there is no guarantee that interference will not occur in a particular installation. If this equipment does cause harmful interference to radio or television reception, which can be determined by turning the equipment off and on, the user is encouraged to try to correct the interference by one or more of the following measures: - Reorient or relocate the receiving antenna. - Increase the separation between the equipment and receiver. - Connect the equipment into an outlet on a circuit different from that to which the receiver is connected. - Consult the dealer or an experienced radio/TV technican for help. 21 Important Safety Precautions When using your equipment, basic safety precautions should always be followed, including the following: 1. Read and understand all instructions before using. 2. Always use the correct voltage, as described on page 24. Incorrect voltage can lead to malfunctions in the projector. 3. Close supervision is necessary when any appliance is used by or near children, or others who may not understand the need for the following precautions. Do not leave the projector unattended while in use. 4. Care must be taken as burns can occur from touching hot parts. For lamp replacement let the module cool down before touching the lamp and the surrounding area. Do not place the lampmodule on heat sensitive surfaces (s. p. 32). 5. Do not operate projector with a damaged cord or if the projector has been dropped or damaged - until it has been examined by a qualified service technician. 6. Position the cord so that it will not be tripped over, pulled, or placed in contact with hot surfaces. 7. If an extension cord is necessary, a cord with a current rating at least equal to that of the projector should be used. Cords rated for less amperage than the projector may overheat. 8. Always unplug the projector from the mains before cleaning and servicing (e.g. lamp replacement) and when not in use. Never pull cord to plug from outlet. Grasp plug and pull to disconnect. 9. Let the projector cool completely before putting away. 10. To reduce the risk of electric shock, do not immerse this projector in water or other liquids. 11. To reduce the risk of electric shock, do not disassemble this projector, but take it to a qualified service technican if service or repair work is required. Incorrect reassembly can cause an electric shock when the projector is used subsequently. 12. The use of an accessory attachment not recommended by the manufacturer may cause a risk of fire, electric shock, or injury to persons. Only devices with safety-low voltage (SELV) are allowed to be connected. 13. Connect this projector to a grounded outlet. 14. Keep air inlet (5) and air outlet (19) free from obstruction. SAVE THESE INSTRUCTIONS! 22 Introduction W elcome to the world of the KODAK EKTAPRO Slide Projectors. You are, with your EKTAPRO Slide Projector, holding one of the newest generation KODAK projectors. It will certainly help you meet your current and future 35 mm slide projection challenges. A few benefits of your new KODAK EKTAPRO Slide Projector are listed below. We wish you much pleasure in presenting with this projector. - Highest precision All functions are continually monitored and controlled with the highest precision by the built-in microprocessor. This, for example, guarantees that the slide change time will always be kept, independent of the voltage used. - Optical quality All important structural elements for the optical equipment such as the slide gate and base for the lens mount housing are in diecast, and adjustment problems are, thereby, minimized. - Communication Connection to the PC world! You are able to communicate with the projector via a connected PC with the help of EKTAPRO P-COM Protocol- the projectors communications language. The interface is called P-Bus. Total integration of the projector into the multimedia scene is now realizable. - Convenience Working with EKTAPRO Projectors means presenting with the greatest of ease: Standby, no-slide-no-light, integrated dissolver and random access are but a few of the features. - Flexibility The modular design, lamp module and the module expansion slot allow your projector to be constantly adapted to today and future developments. - Up-to-date Due to environmental and recycling reasons EKTAPRO Slide Projectors are not varnished. This is visible on the shade-differences of the housing. 23 Switching-on the projector Switching- on the projector Check voltage setting EKTAPRO Slide Projectors will be exported throughout the world to countries with differing mains voltages. The projectors are already set during manufacture to a fixed mains voltage. Shipments to countries with 100 or 120 V mains will be equipped with a 4 A slow blow/ 250 V fuse. A spare fuse for replacement is also supplied. Shipments to countries with 220, 230 or 240 V mains will be equipped with a T 2A L/ 250 V fuse. A spare fuse for replacement is also supplied. Before you switch on your projector ensure that the voltage is correctly adjusted! An incorrectly adjusted mains voltage can damage the projector! The voltage indicator (30) must show your country´s actual mains voltage! 2. 1. . Connect your EKTAPRO Slide Projector to the mains with the mains lead . (UK users note: A suitable fused 13A plug must be fitted. See instructions on cable!) Turn on the mains switch (34). The projector is switched on and ready for use. The red LED (18) is on; lamp and fan are switched off. I.e. the projector stays in a "silent" mode. With any strike on a key (such as transport, standby, ..) lamp and fan will be switched on. . Note: If a problem on the slide change is detected, the red LED (18) (operation indicator) will start to blink and the projector can no longer be operated (see Trouble Shooting Guide, page 34). Tray setting 3. 140 Setting of a different operation voltage WARNING For safety, the mains lead must be unplugged! Important: Ensure that the 100 and 120 V setting uses a different fuse to the 220 -240 V setting. See text above! 1. Unlock the fuse link compartment (31) by using a screwdriver and pull compartment out. 2. 3. . 24 Push the fuse link (32) into the compartment so - that the applied voltage can be seen in the window (30) of the compartment. Push the loaded compartment (with mounting underneath) firmly into the projector opening provided. 80 10 Round trays for both 80 slides and 140 slides can be used. The tray setting switch (10) is set in the factory to accomodate the 80 tray. By using a small screwdriver, the switch can be brought into the 140 position. Caution If the projector is not properly adjusted, there will be transport problems! You can only set the EKTAPRO 3020 before you switch on the projector! Extra Bright Lamp Module - Important Hints Loading and installing the slide tray 1. Check that the baseplate of the slide tray is locked into zero-position and cannot be rotated. 2. 2. Load the slides upside down for normal front projection. With the higher light ouput of the Extra Bright Lamp Module the temperature in the slide gate rises. To enable a smooth operation following hints should be considered: 1. Use only light respectively light gray slide mounts (e.g. Wess slide mounts). Slide mounts with only one dark side or black side have to be sorted in respectively, mounted with the side facing the lamp. Please pay special attention when sorting your slide mounts in rear projections: . Replace and lock the cover to prevent damage and splitting in case the tray is dropped or turned over. 3. 3. Place the loaded tray into its zero position on the projectors transport ring (15). The cleft in the slide tray (zero position) fits on to the notch of the transport ring. Tray positioning index mark Note: To avoid annoying automatic refocus- ing during presentation, damaged, distorted or warped slides should not be used as they may jam the projector`s transport mechanism. A slide tray index (80 slides) for copying can be found on page 86. This is ideal for archiving and an index copy can be made for each slide tray. Projectors are often installed on racks where tray installation may be difficult and only possible from the rear of the projector. In this case the tray positioning index mark (27) on the back of the projector is very helpful: The tray is properly set when the index mark aligns with the mark placed on the tray (at slide no. 20 of the 80 slide tray and at slide no. 35 on the 140 slide tray). 2. Do not use a lamp type EXW/15 h for the projector (higher temperature - lamp not available from Kodak). 3. Consider the room temperature! It may not exceed 35 degrees C! 4. High-Light-Mode (models 7010, 7020, 9010, 9020): Slide projection time per slide may not exceed 1 minute! If these hints are not considered, mounts may deform! 5. Glass mounted slides can produce sweat spots due to the high temperature in long term projections. As soon as the slide has warmed up these sweat spots disappear. To reduce slide temperature (and light output): a) Install a heat-absorbing filter (see Accessories p. 35) or b) Use the lamp economy switch, or c) install a 200 h lamp (see Accessories p. 35) 25 Fitting the lens Setting up the projector Gear rack lenses: Gear rack lenses (such as KODAK Slide Projection FF Lenses) are pushed into the lens mount housing. A slide tray index (80 slides) for copying can be found on page 86. This is ideal for archiving and an index copy can be made for each slide tray. Spiral lenses: Spiral grooved lenses are screwed clockwise (from front of the projector) into the lens mount housing. Place the projector on a firm, vibration free base for stable and smooth operation. For professional use we recommend the special projection racks available from dealers. The projector may be elevated plus or minus 30o from the horizontal along the projection axis. Note: Operating the projector at its maximum angle setting may reduce the average lamp life time! Focusing the image (manually) The picture focus can be altered at any time during the projection by using the focus buttons (2) on the projector or the corresponding buttons on the remote control. The first slide, at the beginning of every projection, must be focused by turning the knob for gear rack lenses (11) or by turning the spiral lens: 1. 2. 4. Leveling the projector Push the slide-forward button project a slide. (1) to 3. max. 30º 1. Slide positioning Press lightly the slide forward button (1). The first slide will move into the slide gate and will be projected. .height. Turn the projector feet (13) to adjust the max. 30º Important! Proper ventilation is required! Check that the projector can draw-in sufficient cool air and that warm air can be freely expelled. Keep air inlet (5) and air outlet (19) free from obstruction! Line-up (EKTAPRO 4020, 5020, 7020, 9020) Aligning the projectors i.e. fully fading up all projectors, in multivision operation is difficult, since dissolve units often do not provide this kind of option. With the Line-up feature you can turn the light of every projector on and off independently. This means the projectors can be aligned or checked at any time. You can only set the line-up on the projector. (The external controlling via P-Bus is rejected during setting. With line-up standby will be also switched off and the shutter will be opened): Line-up on: Press both transport buttons on the projector simultaneously for at least 1 second. The lamp now lights up at maximum output and the zero position indicator (green LED, 24) flashes. Line-up off: Press the standby button (3). 26 4. 2. Move the lens mount to the middle position Repeatedly press the focus buttons (2) until- 3. - the indicator pointer of the centre position indicator (9) reaches the middle position. 4. Focusing a) with KODAK EKTAPRO Lenses or any other gear rack lens: - by turning the focusing knob (11) b) with spiral lenses: - by turning the lens by hand. Operation EKTAPRO 5020 and 9020 Projector: Focusing with the autofocus Manual refocusing during projection is no longer necessary as the built-in autofocus device will automatically give the best definition. However, before you start, the first slide has to be manually focused by turning the knob for gear rack lenses (11) or by turning the spiral lens (the lens mount should be about in middle position) : 1. Slide changing I. Using the buttons on the projector or remote control* II. Using the built-in interval timer (EKTAPRO 5020 and 9020 Projectors) Single Movement: The built-in timer (6) enables the projector to automatically transport your slides. Press button (1) forwards backwards Quick search and zero positioning: To transport the tray quickly in either direction, press and hold down the slide change button-backwards (1) [ ] until the position wanted is reached. The tray will, however, automatically stop at 0 and will remain in this position. If you want to repeat the search run, press the slide change buttonbackwards again. 2. 3. 1. Slide positioning Press lightly the slide forward button (1). The first slide will be moved into the slide gate and will be projected. 2.(PushSwitch the autofocus (7) on button in). 3. Focusing a) with KODAK EKTAPRO lenses or other gear rack lenses: - by turning the focusing knob (11) b) with spiral lenses: - by turning the lens by hand Override feature You can, however, re-adjust the focus at any time using the focus buttons (2). The autofocus is re-activated with the next slide change. Please note Your EKTAPRO Slide Projector can sense when there is a slide in the gate. Only then will the shutter open and the lamp achieve its optimum brightness. In exceptional case the feature can also be switched off with the IR Remote Control (does not apply for the EKTAPRO 3020). To do this, enter the figures 555 and confirm with "*". *There are three different remote controls available as accessories to your EKTAPRO Slide Projector. (Description of the most important features under Accessories page 35): Eleven time settings can be made: Marked time settings: 1; 2; 3; 4; 5; 10; 30; 60 sec Unmarked interim time settings: 8 sec (timer position between 5 and 10 sec) 20 sec (timer position between 10 and 30 sec) 45 sec (timer position between 30 and 60 sec) 1. 2. 1. Setting the timer: Turn the timer clockwise, to the right, until the time required agrees with the indicator on the projector. The timer is now activated and the first picture will be projected after expiration of the set time interval. 2. Switching the timer off: Turn the timer to the OFF position. Note: The slide transport button can be pressed at any time to project the next slide independently of the timer setting . The preset time of the timer will not be interrupted. 27 Standby Function III. With the Autotimer function via IR remote control (EKTAPRO 7020 and 9020) Automatic slide shows can be programmed directly via remote control with the Autotimer function. You can input times between 1 and 60 seconds! Use the number combinations 601 - 660. Then use the <*> key to confirm. The first slide is then transported immediately, the next one in the preprogrammed time. By inputting <600> and <*> you switch the autotimer off again (see also separate manual). Note The Autotimer function takes precedence over times which are set on the built-in timer (model 9020)! Automatic zero positioning (EKTAPRO 9020) The KODAK EKTAPRO 9020 Slide Projector has an automatic zero positioning selector switch (8). When switched on, it automatically returns the tray to the zero position, via the quickest route, as soon as the slide gate is empty. The automatic zero-positioning is particularly useful for presentations with few slides and in continuous operation (see p. 32). 1./ 2. You can run the lamp of your projector in standard mode, economy mode and also in high light mode on the models 7020 and 9020. 1. 1. Projector in Standby: Press the standby button (3) on the projector or remote control. The projection lamp and the fan will be switched off. The tray remains in its position! In addition on models 4020, 5020, 7020 and 9020 the standby status is indicated by the red LED (18) flashing! 2. Projector in operation: Press again the standby button on the projector or remote control. The presentation can now be continued. Standby The standby function enables you to interrupt and restart at any time during your presentations. Standby places the projector in readiness for operation. Note (EKTAPRO 4020, 5020, 7020 and 9020): In any case the projector goes definitely on standby (independent of which mode it was in) if the standby key has been pressed for longer than 2 seconds! If the projector was on standby it will be switched on again and will then go again on standby. Standby is not possible if the slot for modules (35) is engaged with the KODAK EKTAPRO 12/7-Pol Module. 28 Lamp setting 2. 1. Economy Setting: Move switch (4) . 2. Standard Setting: Return the switch (4) to original position. The economy setting offers you approximately three times longer life-span by reducing the projection brightness. The setting can be changed by the lamp economy switch. . High light mode (models 7020 and 9020) Push the switch (4) backwards and forwards once within 1 second. This takes the projector into high light mode. The lamp display of the lamp currently on (L1 or L2, (26)) begins to flash. Lamp output is increased by 20%, although this reduces the lamp life by around 30%! As soon as you move the switch (4) once again you cancel the high light mode! N.B. Projection time must not exceed 1 minute per slide. See special instructions on page 25. Note You can find information on the output of the projection lamps on page 36. . Changing the slide tray (in zero position) Removing the slide tray (in any position) Always lift off the slide tray in the zero position. The zero positioning indicator (24) lights up when the slide tray transport ring is in the zero position. In an emergency, e.g. transport failure, the tray can be removed from the projector in any position: 2. Move tray to zero position: a) Using the slide change button on your projector or remote control units Hold the slide transport-backwards button down. The slide tray goes into rapid search and stops automatically in the zero position. b) Using the IR Remote Control Select "0" on the keypad and confirm with "*". The slide tray moves to the zero position. c) Using the mains switch Turn the projector off by the mains switch (34). When the projector is turned on again, it will complete a system check and bring the slide tray back to the zero position! 3. First switch off your projector! 1. lock Push aside and hold the slide tray (14) while 2. - lifting off the slide tray. 3. Having removed the slide tray turn it over and rotate the base plate until it locks into the zero-position, otherwise the slide tray cannot be replaced on the projector in the zero position. . Turn the projector on again. The slide remaining in the slide gate will be ejected by the slide lift and can be replaced in the slide tray. Fastening or mounting the projector To reduce vibration or for security you will find fixing holes suitable for inserts (M5) in the baseplate of the projector (see figure). 29 EKTAPRO 4020/5020/ 7020/9020 Projector: Lamp failure indicator Your KODAK EKTAPRO Slide Projector is provided with an automatic lamp changer module (20) (also available as an accessory, see page 35). Should the projection lamp (L1) fail, the system automatically activates the second projection lamp (L2). Centring of the lamp is not necessary because each lamp is prealigned in its own reflector. Lamp failure is indicated by two red LEDs (26): Red LED L1 lit: Lamp 1 failed Red LED L2 lit: Lamp 2 failed As soon as a failed lamp is replaced the LED shuts off (for replacement see page 32). Other projection modes Random access operation Any slide can be selected using the KODAK EKTAPRO IR Remote System (available as accessory, see page 35). Access is fast, within approx. 3.5 sec: Input the required slide number to your IR remote control and confirm using <*>. The RA operation is ideal for lectures, interactive learning programmes and computer control. For further details, please see the instructions manual for the IR EKTAPRO Remote System RA and EKTAPRO IR Remote System RA/LP. Note (EKTAPRO 7020 and 9020) RA mode is also possible in the MASTER/SLAVE combination (2 projector dissolve). You can find further information in the separate manual! Note (EKTAPRO 7020 and 9020) If the LED flashes, it means that the projector is in high-light mode. To check which lamp is active Switch the lamp economy switch out of its position. The respective lamp LED (L1 or L2) lights up for a short time. Mode Priority Lamp L1 (factory setting) In this mode the projector will automatically go into lamp 1 position after switching on. This is indicated by a short blinking of the LED L1 when switching the projector on. Mode Lamp position on the last active lamp In this mode the projector stays -even after a lamp change- on the last active lamp in use after switching the projector back on. At unsupervised continuous presentation (projection) this has the advantage that an unused spare lamp with full life time is always available. Choosing the individual mode You can switch anytime to the other mode. For this purpose keep the standby button pressed when switching the projector on 30 EKTAPRO 7020 and 9020: Connection of devices with 12/7 pin socket Your EKTAPRO Projector is fully compatible with most of the professional AV equipment that is equipped with a 12 or 7 pole standard interface. A corresponding module is available as an accessory to connect to these systems (see page 35). You can program new multi-visions as well as play back shows already programmed on this system with the connected equipment. The features standby and random access can however not be used here. Further information on module installation and the operating order of the connected equipment can be found in the corresponding operating instructions. Simultaneous Projection 1. With the KODAK EKTAPRO Twin Socket Adapter (accessory) You can connect two projectors in parallel using the Twin Socket Adapter and an EKTAPRO Twin Socket Connecting cable (accessory). The adapter is inserted into the remote control socket (25). The cable connects the Twin Socket Adapter with the remote control socket of the second projector (see illustration). You control the projectors with the cable remote control as shown in the drawing. The connection of the IR receiver is also possible. However, this can only be connected to the receiver with the 8 m extension cable (accessory). If you have another Twin Socket Adapter you can connect up to three projectors in series. (You can connect up to five projectors but electrical interference can affect the synchronisation.) 2. Using the KODAK EKTAPRO IR Remote Systems Several EKTAPRO Projectors can be operated simultaneously when each projector is equipped with an EKTAPRO IR Receiver (available as accessory, see page 35). 3. With the EKTAPRO Dissolve Cable (accessory) in the MASTER/SLAVE combination (EKTAPRO 7020 and 9020) Press <970> and <*> on your IR remote control and both projectors are in parallelmode. You can find further information on the MASTER/SLAVE combination in the separate manual. Notes: This mode should only be used for slide change purposes! The focus operation will occur on all projectors in parallel! Ensure that all receivers and the transmitter are set to the same channel! EKTAPRO 4020/5020/ 7020/9020 Projector: Dissolve and multiprojection mode EKTAPRO 4020/5020/ 7020/9020 Projector: Operation with Personal Computer Your EKTAPRO Slide Projector is fully equipped for dissolve and multi-vision operation. The following options are available for controlling the projector: Your EKTAPRO Projector can be connected directly to any PC with a standard interface RS232 via the P-Bus-in (21) (9-pin sub D socket). For connection use a simple monitorcable (1:1, shielded)! a) You use the dissolve which is a built-in feature of models 7020 and 9020 and can do a 2 projector dissolve in the easiest and fastest way possible. The second projector can be an EKTAPRO 4010, 4020, 5000, 5020, 7000, 7010, 7020 , 9000, 9010 or 9020. You can find further information in the separate manual. b) Connect one of the many dissolve units on the market to your EKTAPRO projectors. You will need to choose between systems which are fully installed in the AV slot (EKTAPRO 7020 and 9020) and ones which are connected to the P-bus interfaces. c) You can also connect dissolve units which are designed for the KODAK CAROUSEL S-AV or EKTAGRAPHIC projectors (see "compatibility", p. 30). d) You can also connect the projectors directly to a computer. See next section for further information. With the help of the communications language P-COM Protocol, commands are given directly to the projectors micro-processor and information from the projector is received. Commands are transferred in binary code. Slide shows can, for the first time, be completely controlled from a computer with PCOM Protocol. Sixteen projectors (EKTAPRO 7020 or 9020), in all, can be controlled independently. In this instance all projectors will be addressed by setting the address switch (23). Only the first projector is connected to the PC; the other projectors are daisy-chained. Another RS232 interface must be attached to the PC if further projectors are required. Note: There is already professional software on the market for controlling the projectors. You can obtain the addresses from your local Kodak dealer. Some Kodak addresses can be found on the back of these operating instructions. Users who are familiar with computer programming can request a brochure from Kodak (P-COM Protocol) in English on the binary coding of the various commands and the corresponding computer configuration. 31 Service Continuous projection You can either run automatic slide shows using the built-in timer (EKTAPRO 5020 and 9020) or via the IR remote control using the Autotimer function (EKTAPRO 7020 and 9020 -in single or in the MASTER/ SLAVE combination). This makes slide change times between 1 and 60 seconds possible. For further information please see under Timer, page 27 or in the separate manual under "Autotimer". Note (EKTAPRO 4020/5020/7020 Projector) In order to avoid "dark pause" it is recommended that the slide tray is filled as completely as possible. Service Replacement of a defective lamp WARNING: Before pulling out the lamp module, switch off the projector and unplug the mains lead first! For lamp replacement let the module cool down before touching the lamp and the surrounding area. Do not place the hot lampmodule on heat sensitive surfaces. Glass may shatter. Wear gloves. Keep glass covered. Do not touch the small bulb or the mirror surface! If you accidentally get finger prints on them, remove marks with a soft cloth moistened with rubbing alcohol. Replacement of a defective lamp is very easy with your EKTAPRO Slide Projector: 1. KODAK EKTAPRO 9020 Projector You can immediately bring the tray back to the zero position after the last slide with the help of the automatic zero positioning feature. This is useful when continuous projection is required using only a few slides. By pressing the switch (8), you can activate the automatic zero positioning. 4. 3. 2. 1. Press down and hold down the lamp module release (28) and... 2. ... pull out the lamp module (20). . Push the lamp ejector lever down so that it clears the retaining clip. Note: For your projection requirements you have a choice of 3 lamps with different brightness and lamp life (see Accessories page 35). 3. Push the ejector lever completely to the side. The defective lamp will come free of its holder. 4. . Push the ejector lever back to the right and press down until it locks into its hold- Remove the defective lamp and insert the new lamp. ing. . Push the lamp module back into the projector until it locks. 32 Servicing Maintenance and guarantee Replacement of fuses WARNING: Always switch off the projector and unplug the mains lead before replacing a fuse! Avoid the risk of fire, replace only with a fuse of same type and rating! The electric circuits in your projector are protected by three fuses which you can replace yourself. The casing need not, therefore, be opened. Replacement of primary circuit fuses 1. Pull out the fuse link compartment (31). Do not change the position of the fuse holder when reinserting into the projector (see also page 26). 1. . . Push the fuse link compartment back into the projector. Replace the defective fuse (33) (technical data, page 37). Replacement of secondary circuit fuses Please note: These fuses are different! See technical data, page 37. Two secondary fuses protect the projector against damage caused from too higher current drawn by external equipment connected to the projectors remote socket or to the module expansion slot. 1. 2. Reliability and sturdiness are important features of your EKTAPRO Slide Projector. The projector should be periodically serviced as needed to prolong its life. Dirt and dust can have adverse effects on the lubricants used in the projector and thus can cause malfunctions. With the help of the built in micro-processor your Kodak service center can make a fast and reliable diagnosis of the projector. Defective or worn parts can be detected and replaced or repaired. We recommend routine maintenance approximately every 1500 hours of operation or three years whichever comes first. Where the projector is used in very dusty locations (e.g. exhibitions) more frequent servicing will be needed. Cleaning the projector WARNING: For safety, always turn the machine off, unplug the mains lead and allow the projector to cool down before cleaning. Housing: Wipe the housing with a soft, cotton cloth and use a cleaner designed for plastic materials. Do not use solvents or spirit based cleaners. Optics: Do not touch optical surfaces! Clean the lens with a soft lintfree cloth or with special lens tissues. Never wipe over a dry surface! Use a special lens cleaner (available from photographic dealers) or add moisture by breathing over the parts to be cleaned. 1. Turn the fuse carrier (29) anti-clockwise with a screwdriver or a coin. 2. Replace the defective fuse. (Technical data, page 37). 3. Re-screw the carrier clockwise into position. 33 Possible problems during operation 3UREOHP 3RVVLEOHUHDVRQV +HOS After switching on, the projector is not operable. No defect is indicated by the red LED. Fuse (primary or secondary) blown. Check fuse and possibly replace it. For UK users: Check 13 A plug fuse also. EKTAPRO 7020/9020: After switching on, the tray is moved (to 0-position) and the projector is switched off. The projector is in "silent mode" (no defect). Press transport button and the projector will leave the silent mode (see. page 24). Red LED is flashing, and all functions are blocked (after switching-on or during operation). Projector drive system failure (tray transportation, slide lift): 1. Jammed slide in the slide gate. 2. Slide tray base plate not in the zero position. 3. Slide tray base plate bent. 1. Switch off projector; lift off slide tray; remove slide from the slide gate; rotate the base plate until it locks in position; replace the tray and switch on the projector. 2. Switch off projector; lift off slide tray, rotate the base plate until it locks in position; replace tray and switch on the projector. 3. Use a new slide tray. 4.Tray setting switch is not set correctly! 4. Switch off projector; lift off slide tray, rotate the base plate until it locks in position; set tray setting switch to correct position (see page 24); replace tray and switch on the projector. Image can’t be focused by focus buttons. 1. Lens mount was not set to its default position. 1. Press focus buttons to move lens mount to its default setting. Focus the image as indicated in the manual. 2. Slide is distorted 2. Use glass mounted slides. 3. Slide mount is defective. 3. Replace slide mount. The tray cannot be fit on the tray transport ring Tray transport ring not in zero position. - Hold slide change buttons depressed till tray stops in zero-position or - switch projector off and then on again. The tray cannot be moved. Tray has not been placed correctly on the transport ring. Lift off the tray; switch projector on and then off again and then replace tray. Slides are one-sided illuminated. Condensor out of position. Switch off the projector; pull out the lamp module and let it cool down; check that the condensor is correctly seated and push back into position if necessary. Fan runs but lamp is switched off. 1. Lamp failure 1. Refer to page 32 2. Lamp module is not properly fixed. 2. Refer to page 32 1. Lens mount was not set to its default position. 1. Switch autofocus off, move the lens mount to its middle position (s. page 26, switch on the autofocus and focus the image. 2. Slide is distorted. 2. Use glass mounted slides. 3. Slide mount is defective. 3. Replace slide mount. 4. Slide in the 0-compartment of the tray 4. Remove slide from the 0-compartment. (If necessary, further information can be requested from Kodak). Timer and the switch for slide tray zeroing is switched on. Switch off timer and/or switch for slide tray zeroing. Even if autofocus is switched on, the image is not in focus. After switching on the EKTAPRO 9020 Slide Projector the tray is permanently transported from the 0-position to the 1position and vice versa. Note: If none of the faults listed above caused the problem, please contact your KODAK audiovisual products dealer. 34 Accessories KODAK Slide Projection FF Lenses (lens summary, page 85) KODAK EKTAPRO Lens Support -the lens support for large and heavy lenses. European CAT No. 715 1335 KODAK EKTAPRO 80 Slide Tray with transparent cover. European CAT No. 712 8580 Trays are available for holding 80 slides. KODAK CAROUSEL TRANSVUE 140 Slide Tray European CAT No. 184 0768 (not widely available in Europe). KODAK EKTAPRO Cable Remote (4 m) European CAT No. 712 1080 Control of slide change, focus and standby. KODAK EKTAPRO Remote Extension Cable / 8 m European CAT No. 712 5925 Using the EKTAPRO Cable Remote: Up to three of these cables can be joined together giving a possible operation length of up to 28 m. Using the EKTAPRO IR Remote Receiver RA: The receiver can be installed up to 8 m away from your projector with this cable. KODAK EKTAPRO IR Remote System RA European CAT No. 712 1072 The remote control consists of a transmitter and a receiver. The receiver has been constructed so that it can fit directly into the remote control socket (25). Furthermore, you can choose between two channels which enable use of two IR remote controls to control two different projectors in one room. The receiver does not need batteries as it receives electricity through the 8-pin remote control socket (25), from the projector. With this remote system, you can control the functions standby, slide change and focus. With the ten key keypad you can select any slide in the slide tray. With models 7020 and 9020 you can use this keypad to transfer a series of additional interesting functions such as inputting a dissolve time, autotimer, freeze, reset etc. The keypad has a sliding cover for storage. KODAK EKTAPRO IR Remote System RA/LP European CAT No. 712 1064 This remote, in addition to above features, has a built-in laser pointer with an illuminous red point for emphasizing important picture content on the screen. KODAK EKTAPRO 12/7-Pin Module European CAT No. 712 5875 KODAK EKTAPRO 12/7-Pin Adapter Cable European CAT No. 712 5883 With the module and the adapter cable you can connect many dissolve devices, those for the KODAK CAROUSEL S-AV and EKTAGRAPHIC projectors (12 or 7 pin standard). KODAK EKTAPRO Extra Bright Lamp Modules Single Lamp Module for EKTAPRO 3020 Projector: European CAT No. 718 3379 Dual Lamp Module (ALC) for EKTAPRO 4020, 5020, 7020, 9020: European CAT No. 718 4369 KODAK EKTAPRO Standard Heatfilter for Extra Bright Lamp Modules for the reduction of slide temperature and brightness (conforms with the 3000, 3010, 4010, 7000, 9000 and 9010 models). European CAT No 717 7140 KODAK EKTAPRO Heatfilter +10 for Extra Bright Lamp Modules for the reduction of slide temperature and brightness (conforms with all previous models already equipped with such filters). European CAT No 717 7157 KODAK EKTAPRO IR Remote Receiver RA European CAT No. 712 8606 This receiver is necessary for operating another projector in parallel via the EKTAPRO IR Remote Controls. Projection Lamps There are three different projection lamps for varying projection conditions available for your EKTAPRO Slide Projector: EXR 82V/35h 300W European CAT No. 145 2259 Brightness: 100% (standard value) FHS 82V/70h 300W European CAT No. 147 7678 Brightness: 80% EXY 82V/200h 250W European CAT No. 145 2143 Brightness: 60% KODAK EKTAPRO Carrying Case European CAT No. 718 1993 Hard case for projector, lens, tray and remote control transportation. KODAK EKTAPRO Twin Socket Adapter European CAT No. 712 5909 This adapter allows linkage of an additional projector in parallel and an EKTAPRO Cable Remote. The adapter will fit into the remote control socket. KODAK EKTAPRO Twin Socket Connecting Cable / 2 m European CAT No. 712 5917 To connect an additional EKTAPRO Slide Projector to the Twin Socket Adapter for a projection in parallel. KODAK EKTAPRO 4 x 4 Condenser Kit Europ. Cat. No. 714 4967 For projecting 4 x 4 slides (superslides) for the KODAK 36, 85, 93, 100, 150 and 180 mm Projection FF Lenses! KODAK EKTAPRO 1 m Dissolve Cable Europ. Cat. No. 715 3992 You can connect a second projector with a P-Bus-in interface to an EKTAPRO 7020 or 9020 for the dissolve mode (or parallel mode). 35 Technical Data Mechanical System Projector Measurements (see page 90): Length: 340 mm Width: 336 mm Height: 140 mm Height with tray: 175 mm Weight without tray: approx. 9000 g Weight of tray without slides: 540 g Slide Formats: 24 x 36 mm 4 x 4 (superslide) with special condenser Slide Trays: KODAK EKTAPRO 80 Slide Tray for holding 80 slides with a maximum slide mount thickness of 3.2 mm. KODAK CAROUSEL TRANSVUE 140 Slide Tray for holding 140 slides with a maximum slide mount thickness of 1.2 mm. Slide Gate: Gravity-feed slide change with registergate pressure levers in two planes to ensure good slide alignment. Lens Mount: Universal lens mount for both spiral- and rack-mounted lenses (such as KODAK Projection FF Lenses). Height Setting: Height setting to a maximum of 10o via two turnable feet. Levelling: The projector may be operated at an angle of plus or minus 30o from the horizontal along the projector axis. Note: Tilting the projector side ways will adversely affect the lamp lifetime! Housing: Sturdy, fibre-glass reinforced housing (LEXAN). All parts are marked and therefore fully recyclable. All important structural elements for the optical equipment such as slide gate, lamp module and base for the lens mount housing are in die-cast zinc assemblies. Illumination Drive: 1 stepper motor for tray motion 1 stepper motor for slide lift and tray release mechanism 1 DC motor for focus 1 DC motor for fan cooling 1 DC motor for the mirror (automatic lamp changer) 1 rotary solenoid for the shutter Noise Development: approx. 57 dB (A) 82V/35h/300W halogen lamp(s) with integrated cold light reflecting mirror. EKTAPRO 4020/5020/7020/9020: Modular automatic lamp change system. In case of lamp failure the system automatically switches over to the second lamp (<0,3sec). LED indicators showing defective lamps. No adjustment necessary. You can pull out the entire module out of the projector to replace a defective lamp Choice of standard, economy or High Light setting for projection lamp. Projection Lamps (available as accessories): EXR 82V/35h/300W Brightness 100% FHS 82V/70h 300W Brightness 80% EXY 82V/200h 250W Brightness 60% The economy setting reduces the lamp output to around 75% of the normal value (tripling bulb life). The high light setting increases the lamp output by 20% (whilst reducing bulb life by 30%). Temperature range for safe operation The operating temperature range of the projector depends on the ambient temperature and the voltage (see illustration). Standard and economy setting: Minimum 0o C and maximum +40o C High Light setting (models 7020/9020): Minimum 0o C and maximum + 35o C a = Ambient temperature (Co) b = Nominal voltage a 40º 35º 30º 20º 10º -10% b +6% Should the projector overheat, e.g., due to lack of cooling air, the built-in thermal cutout automatically switches the lamp off and then switches it on again once it has cooled down. 36 Electrical System Control system Power Voltage: AC ONLY! Different power voltages are adjustable via the removable fuse link. (120, 220, 230, 240 V) External: P-Bus-in 9-pin Sub-D female connector (V.24/V.28 standard interface) P-Bus-out 9-pin Sub D male connector (V.24/V.28 standard interface). Slot for modules 8-pin remote socket (MiniDIN) Frequency: 50/60 Hz Performance: approximately 380 W Fuses: Primary circuit: 1 x T 2A L/250V for 220, 230 and 240V or 1 x 4 A slow blow/250V for 120V Secondary circuit: For 10 V: 1 x T 1.25 A L/250V (5 x 20 mm) (For USA and Canada: 1 x 1.25 A slow blow/ 250V) For 24 V: 1 x T 2.0 A L/250V (5 x 20 mm) (For USA and Canada: 1 x T 2.8 A slow blow/250V) Supply Voltage for External Units: Provision of 12V/50 mA (DC) direct voltage on the 8-pin remote control socket. Provision of 24V/750 mA direct voltage or 34V/750 mA (AC) alternating voltage on the slot for external control modules. ADDRESS Switch Rotary switch to set projector address 1-16 (hex.-code 0-9 and A-H). Slide Change Time: 0.88 sec (independent of mains voltage and frequency). Slide Access Times : <3.5 sec for the longest search run. Connectors and Interfaces P-Bus-in and P-Bus-out: The following pin connections are used for data transmission: Pin 2: Transmit Data TxD Pin 3: Receive Data RxD Pin 5: Signal ground 54321 9876 EKTAPRO 7020/9020 Projectors: The P-Bus-in interface is used as exit to the SLAVE projector. By setting of a transport command via IR-remote or via a built-in timer, a status call follows. Slot for Module: Pin a1: SDA Pin a2: Pin a3: SLOT_232_R Pin a5: SLOT_A Pin a6: SLOT_C Pin a8: 12 VDC Pin a9: 34 VDC Pin a10:24 VAC_N Pin b1: SCL Pin b2: PLL_DISS Pin b3: SLOT_232_T Pin b4: STBY_DIS Pin b5: SLOT_B Pin b6: SL_DISS Pin b8: VSS 12 Pin b9: VSS 34 Pin b10: 24 VAC_L a10 a9 a8 a7 a6 a5 a4 a3 a2 a1 b10 b9 b8 b7 b6 b5 b4 b3 b2 b1 8-pin Standard Projector Socket: (For connecting the KODAK EKTAPRO Remote Systems or KODAK EKTAPRO Twin Socket Adapter). Pin 1: 12 VDC Pin 2: Gnd 8 Pin 3: Signal 1 (LSB) Pin 4: Signal 2 5 Pin 5: Signal 3 Pin 6: Signal 4 4 Pin 7: Signal 5 (MSB) Pin 8: Interrupt 7 6 3 2 1 KODAK, CAROUSEL, TRANSVUE, EKTAGRAPHIC and EKTAPRO are registered trademarks. 37 Diamagazin Register-80 Tray Index Card-80 Identification magasin 80 Indice para Bandeja-80 Sequenza diapositive nel caricatore da 80 Kodak 1 21 41 61 2 22 42 62 3 23 43 63 4 24 44 64 5 25 45 65 6 26 46 66 7 27 47 67 8 28 48 68 9 29 49 69 10 30 50 70 11 31 51 71 12 32 52 72 13 33 53 73 14 34 54 74 15 35 55 75 16 36 56 76 17 37 57 77 18 38 58 78 19 39 59 79 20 40 60 80 86 " Projektor-Übersicht KODAK Projektionsobjektive KODAK Projection Lenses Objectifs KODAK Objetivos KODAK Obiettivi Kodak .2'$.6OLGH3URMHFWLRQ ))/HQVHV PP PP PP PP PP PP C C C C =RRP =RRP =RRP C C Vergütung Coating Couche Revestimiento Rivestimento Länge Length Longueur Longitud Lunghezza 117 mm 153 mm 185 mm 125mm 125 mm 190 mm Front-Ø Front tube-Ø Tube Ø devant Tubo delantero Ø Frontale 69 mm 65 mm 73 mm 73 mm 73 mm 63 mm Gewicht Weight Poids Peso 210 g 310 g 450 g 108 g 108 g 205 g Lichtstärke Aperture Aperture Abertura Apertura f/3.5 f/3.5 f/3.5 f/2.8 f/2.8 f/3.5 Anzahl Linsen Elements Elements Número de lenses Numero di lenti 7 7 9 3 3 3 Bildwinkel Field angle Champ Angulo de projección Campo die proiezione 32° - 20° 24° - 16° 24°-12° 27° 23° 13° PP PP PP PP PP PP =RRP =RRP =RRP MC MC MC MC MC MC 150 mm 177 mm 226 mm 125 mm 125 mm 146 mm .2'$.(.7$352 6(/(&73URMHFWLRQ)) /HQVHV Vergütung Coating Couche Revestimiento Rivestimento Länge Length Longueur Longitud Lunghezza Front-Ø Front tube-Ø Tube Ø devant Tubo delantero Ø Frontale 61mm 70 mm 87.5 mm 78 mm 78 mm 73 mm Gewicht Weight Poids Peso 580 g 700 g 910 g 457 g 320 g 605 g Lichtstärke Aperture Aperture Abertura Apertura f/2.8 f/3.5 f/3.0 f/2.8 f/2.5 f/2.8 Anzahl Linsen Elements Elements Número de lenses Numero di lenti 8 9 9 7 5 5 Bildwinkel Field angle Champ Angulo de projección Campo die proiezione 32°-20° 28° - 12° 12°-8° 62° 25° 15° * 4 x 4 Projektion möglich (Spezialkondensor nötig, Zubehör) * 4 x 4 Projection possible (special condenser necessary, see accessory!) *Possibilité de projection de diapositives 4 x 4 (condenseur spécial requis !) * Es posible la proyección 4x4 (se necesita un condensador especial). * Possibilità di proiettare diapositive 4 x 4 (è necessario un condensatore speciale, vedere accessori). 87 Projektionsbildweiten Dimensions des vues projétées Projected picture sizes Anchura de la imagen proyectada Dimensioni dell'immagine a c 88 Projektionsbildweiten Dimensions des vues projétées Projected picture sizes Anchura de la imagen proyectada Dimensioni dell'immagine b1 = 35 mm b2 = 23 mm b3 = 38 mm a c a c f = 36 mm 89 1 90 7 5 Austria: Kodak Gesellschaft mbH Albert-Schweitzer-Gasse 4 A-1148 Wien Germany: Kodak Aktiengesellschaft D-70323 Stuttgart Australia: Kodak Pty. Ltd. P.O. Box 90 Coburg 3058 Belgium: N.V. Kodak S.A. Steenstraat 20 1800 Konigslo-Vilvoorde Denmark: Kodak A/S Dybendal Alle 10 DK-2630 Taastrup England: Kodak Limited P.O. Box 66 Hemel Hempstead Herts. HP1 1JU Netherlands: Kodak Nederland BV Zeisterweg 1 Odijk Postbus 1000 3970 BA Driebergen Finland: KODAK OY P.O. Box 19 01511 Vantaa Norway: Kodak Norge AS Trollasveien 6 1410 Kolbotn. France: Kodak Pathé 26, rue Villiot 75594 Paris-Cedex 12 Sweden: KODAK AB 17585 Järfälla Italy: Kodak S.p.A. Viale Matteotti 62 20092 Cinisello B.-Milano Printed in Germany. Switzerland: Kodak Société Anonyme 50, avenue de Rhodanie CH-1001 Lausanne KODAK, CAROUSEL, EKTAGRAPHIC and EKTAPRO are registered trademarks. 620 4351-0597, G&S 0192/97 Spain: Kodak, S.A. Ctra. Nal. VI, Km. 23 28230 Las Rozas - Madrid Turkey: Kodak (Near East) Inc. Tophanelioglou CAD No:21 81190 Altunizade Istanbul U.S.A. Eastman Kodak Company 343 State Street Rochester New York 14650-0406