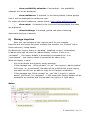
1
USER MANUAL
Top
/ Top /1
Table of Contents
A. Introduction.................................................................................................. 4
B. What is new in VRS7................................................................................... 5
1) Front-end area..............................................................................................................................5
2) Admin area...................................................................................................................................8
C. Installation ................................................................................................ 12
D. Starting tips................................................................................................ 15
1) Set the languages....................................................................................................................... 17
2) How to make a new language pack........................................................................................... 18
3) Settings...................................................................................................................................... 19
4) How to set Paypal test (sandbox mode). .................................................................................. 23
E. Admin Panel............................................................................................... 27
1) Listings...................................................................................................................................... 27
i) Manage listings .....................................................................................................................27
ii) Manage inquiries.................................................................................................................. 32
iii) Manage bookings................................................................................................................ 33
iv) Manage reviews...................................................................................................................33
v) Manage listing types.............................................................................................................33
vi) Manage unit types................................................................................................................34
vii) Manage bedroom/bathroom/access options........................................................................34
viii) Manage holiday types........................................................................................................34
ix) Manage view types..............................................................................................................34
x) Manage utilities.................................................................................................................... 35
xi) Manage facilities..................................................................................................................35
xii) Manage activities................................................................................................................35
xiii) Manage services................................................................................................................ 36
xiv) Manage distances...............................................................................................................36
2) Payment.....................................................................................................................................37
i) Booking requests................................................................................................................... 37
ii) Manage coupons...................................................................................................................37
iii) Add funds............................................................................................................................ 37
iv) Payment history...................................................................................................................37
v) Manage packages..................................................................................................................38
vi) Ipn logs................................................................................................................................ 38
3) Simple CMS.............................................................................................................................. 39
i) Links......................................................................................................................................39
ii) Manage guides......................................................................................................................40
iii) Manage news.......................................................................................................................40
iv) Manage adverts....................................................................................................................40
v) Manage Flash, Manage Photos, Manage Content.................................................................41
vi) Manage css, Manage templates........................................................................................... 43
4) Regional.....................................................................................................................................44
i) Manage locations...................................................................................................................44
ii) Manage languages................................................................................................................ 47
iii) Manage currencies...............................................................................................................47
5) Users..........................................................................................................................................47
i) Manage users.........................................................................................................................47
6) Mail............................................................................................................................................52
i) Manage e-mail templates.......................................................................................................52
/ Top /2
ii) Bulk mails / Newsletters.......................................................................................................54
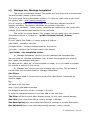
F. Themes and templates............................................................................... 56
1) Introduction............................................................................................................................... 56
2) Theme structure.........................................................................................................................57
3) Templates...................................................................................................................................57
4) CSS and Jscript files .................................................................................................................59
G. Google Analytics ....................................................................................... 60
H. Bookings & booking calculations............................................................... 66
I. FAQs........................................................................................................... 70
/ Top /3
A. Introduction
Thank you for choosing Vacation Rental Script (VRS7). We hope that
our latest release will meet your expectations. Through this user manual we
would like to make your experience with our product as best as possible. Read
below some guidelines on how to get your way with the basic or not so basic
settings, find out how to work with the admin area, listings, package system
and other aspects of managing your script-based website without having to
bother yourself with tech details.
A. Introduction / Top /4
B. What is new in VRS7
1)
Front-end area
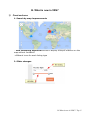
1. Search by map improvements
- new clustering algorithm allows to display multiple markers on the
map without limitation.
- different icons for each listing type
2. Slider changes
B. What is new in VRS7 / Top /5
4. Quick cms content edit
5. Search by keywords with auto-complete (+Chinese support).
6. Search speed improvements + new refine search filters.
7. Seo improvements: seo filters, /languages/[XX]/seo.php file for
different terms & combinations.
8. Compare list
B. What is new in VRS7 / Top /6
9. Chat system
–
registered guests can chat with the online members (the members
should have a package with “Allow contact” on “yes”).
–
Admin can chat with any online user
10. New inquiries system (multiple replies/spam report)
B. What is new in VRS7 / Top /7
11. support for CDN / HTTPS
- if you want to serve images from a CDN, you can set the cdn url
from /private/config/base_url.php
- if you want to use https for admin, member, registration sections you
can un-comment this line from /private/config/base_url.php
//require_once(PRIVATE_PATH.'config/base_url_https.php');
12. Quick booking calculator
2)
Admin area
1. Design changes
B. What is new in VRS7 / Top /8
2. Autosave for: listings, cms content, news.
3. Wysiwyg editor changes + html image map plugin.
4. Edit in place
Note: the items that can be edit in place are marked with a bottom gray
dotted line.
B. What is new in VRS7 / Top /9
5. Drag & drop to change hierarchy for: listing photos (via thumbs
view), links (via links tree view), listing types (via links tree view).
6. Listing photos processing: crop, re-size, rotate.
7. Bulk emails – send emails to group(s)
8. Spam filter for inquiries
9. Listing new fields
10. Listing videos: .mp4 support, .avi to .flv convert (requires ffmpeg
library ), embed code with auto-complete from video link.
11. Users logo: gravatar support.
B. What is new in VRS7 / Top /10
12. Search speed improvements
13. HTML5 (multi)upload + resize on client side.
And many more ...
B. What is new in VRS7 / Top /11
C. Installation
After receiving the zip file containing the VRS v.7 script you must go
through the following steps:
a) Create a new directory on your server for the script files. (e.g. /dir)
b) Upload all the files included in the zip file to your server, in the new
directory.
Note: if you want the script to be visible on
http://your_site.com/ upload the files in the root folder (usually
/public_html) and skip a) and b).
c) Create a database on your server. In some cases, you will need to
contact your hosting company for assistance if you don't have access to CPanel
or similar. Note your database name, database username & password for later
use.
d) Run install script using "http://your_site.com/dir/install/" from the
browser.
Note: replace "yourserver.com" with your domain & replace "dir" if you
called your directory something different.
e) Install will prompt you for required data (server configuration,
database configuration, admin username/password).
Please fill in the empty fields.
f) After successful install, you will be able to log into admin area (use the
login info set on step e) )
Install Notes:
1.The script's source code is IonCube encrypted in order to avoid code
alteration. If you get error messages on install, related to IonCube loader
a. if you have access to php.ini file follow the instructions from :
http://yourserver.com/dir/install/loader-wizard.php
b. if you don't have access to php.ini file, please contact your hosting
company.
C. Installation / Top /12
2.The script requires some files / folders to be fully writable (chmod
777).
/dir/logs/
/dir/cache/
/dir/xmls/
/dir/utmp/
/dir/public/themes_c/
/dir/public/upload/adverts
/dir/public/upload/adverts_resize
/dir/public/upload/captcha
/dir/public/upload/flags
/dir/public/upload/flags_resize
/dir/public/upload/gflash
/dir/public/upload/gimages
/dir/public/upload/gimages_resize
/dir/public/upload/guide_photos
/dir/public/upload/guide_photos_resize
/dir/public/upload/listing_photos
/dir/public/upload/listing_photos_resize
/dir/public/upload/listing_videos
/dir/public/upload/logos
/dir/public/upload/logos_resize
/dir/public/upload/no_img
/dir/public/upload/no_img_resize
/dir/public/upload/posters
/dir/public/upload/posters_resize
/dir/public/upload/qrcodes
/dir/public/upload/unzip
/dir/private/config/alias.php
/dir/private/config/db.php
/dir/private/config/installer.php
/dir/private/config/mod_rewrite.php
/dir/private/config/base_url.php
/dir/private/config/admin_email.php
The script will try to make these files fully writable automatically
If the automatic process fails:
C. Installation / Top /13
•
the script will display some error messages.
•
the files / folders must be made fully writable manually
3. The script will try to automatically detect the base url. Sometimes, on
some server the auto-detect fails.
In this case :
a. open /private/config/base_url.php
b. change this line:
$config['base_url'] = '';
with
$config['base_url'] = 'http://www.your_site.com/dir/';
4. After installation chmod the following files to 644.
/dir/private/config/db.php
/dir/private/config/installer.php
/dir/private/config/mod_rewrite.php
/dir/private/config/base_url.php
/dir/private/config/admin_email.php
C. Installation / Top /14
D. Starting tips
Login using the username and password you have entered in the
installation form and proceed to the administration area.
NOTE: To login as admin:
a. go to /admin relative to the installation folder on your server.
Eg: http://your_site.com/dir/admin
or
b. click on „Login” link, located on the right top part of the front-end
area.
D. Starting tips / Top /15
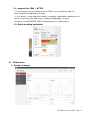
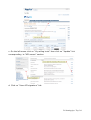
If the login process is successful, you’ll be redirected to the admin area
index page. The first things to be noticed are the left column containing the
expandable menu. (for small screens with the resolution <=1100px the menu
will collapse).
In the central part of the admin index you have some helpful information
categorized into Overview, Visits.
From the menu you can manage almost every aspect of the website. Click
any category to expand it and reveal the options.
D. Starting tips / Top /16
1) Set the languages
After the successful installation you need to configure some basic
settings before in order to get the website going.
First of all go to the Regional section and choose Manage Languages .
In this section you can manage the languages which will be available on your
site. From the manage languages you can add, edit or remove the languages.
Notes:
–
the script can handle max 5 active languages.
–
the order/hierarchy of the languages is very important, try
to set it from the beginning and try not to change it in the future.
–
if the hierarchy change is really important then please
follow the steps:
a. create a database backup
b. change the languages hierarchy
c. swap the languages content
D. Starting tips / Top /17
If we don’t have the language files that you need, you can try translating
the English language files into your language.
2) How to make a new language pack
The language files are located in the /languages folder .
Make a new folder in the languages directory. ( eg. /languages/spanish ).
Copy the files located in /languages/english to the new created folder
/languages/spanish.
Your languages directory should look now like this :
/languages
|___ /english
|___ /spanish
|__ globals.php
|__ email.php
|__ db.php
Open each file located in /languages/spanish/ with any text editor
( eg. Notepad++, you can download it from http://notepad-plus-plus.org/ )
and make the translation .
When you save the file don't forget to save it UTF-8 without BOM
encoded.
D. Starting tips / Top /18
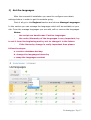
3) Settings
a) Choose from admin area menu Tools & Settings / General
Here you can set:
–
default site title, description, keywords
–
Twitter, Facebook, Google+, Pinterest links (if any).
–
Number of featured listings : featured listings are displayed in
front-end homepage, search results top slider. This number limits the number
of listings to display in each of these sections.
–
Number of latest listings : the latest listings means the new listings
added through the system and sorted by creation date.
–
Number listings same member / nearby listings : these are
displayed in the listing details page (right side).
–
Number popular listings (displayed in front-end): the popular
listings are calculated based on ROI (rate of interest) = total commission
earned / total listing views
–
Number featured guides – the number of featured guides that will
be displayed in front-end
–
Quick/Refine search field (ctrl+click for multiple selects)
b) Choose from admin area menu Tools & Settings / Messages
If you use smtp for sending emails, you can set here the smtp host,
username, password and port.
If you don't know these info, please contact your hosting company.
From same section you can set the SMS API info for Clickatell/Mobilant.
c) Choose from Payment / Manage packages
Before you can start adding properties you must add packages.
You must fill in the blank fields accordingly.
D. Starting tips / Top /19
- Title: this should be as revealing as possible. So the customers will
know what are paying for.
- Listings: how many listings will this package display on your website.
- Days: the period of time for which the listings will be displayed on
your website.
- Photos: how many photos a listing can display.
- Videos: how many videos a listing can display.
- Price: the price the customers will pay for this package.
- Booking fee: can be fixed price or percent of rental price; can be a
positive number (payed by renter) or can be a negative number (payed by
property owner).
- Deposit: can be fixed price or percent of total rental amount;
a. if the property owner is verified + he has a Paypal account set into
he's profile + renter choose Paypal as payment system then the deposit goes
to property owner's Paypal and booking fee goes to admin's Paypal.
b. if the property owner is not verified or he doesn't have a Paypal
account set into he's profile or renter choose a payment system other than
D. Starting tips / Top /20
Paypal the booking fee + deposit go to admin.
- Hidden: if this is set on yes the package will be visible for admins only.
- Allow contact:
a. if yes – the inquiries will go to property owner directly, the contact
info will be displayed
b. if no – the inquiries will go to admin first, the contact info will not be
displayed.
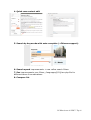
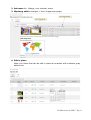
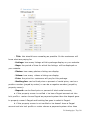
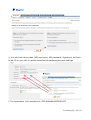
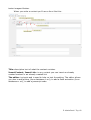
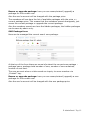
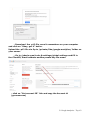
d) Assign a package to admin
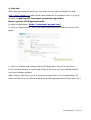
Click on the right top of admin area like is shown in the picture.
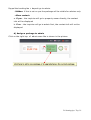
D. Starting tips / Top /21
It will be displayed a page like is shown in the picture:
e) Choose from Tools & Settings / Payment
Sign-up Default package / Sign-up default balance: if default
package is set, the new members that register on the site will have assigned
automatically the selected package.
If default balance is set, the new members that register on the site will
have assigned automatically the amount specified.
These settings are used/good for trial periods. When trial package
expires, the user(except admin) will not be able to select a trial package (0
price) again.
Paypal , Wire transfer, Authorize.NET, 2Co, Worldpay : Here you
can set your payment gateways.
You have the option to select which payment method you want to use by
activating either one of the two or maybe all.
D. Starting tips / Top /22
4)
How to set Paypal test (sandbox mode).
1. Go to https://developer.paypal.com/
2. Login with your Paypal login info.
a. In the main menu click on “Applications” link, then choose from the left
“Sandbox accounts”.
b. Create a sandbox(test) account for each of the user types: guest (renter),
property owner and admin. The admin account should be a “business” one, the
other 2 can be any type.
3. Click on “Enter Sandbox site” - you will arrive on an exact copy of
“Paypal” site. The only difference is that on sandbox site, any transaction is not
for real.
a. Please login with the “admin sandbox account”. On Sandbox site we will
need to get the: API username/API password/API signature.
b. from the main menu choose “Profile”.
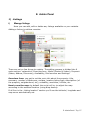
D. Starting tips / Top /23
c. On the left menu click on “My selling tools” then click on “Update” link
corresponding to “API access” section.
d. Click on “View API signature” link.
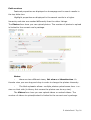
D. Starting tips / Top /24
e. the info from this screen (API username, API password, Signature) will have
to be fill on your site in /admin area/tools & settings/payment settings.
f. The Application id for sandbox is: APP-80W284485P519543T
D. Starting tips / Top /25
4. Live site
when you are ready to switch on live site you will login to Paypal live site:
http://www.paypal.com and follow same steps as on sandbox site (3. b,c,d,e)
in order to get the API username, password, signature.
How to get the LIVE Application ID:
a. login to developer: https://developer.paypal.com/
b. click on “Applications” link in the main menu and from the left choose “My
apps”.
c. click on “Create and mange Classic API apps and then fill in the form.
If you have questions or need help filling in the form you can contact Paypal
via their ticketing system.
After filling in the form you will receive an email with you live Application ID
which will be fill in on /admin area/tools & settings/payment.(similar with 3.e.)
D. Starting tips / Top /26
E. Admin Panel
1) Listings
i)
Manage listings
Here you can add, edit or delete any listings available on your website.
Adding a listing is nothing complex.
There are only a few things to explain. The adding process is divided into 6
main section+ subsection: Overview form, Media (Photos & Videos), Payment
(Rates, Addons, Discounts), Availability, Paid services and Settings.
Overview form: you get to set the main info about the property: title,
summary, number of bedrooms, surface, location,listing type, descriptions (of
the property, neighborhood, etc), suitability, amenities, utilities, etc.
How to use the map: by default the script will try to adjust the map
according to the selected location (using drop downs).
If all fine in the „Listing location” section you'll see the latitude / longitude and
map zoom automatically set.
E. Admin Panel / Top /27
If you are not happy with the automatic latitude / longitude results or the
automatic process returns no results, you can manually search for a location
using the „Location search tool”.
If there is more than one result, choose from the list the correct location.
Double click to change the zoom, click and drag the pin till you are happy with
the results.
E. Admin Panel / Top /28
Paid services
Featured properties are displayed on homepage and in search results in
the top slider box.
Highlight properties are displayed in the search results in a higher
hierarchy and also are marked differently than the other listings.
The Photos form here you can upload photos. The number of photos to upload
is limited to the current user's package.
Notes:
–
there are two different views, list view and thumbs view. In
thumbs view you can drag and drop in order to change the photos hierarchy.
–
The flash uploader allows: multiple photos upload same time + re-
size on client side (in theory this means the photos can be any size).
The Videos form here you can upload videos or embed videos. The
number of videos to upload/embed is limited to the current user's package.
E. Admin Panel / Top /29
Notes 1:
–
For .avi uploads, you need to have the ffmpeg library installed on
your server. For more info please contact your hosting company.
–
If you have the ffmpeg library installed on your server and you
want to allow .avi uploads, please open /private/config/config_app.php file and
change this line:
$config['ffmpeg'] = array(
'active'
=> false
...
);
to
$config['ffmpeg'] = array(
'active'
=> true
);
Notes 2:
For embed videos, the script has an auto-complete tool. The script will
try to recognize the video link
E. Admin Panel / Top /30
and fill in the embed field with the appropriate embed code.
The Availability form
The Settings form.
–
show address: if unchecked – the property address will not be
displayed. If the property owner has a package with ”Allow contact” on no, this
setting is overwritten.
E. Admin Panel / Top /31
–
show availability calendar: if unchecked – the availability
calendar will not be displayed.
–
show walkscore: if checked, in the listing details, bellow google
map it will be displayed the walkscore map.
For more info about walkscore, please check: http://www.walkscore.com/
–
show rates: if checked,in the front-end listings details the rates
are displayed.
–
allow bookings: if checked, guests can place a booking
reservation and pay a deposit.
ii)
Manage inquiries
Here you can manage all the inquiries sent on your website.
Inquiries are sent when the guest contacts the member via „Contact” tab in
front-end area / listing details.
By default the inquiry status is „pending” (awaiting review / moderation).
In admin area can be seen the „admin status” column. If this is on
„reviewed” ... the inquiry details is accessible by members too, if on
„unreviewed”... the inquiry details is accessible by admin only.
When an inquiry is sent:
–
the script checks the property owner package.
–
If the package has „Allow contact” on „no” the inquiry's „admin status”
will be set on „unreviewed”. Member will be notified that a new inquiry
was sent but will not be able to reply to it till admin moderation.
–
If the package has „Allow contact” on „yes” the in inquiry's „admin
status” will be set on „reviewed” -> this means the inquiry details will be
accessible by member and the member can reply to it right away.
–
Notes:
E. Admin Panel / Top /32
–
the admin can set a message as being: spam or ham (the reverse of
spam).
–
The members can set a message as being: spam
–
when a new inquiry is sent through the system, the script will also
calculate the spaminess %. the spaminess is a statistical number, based
on users experience and indicates if a message is probable to be a
spam.
–
More spam reports means more accurate spaminess %.
iii)
Manage bookings
Here you can review, edit, re-calculate or delete any booking
reservations made on your website.
In admin area can be seen the „payment status” radio button.
If this is set on „confirmed” the booking is seen by the owner too, if this is set
on „not confirmed” the booking is seen by the admin only.
If property owner has a package with “Allow contact” on “no” the guest's
contact info are hidden.Manage bookings
iv)
Manage reviews
Here u can manage all the reviews sent on your website.
The reviews can be added by logged in users only.
Each property can be reviewed by guests via „Write review” form in front-end
area.
By default the reviews status is „pending” ( awaiting moderation ).
If the combination reviewer user + check in date matches the bookings
database (this means the reviewer really stayed at that property ) the review
status is automatically changed to „active”.
The owner of the property can add a reply to the review but cannot change the
review info.
v)
Manage listing types
Here you can manage the listing types.
Important to know here :
–
slug field is used for search. Should contain alpha-numeric + hyphens
only (a-z,0-9,-). And also should be unique.
–
Also you can set if the listing type is search-able or not. If this field is set
on „no” the listing type will not appear in the „Refine search” area.
For performance reasons, the max number of search-able fields is set to
5.
E. Admin Panel / Top /33
- For each listing type you can set a marker image. The marker image is
displayed in front-end search, map view.
vi)
Manage unit types.
If the listing has multiple units, here you can set some predefined unittypes. (Eg: single room)
vii) Manage bedroom/bathroom/access options
Here you can manage the bedrooms / bathroom / access options.
viii) Manage holiday types
Here you can manage the holiday types.
By default script comes with a series of holiday types but you can
change/edit/delete in order to fit your business needs.
Important to know here :
–
slug field is used for search. Should contain alpha-numeric + hyphens
only (a-z,0-9,-). And also should be unique.
–
Also you can set if the holiday type is search-able or not. If this field is
set on „no” the holiday type will not appear in the „Refine search”
area.
The max number of search-able fields is set to 5 per section.
ix)
Manage view types
Here you can manage the view types.
By default script comes with a series of view types but you can
E. Admin Panel / Top /34
change/edit/delete in order to fit your business needs.
Important to know here :
–
slug field is used for search. Should contain alpha-numeric + hyphens
only (a-z,0-9,-). And also should be unique.
–
Also you can set if the view type is search-able or not. If this field is
set on „no” the view type will not appear in the „Refine search” area.
The max number of search-able fields is set to 5 per section.
x)
Manage utilities
Here you can manage the utilities.
By default script comes with a series of utilities but you can
change/edit/delete in order to fit your business needs.
Important to know here :
–
slug field is used for search. Should contain alpha-numeric + hyphens
only (a-z,0-9,-). And also should be unique.
–
Also u can set if the utility is search-able or not. If this field is set on
„no” the utility will not appear in the „Refine search” area.
The max number of search-able fields is set to 5 per section.
xi)
Manage facilities
Here you can manage the property facilities : general facilities, outdoor
facilities, indoor facilities.
By default script comes with a series of facilities but you can
change/edit/delete in order to fit your business needs.
Important to know here :
–
slug field is used for search. Should contain alpha-numeric + hyphens
only (a-z,0-9,-). And also should be unique.
–
Also u can set if the facility is search-able or not. If this field is set on
„no” the facility will not appear in the „Refine search” area.
The max number of search-able fields is set to 5 per section.
xii) Manage activities
Here you can manage the property activities: local, other activities.
By default script comes with a series of activities but you can
change/edit/delete in order to fit your business needs.
Important to know here :
–
slug field is used for search. Should contain alpha-numeric + hyphens
only (a-z,0-9,-). And also should be unique.
E. Admin Panel / Top /35
–
Also you can set if the activity is search-able or not. If this field is set
on „no” the activity will not appear in the „Refine search” area.
The max number of search-able fields is set to 5 per section.
xiii)
Manage services
Here you can manage the property services. The paid services will be
added using /payment /addons form.
xiv) Manage distances
Here you can manage the property distances. Eg. „Nearest school”.
When a property owner will add he's listing he will be able to choose the
distance(in meters, km, etc) till „Nearest school”.
E. Admin Panel / Top /36
2) Payment
i)
Booking requests
When a Guest makes a booking request via booking reservation form
in front-end area he will be redirected to Payment
gateway (Paypal,Authorize.Net...etc) in order to pay the booking fee + deposit.
The admin can manage the booking requests using this section :
– admin can approve a booking request – this means that the payment =
booking fee + deposit is marked as “payed”.
– admin can cancel a booking request – this means that the payment is
marked as “not paid”.
In this section the admin can create a pdf invoice.
ii)
Manage coupons
The coupons can be used by admin to create discounts.
Discount: can be fixed price or percent.
Uses: the number of times the coupon code can be used.
iii)
Add funds
In admin area this section is just for tests...to see if the „add funds”
module is working correctly or not.
In members area this section is used to „add funds”. The funds are necessary
in order to : purchase / upgrade / renew package; purchase paid services :
make a property featured or highlight.
The balance is displayed in the top right corner.
iv)
Payment history
In this section, the admin can manage/review the payment requests.
This section is related to packages, add funds, paid services.
E. Admin Panel / Top /37
Each payment activity made by the owners like : spend funds / add funds
..etc can be seen/managed from here.
For each payment activity a PDF invoice can be generated.
v)
Manage packages
In this section you can manage the packages.
The process is explained in the „Installation” chapter.
Packages are used by members in order to display listings on the site.
If the package expires, all the listings of that member will be made inactive.
Also a cronjob can be set on the server in order to send to the member an
email 3 days before package expiration.
The cronjob can be set to run daily and the command should be something like
this :
php cron.php --run=/cron/alert_packages
Note: the path to cron.php should be absolute
eg: php /path/to/cron.php --run=/cron/alert_packages
vi)
Ipn logs
Here you can check the ipn logs.
Ipn = instant payment notification.
E. Admin Panel / Top /38
3) Simple CMS
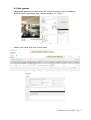
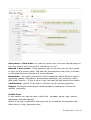
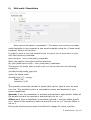
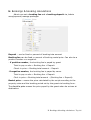
i)
Links
Links section is used to create static pages and links.
The form looks like in the picture:
Note:
Page = content + anchor link associated to that content
Link = anchor link
Title: link title or page title.
Parent: the link can be assigned to a parent. For example if we want a link in
the main menu we'll choose the parent „Main menu”.
By default the default theme supports multi-level menu, so you can assign a
link to a menu item.
Content & Template : these drop-downs make the difference between anchor
links and page links.
If these are set then the link is a page link.
•
Content : you can set here the page's main content.
E. Admin Panel / Top /39
•
Template : in order to display it we need to choose a template for that
page.
Slug: the slug is used to make the page link seo-friendly.
External link: the anchor link can point to an external site. Eg:
http://www.google.com
Internal link: the anchor link can point to an internal link. Eg: search
Is homepage: if set on yes the page link will be the „Home” page.
Seo section: used to make the page seo friendly. The admin can fill in here
the meta title, meta description, meta keywords.
Note: in the tree view you can drag and drop to change the link's hierarchy.
ii)
Manage guides
The admin can add guides using this section.
For each guide can be set the location, title and description, photos.
If featured, the guide will be displayed in front-end.
The guides also are displayed in the listing details, right sidebar if the current
listing location matches any guide location.
iii)
Manage news
The admin can add news using this section. By default the news are
displayed on the homepage, latest news on the top.
iv)
Manage adverts
In this section you can manage different types of adverts (banners).
Image adverts, flash adverts, jscript adverts.
Start date, End date: here you can set the advert promotion period.
If the current date is greater than the End date, the advert will be disabled
automatically (expired).
Advert type: you can add Image adverts (.jpg, .gif, .png), Flash adverts
(.swf) or Jscript adverts ( like Google Adsense ).
Title, Description: you can add a descriptive title and/or short description for
the advert.
Advert position: here you can set where the advert should be displayed.
Available positions : left, bottom, top, slideshow, right.
The slideshow position is a custom position, the slideshow can be seen on
the homepage.
E. Admin Panel / Top /40
Each slide is a new advert with the position „slideshow”.
Link: when the advert is clicked, the visitor will be redirected to this address.
Link other: here you can set other parameters for the link anchor tag.
Eg: class=”some_class”
Direct link: if yes, the banner's clicks will not be count.
Note: Only the Image type adverts are countable.
Advert file: if the advert is an Image type or Flash type you'll upload the
advert file using this control.
Advert code: if the advert is a Jscript Type you'll add the advert code using
this control.
Width & Height: advert dimensions. If the advert is an Image type these will
be calculated automatically by the script.
If the advert is a Flash type, these info should be filled in manually.
Advert prefix / suffix: sometimes is needed to add some text or html code
before/after the advert, you can do that from here.
Eg.: if i want to insert the advert into a specific div tag, i'll write something like
this :
prefix : <div class=”my_div”>
suffix: </div>
Featured: if yes, the current advert will be displayed higher in hierarchy than
the rest of the adverts in the specified position.
How the adverts are called in templates?
You'll need this info if u want to make a new theme or you want to place the
adverts in different places than the default.
If you'll check the : /public/themes/default_theme/tpls/index.tpl template
you'll notice this line:
{load_adverts advert_position='top' random=false}
This line loads all the templates from the 'top' position.
advert_position can have one of the following values: 'left','top','bottom'
random can be true or false, if false all the adverts from the selected position
will be displayed, if true just one advert from the selected position will be
displayed and that adverts is chosen by the script on random.
v)
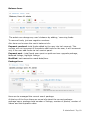
Manage Flash, Manage Photos, Manage Content
Manage content is used to create „contents”. The contents are pieces of
E. Admin Panel / Top /41
texts+images+flashes.
When you write a content you'll see a form like this :
Title: descriptive text of what the content contains
Insert Content, Insert Link: in any content you can insert an already
created content or an already created link
The editor: is simple and is used to help on text formatting. The editor allows
you also to add photos (from database or url), to add a flash animation (from
database or url), to add a javascript code.
E. Admin Panel / Top /42
vi)
Manage css, Manage templates
The script is templates based. Templates are html files with the extension
.tpl and contain pieces of html code.
The script uses Smarty templates system, if u want to read more u can check
the smarty site : http://www.smarty.net
All you need to know about templates files is that they contain html and
smarty variables. The smarty variables are pieces of text like :
{$this_is_a_variable}. These smarty variables are replaced by the script with
custom functionalities and should not be removed.
The script is themes based. This means you can make your own theme.
The default theme is located in : /public/themes/default_theme/
directory.
If you'll check this folder u'll notice couple of folders :
/css folder : contains .css files
/images folder : contains images used by the theme.
/js folder : contains jscript files used by the theme
/tpls folder : the templates folder.
In „Manage templates” section you can manage the template files.
You can click on „Browse templates” link, browse the template you wish to
edit, make the changes and save.
On each save a „back-up” of the template is made, so if you make a mistake
the old file is stored on the server.
In „Manage css” section you can manage the css files. The process is
similar with the one described for „Manage templates”.
Seo filters
Seo filters are used to overwrite the meta title, description, keywords for
specific pages.
Eg:
we have a link like this:
http://your_site/search/europe
the default meta title will be : Listings in Europe
in order to change/overwrite it you can add a new seo filter.
The filter will be the part after domain name, in this case: search/europe
Seo title (your new meta title): Luxury listings in Europe
Seo description(your new meta description): Listings in europe description
Seo keywords(your new meta keywords): listings, luxury, europe
E. Admin Panel / Top /43
4)
i)
Regional
Manage locations
In this section you can manage the locations. The locations are
used in listing upload process.
Note:
- By default the script has some „reserved” locations : the root of
locations tree (called „world”) and the „world's continents”. These
locations by default are locked.
- The „locked” status is just an internal script protection in order
you not to accidentally delete one of these locations.
Add/Edit location
Adding a location is a simple process.
E. Admin Panel / Top /44
Title : location's name (eg. Cesenatico)
Parent : the location's parent. Click on „Browse locations” link and choose the
appropriate parent for the current location. eg. The parent for „Cesenatico” is
the region „Emilia-Romagna”
Note: if the „click to reset parent” link is clicked, the parent for current location
will be set to „World”(the root of the locations tree)
Lat, Lng : latitude and longitude .
Google map link: will help you set the latitude / longitude.
When a location is added, the script will automatically add it's slug.
The slug field can be seen and / or edit in the edit mode.
The slug field is used for search...so it's an important field.
Import locations
By default the script comes with a world database that can be imported.
The world database contains countries / regions / cities worldwide.
Import locations routine:
Step 1. From the „Manage locations” top menu, click on the "Import locations"
button.
Step 2. select from the "Available countries for import" drop down the "world"
option if your business is world-wide or choose a continent from the list and
click on "Import locations" button.
The screen should now look like this:
E. Admin Panel / Top /45
When the progress indicator is on 100% the locations are imported and ready
to use.
Rebuild tree
The script uses the nested-sets as locations tree representation in the
database.
For more info you can check this link:
http://dev.mysql.com/tech-resources/articles/hierarchical-data.html
Each location stored in the database have 2 numbers assigned to it : lft and rgt
values.
When a location is added or updated (moved to other parent), these 2
numbers are recalculated.
Sometimes number calculation fails (server load, memory problems ...etc).
In this case we have the „Rebuild tree” feature witch refresh / recalculates the
location lft and rgt numbers.
This feature should be used only if you add a listing (property), and u don't
see the locations in the drop-downs but you're 100% sure you did add those
locations.
The advantage of this method is that is fast selecting/searching into big
E. Admin Panel / Top /46
number of locations...the disadvantage is that this method is slow on updates
(uses lot of resources, time or memory).
Note: try not to use this feature if not necessary.
ii)
Manage languages
This section was explained previously (please check the „Starting tips”
section ).
iii)
Manage currencies
The currencies are used when your add / edit / display property's prices.
The currency rates are updated automatically every day.
If you don't want the currency rates to be automatically updated, you can open
/private/config/config_app.php file and change this line:
$config['automatic_currency_rate_update'] = true;
to
$config['automatic_currency_rate_update'] = false;
5)
i)
Users
Manage users
The script can handle 3 types of users: admins, members (property
owners) and guests.
Admins: can log in to their control panel using a link like this :
http://your_site.com/admin
The admins have full rights, they can manage anything: settings, users,
packages, etc.
Also an admin can add he's own listings.
Members: have to signup before accessing their control panel area.
After they fill in the signup form in front-end area, the members have to first
confirm their email address. They receive and email with a confirmation link
they have to click.
If confirmation ok, the members can login to their control panel clicking on the
„Login” link in front-end or directly accesing a link like this:
http://your_site.com/member
The member's control panel looks similar with the admin's control panel but
with some exceptions:
E. Admin Panel / Top /47
–
the member can change he's profile
–
the member has limited rights : he cannot see or change settings, other
users, other listings but he's own listings, etc
–
the member can manage only he's listings, inquiries, reviews
Important to know here is that an admin cannot login as admin and as
member on same browser. He can login as admin and as member same time
but using different browsers. For example he can login as admin using Firefox
and as member using Google Chrome.
Guest: have to signup before accessing their control panel area. They can
login from front-end.
After login the guest can access the control panel via „My panel” top link :
Add / edit users
Overview form: here you can set the user's login info.
E. Admin Panel / Top /48
Sms phone + Sms active : in order to receive sms, the user should have set
the „sms phone” and „sms active” should be on „yes”
Banned + ban reason : if the banned is set on yes the user will not be able
to login to he's control panel. The ban can be temporary that's why if the ban
is activated the user's listings will not be deleted.
Newsletter : the admin can send to all the registered users different kind of
messages (notes, information, promotional messages, etc) using the „Mail /
Bulk mails” section. If this is set on „yes” the user will get emails from admin.
Verified user: yes/no. If the user is verified, he can receive payments.
Paypal: the Paypal email where verified property owners can receive the
deposit payments.
Profile form:
In this section you can set user's other info : company name, logo, spoken
languages, website address.
Notes: if no logo is uploaded, the script will try to identify the gravatar logo.
More info on: http://gravatar.com/
E. Admin Panel / Top /49
Balance form:
The admin can change any user's balance by adding / removing funds.
To remove funds, just use negative numbers.
Also here can be seen the user's balance info:
Payment received: total funds added by the user into he's account. This
counter will not increment if the admin add funds for the user, it will increment
only if the user add funds via he's control panel.
Payment sent : total funds user spent on paid services: upgrade package,
featured listings, highlight listings.
Modified: last transaction made date/time.
Package form:
Here can be managed the current user's package.
At the top of the form there are some info about the current package :
package name, package total number of listings, number of photos, number of
videos and the expiration date.
E. Admin Panel / Top /50
Renew or upgrade package: here you can renew/extend (upgrade) a
package for the current user.
Also the user's account will be charged with the package price.
The members will see here the list of available packages with the price >=
current package price. This means that the members cannot downgrade, just
renew the current package or upgrade the current package.
Also the members cannot see here the hidden packages, the hidden packages
can be seen by admin only.
SMS Package form:
Here can be managed the current user's sms package.
At the top of the form there are some info about the current sms package :
package name, package total number of sms, number of sms remained,
number of sms sent.
The sms are sent when a visitor sends an inquiry to some member via
„Contact” tag.
Renew or upgrade package: here you can renew/extend (upgrade) a sms
package for the current user.
Also the user's account will be charged with the sms package price.
E. Admin Panel / Top /51
6)
Mail
i)
Manage e-mail templates
This section is used to manage the email templates sent through the system or
to add new email templates for the bulk emails.
Each mail template has an alias, this is important and shouldn't be deleted or
changed.
The alias is used by the system to call the email template.
System e-mail templates by alias :
–
add_credits_approve: when funds are added to some user's account
an email is set to that user.
–
add_credits_fail : when an user try to add funds, but the payment was
not confirmed an email is sent to that user to inform him that the
transaction failed.
–
booking_canceled_notify_[admin/member/guest] : when a
booking is marked as “Canceled” an email is sent to
[admin/member/guest] to inform about this action.
–
booking_confirmed_notify_[admin/member/guest] : when a
booking is marked as “Booked” an email is sent to
[admin/member/guest] to inform about this action.
–
booking_pending_notify_[admin/member/guest] : when a
booking is placed by the guest an email is sent to
[admin/member/guest] to iform about this action.
–
contact: this is used when some visitor wants to contact the admin via
the „Contact us” form in front-end area.
–
inquiry_new_notify_[admin/member/visitor]: when a visitor sends
an inquiry via “Contact” tab, an email is sent to admin/member/visitor to
inform about this action. Each email contains a link to inquiry details
which be used to read/write inquiry replies.
–
inquiry_replyby_[staff/visitor]_notify_[visitor/admin/member]
each time a new reply is appended to some inquiry the system will send
a notification email to the persons involved in discussion.
–
newsletter_subscribe: this email is sent when some visitor fills in the
„Newsletter” form in the front-end
–
new_review: when a guest writes a review for some listing, an email is
sent to the property owner to inform him about the new review.
–
package_expired_alert: a cronjob can be set on the server to run on
server daily with a command like this :
php cron.php --run=/cron/alert_packages
E. Admin Panel / Top /52
this cronjob will send an alert email to the owner 3 days before the
package expiration date.
Note: the path to cron.php should be absolute
Eg: php /path/to/cron.php –run=/cron.alert_pachages
–
payment_activity: for each payment activity : add funds, spend funds
an email is sent to admin to inform him about.
–
pending_inquiry_admin: when a visitor wants to contact some
property's owner, he will use the „Contact” form from the property
details page.
If the owner has a package with „Allow contact” set on „No” the email
will be sent to admin first.
–
pending_inquiry_member: this email is sent when the admin confirms
a pending inquiry „Admin status” is „reviewed” or the owner has a
package with „Allow contact” set on „Yes”, in this case the inquiry email
goes directly to the member.
–
reset_password_request: when some uses wants to reset he's
password an email with the password reset link is sent to him.
–
reset_password: after a password reset, the user gets an email to
inform him that the password was successfully changed.
–
registration: this is used to send the activation email to a newly
registered owner.
–
send_to_friend: this templates is used when some visitor likes a
property and want to send that's property link to some friend's email.
–
spend_credits_approve: if some user pays for some service, an email
is sent to that user with some info about the transaction.
–
spend_credits_fail: if an user wants to pays for some service but he
don't have enough funds an email is sent to inform him that the
transaction failed.
–
wire_transfer_invoice: if the user choose to pay using the wire
transfer, an invoice email is sent to him.
Note: Important here is that the admin can receive a copy of any of the emails
sent through the system if he will set in the „bcc copy” field the email recipient
where he wants to get the copy.
E. Admin Panel / Top /53
ii)
Bulk mails / Newsletters
Here can be activated a „newsletter”. The admin can choose an already
made template or can compose a new email template using the „Create email
template” section of this form.
In order to work a cron job should be set on server to run from hour to hour
with the following command:
php cron.php --run=/cron/send_newsletter
Note: the path to cron.php should be absolute.
Eg: php /path/to/cron.php --run=/cron/send_newsletter
The amount of emails sent on each cron run can be set from the following
config file :
/private/config/config_app.php
search for these lines:
$config['mail_q'] = array(
'start'=>0,
'quantity'=>50
);
The quantity means the number of emails that can be sent at once on each
cron run. This should be set to a reasonable number and depends of your
server capabilities.
Queued: if yes, the newsletter is activate and started to send emails. When all
the emails are sent the queued is automatically set on „no”.
Offset: each time a newsletter is activated (queued = yes) the offset should
be 0. When all the emails are sent the queued is set on „no” and the Offset is
set on 0.
During the emails send process the offset will change it's value, and this
E. Admin Panel / Top /54
number is like a book page index.
Eg: any book has pages, on each page you see the page number.Each page
have rows of text. You can imagine that every time you read a row of text an
email is sent...when you finish the page, you go on on the next page.
Same here, after X emails sent the offset number will change...like book page
number.
User group: each newsletter can be sent to selected user types.
Test mode: if on „yes” the script will send just 1 test email on newsletter
sender's email.
E. Admin Panel / Top /55
F. Themes and templates
1)
Introduction
The script is themes based, this means you can make your own theme or
modify the default one.
The themes are stored on your server in /public/themes/ directory.
In order to make a new theme:
–
make a new directory in /public/themes/ directory for example :
/public/themes/my_theme
–
copy the content from /public/themes/default_theme/ to your new
created directory /public/themes/my_theme
In order to use the new theme, you'll have to activate it from : /admin area /
tools & settings / general /
Notes:
–
before using the new theme clear the : /cache folder and
/public/themes_c/ folder. (the script will try to do that automatically)
–
When you add a new link, and you set the template be sure you select it
from the correct theme folder.
F. Themes and templates / Top /56
2) Theme structure
The theme is structured in 4 main directories:
/css – directory contains theme's css files
/images – directory contains theme's images files
/js – directory contains theme's js files.
/js_min - directory contains theme's js file minified.
/tpls – directory contains the tpl files.
3) Templates
The script uses the Smarty template engine. If you’re not familiar with the
concept of templates or Smarty take a look on this site :
http://www.smarty.net/manual/en/
The templates are located on each theme in /tpls directory, so on the default
theme it will be located in : /public/themes/default_theme/tpls/ directory.
The templates files contain pieces of xhtml code + template variables (which
make the connection between design and the script code).
The template variables are always included between „{„ and „}” brakets.
For example : {$this_is_a_variable}
Try not to delete these variables or the site or some functionality will not work.
Logo – the logo is located in this file:
/public/themes/default_theme/images/logo.png
make your version of logo and overwrite the default one.
The logo is called from the following template file:
F. Themes and templates / Top /57
/public/themes/default_theme/tpls/box_header.tpl
in this template are also displayed the top right links : Login, Signup,
Language switch, Currency switch, Wishlist, Comparelist.
Main menu –the main menu template is located in default theme in this file:
/public/themes/default_theme/tpls/main_nav.tpl
The main nav style can be changed from:
/public/themes/default_theme/css/style.css
and from
/public/themes/default_theme/css/plugin.superfish.css
Slideshow – the slideshow template is located in this file:
/public/themes/default_theme/box_slideshow.tpl
the slideshow images can be managed from : /admin area / simple cms /
manage adverts.
The css for the slideshow is located in
/public/themes/default_theme/css/s_home_slideshow.tpl
Quick search form – the quick search form and any other form is stored in
the the /tpls/forms/ directory.
So the quick search form template is located in this file :
/public/themes/default_themes/tpls/form/form_quick_search.tpl
Featured, popular and latest listings – cause these are related to
properties, these will be located in the /tpls/properties/ folder like any other
property template.
So :
– featured listings template is located in :
/public/themes/default_theme/tpls/properties/grid_featured_listings.tpl
– latest listings template is located in :
/public/themes/default_theme/tpls/properties/grid_latest_listings.tpl
Footer links – the footer links templates is located in :
/public/themes/default_theme/tpls/box_footer.tpl
The footer links can be managed from admin area.
As you can see ... the page design was splitted into parts for easy
management. Now..in order to be displayed all these pieces have to be added
together into a big template or a framework template.
Usually the framework templates are located in : /tpls folder and have the
F. Themes and templates / Top /58
name starting with : index_ .
The homepage main template is located in :
/public/themes/default_theme/tpls/index_slideshow.tpl
You'll notice in these kind of templates lot of calls like :
{include file="template_name.tpl"} this means that you load in the current
template other templates content.
We left the "home page content" and "news" cause these are loaded in this
template.
Home page content: is loaded by the script with this template variable:
{$content}
if you remove this variable...you'll notice that the home page content will
dissapear.
The Home page content can be managed from admin area / simple cms / edit
the the homepage content.
On our demo site the link to it is like this :
http://www.realestatescript.eu/demo/admin/content/edit/1/
News: the news template is located in this file:
/public/themes/default_theme/tpls/news/latest_news.tpl
and these news are loaded in the homepage with the following line :
{include file="$theme/tpls/news/latest_news.tpl"}
There rest of the script's pages work similar. The main template for property
details is : index_details.tpl, the main template for search results is :
index_search.tpl, etc.
4)
CSS and Jscript files
The main css file for default theme is located in :
/public/themes/default_theme/css/style.css
The css and jscript files are loaded on demand and are combined for
performance reasns.
The next part is for advanced users that have xhtml, css, jscript, php
knowledge.
If you'll check the page source you'll notice this line :
<link rel="stylesheet" href="http://www.vacationrentalscript.com/demo/combine.php?
theme=default_theme&type=css_min&assets=home/index&dir=ltr" type="text/css" />
F. Themes and templates / Top /59
this means that all the css files used for this page are grouped and combined
into a single file (for performance reasons).
How the css / jscript files are called ?
The best way to figure it is to check the combine config file:
/private/config/combine_front.php
Each page and it's css / jscript file is commented ... for example the homepage
will look like this:
// HOME
//---------------------------------------------------$combine['home/index'] =
array_merge_recursive( $combine['global_front'],array(
'global'=>array(
'plugin.tabs.js',
'plugin.tabs.slideshow.js',
'jquery.ui.core.min.js',
'jquery.ui.widget.min.js',
'jquery.ui.mouse.min.js',
'jquery.ui.slider.min.js'
),
'theme'=>array(
'jquery.ui.css',
'jquery.ui.slider.css',
's_home_slideshow.css',
's_search_results.css',
'plugin.jcarousel.js',
's_jcarousel_home.css',
'search.js'
)
));
The files from the array with the key "global" are global css/jscript files.
The global css or jscript files can be used anywhere in the script, they are not
theme based and are located in :
/public/css and /public/js folders. Usually the global css/jscript files contain 3 rd
party plugins or helpers.
The files from the array with the key "theme" are theme css/jscript files .
G. Google Analytics
The Google Analytics tracking code can be added in /admin area/tools &
G. Google Analytics / Top /60
settings/ in "Google analytics tracking code" field.
The admin area uses the Google Analytics info and display them in dashboard /
"Visits" tab.
In order to activate these statistics you'll need to make some settings
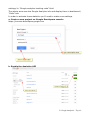
a. Create a new project on Google Developers console
https://console.developers.google.com
b. Enable the Analytics API
G. Google Analytics / Top /61
c. Credentials
G. Google Analytics / Top /62
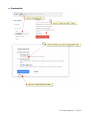
- Download the .p12 file, save it somewhere on your computer
and click on "Okay, got it" buton.
Upload the .p12 file via ftp to /private/libs/google-analytics/ folder on
your server.
- Go to /admin area/tools & settings/global settings and fill in
the ClientID, Email address andthe prvate key file name.
- click on "Get account ID" link and copy the Account id
(ga:xxxxxxxx)
G. Google Analytics / Top /63
d. Login to Analytics
http://www.google.com/analytics/
– Click on "Admin" link.
–
select an account and click on „User management” link
–
in the "Add permissions for" field fill in the email address from point c.
([email protected])
Note: this process has some delay, please wait for 5 minutes
G. Google Analytics / Top /64
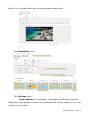
e. Finally, if all set correctly in the dashboard/visits tab you should see now
the analytics statistics like in the picture:
G. Google Analytics / Top /65
H. Bookings & booking calculations
Admin can set a booking fee and a booking deposit via /admin
area/payment/manage packages.
Deposit – can be fixed or percent of booking tota amount
Booking fee can be fixed or percent of booking rental price. Can also be a
positive number or a negative.
- if positive number, the booking fee is payed by guest
Total to pay on site = Booking fee + Deposit
Check in price = Booking total amount – Deposit
-if negative number, the booking fee is payed by owner
Total to pay on site = Booking fee + Deposit
Chck in price = Booking total amount – (Booking fee + Deposit)
Rental price = means the price calculated by the script according to the
property rates and the booking period set by the guest via booking form.
The check in price means the price payed by the guest when he arrives at
destination.
H. Bookings & booking calculations / Top /66
1. The Guest fills in the booking form with the appropiate info.
If the selected booking period is vaid the booking info ( arrival date,
departure date, rental price, booking fee, deposit etc.) will appear on an
orange background .
If the booking period is not valid :
– the selected period is less than the min stay
– the arrival date or arrival / departure date doesn't match the
changeover settings
– the selected period do not match any rates set for the current
property
– the selected period is already booked
the form will display an error on red background and the booking cannot be
placed.
Rental price calculation
Eg: Rate 1 : 1 july 2014 – 15 july 2014 / nightly rate 10 euros / weekly rate
60 euros
Rate 2 : 16 july 2014 – 20 july 2014 / nightly rate 20 euros / weekly rate 80
euros
a. booking period: 1 july – 3 july 2014
Number nights : 2
Rate used : Rate1
Because the number of nights <7 we cannot use the weekly rate.
H. Bookings & booking calculations / Top /67
Rental price = number nights x nightly rate = 2 x 10 = 20 euros.
b.booking period: 1 july – 8 july , 2014
Number nights : 7
Rate used : Rate 1
Because the number of nights = 7 we can use the weekly rate.
Rental price = 1 x weekly rate = 1 x 60 = 60 euros
c.booking period: 1 july – 9 july, 2014
Number nights : 8
Rate used : Rate 1
The number of nights >7 and we have the weekly rate we apply the formula:
54
if weekly rate (7 nights) .......... = 60 euros
then 8 nights ......................... = X euros
X = (8 x 60)/7 = 68.5 euros
Rental price = 68.5 ~69 euros
d.booking period : 1 july – 17 july,2014
Rates used: Rate 1 and Rate 2
Number of nights : 16
Number of nights that match Rate 1 : 1-15 july 2014 = 15 nights
Number of nights that match Rate 2 : 16-17 july 2014 = 1 night
Rental price 1
number nights >7 we apply the formula
if nightly rate ( 7 nights ).............. = 60 euros
then 15 nights ............................ = X euros
X = (15x60)/7 = 128.5 euros
Rental price 1 = 128.5 euros
Rental price 2
number nights <7 we use the nightly rate
Rental price 2 = number nights x nightly rate = 1 x 20 = 20 euros
Rental price = Rental price 1 + Rental price 2 = 128.5 + 20 = 148.5 ~149
H. Bookings & booking calculations / Top /68
euros.
Subtotal = rental price + extra persons price+ addons price
Total = Subtotal - Discount
Booking fee: The booking fee can be fixed price or percent.
if % , then the booking fee = % of rental prie
Pay on site / Check in price :
a. if booking fee is positive number
Pay on site = Booking fee + Deposit
Check in price = Total - Deposit
b. if booking fee is a negative number
Pay on site = Booking fee + Deposit
Check in price = Total -(Booking fee+Deposit)
2. If the booking is correctly placed and the “Pay now” price =(Booking
fee + Deposit) > 0, the guest is
redirected to payment gateway site in order to pay the “Pay now” price.
– a booking request is added to the database
– the booking is added to the database.
There is a difference between booking and booking request. Booking request is
related to payment, when we say that the booking is added to
the database we say that the booking info is stored to the database.
2a. if the „tools & settings/ payment configs / booking section / confirmation”
is set on „yes” an email is sent to the admin on the email recipient specified in
„tool & settings / payment configs/ booking section / confirmation email”.
In this point the property owner doesn't get any email and he cannot see the
booking info.
The admin will have to check if the booking fee was payed and to
confirm / cancel the booking request.
The booking requests are stored in admin area in /payment section.
You'll notice in the admin menu that a new booking request is waiting
for moderation „ Booking requests 1”.
And you'll notice in the booking requests list the new booking request with the
status on pending.(the status column has a clepsydra icon)
If the admin approves the payment request (booking fee + deposit was payed)
H. Bookings & booking calculations / Top /69
2 actions
are made :
– in the listings / manage bookings / the „payment status” for the current
booking is switched on „Confirmed” and the property owner can see now
the booking info when they login to their control panel.
– The property owner gets an email to alert him about a pending booking.
The booking is still on pending mode, the property owner will have to confirm
the booking.
If the Booking status is switched on „Booked” the booking is now confirmed,
the calendar in front-end is marked for the booked period with red, and a
confirmation email is sent to the guest.
2b. if the „tools & settings/ payment configs / booking section / confirmation”
is set on „no” an email is sent to the property owner directly without admin
booking request confirmation.
The „Payment status” is switch automatically on „Confirmed” and the owner
can see in it's control panel the new pending booking.
The rest of the booking management process is the same as described on 2a.
I. FAQs
Q. Can i get a non-encrypted version of the script?
A. No, sorry. The script source code is Ioncube encrypted in order to
avoid code alteration, and the script sourcecode is not for sale.
Q. Can i use same license on multiple domains ?
A. No, the script license is for 1 domain only. This means if you purchased the
script for domain A.com you cannot install and use it on B.com.
However, the license domain can be changed, but only once.
This means that, if you purchased the license for domain A.com and you
change your mind and you want to use it on B.com, you'll be able to make this
change.
Q. What is the price if i want to buy multiple licenses ?
A. Our discount schema is like this:
1st license : 0% discount
2 – 5 licenses : 20% discount
6 – 10 licenses : 30% discount
11+ : 50% discount
Q. Do you offer support by phone/chat ?
A. No, not at this time. Due to time zone differences with some of our clients
and availability of qualified support staff we decided to perform email- based
I. FAQs / Top /70
support only.
Q. What is the response time for Email support?
A.The maximum response time for support-related issues is 48 hours due to
workload/time zone difference.
• The average period of support response is 12 hours.
• In case you have not received any reply to your request after 48 hours, please
contact Support again: your email might have been undelivered/killed by
spam filters. You can also use your alternative email account on another mail
server.
Q. How soon can i download the software after payment?
A. Download links are available once an order has been approved. For orders
placed during (GMT+2) business hours the approval process is usually
complete within 1 to 8 hours. Orders placed outside of business hours may still
be processed same day, but if not they are given priority processing the next
day.
In case you have not received the download link/instructions by email after
48h please contact us on sales[at]realestatescript.eu
Q. How the custom changes work ?
–
custom changes can be done only for clients with a valid license.
–
If you are a client and you wish custom changes to be done on your
basic license, you can send us a list with the custom changes and we'll
reply back for each of the items with : can or cannot be done / time &
price / working start date.
–
Before the working start date, you'll have to pay a 50% deposit (from
the custom changes total amount), the rest of 50% when the job is
complete and completely checked by you.
–
The job is done on your server, in order to be able to update your basic
license we'll need the ftp info where the script is installed.
Note: we reserve the right to decline custom changes requests.
Q. When will you release the next version of the script ?
A. We do our best to release each year a new version of the script.
Q. How do i upgrade from VRS6 to VRS7 and what is the price?
A. The upgrade means:
–
download and install the new version of the script into a separate folder
I. FAQs / Top /71
on your server.
–
run a database/photos import tool from vrs6 to vrs7.
–
when all fine and everything is checked, move the new version's files to
vrs6 installation folder.
Prices:
–
free if your support period is not expired.
–
59 euro (+6 months support) if the support perod is expired.
I. FAQs / Top /72