1
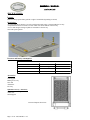
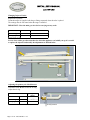
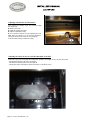
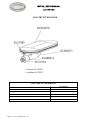
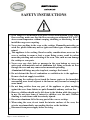
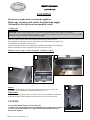
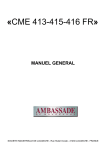
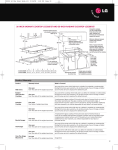
LAG 010 CKG "OPTIONAL FLAME GRILL " WARNING: If the information in this manual is not followed exactly, a fire or explosion may result causing property damage, personal injury or death. - Do not store or use gasoline or other flammable vapors and liquids in the vicinity of this or any other appliance. - WHAT TO DO IF YOU SMELL GAS. • Do not try to light any appliance. • Do not touch any electrical switch. • Do not use any phone in your building. • Immediately call your gas supplier from a neighbor’s phone. Follow the gas supplier’s instructions. • If you cannot reach your gas supplier, call the fire department. - Installation and service must be performed by a qualified installer, service agency or the gas supplier. WARNING: THIS RANGE CAN TIP INJURY TO PERSONS COULD RESULT INSTALL ANTI-TIP DEVICE PACKED WITH RANGE SEE INSTALLATION INSTRUCTIONS Page 1 of 20– LAG010CKG – US Page 2 of 20– LAG010CKG – US SPECIFICATIONS: Layout: Built-in cooktop option flame grill left or right of central hob (depending on model) Description: -A 12,500 BTU/hr gas burner, a gas valve with thermocouple safety is located under the fire tray. -An optional bed of lava rock rests on a rack which rests on the bottom of the fire tray. -A 275 x 460 mm grill resting on pillars is located above the fire tray. -Electronic spark ignition. Pressures and hourly consumption: Table 1 PRESSURE 6’’ WC 10’’ WC GAS Natural gas L.P. Btu / hr Btu / hr 12,500 12,500 Accessories Cooking grill Railing of recovery Juice Tub Ash-drawer Fire Tray Optional Accessory - 36 LCKG: -Bag of lava rock. 3 kg. -Stone rack -Rack Support Lava Rock Option shown here: Page 3 of 20– LAG010CKG – US Page 4 of 20– LAG010CKG – US Page 5 of 20– LAG010CKG – US "OPTIONAL FLAME GRILL" INSTALLER'S MANUAL Appliances must be installed in a workmanlike manner in accordance with the instructions in this manual and locally applicable regulations. This manual will be handed over to the user after installation Page 6 of 20– LAG010CKG – US Page 7 of 20– LAG010CKG – US LEVELING Cautions: The purchaser undertakes to install or arrange for his/her equipment to be installed in a workmanlike manner and in accordance with the applicable regulations and standards. Any servicing or repair work on appliance must be performed by a qualified technician. Recommendations: Adjust this appliance by using the leveling feet. Allow a minimum clearance of 50 mm between the appliance and any other surfaces above counter height (walls affected by heat). If the appliance is to be built in between two surfaces, it is CRUCIAL to allow free circulation of air behind the appliance (provide shielding at rear). Cooktops should NEVER be installed lower than adjacent work surfaces. It is also recommended to allow the unit front panel to protrude 50 mm relative to the adjacent units (cabinets). Must be installed under an exhaust hood. Do not install this unit near combustible walls, partitions, pieces of furniture or decorative material unless these are covered with adequate thermal insulation of the noncombustible type. Making sure the resulting installation meets local fire regulations. A shut-off valve must be installed and accessible close to the appliance in order to isolate it from the supply or to facilitate cutting the gas supply : Page 8 of 20– LAG010CKG – US Changing Injector Nozzle: Replace the injector C. Lacanche ranges are supplied with the gas fittings requested when the order is placed. The settings must be fine-tuned when the range is installed. IMPORTANT: Close the main gas valve before carrying out any work. GAS Pressure Ø Natural-gas 6" WC 1.40 L.P. propane 10" WC 0.95 IMPORTANT In case of use with a gas other than that for which the appliance was initially set up, it is crucial to replace the injectors and modify the adjustments as defined below. Adjusting the primary air of hob burners Loosen the screw D that secures the air ring Adjust the air ring. GAS Pressure Opening in mm / inches Oven Natural gas 6" WC 3 / 1/8 L.P. propane 10" WC 6 / 1/4 Air Adjustment Page 9 of 20– LAG010CKG – US Adjusting reduced flow of hob burners: After connection or change of gas, it is crucial to modify this adjustment : ► Remove the knob. ► Light the appropriate burner. ► Adjust to minimum setting. ► Use a small screwdriver to set the adjusting screw E. Note: Flame is reduced to ¼ of its size in the minimum setting, the burner must remain lit when changing from maximum setting to minimum setting. Adjusting the safety devices for each thermocouple of the hob: If the burner goes out, having kept the control knob pushed in for roughly twenty seconds, check that: - The magnetic head grips the valve moderately. - The flame touches the point of thermocouple F. - The thermocouples and magnetic head connections are absolutely clean. Page 10 of 20– LAG010CKG – US IMPORTANT Ø Must be installed under an exhaust hood. Ø Do not install this unit near combustible walls, partitions, pieces of furniture or decorative material unless these are covered with adequate thermal insulation of the noncombustible type. Ø Making sure the resulting installation meets fire regulations. IMPORTANT Ø T H E A P P L I A N C E M U S T B E I N S TA L L E D I N ACCORDANCE WITH THE LOCAL CODES OR National Fuel Gas Code, ANSI Z223.1 or latest edition. IMPORTANT Page 11 of 20– LAG010CKG – US Ø Manual shut-off valve should be installed in an accessible location in the gas piping external to the appliance for the purpose of turning on or shutting off gas to the appliance. ELECTRICITY Ø ALL WORK ON OR REPAIR OF AN APPLIANCE MUST BE CARRIED OUT BY A QUALIFIED INSTALLER OR REPAIR TECHNICIAN. Ø THE APPLIANCE WHEN INSTALLED, MUST BE ELECTRICALLY GROUNDED IN ACCORDANCE WITH THE LOCAL CODES OR The National Electrical Code, ANSI/NFPA 70-1996 or latest edition. REPAIRS All work on or repair of an appliance must be carried out by a qualified installer or repair technician. Refer to data sheet of basic appliance. Page 12 of 20– LAG010CKG – US GAS CIRCUIT DIAGRAM + 4 screws 65.129101 + 4 washers 65.30932 GAS CIRCUIT DIAGRAM Description Oven Burner Diffuser Part Number Injector Holder 65.51764 Air Shutter 65.080012 2.5mm Set Screw 65.51085 Oven Burner Body 65.062011 Page 13 of 20– LAG010CKG – US 65.062070 Page 14 of 20– LAG010CKG – US « LACANCHE» LAG 010 CKG USER'S MANUAL IMPORTANT Provide adequate air supply during use of the appliance. Provide adequate clearances for servicing and proper operation by not obstructing front or side of appliances. WARRANTY The warranty is stated on the sales contract. Please contact your approved Dealer if any work has to be carried out under warranty. This warranty excludes damage resulting from incorrect installation, improper use or inadequate servicing. Page 15 of 20– LAG010CKG – US Page 16 of 20– LAG010CKG – US SAFETY INSTRUCTIONS Ø If the range is to be installed on an area covered with linoleum or any other floor covering, make sure that the floor covering can withstand 90 F (65°C) above room temperature without warping, shrinking or discoloring. Do not install the range over carpeting. Ø Never store anything in the oven or the cooktop. Flammable materials can catch fire, plastic items may melt or ignite and other types of items could be ruined. Ø This appliance is for cooking. Based on safety considerations, never use the oven or cooktop to warm or heat a room. Doing so may result in carbon monoxide poisoning and overheating of the oven. Also, such use can damage the cooktop or oven parts. Ø Never cover any slots, holes or passages in the oven bottom or cover an entire rack with materials such as aluminium foil. Doing so blocks air flow through the oven and may cause carbon monoxide poisoning. Aluminium foil linings may also trap heat, causing a fire hazard. Ø Do not obstruct the flow of combustion or ventilation air to the appliance. Be sure a fresh air supply is available. Ø When using the cooktop, do not touch the burner grates or the immediate surrounding area. Areas adjacent to the burners may become hot enough to cause burns. Ø Do not hang articles from any part of the appliance or place anything against the oven. Some fabrics are quite flammable and may catch on fire. Ø However, children should not be left alone in the kitchen while the range is in use. Do not store items of interest to children over the unit. Children climbing to reach items could be seriously injured. Ø Do not use aluminum foil to line any part of the oven or cooktop. Ø When using the oven, do not touch the interior surfaces of the oven, the exterior area immediately surrounding the door or the backtrim. Ø Disconnect from power supply before servicing. Page 17 of 20– LAG010CKG – US USE OF OPTIONAL LAVA ROCK GRILL Before use, it is mandatory to remove all the internal and external plastic packing pieces, failure to do so will cause irreversible damage to the steel walls. Remove the cooking grill and cover only the stone rack in the tray with the 3 kg of lava rock supplied. Initial usage will cause some smoke and is no cause for alarm. Caution potential users that temperatures may exceed 300°C. After any use, close the valve to stop gas flow Using the burner: → Push and turn the burner control knob anticlockwise as far as the «IGN» symbol. Depression of the control knob will activate the spark ignition. You should hear the burner flame ignite. → After the flame ignites, keep the control knob pushed in for roughly 20 seconds in order to activate the thermocouple safety device. → A reduced flow rate position identified by the «LOW» mark produces the preset minimum burner power (low flame). → To turn off, turn the control knob clockwise to the «OFF» position. Useful tips: CAUTION : → Use no oils or fats when cooking over lava rock as these may burn and smoke. → Untrimmed fat may burn and smoke; simply move the cut away from the flame. → The grill can be fixed in a higher or lower position for fast or slow cooking. High level Low level Page 18 of 20– LAG010CKG – US Broiled meat tips : → Do not score or «spear» the cut or it will lose its juices. → Use tongs not a fork to turn. Recommended temperatures : -Very hot : Use for thin cuts or for rare and red cuts. -Hot : For thin or medium-thick cuts cooked medium. -Medium : Thick cuts (e.g., ribs of beef) should not be seared too quickly to avoid a well-browned outside and a raw inside. Broiling lengthwise and crosswise : Cuts can be broiled length and crosswise once or twice; twice will more evenly distribute the juices and produce a tender piece, dripping less when served. Page 19 of 20– LAG010CKG – US CLEANING Do not use a steam cleaner to clean the appliance. Before any cleaning work, isolate from the main supply Wait until the fire tray has at least partially cooled. Cooking grill: DANGER : Wait for the cooling of the device before any manipulation of the drawer with residues (rep. C) and to use an adequate hand protection so required by manipulation of the tub while full of juice (fig. B) during the service. Warn users of the potential hazards. After use, remove food residue with a metal brush from grill while still hot. The optional lava rock rests on a rack which itself rests on the bottom of the fire tray. The rack may be removed to clean the tray. Ashes fall into the ash drawer C, which may be pulled out completely for emptying. Replace optional lava rock as a function of use at least once a year. Railing of recovery (fig.A) - Juice Tub (fig.B) - Ash Drawer (fig.C) B C A Burner: The deflector D detachable (removable) protecting the burner can clean easily in the dishwasher. Use a metal brush to clean the burner after heavy use. Body panels: You can use special-purpose products for stainless steel (e.g. SUMAINOX ®, JOHNSON STAINLESS STEEL®, PPZ STAINLESS STEEL ®). Never use abrasive products. CAUTION Use NO chlorinated cleansers to clean this unit. Carefully read the precautions and recommendations for applying the products you use to clean and maintain the range. Follow the instructions for use as listed on the product. Page 20 of 20– LAG010CKG – US D