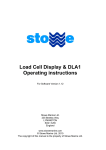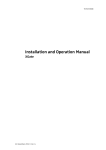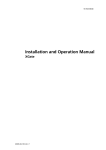
1
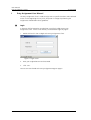
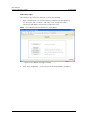
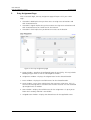
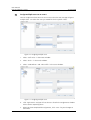
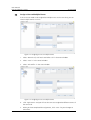
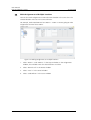
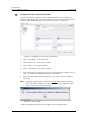
TD 92374GB
User Manual
Duty Assignment
XGate
2006-04-07 / Ver. A
User Manual
Duty Assignment, XGate
TD 92374GB
Content
1
Duty Assignment User Manual..................................................................................1
1.1 Login ..................................................................................................................1
2
Duty Assignment Page ...............................................................................................3
3
Duty Assignment Menu .............................................................................................4
4
Duty Assignment Client .............................................................................................5
4.1 Assign values to rooms and users .......................................................................5
4.2 Assign multiple users to an event .......................................................................8
4.3 Assign a User to Multiple Events.........................................................................9
4.4 Make Assignments to Multiple Locations..........................................................10
4.5 Assign Users from a Top Level Location ............................................................12
4.6 Unassigned Event Notification Warning ............................................................13
4.7 Room Assignments Summary ...........................................................................14
4.8 Save Assignments.............................................................................................14
2006-04-07 / Ver. A
User Manual
Duty Assignment, XGate
1
TD 92374GB
Duty Assignment User Manual
The Duty Assignment Client is used to assign users to specific locations and associated
events. At the beginning of every shift, the person in charge of performing the
assignments should follow these guidelines.
1.1
Login
A shortcut shall be located on your desktop, most likely called Ascom Duty
Assignment Client. If there is no shortcut, see Alternative Login on page 2.
1. Double click on this icon to login to the Duty Assignment Client.
Figure 1. Login screen
2. Enter your assigned User ID and Password.
3. Click “OK”.
You are now transferred to the Duty Assignment Page on page 3.
2006-04-07 / Ver. A
1
User Manual
Duty Assignment, XGate
TD 92374GB
Alternative Login
This section is only valid if the shortcut is not on your desktop.
1. Open a web browser (i.e. Internet Explorer) and do one of the following:
• in the menu, click “Favorites” and select “Duty Assignment Client”
• enter the web address for the Duty Assignment Client.
Note: Your administrator should have this web address.
Figure 2. The default start page of XGate
2. Click “Duty Assignment”. It will take you to the login prompt, see Figure 1.
2006-04-07 / Ver. A
2
User Manual
Duty Assignment, XGate
2
TD 92374GB
Duty Assignment Page
After a successful login, the Duty Assignment page will open. This is your “Main
Page”.
• A location in bold implies that you have access to assign users to locations and
their associated events.
• A location in regular implies that you have access to assign users to locations and
their associated events on a lower level in the structure.
• A location in italic implies that you do not have access to the location.
Figure 3. The Duty Assignment page
A. Layout window – Describes the configured layout of your facility. This may include
building wings or floors as well as sub-categories of rooms.
B. Assignments window – Displays the assigned users for the selected location.
C. Events window – Displays the available events for the selected location.
D. Levels window – Events have multiple levels that you must assign users. This is in
case the text message alert is not taken care of at the first level. It is then escalated
up to higher levels as needed.
E. Users window – Displays the available users for the assignment. It is up to you to
know who is on duty and who is unavailable.
F. Assigned Users window – Displays the selected users for the applicable events.
2006-04-07 / Ver. A
3
User Manual
Duty Assignment, XGate
3
TD 92374GB
Duty Assignment Menu
Figure 4. The Duty Assignment Menu
By clicking “Assignment”, a drop-down list will be displayed. The items on the list are
briefly described below.
Save: Saves your changes in the Duty Assignment page.
Clear: Removes the assignments to the selected location only.
Clear All: Removes the assignments to the selected location and all locations below
this one.
Unassigned Events: Displays all locations wherre events are not assigned. An empty
list is shown if all assignments are done.
Summary: Displays an overview of all assignments.
Log out: Ends your session.
By clicking “Options”, the following items will be displayed.
Layout Setup: Configures the Duty Assignment. Only the system administrator will
have access to this item. This function is not described in this document.
Auto Save: Sets a time for automatic save. Only the system administrator will have
access to this item. This function is not described in this document.
2006-04-07 / Ver. A
4
User Manual
Duty Assignment, XGate
4
TD 92374GB
Duty Assignment Client
In this chapter we will describe how to use the Duty Assignment Client.
4.1
Assign values to rooms and users
In this example we have the possibility to assign values to Ward BLUE, Room 1,
Room 2 and Ward RED. You must assign Users for a Normal Call in Room 1. Jacob
Wilson and Mia Griffin are working this shift.
• Jacob Wilson will be the 1st level contact.
• Mia Griffin will be the 2nd level contact.
Note: They are the only 2 names listed in the Users window now. However there
may be more listed that are not working the shift. Again, it is up to you to
know who is working that shift.
Figure 5. Selecting Events
1. Select “Normal Call” in the Events window.
Note: Different levels will appear once you have selected an event. In this example,
Level 1 and Level 2 appear when you have selected the event.
2006-04-07 / Ver. A
5
User Manual
Duty Assignment, XGate
TD 92374GB
Figure 6. Selecting Levels
2. Select “Level 1” in the Levels window.
Figure 7. Selecting Users
3. Select “Jacob Wilson” in the Users window.
Note: Values should be highlighted in 3 windows.
2006-04-07 / Ver. A
6
User Manual
Duty Assignment, XGate
TD 92374GB
Figure 8. Assigning users
4. Click the “forward arrow” to the right of the Users window to assign the values
selected to the desired user.
You have made the assignment and will see the assignment in the Assigned Users
window as well as at the Assignments window.
You can see that you have now assigned “Normal Call from Room 1 to Jacob Wilson
as Level 1 recipient”. Do the same for the rest of the locations and events.
Figure 9. Saving your assignments
5. When you have completed the assignments, click “Save” for your changes to
take effect.
2006-04-07 / Ver. A
7
User Manual
Duty Assignment, XGate
4.2
TD 92374GB
Assign multiple users to an event
You can assign more than one user to an event so that the text message will go to
multiple users. Just select the users you would like for the specific values.
Figure 10. Assigning multiple users
1. Select “Staff Assist” in the Events window.
2. Select “level 1” in the Levels window.
3. Select “Jacob Wilson” and “Mia Griffin” in the Users window.
Figure 11. Assigning multiple users
4. Click “right arrow” and you will see the users listed in the Assignments window
with a comma separating them.
5. When you have completed the assignments, click “Save” for your changes to
take effect.
2006-04-07 / Ver. A
8
User Manual
Duty Assignment, XGate
4.3
TD 92374GB
Assign a User to Multiple Events
If the same user needs to be assigned to multiple events at the same level, you can
select multiple events at a time.
Figure 12. Assigning a user to multiple events
1. Select “Normal Call, Staff Assist and Toilet Call” in the Event window.
2. Select “Level 1” in the Levels window.
3. Select “Mia Griffin” in the Users window.
Figure 13. Assigning a user to multiple events
4. Click “right arrow” and you will see the same user assigned to different events of
the same level.
5. When you have completed the assignments, click “Save” for your changes to
take effect.
2006-04-07 / Ver. A
9
User Manual
Duty Assignment, XGate
4.4
TD 92374GB
Make Assignments to Multiple Locations
You can also make assignments to more than one location at the same time. The
selected locations must be in the same sub menu.
For example, under Ward RED we have Room 1 – Room 3. We are going to make
assignments to two of these rooms.
Figure 14. Making assignments to multiple locations
1. Select “Room 1” and “Room 2” in the Layout window. In the Assignments
window, the available events for these locations are visible.
2. Select “Normal Call” in the Events window.
3. Select “Level 1” in the Levels window.
4. Select “Jacob Wilson” in the Users window
2006-04-07 / Ver. A
10
User Manual
Duty Assignment, XGate
TD 92374GB
Figure 15. Making assignments to multiple locations
5. Click “right arrow” and you will see the same user assigned to different events of
the same level. The same user you assign to the level will show up in multiple
locations. As shown with “Jacob Wilson”.
6. When you have completed the assignments, click “Save” for your changes to
take effect.
2006-04-07 / Ver. A
11
User Manual
Duty Assignment, XGate
4.5
TD 92374GB
Assign Users from a Top Level Location
You can also perform assignments from a higher location level. For example, by
selecting “Ward BLUE” you can make assignments to events that are common to all
locations under Ward BLUE which in this case means Room 1 and Room 2.
Figure 16. Assigning users from a top level location
1. Select “Ward BLUE” in the Layout box.
2. Select “Normal Call” in the Events window.
3. Select “Level 1” in the Levels window.
4. Select “Jacob Wilson” in the Users window.
5. Click “right arrow” and you will see the same user assigned to “Normal Call” of
Level 1 in Ward BLUE including both Room 1 and Room 2.
6. When you have completed the assignments, click “Save” for your changes to
take effect.
Note: Assignments performed at a higher level cannot be changed at the lower
level. They will be in bold print. If you try to change the assignments from a
sub-level, you will get an alert message.
Figure 17. Alert message
In order to change them, go back to the higher level and change it there.
2006-04-07 / Ver. A
12
User Manual
Duty Assignment, XGate
4.6
TD 92374GB
Unassigned Event Notification Warning
When you see the yellow caution triangle in the top right-hand side of the screen, it
means there are events you have left unassigned.
Figure 18. Clicking on the yellow caution triangle
1. Click the “Yellow Caution Triangle”, a dialog window appears on the screen.
2. Click on any of those values in the Unassigned Events column, you will see what
is still requiring assignment.
2006-04-07 / Ver. A
13
User Manual
Duty Assignment, XGate
4.7
TD 92374GB
Room Assignments Summary
To see a summary of your room assignments, click “Assignment” in the menu then
select “Summary” from the drop-down list. You will see a view of all of your
assignments.
Figure 19. Summary
If you have any questions, please contact your system administrator for additional
details.
4.8
Save Assignments
Before you logout, remember to save your assignments. There are two different ways
to save your assignments:
• Click “Save” button under the Assigned Users window
• Click “Assignment” at the top left corner of the screen. Select “Save” from the
drop-down list.
Note: By clicking “Logout” you will end the session without saving your changes.
2006-04-07 / Ver. A
14