1
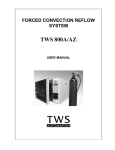
SPIRAL MIXER AEF015/025/035/050/080/100/150
Index
TO GET THE BEST PERFORMANCE OF YOUR MACHINE, PLEASE READ
CAREFULLY THIS MANUAL
CHAPTER 1 ............................................................................................................................ 6
NAMEPLATE .......................................................................................................................... 6
CHAPTER 2 ............................................................................................................................ 7
GENERAL DESCRIPTION ................................................................................................... 7
CHAPTER 3 ............................................................................................................................ 8
TECHNICAL DATA ................................................................................................................ 8
3.1.- GENERAL DIMENSIONS........................................................................................ 8
3.2.- TECHNICAL CHARACTERISTICS........................................................................ 9
3.3.- ELECTRICAL CHARACTERISTICS...................................................................... 9
3.4.- BREAKDOWN SITUATIONS ................................................................................ 10
3.5.- ELECTRIC INSTALLATION .................................................................................. 10
3.6.- SECURITY MECHANISM DESCRIPTION ......................................................... 10
3.7 – CONTROL DEVICES ............................................................................................ 10
3.8.- EMERGENCY STOP.............................................................................................. 11
3.9.- NOISE EMISSION .................................................................................................. 11
CHAPITER 4 ......................................................................................................................... 12
SHIPPING, POSITIONING AND ELECTRICAL CONNECTIONS ............................... 12
4.1.- SHIPPING ................................................................................................................ 12
4.2.- POSITIONING ......................................................................................................... 12
5.3.- ELECTRICAL CONNECTIONS ............................................................................ 12
CHAPTER 5 .......................................................................................................................... 14
SPIRAL MIXER OPERATION............................................................................................ 14
5.1.- GENERAL CHARACTERISTICS ......................................................................... 14
5.2.- GENERAL INFORMATION ................................................................................... 15
5.3.- START ...................................................................................................................... 15
5.3.1- In case of emergency........................................................................................... 15
5.4 - STANDBY MODE (SM).......................................................................................... 15
5.4.1 - Display information to identify this mode ......................................................... 15
5.4.2 – Water counter – (optional function).................................................................. 16
5.5 - MANUAL MODE (MM) ........................................................................................... 16
5.5.1 - Display information to identify this mode ......................................................... 17
5.5.2 – Water counter – (optional function).................................................................. 17
5.5.3 - Select and visualize speeds “I” or “II” ............................................................... 18
5.5.4 - Starting the machine ........................................................................................... 18
5.5.5 - Speed change operation .................................................................................... 18
5.5.6 - Counting and visualizing the operating time.................................................... 18
5.5.7 - Reversing the bowl rotation during speed “I” – (optional function) .............. 18
5.5.8 - Reversing bowl rotation during work speed “II” – (optional function) .......... 19
5.5.9 - Stop the machine ................................................................................................. 19
5.5.10 - Reversing the bowl rotation during discharge – (optional function) .......... 19
5.6.- AUTOMATIC MODE (AM) ..................................................................................... 19
5.6.1 - Display information to identify this mode ......................................................... 19
5.6.2 – Water flow (optional function) ........................................................................... 20
5.6.3 – Program Edit........................................................................................................ 20
5.6.4 - Saving program.................................................................................................... 20
5.6.5 - Executing and Operating saved programs ...................................................... 20
5.6.6 - Counting and visualizing the operating time.................................................... 21
5.6.7 - Reversing the bowl rotation during work speed “I” – (optional function)..... 21
5.6.8 - Reversing the bowl rotation during speed “II” – (optional function) ............. 22
5.6.9 - Stopping the machine ......................................................................................... 22
5.6.10 - Reversing the bowl rotation during discharge– (optional function)............ 22
CHAPTER 6 .......................................................................................................................... 24
MAINTENANCE ................................................................................................................... 24
6.1.- WHEN THE MACHINE IS NEW ........................................................................... 24
6.2.- EVERY DAY............................................................................................................. 24
6.3.- EVERY 6 MONTHS ................................................................................................ 24
6.3.1.- Control of belt’s stretching.................................................................................. 24
6.4.- EVERY YEAR.......................................................................................................... 25
6.4.1.- Control of the stainless steel bowl .................................................................... 25
CHAPTER 7 .......................................................................................................................... 26
SECURITY ............................................................................................................................ 26
7.1.- SAFETY INSTRUCTIONS..................................................................................... 26
7.2.- HAZARDS ................................................................................................................ 26
7.2.1.- Spiral...................................................................................................................... 26
7.2.2.- Transmissions ...................................................................................................... 26
7.2.3.- Electric hazards.................................................................................................... 26
7.2.4.- Hygienic hazards ................................................................................................. 26
CHAPTER 2
GENERAL DESCRIPTION
Using technological innovation and efficient technical experience of our team, we have
projected the spiral mixer to meet the needs of those who visit us and that make this a tool
of work.
Spiral mixers are designed to be used by qualified people in the bakery production.
The particular shapes and speeds of the spirals and bowls allow you to have in a short
period of time, very smooth dough, even when big quantities of water are used. These
characteristics of implementation arise due to the particular shape of the hook (pigtail) and
to the shape and speed of the tank.
One of the features of this machine is to be able to work small amounts of dough in tanks of
great capacity.
Example: a spiral mixer of 100kg can produce dough from 5kg of flour.
The machine has a control panel for easy reading with selection of cycles of work (automatic
and manual) at two speeds.
There are also versions with an integrated automatic dosing of water (also programmable)
with a dose of water before the start of or during the mixing.
CHAPTER 3
TECHNICAL DATA
Figure 2
3.1.- GENERAL DIMENSIONS
Figure 2 shows the dimensions of the machines.
General characteristics of the spiral mixer:
Model
x
*
A
B
C
[mm] [mm] [mm]
Flour Capacity [kg]
minimum
[kg]
maximum
[kg]
Weight
[kg]
AEF015
AEF025
AEF035
AEF050
AEF080
AEF100
AEF150
1010
1065
710
800
440
480
0,75
1.25
15
25
195
202
1180
1320
1430
1430
1470
1140
1170
1540
1590
1720
550
670
770
870
950
1,75
2,5
4
5
7,5
35
50
80
100
150
340
480
675
720
775
AEF051*
AEF081*
AEF101*
AEF151*
1320
1430
1430
1470
1270
1650
1690
1820
670
770
870
950
2,5
4
5
7,5
50
80
100
150
485
680
725
780
With dosing of water integrated, of a maximum capacity of 99.5 liters.
3.2.- TECHNICAL CHARACTERISTICS
x Obtaining a dough of bread well mixed and peroxide.
x Avoid overheating of the dough.
x To work with small or large amounts of weight.
x Digital control, manual and automatic, with 9 memories of scheduling hours of work *.
x Independent electrical motors with two engine speeds on the hook and on the tank.
x Equipped with wheels and support antivibration.
x Forwarded by belts.
x Stainless steel Hook and tank.
x Grid in stainless steel for protection against accidents.
x Rollers to ensure the alignment of the tank.
x Painting of high-resistance and easy cleaning.
x It can be used in meat industry, upon the specifications of the customer.
x To work with dough of 45 to 100% of hydration.
x To conduct dough below 45% of hydration, reduce 20% in the maximum capacity of the
tank.
x Allows crushing from 5% of the capacity of the tank.
x Optional: dosage of water and / or inverter of the tank.
* Options (after consideration of the needs of each customer): automatic dosage of water up
to 99.9 liters and reversing the rotation of the tank.
3.3.- ELECTRICAL CHARACTERISTICS
x Protection IP55.
x Asynchronous Motor with 3 phases + ground
Potência
>kW@ >Cv@
AEF015
AEF025
AEF035
AEF050
AEF080
1ª Velocidade
2ª Velocidade
Engine(*) 2 velocidades (*)
1ª Velocidade
Engine
2ª Velocidade
Engine(*) 2 velocidades (*)
1st Speed
Hook
Engine
2nd Speed
1st Speed
Tank
Engine
2nd Speed
1st Speed
Hook
Engine
2nd Speed
1st Speed
Tank
Engine
2nd Speed
1st Speed
Hook
Engine
2nd Speed
1st Speed
Tank
Engine
2nd Speed
1st Speed
Hook
Engine
Rotação (rpm)
400V 50Hz 230V 60Hz
1.1
1.8
1.5
1.1
1.8
2.2
1.5
2.4
2
1.5
2.4
3
750
1500
1000
750
1500
1500
900
1800
1200
900
1800
1800
1.5
2.5
0.4
0.7
3.3
5.5
0.7
1.1
5.5
8
1.1
1.8
5.5
2
3.4
0.5
1
4.4
7.5
1
1.5
7.5
10.7
1.5
2.4
7.5
750
1500
750
1500
750
1500
750
1500
750
1500
750
1500
750
900
1800
900
1800
900
1800
900
1800
900
1800
900
1800
900
2nd Speed
Engine
AEF100 Tank
1st Speed
Engine
2nd Speed
1st Speed
Hook
Engine
2nd Speed
AEF150 Tank
1st Speed
Engine
2nd Speed
(*) 1 phase with inverter
8
1.1
1.8
5.5
8
1.1
1.8
10.7
1.5
2.4
7.5
10.7
1.5
2.4
1500
750
1500
750
1500
750
1500
1800
900
1800
900
1800
900
1800
3.4.- BREAKDOWN SITUATIONS
The manufacturer can not be responsible for the machine’s damages in the following
situations:
x
x
x
x
x
x
x
x
Bad use of the machines.
Using them out of the national laws statements.
Incorrect installation of the machine
Problems with electric power.
Non-authorized changes or repairs.
Deficient maintenance.
Use of unoriginal parts and products of the machines.
Not following this manual.
3.5.- ELECTRIC INSTALLATION
This machine has an electric installation in compliance with European standards EN 602041: “Machinery security – Electric Equipment of the Machines – Part 1: General Application”.
To assure the better security of the users, the client has the possibility to connect a second
earth cable. The following sign marks the specific connection’s point:
3.6.- SECURITY MECHANISM DESCRIPTION
The potentially most dangerous area of these machines is the one that surrounds the
moving spiral.
So, there is a safety guard that obstructs the entry in this area. This safety guard is design in
a way to allow the user to watch the dough, following the European standards
EN 2921/2. However is possible to observe the machine working.
If you lift the safety guard, the machine will activate the micro switch and stop immediately.
This procedure is in accordance with the standards EN 60 204-1 e EN 60 947-5-1.
To start it, close the safety guard and press the green button “Start” (button 7, figure 3).
It is forbidden to remove, modify or damage the machine’s security bars.
3.7 – CONTROL DEVICES
Figure 3 presents the control panel of the spiral mixer:
The machine is also equipped with a general switch that interrupts the current (yellow and
red [
]). When it is in position 0 (off) the machine is devoid of any type of electrical
power. When he is in the position I (on) the machine is powered by electrical power and the
panel bright lights and beeps.
3.8.- EMERGENCY STOP
The machine has two emergency stop devices, in the form of a mushroom: one in the
control panel and another in the pending button. These allow, the user, to stop the machine
when it is the wish or need, preventing the passage of current.
The buttons stopped emergency are consistent with the Directive 89/392/EEC and the
European standards EN 418 and EN 60204 -1.
When the user loads one of these buttons emergency the machine stops and the button is
locked.
The emergency stop button, has two arrows in its surface, it is necessary run it clockwise
(follow the arrows) and the device will be reset by itself.
3.9.- NOISE EMISSION
The use of particular construction techniques such as driving belts that keep a lower
sonorous pression, lower than 70dB, in compliance with European Directive 98/37/EC and
the standard ISO 3744: “Acoustic. Determination of sound power levels of noise sources
using sound pressure. Engineering method in an essentially free field over a reflecting
plane.”
CHAPITER 4
SHIPPING, POSITIONING AND ELECTRICAL CONNECTIONS
4.1.- SHIPPING
The machine weight is indicated on the following table and it can also be read at the machine’s
registration plate.
.Model
AEF015
AEF025
AEF035
AEF050
AEF080
AEF100
AEF150
Weight [kg]
195
202
340
480
675
720
775
The machine can be lifted, as you may see at the examples of Illustration, with elevators, cables,
ropes or hooks, perfectly dimensioned to withstand the machine’s weight. It must always be moved
with its wheels blocked.
During manual moving, it has to be considered that the machine may slide more than expected or to
a non expected direction, because of its wheels.
4.2.- POSITIONING
The faulty installation of the machine may cause material and personal damage. In this case, the
producer can not be considered responsible.
This machine has directional wheels in order to facilitate its positioning and installation.
The ground surface where the machine will be positioned must be perfectly rigid and firm, so the
machine may be balanced avoiding its fall during its operation.
After the installation at its working place, all machine’s anti-vibration devices must be blocked.
5.3.- ELECTRICAL CONNECTIONS
Electrical Connection:
Make sure all electrical sockets of the premises have the same voltage and power than that
described in the machine’s registration plate. (Chapter 1)
The sockets should be at the closest location to the machine.
Avoid connecting more than one machine to the same socket.
The machine must receive current by an electrical line with neutral point connection EE, with a
differential protection of 300mA.
Make sure that the rotation hook and bowl is the correct one. If necessary change the sequence of 2
phases.
ATTENTION: WHEN YOU USE ELECTRIC TOOLS, ALWAYS PROCEED WITH CAUTION IN
ORDER TO REDUCE FIRE RISKS, ELECTRIC SHOCKS AND PERSONAL DAMAGE. IN ANY
CASE, ONLY TRAINED PERSONNEL SHOULD HAVE ACCESS TO THE MACHINE ELECTRIC
SYSTEM, AND THEY SHOULD ALWAYS FOLLOW THESE RULES:
1. Stop the machine.
2. Disconnect the electrical current at the master switch.
3. Pull the plug out from the electrical socket.
4. Do all necessary maintenance or repairing operations.
5. Make sure that the machine is in perfect condition to operate.
6. At the end, plug in the machine to the electrical grid again.
7. Connect the electrical current at the master switch.
8. Never disconnect or modify the machine’s safety systems.
CHAPTER 5
SPIRAL MIXER OPERATION
5.1.- GENERAL CHARACTERISTICS
x Electric commands with two modes: manual or automatic mode.
x 9 different programs capacity.
x In each program you may adjust the time of work for the 1st and 2nd speed.
x Low tension working, 24 Volts.
Figure 3
Button
1
2
3
4
5
6
7
8
9
10
11
12
13
Display
A
B
C
D
E
H
Function
Standby Switch (SM)
Speed change (Manual Mode) (MM)
Start the machine, bowl motor and hook motor, simultaneously
Emergency STOP
Select Automatic Mode (AM)
Stops the machines bowl and hook motors simultaneously, as well water meter
Decrease value on displays C, D, E
Increase value on displays C, D, E
Reverse bowl rotation - (optional function)
Start/stop water meter - (optional function)
Reset display H - (optional function)
Decrease value on displays J, K - (optional function)
Increase value on displays J, K - (optional function)
Function
Information timer
Working Speed
Program number
At automatic mode (AM)
Low speed “I” working time
At manual mode (MM)
Low speed “I” elapsed working time
At automatic mode (AM):
High speed “II” working time
At manual mode (MM):
High speed “II” elapsed working time
Water loaded to the bowl - (optional function)
J
K
L
Led
F
G
I
Water quantity selected for speed “II” - (optional function)
Water quantity selected for speed “I” - (optional function)
Water temperature in the counter (Celsius by default) - (optional function)
Function
Function indicator (Button 5 ON)
Function indicator (Button 9 ON) - (optional function)
Start/stop water meter indicator - (optional function)
5.2.- GENERAL INFORMATION
x Electrical supply installation must be in accordance with the electrical rating on the
nameplate.
x Connect the electric plug of the cable to a switch provided with differential protection of
30mA, compatible with the characteristics of registration (type CE).
x The plug must be as near as possible of the machine and easily accessible.
x In the case of other machines are connected to the same outlet, make sure that the
intensity is proper to support all the machines.
5.3.- START
Supply the machine according to the Plate Specifications
All displays stay ON during 2 seconds displaying number “8”;
All led stay ON during 2 seconds.
Simultaneously is emitted a continuous beep (during 2 seconds).
After that, changes to Stanby Mode (SM)
When the machine is working, stopped or in standby, there is always a short beep when any button is
pressed or pulsed.
To work at any mode including programming cycles:
“open” message can not be shown.
“erro” message can not be shown.
Button 4 contacts must be closed.
When the machine is new, you should, before starting production, try it with some dough.
That will remove the lubricator’s residuum that may remain in the bowl and on the tools.
5.3.1- In case of emergency
In case of emergency:
Pulse emergency stop button. This action does not keep the information on displays A, B, C,
D, E, F, G, H, I, J, K, L. These displays turn OFF.
5.4 - STANDBY MODE (SM)
5.4.1 - Display information to identify this mode
To go to Manual Mode (MM):
Pulse button 1
To return to Standby Mode (SM):
Pulse button 1, again.
5.4.2 – Water counter – (optional function)
In this mode (SM), it is possible to operate with the water counter.
Display L assumes actual water temperature.
Change Display L from Celsius into Fahrenheit:
The machine must be in standby mode;
Led I OFF;
Press for 3 seconds button 11;
Display L shows
Pulse button 11;
corresponding to Celsius;
Display L changes to
corresponding to Fahrenheit;
After 3 seconds it assumes automatically the selected value “F”;
Display L turns to water temperature again.
To adjust display K:
Pulse buttons 13 or 12.
To start the water counter:
Pulse button 10
Water counter automatically stops when display H reaches the selected value on
display K.
To pause during discharge:
Pulse button 10.
To resume:
Pulse again button 10.
After a stop or a pause the display H can reset by pulsing button 11.
During discharge:
display I is ON and display K blink;
display H increases;
Display K remains as pre-set.
To redefine the preset value on display M, use buttons 12 or 13;
In case of water failure:
The valve turns OFF after 10 seconds;
Display A shows the message “H2O”.
Display I turns OFF;
To try discharging water:
Pulse button 10.
5.5 - MANUAL MODE (MM)
The machine goes to this mode:
If in Standby Mode, pulse button 1.
If in Automatic Mode, pulse button 5.
At any moment, we can operate the water counter.
5.5.1 - Display information to identify this mode
5.5.2 – Water counter – (optional function)
The water counter operates either if the machine is working or not.
Button 10, 11, 12, 13 are always available.
If display B is taken to “1”:
To adjust display K:
Pulse buttons 13 or 12.
To start the water counter:
Pulse button 10
Water counter automatically stops when display H reaches the selected value
on display K.
To pause during discharge:
Pulse button 10.
To resume:
Pulse again button 10.
After a stop or a pause the display H can be reseted by pulsing button 11.
During discharge:
Led I turns ON and K blink;
display H increases;
and display K remains as pre-set;
To redefine the preset value on display K, use buttons 12 or 13;
In case of water failure:
Valve speed “I” turns OFF after 10 seconds;
Display A shows the message “H2O”.
Led I tuns OFF;
To resume, pulse button 3 twice:
Erase “H2O” message;
Display A go on with time counter.
To try discharging water:
Pulse button 10.
if display B is taken to “2”:
To adjust display J:
Pulse buttons 13 or 12.
To start the water counter:
Pulse button 10
Water counter automatically stops when display H reaches the display J and
K sum.
To pause during discharge:
Pulse button 10.
To resume:
Pulse again button 10.
After a stop or a pause the display H can resets by pulsing button 11.
During discharge:
display H turns ON and J blink;
display H increases;
and display J remains as pre-set;
To redefine the preset value on display J, use buttons 12 or 13;
In case of water failure:
Valve speed “II” turns OFF after 1 minute;
Display A shows the message “H2O”.
Display K turns OFF;
To resume, pulse button 3 twice:
Erase “H2O” message;
Display A go on with time counter.
To try discharging water:
Pulse button 10.
5.5.3 - Select and visualize speeds “I” or “II”
Pulsing Button 2 selects the speed “I” or “II”.
Display B shows speed “1” or “2”.
5.5.4 - Starting the machine
Pulsing Button 3 machine starts as selected at display B.
5.5.5 - Speed change operation
To change speed “I” to speed “II”:
At any moment, pulsing button 2, speed “I” stops, and after a pause of 1 second, speed “II”
starts.
In order to change from speed “II” to “I”:
Stop the machine by pulsing button 6;
pulse button 2 to change display B from “2” to “1” ;
pulse button 3 to restart the machine.
5.5.6 - Counting and visualizing the operating time
Display A indicates the elapsed time at speed “I” in progress.
After switching from speed “I” to “II”, display A adds the elapsed time speed “I” to elapsed
time speed “II” in progress.
Display D and E indicate the current elapsed time for speed “I” and speed “II” respectively.
5.5.7 - Reversing the bowl rotation during speed “I” – (optional function)
During work speed “I”
Display B must be “1”;
Display A (elapsed work time) must be more than one second and less than 59
seconds;
Pulse Button 9;
The machine stops bowl and hook to pause 1 second;
After that, starts reverse bowl rotation (speed “I”) and simultaneously start the hook
in normal rotation (speed “I”) during one minute;
Led G is ON;
Display A, continues the working elapsed time (Display A adds the normal rotation
time and the reverse rotation time);
After one minute (reverse rotation), the machine stops bowl and hook, pauses
500ms to return to normal bowl and hook rotation.
To stop the reverse rotation:
Pulse Button 9;
Led G turns OFF;
The machine stops the bowl and the hook;
Pauses 500ms;
After that, return to normal rotation bowl and hook.
To change to speed “II”:
Pulse Button 2 during reversing bowl operation;
Led G turns OFF;
The machine stops the bowl and the hook;
Pause 500ms;
Display B show “2”;
Display A continues the working elapsed time.
(According to Manual Mode (MM))
5.5.8 - Reversing bowl rotation during work speed “II” – (optional function)
During work speed “II”;
This operation is not possible.
5.5.9 - Stop the machine
Manual stop:
Button 6 stops the machine;
Water counter stops immediately;
Display I turns OFF;
Keeps display A, B, D, E, H, J, K information.
Automatic stop:
The maximum operating time at display A is 99 minutes and 59 seconds, so after
that, it stops automatically.
Water counter stops immediately;
Display I turns OFF;
Keeps display A, B, D, E, H, J, K information.
To reset time on display A, D, E and H after stopping the machine:
Pulse button 6;
Display A, D, E and H changes to “0”;
Display B changes to “1”;
The machine is ready to do a new operation.
5.5.10 - Reversing the bowl rotation during discharge – (optional function)
The machine must be stopped;
Safety guard can be close or open;
Button 9 reverses the rotation of the bowl (the hook stay stopped):
Press Button 9 continuously touch “hold to run control” (>500ms);
Led G is ON
Display A does not change during this operation.
The reverse rotation must be speed “I”.
To stop the reverse rotation:
Release Button 9.
5.6.- AUTOMATIC MODE (AM)
To change to Automatic Mode (AM):
The machine must be at Manual Mode (MM)
Pulse button 5.
The machine goes to this mode:
If in Standby Mode, pulse button 1 and after pulse button 5.
5.6.1 - Display information to identify this mode
5.6.2 – Water flow (optional function)
Discharging water (speed “I”) is automatic before the machine starts
Discharging water (speed “II”) is manual during speed “II”.
5.6.3 – Program Edit
Programs are saved in non-volatile memory up to 9 programs.
Press button 5 during 3 seconds:
Word “Prog” blinks in display A;
Led F blinks;
Display C blinks;
Buttons 7 and 8 sets display C;
Pulse button 5 to move to display D;
Display D blinks;
Buttons 7 and 8 sets display D;
Pulse button 5 to move to display M; (*)
Display K blinks;
Buttons 7 and 8, sets display K. (*)
Pulse button 5 to move to display E;
Display E blinks;
Buttons 7 and 8, sets display E;
Pulse button 5 to move to display J; (*)
Display J blinks;
Buttons 7 and 8, sets display J. (*)
(*) – Optional function. Without this function, it is not possible display modify.
5.6.4 - Saving program
Press button 5 during 3 seconds;
A beep sounds and appears the word “SAVE” at display A;
The program is saving.
Now it is possible to execute this program, change it or make changes to another program
number.
5.6.5 - Executing and Operating saved programs
Led F must be “ON”;
Buttons 7 and 8 select the saved programs;
Display C shows the selected program, blinking;
Button 3 starts the programmed cycle in automatic mode;
Valve speed “1” opens;
Display I turns ON;
Display K blinks;
During discharge:
To redefine the preset value on display K, use buttons 12 or 13;
Display H increase until display K reached;
Valve speed “1” stops;
Display I turns OFF.
(It is possible to execute programs with display K “0.0”).
(To start the machine while it loads water, pulse button 3 twice.)
After water stops, the machine starts automatically at speed “I”:
Display D blinks.
Display B shows the speed “1”.
When display A reaches the time that has been defined at display D,
It turns speed “I” OFF;
Makes a pause;
Changes automatically to speed “II”:
At same time, there is a 3 seconds continuous beep.
(If display K quantity is not yet in display H, the display K must be loaded).
Display E blinks;
Display B shows the change from speed “1” to “2”.
Display A shows the operating time sums at speed “II” and “I”.
Display D continues to show the elapsed time at speed “I”.
To add water:
(It is possible to execute programs with display J “0.0”).
Pulse button 10;
Valve speed “2” opens;
Display I turns ON;
Display J blinks;
Display H increase until display J and K sum reached;
Valve speed “2” stops;
Display I turns OFF.
The machine continues the automatic cycle at speed “II”.
During discharge:
To redefine the preset value on display J, use buttons 12 or 13;
Button 11 (when display I is OFF), reset the display H to “0,0”.
During the execution of a program cycle, we can make changes at any time, by pulsing
buttons 7, 8, 10, 11, 12, 13. At the end of the cycle, those changes will not be saved.
Pre-set values remain.
During work speed “1”
Pulse Button 7
If (Display D value) < (Display A value):
The machine change to speed “2”.
During work speed “2”
Pulse Button 7
If (Display E value) < ((Display A value)-(Display D)):
Machine stops.
In case of water failure: (*)
Valve speed “I” turns OFF;
The program cycle does not continue;
Display A shows the message “H2O”.
Display I turns OFF;
To resume, pulse button 3 twice:
Erase “H2O” message;
Display A go on with time counter.
To try discharging water:
Pulse button 10.
5.6.6 - Counting and visualizing the operating time
Display A indicates the elapsed time at speed “I” in progress.
After switching from speed “I” to “II”:
Display A adds the elapsed time speed “I” to elapsed time speed “II” in progress.
Display D and E indicate the final elapsed time for speed “I” and speed “II”
respectively.
(The final elapsed time could be different from saved value, because:
During the execution of a program cycle, we can make changes at any time,
by pulsing buttons 7, 8, 10, 11, 12, 13. At the end of the cycle, those changes
will not be saved. Pre-set values remain).
5.6.7 - Reversing the bowl rotation during work speed “I” – (optional function)
Display B must be “1”;
Display A (elapsed work time) must be more than one second and less than 59
seconds;
Pulse Button 9;
The machine stops bowl and hook to pause 500ms;
After that, starts reverse bowl rotation (speed “I”) and simultaneously starts hook in
normal rotation work (speed “I”) during one minute (even if programmed time
speed “I” is one minute);
Led G is ON;
Display A, continues the working elapsed time (Display A adds the normal rotation
time and the reverse rotation time);
After one minute (reverse rotation), the machine stops bowl and hook, make a
pause start normal cycle according “Automatic Mode” (AM).
Manual stop reverse rotation:
Pulse Button 9,
Led G turns OFF,
Machine stops the bowl and hook;
Pause 500ms.
After that, the machine retakes the normal cycle in “Automatic Mode”, as selected.
5.6.8 - Reversing the bowl rotation during speed “II” – (optional function)
During work speed “II”;
This operation is not possible.
5.6.9 - Stopping the machine
Manual stop:
Button 6 stops the machine;
Water counter stops immediately;
Keeps Display A, B, C, D, E, F, H, J, k, L information (*).
By pulsing button 3 the machine restarts:
Display A continues increasing time.
Automatic stop:
At the end of the cycle:
Water counter stops immediately;
Keeps display A, B, C, D, E, H, J, K, L information (*);
Display C blinks;
Display A shows “Done” during 3 seconds;
Display A change “Done” to elapsed total time;
Display B shows “0”;
Display D shows the speed “I” elapsed time;
Display E shows the speed “II” elapsed time;
Display H shows the discharged water quantity (display K and J sum) (*);
Display K shows the speed “I” water quantity (*);
Display J shows the speed “II” water quantity (*);
Display I turns OFF (*);
To erase time on display A, D, E and H:
Pulse button 6;
Display A and H changes to “0.0”;
Other displays stay as programmed;
To repeat previous program:
Pulse button 3;
The machine repeats the previous program number.
To run a new program:
Select program number (button 7 or 8);
Pulse button 3.
The machine will run as selected.
5.6.10 - Reversing the bowl rotation during discharge– (optional function)
The machine must be stopped;
Safety guard can be close or open;
Button 9 reverses the rotation of the bowl (the hook stay stopped):
Press Button 9 continuously touch “hold to run control” (>500ms);
Led G is ON
Display A does not change during this operation.
The reverse rotation must be speed “I”.
To stop the reverse rotation:
Release Button 9.
5.7. ALARM MESSAGES
Display Message
OPEn
Cause
Manual mode (MM) ou Automatic mode
(AM):
Safety guard opened.
Prog
Successful access in program mode
(AM).
SAVE
Successfully leaving and saving edited
program (AM).
Erro
Thermal relay protection activated.
Effort of the machine, with activate of
the thermal protection of engine, or
caused by the effort of hard dough; Or
by various frictions. Shut the machine
of the plug
Reduce the load on the machine.
Try to work again.
H2O
Water’s failure. (Optional function)
DonE
Automatic program cycle has ended.
In case of “erro” message, switch off the general switch of the machine [
], for
approximately 10 minutes. The error can be eliminated if it was caused by a punctual cause,
but if not, call the after sales Service.
CHAPTER 6
MAINTENANCE
ATTENTION: BEFORE DOING MAINTENANCE AND CLEANING, SWITCH OFF
THE MACHINE WITH THE MAIN SWITCH AND UNPLUG IT.
There are always operations potentially dangerous, such as adjustments, maintenance,
disassemblies, electrical or mechanical replacements. The operator should always be
certain that the plug is really disconnected.
During and after each operation, which requires the dismantling of one or more protections
fixed or mobile, it is imperative not start working with the machine until all the protections are
properly assembled again.
6.1.- WHEN THE MACHINE IS NEW
x
x
x
x
When the machine is new, you should, before starting the production, try it with some
dough. This way, it will remove some lubricator’s residuum, resultant of manufacture.
After the 1st working month, you have to check the belts tension:
a) The transmission’s belts of the spiral may be examined by opening the cover of
the machine.
b) The transmission’s belts of the bowl may be examined by removing the access
panel on the bottom side of the machine.
c) To verify if the belt needs to be stretched, press the finger in the middle of the
belt, and if the looseness is superior to 1 cm (½ inch), there is a need to stretch it.
To check the electric equipment, it is necessary lift the cover of the machine and
opening the electric board.
To check the motor, it is necessary remove the access panel in the back of the machine.
6.2.- EVERY DAY
The machine must be cleaned every day, especially in the areas that have contact with the
dough (bowl, spiral and side board).
To clean the machine do not use knifes, sandpaper, metallic objects, hard brushes or any
tool that may damage its surface. You may use plastic tools or soft sponges.
DO NOT: - USE TOXIC PRODUCTS, SOLVENTS, ABRADING AGENTS OR
ANY PRODUCTS THAT MAY DAMAGE THE SURFACES OR THE
DOUGH’S COMPOSITION.
- CLEAN WITH WATER JET.
6.3.- EVERY 6 MONTHS
6.3.1.- Control of belt’s stretching
It is necessary to control the belts’ stretching every 6 months in all transmissions. If the belts
are too loose, the machines will lose power.
x
x
The transmission’s belts of the spiral can be examined by opening the cover of the
machine.
The transmission’s belts of the bowl can be examined by removing the access panel on
the bottom side of the machine.
x
x
To verify if the belt needs to be stretched, press a finger in the middle of the belt, and if
the looseness is superior to 1 cm (½ inch), there is a need to stretch it.
To stretch it, it is necessary to call an authorized technician.
6.4.- EVERY YEAR
6.4.1.- Control of the stainless steel bowl
Once a year, it is necessary to control the stainless steel bowl.
Verify if the bowl has any damages. If you follow the procedures of 5.2., it is not normal that
the bowl’s surface have damages, but if there are some, you should replace it.
Even with a small deterioration of the surface, that will possibly reduce the working capacity
of the machine, and its capacity to prevent dough contamination.
CHAPTER 7
SECURITY
7.1.- SAFETY INSTRUCTIONS
x
x
x
x
x
x
x
x
x
x
The machine must be used only for the functions that it has been conceived for.
Manufacturer will not be responsible for the damages to people, animals or objects,
caused by an improper, bad or irrational use of the machine.
Before cleaning or doing maintenance, turn the main switch off and unplug it.
Do not remove security parts of the machine.
If the machine has inactive security units, do not switch it on.
The work of the machine may be stop by using the red STOP switch.
The control panel is a low voltage (24 V).
If you detect any damages or bad functions of the machine, turn it off immediately and
don’t try to run it again. Call for an authorized technician. The disrespect for these rules
may cause irreversible damages in the machine.
The electric connection must follow the procedures presented in the installation chapter.
When withdraw the tank, make sure that the overall temperature switch is in the off.
The user's manual should always be with you for all your machine shipments.
7.2.- HAZARDS
7.2.1.- Spiral
The spiral (point 4, figure 3) in movement is the most dangerous part of the machine.
The safety guard does not allow the access to this area (point 3, figure 3). You must not
remove it, damage it or modify it.
7.2.2.- Transmissions
The transmission, potential dangerous, is protected with fixed protections. In order to have
access to them, you must respect the instructions of the manual.
7.2.3.- Electric hazards
The electric installation follows the European security standards. Nevertheless, respect the
basic security standards in a way to avoid the risk of fire, electric shock, personal and
material damages.
Only qualified people may access to the parts that as electric current, which are obliged to:
12345-
Stop the machine
Turn off the main switch
Unplug the machine.
Do the necessaries operations
Plug the machine again.
7.2.4.- Hygienic hazards
All the materials that are in contact with the dough are not toxic.
FIGURE 4
1.
2.
3.
4.
5.
6.
7.
8.
9.
Control panel.
Machine structure.
Safety bars.
Spiral hook
Bottom body.
Stainless steel bowl.
Machine floor fixer.
Roller. (Optional on AEF015)
Sideboard.
FIGURE 5
1.
2.
3.
4.
Micro switch.
Control panel.
Electric motor
Electric motor (exception AEF015 and
AEF025)
5. Safety bars.
6. Current transformer
7. Switch.
8. Contactor.
9. Electric plug
10. 4 wire electric cable/cord.
11. Main switch.