1
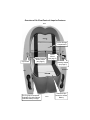
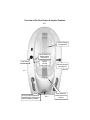
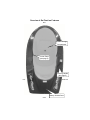
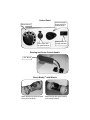
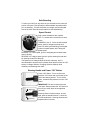
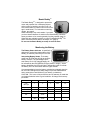
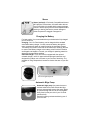
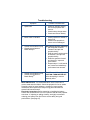
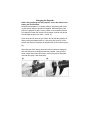
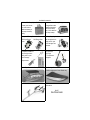
® Ele ct ric Boa t s ! 2 0 12 Go- Floa t ® Go-Float Electric Boats Welcome to the Go-Float family! Thank you for choosing Go-Float Electric Boats for your boating pleasure. We hope you will be completely satisfied with your purchase and enjoy it for many years. Your new Go-Float has been designed to give you and your family years of trouble free fun on the water. Please read this manual carefully before operating your boat. This manual will assist you in operation, safe use, and care of your Go-Float. By taking a few moments to familiarize yourself with the functions of your Go-Float, you can help make your investment last. Please do not hesitate to contact us with questions or suggestions. We want to ensure that your boating experience is as safe and relaxing and as fun as possible. Enjoy your Go-Float! Sincerely, t Team a o l F o G The PS. Be safe… always wear a personal flotation device. Know and comply with all applicable local boating regulations. Copyright 2012 Go-Float, LLC TABLE OF CONTENTS Overview Go-Float Fusion Overview .............................................................. 4 Go-Float Impulse Overview ............................................................ 5 Go-Float Ion Overview .................................................................... 6 Control Panel ................................................................................. 7 Steering Handle .............................................................................. 7 Beach BuddyTM with Wheels ............................................................ 7 Operation Safe Boarding ................................................................................. 8 Speed Control ................................................................................. 8 Steering & Power Control ................................................................ 8 Beach BuddyTM ............................................................................... 9 Monitoring the Battery Life ............................................................... 9 Charging the Battery ....................................................................... 9 Listening to the Stereo................................................................... 11 Automatic Bilge Pump ................................................................... 11 Storage and Maintenance Beaching ....................................................................................... 10 Storing On End.............................................................................. 10 Safety & Troubleshooting Troubleshooting ............................................................................ 12 Propeller, changing ....................................................................... 13 Accessories Accessories and Online Shopping ................................................. 15 Overview of Go-Float Fusion & Impulse Features Bow Cooler/ Storage Compartment Cup Holder Stereo Control & Battery Meter (see page 5) Speed Control (see page 5) Starboard Port AC Plug Input Receptacle. Available only with optional Onboard Battery Charger Steering Handle (see page 5) Stern Seat Back flips forward to access Battery Overview of Go-Float Fusion & Impulse Features Bow Cooler/ Storage Compartment Stereo Control & Battery Meter (see page 5) Cup Holder Speed Control (see page 5) Starboard Port AC Plug Input Receptacle. Available only with optional Onboard Battery Charger Steering Handle (see page 5) Stern Seat Back flips forward to access Battery Overview of Go-Float Ion Features Bow Cooler/ Storage Compartment Control Panel (see page 5) Steering Handle (see page 5) Starboard Port Battery Access Panel Stern Control Panel Volume Control & Power On/Off for optional stereo Speed Control Audio Input Jack for optional stereo Battery State of Charge Indicator Steering and Power Control Handle “GO” Button Beach BuddyTM with Wheels Beach Buddy with optional wheel kit for paved surfaces. Beach Buddy with optional wheel kit for sandy surfaces. Safe Boarding To board your Go-Float, step as far as you are able into the center aft portion of the seat. This will keep the boat as stable as possible while you are boarding. This will also place your weight onto the strongest area of the deck. Reverse the procedure for safe disembarking. Speed Control Each number indicates a rate of speed. “OFF 0” is neutral with no forward or reverse motion. FORWARD 1 thru 5. 1 is the slowest forward speed, good for navigating around other boats, for docking and beaching. Each higher number increases speed, with 5 being the highest speed. REVERSE 1 is a slow speed, good for navigating around other boats and for docking. REVERSE 2 is a higher speed, good for quickly slowing the boat and for spinning weeds off of the prop. The speed can be changed while the boat is underway, but it is recommended to stop the motor (release thumb pressure from the “GO” button) to change direction. Changing direction suddenly while underway could damage the motor. Steering Handle and Power “GO” Button Power “GO” Button: To turn on the motor, press the “GO” button with your thumb at the end of the steering handle. To turn off the motor, release thumb pressure from the “GO” button. Right turn Left turn IMPORTANT! Be alert for swimmers near your boat! Always release the “GO” button to turn off your motor when others approach your boat. Steering: When in forward motion, to steer right, push the handle forward. To steer left, pull the handle back. Steering directions are opposite when in reverse. Beach BuddyTM The Beach BuddyTM, is designed to protect the motor and propeller from underwater objects while cruising or beaching your Go-Float. It is also used to stand your Go-Float on end for storage in small areas. For instructions on storing upright, see page 9. While underway it may catch weeds. If you think you have slowed because of weeds on the Beach Buddy, follow the same procedure as for removing weeds from the propeller (page X). Wheel Kits are available to add to your Go-Float Beach BuddyTM for easier movement across lawns, driveways, etc. (page 5). Do not use the Beach Buddy as a step to enter the boat. Monitoring the Battery The Battery Status Indicator is specifically designed to monitor the charge status of the battery (or batteries) onboard your Go-Float. Interpreting Battery Status. The battery meter has 10 LEDs that will light to show the battery condition. The percentages represent battery life. A fully charged battery will be Indicated by the #10 GREEN LED light (shown in image). As the battery discharges, the LEDs will light in descending order to indicate the battery life. The chart shows what the lights indicate. It is recommended to have the battery or batteries recharged when the #3 YELLOW LED lights as a safety margin to prevent dead batteries and to extend the overall lifetime of your battery (or batteries). CAUTION: This is not a fool-proof device and no warranty is made that your battery/batteries is/are in good condition. All charge levels are approximate. E Power Level LED Lights 1 F 2 3 4 to 9 Fully Charged Green 40% to 90% Green 30% Power Yellow Flashing Yellow 20% ~ 10% 10 Flashing Red Flashing Yellow Storage Upright, Temporary: Be sure that the battery hold down strap is secured. Remove all items from the cooler-storage compartment and the passenger area. Open the drain plug, located on starboard (right) side of the hull. Tip the boat on its starboard (right) side to make sure water is drained from inside the hull. Replace the plug. Then rest the boat on a flat surface on the Beach Buddy and raise the bow until the boat is completely upright and resting on its transom. Be sure that your Go-Float is out of the wind so as not to blow over. Upright, Long Term: Follow the above procedure, but to extend the life of your battery, remove it first. Store the battery on a wooden surface, such as a piece of lumber, indoors. Use a trickle charger about every 4 -6 weeks to keep the battery powered up. IMPORTANT! Use a heavy line attached to the bow eye to secure your Go-Float to a solid fixture, such as a rafter. This will prevent your GoFloat from accidently falling over if bumped. Drain plug, shown closed. Located on starboard (right) side of hull. Beaching IMPORTANT! When your Go-Float is on shore in a horizontal position, it is recommended that you do not step into the boat. Serious damage may occur to the hull, deck, and Beach BuddyTM. Battery The battery is sealed, so do not worry about it leaking during upright storage. Stereo Stereo (optional). iPod ready. Compatible with most MP3 players, FM receivers, and other audio devices. A mini-jack cable is included with the stereo package. Caution: remove input jack from the receptacle before entering or leaving the boat to prevent damage to either component if snagged or stepped on. Charging the Battery For best results, it is recommended that your batteries be fully charged prior to each use. Charging. Your Go-Float’s battery can be charged with a standard automobile battery charger. You will access the battery through the motor compartment hatch by carefully tipping the seat back forward. The battery may remain in the boat or be removed to recharge. Be sure to connect the battery charger to the battery poles Positive-to-Positive and Negative-to-Negative. Consult your charger’s operating manual to determine the appropriate settings. Onboard charger. If your Go-Float is equipped with the optional onboard charger, use a UL approved three-pronged extension cord designed for outdoor use to connect to your source of electricity. The onboard AC Plug Receptacle is located on deck at the stern of your GoFloat. Left: AC Plug Receptacle. Automatic Bilge Pump Automatic bilge pump. Any water that accumulates inside the hull will activate the bilge pump to automatically remove the water. Water is ejected through the hull via the round plastic fitting found on the port side of your Go-Float (shown at left). Keep this opening unobstructed during use of your Go-Float. Troubleshooting Symptom Possible Cause/Solution Speed loss 1. Check for weeds or fishing line on the propeller and remove. 2. Check battery charge status. 3. Check terminals on battery. Motor noise or vibration 1. Check propeller for weeds or fishing line. 2. Check to see propeller is secure and not damaged. Weeds accumulated on prop Weeds accumulated on Beach BuddyTM Weed Removal while Underway: 1. Set the speed control at Forward 5 and spin the propeller briefly. 2. Stop the motor, set the speed at Reverse 2 and spin the propeller briefly. 3. Reset the speed to forward and check for improved performance. 4. Repeat steps 1-3 until weeds are cleared and satisfactory performance has returned. Weeds accumulated on prop Weeds accumulated on Beach BuddyTM Weed Removal Manually: CAUTION! TURN MOTOR OFF before attempting to remove weeds by hand. Motor Maintenance. We recommend after use to rinse motor to remove sand and other debris. Check the propeller for line or weeds. Regularly check for loose fasteners, corroded or loose terminal connections and frayed wires. Keep moving parts lubricated. An aerosol lubricant works well. Electrical Connections. Before removing or installing the battery, ensure that all switches are in the OFF position and have the propeller area clear. If replacing or adding a battery, we highly recommend ordering your battery from Go-Float to ensure safety and good performance. (See page 15) Changing the Propeller Before doing anything with the propeller, ensure the cables to the battery are disconnected. Detaching the propeller it is a simple matter of unscrewing and removing the locknut using the special tool supplied. When doing this, take hold of the propeller to stop it turning. Under no circumstances should you attempt to loosen the locknut with a hammer or similar tool as this may damage the locknut or shaft – or both. (F) Once the locknut is removed, you will be able to slide the propeller off. When putting the propeller back on, verify there is a proper fi t of the groove and shear pin otherwise the propeller will not be locked in place. (G) After using the motor always check and clear any weed or fishing line that may have become tangled around the propeller. Next, give the motor a wipe down with warm water to remove any salt or sand particles and then spray it with fresh water. Boating Safety Personal Flotation Device. We recommend that the proper personal flotation device be worn by the occupant of the boat. Motor and Prop. Your boat is equipped with an electric motor. You should never attempt to access the motor unless you have disconnected the power source. Always watch out for other boaters or hazards while on the water. This boat is not designed to be a swimming or diving platform. Watch out for swimmers near your boat. Spinning props can cause serious injury or death. Motor. Do not run the motor out of the water. The motor needs to be submerged in water to stay cool. Running the motor when dry can seriously damage motor’s seals. Go-Float Electric Boats can not be responsible for accidents due to misuse, modifications or for using the boat in any manner other than its intended use. Available Accessories 12-Volt, 35Ah Deep Cycle SLA Battery: On-shore 12-Volt Battery Charger: Extend your time on the water with an additional battery or just keep a backup ready. Charges faster than traditional chargers. 100/30/12/2 Amp. Set of 6-ft. cables w/ 125 Amp clamps Waterproof/Floating Protection Cases: Folding Grappling Anchor MP3 Style Player Case Just the right size to easily stow in your boat’s storage compartment. Cell Phone Case Collapsible Paddle Kit: Just the right size to easily stow in your boat’s storage compartment. Bimini Top: Detachable/Collapsible Low Pressure Tire Pump & Tire Pressure Gauge Kit Boat Storage Cover: Durable, weatherproof cover. Black only. Trailer: Find these and other accessories at our online store: SHOP Go-Float.com ® Ele ct ric Boa t s ! Go-Float, LLC 810 First Street South Suite 110 Hopkins, MN 55343 Phone: (952) 955-9500 Fax: (952) 955-9501 Email: [email protected] Website: www.Go-Float.com