1
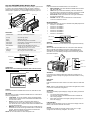
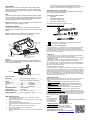
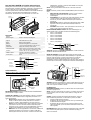
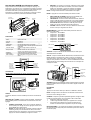
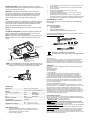
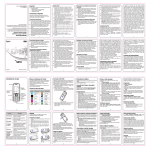
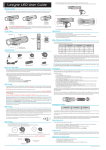
810-106 AM/FM/WB NOAA Weather Radio Keep aware of weather while camping, hiking, boating or just at home in a storm. This compact Weather Radio can receive 7 different weather band channels for alerts and AM/FM stations for news or entertainment. Operates as a LED flashlight if the power goes out. Light Button Telescopic Antenna Solar Panel Hand Crank Lithium Battery Cover Mini USB Front Panel LED Flashlight FEATURES: Weather Band: Receives 7 weather band channels. Radio: AM and FM radio reception. IC Chip: US made high quality. Motor: Brushless AC motor. Battery: LIR123A Rechargeable 3.7V 600mAh Hand Crank: Crank charge 1-minute equals 30-minutes of use Solar Panel: Power all day in sunlight. Mini USB Port: Charge the radio with USB power source. Charge cell phone/USB devices from the radio. Light: LED flashlight at the push of a button. Audio out: Connect earphone (not included). Backlight: Blue changes to Red for Weather Alert RADIO: Press and release the POWER button to turn the radio on. SELECT BAND: Press and release the MODE button to select FM, AM or WB radio. TUNE: With your radio band selected, press and release the left TUNE button to decrease the frequency and the right TUNE button to increase the frequency of the selected band. AUTO-SCAN: Press and hold the left or the right TUNE button to auto-scan frequencies. VOLUME: Use the -/VOL to decrease the volume and the +/VOL to increase the volume. WEATHER BANDS: The weather alert radio can receive 7 weather band (WB) frequencies: Channel 1: 162.400MHz Channel 2: 162.425MHz Channel 3: 162.450MHz Channel 4: 162.475MHz Channel 5: 162.500MHz Channel 6: 162.525MHz Channel 7: 162.550MHz Band (AM, FM, WB) LCD MODE Button VOLUME DOWN Button VOLUME UP Button FREQUENCY DOWN Button FREQUENCY UP Button ON / OFF Button OPERATION: NOTE: Please remove Battery Insulation Tab in the back of the radio before operation. Volume Frequency ALERTS: When WB is selected, the radio receives alarm signals automatically. STANDBY: When in WB hold the MODE button for 3 seconds to enter Standby. When in Standby (WB Flashing) the radio receives alarm signal automatically and the backlight will flash. Press MODE button for 2 seconds to turn off the flashing backlight without influencing weather band radio reception. . Hand Crank Telescopic Antenna Audio OUT Charging Light Mini USB DC IN / OUT ANTENNA: Fully extend and rotate the telescoping Antenna and place near a window to receive a steady strong signal and avoid a broken or noisy reception. Isolation Tab LED LIGHT: ON/OFF: Press and release the LIGHT button to turn ON or OFF the white LED light. NOTE: There is a light shadow above and below the light beam, which is normal for a three LED arrangement. ON/OFF: Press and release the POWER button to turn the radio ON or OFF. SET TIME: With the radio off, press and hold the MODE button for 5 seconds to enter the program menu. 12/24-HOUR: 12h or 24h will flash. Press and release either TUNE button to change. Press and release the MODE button once to move to Hour. HOUR: The Hour will flash. Use the left TUNE button to decrease the hour or the right TUNE button to increase the hour. When the Hour is set press and release the MODE button once to set the Minutes. MINUTES: The Minutes will flash. Use the left TUNE button to decrease the minutes or the right TUNE button to increase the minutes. When the Minutes are set press and release the MODE button to confirm the settings. NOTE: The clock will remain on when the power is off. CHARGING: When the low battery symbol displays, charge the radio by solar/hand crank/USB. Turn off the radio before charging. The red LED charging indicator will illuminate to indicate the unit is being charged. Green light will indicate it is charged. (the light will not stay on when not charging). LOW BATTERY: A battery symbol will display in the top center of the display when the battery is low and the radio will not function. SOLAR: Place the unit outside with the solar panel in direct sun. In bright sunlight the unit will be fully charged in 10-12 hours. HAND CRANK: Extend the Hand Crank on the back of the radio. Rotate steadily clockwise at a rate of 130cycles/minute. 1-minute of cranking will provide 30-minutes of power. Red charge light will indicate cranking speed is appropriate. USB: This unit is equipped with a mini USB input/output jack for charging the radio itself and to charge other external USB devices with hand crank. To charge the radio connect the USB charging cord into the mini USB port and plug into a USB power source. NOTE: The voltage should be 5.0V maximum and current should be 500MA maximum when charging by USB. Do not listen to radio while the unit is plugged with USB power. Reception effect will be heavily influenced this way. Use low frequency adaptor to minimize the influence if an adaptor has to be used. ACCESSORY PACK (not included): Please check with your local retailer to purchase the accessory pack for the Severe Weather Band Radio. The accessory pack includes: Earphone USB Radio charging cord Cell Phone charging cord Cell Phone charging Adaptors To purchase accessory items, follow the link at: www.lacrosseclock.com/810-106 CHARGE CELL PHONE: Connect the cell phone to the mini USB jack with the appropriate adapter kit (not included) and use the hand crank to charge your cell phone. NOTE: Charge time will vary based on the depletion of the phone battery. It is best to have the radio off when charging. Earphone Charging Cord Phone Charge Adaptors USB power cord Mobile Phone (not included) Charging Light WARRANTY: 1-Year Limited Warranty La Crosse McCormick, LLC warrants that if the accompanying product proves to be defective to the original purchaser in material or workmanship within 1year from the original retail purchase, La Crosse McCormick, LLC will, at La Crosse McCormick, LLC ’s option, either repair or replace same without charge (but no cash refund will be made). Charging Cord (not included) Phone Charge Adaptor (not included) RESET: If the display is blank, charge the battery then press the RESET button once. The RESET button is a small pinhole near the antenna, where the crank handle rests. Reset Button Isolation Tab Removed SPECIFICATIONS: Dimensions: Please help in the preservation of the environment and return used batteries to an authorized depot. 5.5 in L x 2.5 in H x 2.375 in D (13.97 cm L x 6.35 cm H x 6.032 cm D) Bands: Weather Band (7 Channels): AM -6dB 82dB FM Rechargeable Battery: 10dB 88-108 MHz LIR123/600MAH Solar charging: Operating Temperature: 5.5v/40MA 32 °F - 130°F (0 °C – 54 °C) Storage Temperature: 14 °F - 130°F (-10 °C – 54 °C) 162.4000 162.5500MHz 540-1700KHz MAINTENANCE AND CARE Extreme temperatures, vibration, and shock should be avoided to prevent damage to the units. Clean with a soft, damp cloth. Do not use solvents or scouring agents; they may mark the radio. Do not submerge the weather radio in water. Opening the casing invalidates the warranty. Do not try to repair the unit. Open and close antenna fully. Never force the antenna. Do not leave in vehicle in extreme temperatures. Radio is not waterproof. Do not crank the unit when there is no battery inside or insulation tab is inserted. CONDITIONS: 1. You must deliver, mail or ship the product, together with the original bill of sale and this limited warranty statement as proof of warranty. 2. This warranty is void if any defects are caused by abuse, misuse, negligence or unauthorized repairs. 3. All liability for incidental or consequential damages is specifically excluded. Some states do not allow the exclusion or limitation of incidental or consequential damages, so the above limitation or exclusion may not apply to you. This warranty gives you specific legal rights, and you may also have other rights, which vary from state to state. Limitation of Liability and Remedies La Crosse McCormick, LLC shall have no liability for any damages due to loss of profits, loss of use or anticipated benefits, or other incidental, consequential, special or punitive damages arising from the use of, or the inability to use, this product, whether arising out of contract, negligence, tort or under any warranty, even if La Crosse McCormick, LLC has been advised of the possibility of such damages. La Crosse McCormick, LLC’s liability for damages in no event shall exceed the amount paid for this product. SERVICE PROCEDURE: Please follow the procedure below to ensure the radio is properly serviced and returned. Failing to follow the procedures may result in delays or loss of product. 1. PROOF-OF-PURCHASE: Include some form of proof-of-purchase. 2. RADIO: Enclose the 810-106 AM/FM/WB NOAA Weather Band Radio. 3. PROPER PACKING: Pack the radio securely to prevent damage during transit. Use original packing material if possible. 4. PROBLEM DESCRIPTION: Enclose a detailed written description of the problem. 5. CONTACT INFORMATION: Enclose a typed or clearly printed name, address, and phone number where you can be contacted during the day M-F. 6. PREPAID TRACEABLE CARRIER: Ship the package with the contents listed above, prepaid and insured by way of traceable carrier (to avoid loss in transit). The Manufacturer is not responsible for units not received if the package has not been properly insured. Mail to: La Crosse McCormick Warranty Department 2817 Losey Blvd S La Crosse WI 54601 Support: www.lacrosseclock.com/810-106 7. REPAIR/EXCHANGE: The radio will be repaired or exchanged upon its receipt if it is under warranty. 8. SERVICE TIMELINE: Please allow approximately 2-4 weeks for the radio to be serviced under warranty. Contact Support: 1-608-782-1610 Product Registration: www.lacrosseclock.com/register 810-106 Radio AM/FM con banda meteorológica Manténgase informado sobre las condiciones del tiempo mientras esta acampando, haciendo senderismo, paseando o simplemente en la casa cuando hay una tormenta. Este Radio Meteorológico compacto puede recibir 7 diferentes estaciones del estado del tiempo con alertas y además estaciones AM/FM para oír noticias o entretenerse. Funciona como una linterna LED, si se va la luz. Botón de la Linterna Antena Telescópica Panel Solar Manivela Mini USB Cubierta de la batería de litio Panel Frontal Linterna LED FEATURES: Bandas Meteorológicas: Radio: Recibe 7 canales meteorológicos. Recepción de radio AM y FM. Chip IC: Alta calidad hecho en USA. Motor: Motor CA sin escobillas. Batería: LIR123A Recargable de 3.7V 600mAh Manivela: 1 min. de carga equivalen a 30 min. de uso. Panel Solar: Carga todo el día bajo la luz del sol. Puerto Mini USB: Carga el radio con una fuente de poder USB. Carga celular/dispositivos USB desde el radio. Linterna: Linterna LED con solo presionar un botón. Salida de Audio: Conecta un auricular (no incluido). Cambia de azul a roja cuando hay una alerta Luz de fondo: Pantalla LCD Botón de Modo Reducir Volumen Aumentar Volumen Disminuir Frecuencia Incrementar Frecuencia Botón de encendido/apagado FUNCIONAMIENTO: NOTA: Por favor retire la lengüeta aislante de la batería en la parte posterior del radio antes de utilizarlo establecidos presione y suelte el botón MODE una vez para confirmar la configuración. NOTA: El reloj permanecerá encendió aun cuando el radio este apagado. RADIO: Presione y suelte el botón de ENCENDIDO para encender el radio. SELECION DE UNA ESTACION: Presione y suele el botón MODE para seleccionar entre FM, AM o la banda meteorológica. SINTONIZAR: Con su radio en el modo seleccionado, presione y suelte el botón TUNE de la izquierda para disminuir la frecuencia y el botón TUNE de la derecha para aumentar la frecuencia. AUTO-SCAN: Presione y mantenga presionado el botón TUNE izquierdo o derecho para escanear automáticamente las frecuencias. VOLUMEN: Use el botón -/VOL para disminuir el volumen y el botón +/VOL para incrementar el volumen. ESTACIONES METEREOLOGICAS: El radio meteorológico con alertas puede recibir 7 canales de frecuencia meteorológicas: Canal 1: 162.400MHz Canal 2: 162.425MHz Canal 3: 162.450MHz Canal 4: 162.475MHz Canal 5: 162.500MHz Canal 6: 162.525MHz Canal 7: 162.550MHz Banda (AM, FM, WB) Volumen Frecuencia ALERTAS: Cuando el modo WB es seleccionado, el radio recibe las señales de alertas automáticamente. MODE DE ESPERA: Cuando este seleccionado el modo de WB presione y mantenga presionado el botón MODE por 3 segundos para entrar al modo de espera. Cuando se encuentra en el modo de espera el raido recibe las señales de alerta y la luz de fondo parpadeara. Presione el botón MODE por 2 segundos para apagar la luz de fondo sin influenciar la recepción de la estación meteorológica. Manivela Antena Telescópica Salida de Audio Luz de carga Mini USB Entrada y Salida AC ANTENA: Extienda completamente y gire la antena telescópica en un lugar cerca de una ventana para recibir una fuerte señal constante y evitar una recepción cortada o ruidosa. Lengüeta Aislante ENCENDER/APAGAR: Presione y suelte el botón de ENCENDIDO para encender o apagar el radio. AJUSTE DEL TIEMPO: Con el radio apagado, presione y mantenga presionado el botón MODE durante 5 segundos para entrar en el menú del programa: Modo 12/24: El indicador 12h o 24h parpadeara. Presione y suelte uno de los botones TUNE para hacer los cambios. Presione y suelte el botón MODE una vez para continuar. HORA: La hora parpadeara.Use el botón TUNE de la izquierda para disminuir la hora o el botón TUNE de la derecha para aumentar la hora. Cuando la hora este establecida presione y suelte el botón MODE una vez para ajustar los minutos. MINUTOS: Los minutos parpadearan. Use el botón TUNE de la izquierda para disminuir los minutos o el botón TUNE de la derecha para aumentar los minutos. Cuando los minutos este LINTERNA LED: ENCENDER/APAGAR: Presione y suelte el botón de la linterna para encender o apagar la luz. NOTA: Hay una sombra de luz por encima y por debajo del haz de la luz de la linterna, esto es normal cuando existe un arreglo de tres luces LED. CARGA: Cuando el símbolo de bacteria baja aparezca, cargue el radio mediante el panel solar, la manivela o el puerto mini USB. Apague el radio antes de cargarlo. El indicador de carga se iluminara de color rojo indicando que el radio está siendo cargado. El indicador de carga se iluminara verde para indicar que el radio está cargado. (La luz no estará encendida cuando no se está cargado). BATERIA BAJA: El símbolo de bacteria baja aparecerá en la pantalla en el centro de la parte superior cuando la bacteria este baja y el radio no funcionara. PANEL SOLAR: Coloque el radio afuera con el panel solar directo al sol. En luz directa del sol el radio estará totalmente cargado de 10 a 12 horas. No escuche el radio mientras que este cargado con una fuente de poder USB. La calidad de la recepción podrá estar afectada. PAQUETE DE ACCESOSORIOS (no incluido) MANIVELA: Extienda la manivela en la partera trasera del radio. Gire la manivela en sentido horario a 130 ciclos/minuto. El indicador de carga se iluminará de color rojo cuando la velocidad de carga con manivela es apropiada. 1 minuto de carga proveen 30 minutos de uso. USB: Esta unidad está equipada con un puerto de entrada y salida mini USB para cargar el radio y cargar otro dispositivos USB externos con la manivela. Para cargar el radio conecte el cable de carga USB en el puerto mini USB y el otro lado en una fuente de carga USB. NOTA: El voltaje máximo de ser de 5.0V y la corriente máxima 500MA cuando se está cargando. CARGAR EL TELEFONO CELULAR: Conecte el celular con el puerto mini USB usando el adaptador correspondiente (no incluido) y use la manivela para cargar el celular. NOTA: El tiempo de carga podrá variar dependiendo del tipo de teléfono celular. Lo mejor cuando se está cargando es tener el radio apagado. Por favor, consulte con su distribuidor local para adquirir el paquete de accesorios para el radio meteorológico. El paquete de accesorios incluye: Audífonos Cable de carga USB para el Radio Cable de carga para Teléfono Celular. Adaptadores para Teléfono Celular. Para comprar accesorios, ingrese a esta dirección: www.lacrosseclock.com/810-106 Audífono Cable de carga para Celular Adaptadores para Celular Cable de carga USB Por favor ayude con la preservación del medio ambiente y retorne las baterías usadas a un distribuidor autorizado. Teléfono Celular (no incluido) Luz de carga Cable de carga (no incluido) Adaptador para Celular (no incluido) REINICIAR: Si la pantalla no presenta nada, cargué la batería y presione el botón REST una sola vez. El botón para reiniciar es un pequeño agujero cerca a la antena en la parte de atrás donde se guarda la manivela. Botón de reinicio SIN la Lengüeta Aislante ESPECIFICACIONES: Dimensiones: 5.5 in L x 2.5 in H x 2.375 in D (13.97 cm L x 6.35 cm H x 6.032 cm D) Estaciones: 162.4000 162.5500MHz 540-1700KHz Banda Meteorológica (7 Canales): AM -6dB 82dB FM Batería Recargable: 10dB 88-108 MHz LIR123/600MAH Carga Solar: Temperatura de Operación: Temperatura de almacenamiento: 5.5v/40MA 32 °F - 130°F (0 °C – 54 °C) 14 °F - 130°F (-10 °C – 54 °C) MANTENIMIENTO Y CUIDADO Temperatura extremas, vibraciones y golpes debe ser prevenidas para prevenir daños en la unidad. Limpie con un paño suave y húmedo. No use detergentes corrosivos o abrasivos, ya que pueden marcar la radio. No sumerja el radio en agua. Abrir el radio invalida la garantía. No trate de reparar la unidad. Extienda la antena completamente y la fuerce. No deje el radio en un vehículo a temperaturas extremas. El radio no es resistente al agua. No use la manivela para cargar si no hay una bacteria o la lengüeta aislante esta puesta. GARANTIA: 1- Año Garantía Limitada La Crosse McCormick, LLC garantiza que si el producto se demuestra estar defectuoso al comprador original con respecto a los materiales o a la mano de obra dentro de 1 año a partir de la compra original, La Crosse McCormick, LLC, decidirá la opción de reparar o sustituir la misma unidad sin ningún cargo (pero no se realizara un reembolso). CONDICIONES: 1. Usted debe entregar, por correo o enviar el producto, junto con la factura original de venta y esta declaración de garantía limitada como prueba de garantía. 2. Esta garantía es invalida si alguno de los defectos es causado por abuso, mal uso, negligencia o reparaciones no autorizadas. 3. Toda responsabilidad por daños incidentales o consecuentes se excluye específicamente. Algunos estados no permiten la exclusión o limitación de daños incidentales o consecuentes, por lo que la limitación o exclusión puede no aplicarse a usted. Esta garantía le otorga derechos legales específicos, y usted también puede tener otros derechos que varían de estado a estado. Limitación de Responsabilidad y Remedios La Crosse McCormick, LLC no será responsable por ningun daño debido a la pérdida de beneficios, pérdida de uso o los beneficios esperados, o incidental, consecuente, especial o punitivo que resulte del uso de, o la imposibilidad de usar este producto, independientemente de que sea por contrato, negligencia, acto ilícito o bajo cualquier garantía, incluso si la Crosse McCormick, LLC ha advertido de la posibilidad de tales daños. La responsabilidad por La Crosse McCormick, LLC por daños y perjuicios en ningún caso excederá el monto pagado por este producto. PROCEDIMIENTO PARA SERVICIO: Por favor siga el siguiente procedimiento para asegurarse de que la radio está bien servicio y la devolución. Si no se siguen los procedimientos puede resultar en demoras o pérdida del producto. 1. PRUEBA DE COMPRA: Incluya algún tipo de prueba de compra. 2. RADIO: Incluya el Radio AM/FM con banda meteorológica 3. EMPAQUE APROPIADO: Empaqué el radio de una manera segura para evitar daños durante el envió. Use el empaque original en lo posible. 4. DESCRIPCION DEL PROBLEMA: Envié una descripción escrita con los detalles del problema. 5. INFORMACIONDE CONTACTO: Envié su información claramente escrita con su nombre, dirección y número de teléfono de pueda ser contactado durante el día de lunes a viernes 6. PREPAGUE EL ENVIO CON RATREO: Envíe el paquete con los contenidos antes mencionados, usando el sistema de rastreo y asegurado a través de la empresa de transporte (para evitar pérdidas en tránsito). El fabricante no se hace responsable de las unidades no hayan sido recibidas si el paquete no ha sido debidamente asegurado. Enviar a: La Crosse McCormick Warranty Department 2817 Losey Blvd S La Crosse WI 54601 Soporte: www.lacrosseclock.com/810-106 7. REPARACION/SUSTITUCION: El radio será reparado o sustituido una vez es recibido si todavía esta con la garantía vidente. 8. TIEMPO DE SERVICIO: Por favor espere de 2 a 4 semanas para que el servicio de garantía revise su producto. Contacto para spoprte: 1-608-782-1610 Registro de productos: www.lacrosseclock.com/register 810-106 Radio AM/FM avec fréquences météo Soyez informés d’une tempête durant vos séjours camping, vos randonnées, une sortie en mer, ou simplement en étant à la maison. Cette radio météo peut recevoir 7 fréquences radio différentes pour les alertes météo ainsi que les fréquences AM/FM pour les informations ou simplement pour vous divertir. Fonctionne comme une torche électrique si la puissance d’alimentation faiblie. MINUTES: Les minutes vont clignoter. Utilisez le bouton TUNE de gauche pour faire diminuer le chiffre, et le bouton TUNE de droite pour l’augmenter. Lorsque les minutes sont réglées, appuyez sur la touche MODE pour confirmer les réglages. NOTE: L’horloge restera allumée si l’alimentation est coupée. RADIO: Appuyez sur la touche POWER pour allumer la radio. Bouton d’éclairage Antenne télescopique Panneau solaire Manivelle Compartiment pile au lithium Mini USB Face avant Lumière LED FONCTIONS: Fréquence météo : Reçoit 7 fréquences radio météo Radio: Puce IC: Bandes AM et FM. Qualité US Moteur: Alimentation: Manivelle: Moteur AC. LIR123A Rechargeable 3.7V 600mAh Une charge durant 2 minutes équivaut à 30 minutes d’utilisation Permet la charge durant l’exposition au soleil Installez la radio sur votre ordinateur Chargez votre téléphone depuis la radio Torche électrique par pression du bouton Connectez des écouteurs (non inclus). Bleu changeant en rouge pour les alertes météo Panneau solaire: Mini port USB: Eclairage: Sortie Audio: Rétro éclairage: LCD Bouton MODE Bouton de baisse du VOLUME Bouton de baisse de la FREQUENCE Bouton de hasse du VOLUME Bouton de hausse de la FREQUENCE Bouton ON / OFF UTILISATION: NOTE: Retirez la languette au dos de l’appareil avant toute utilisation. SELECTION DE LA BANDE: Utilisez la touche MODE pour sélectionner la fréquence radio FM, AM ou WB.. FREQUENCE: Une fois la bande radio sélectionnée, utilisez le bouton TUNE de gauche pour diminuer ou le bouton TUNE de droite pour augmenter la fréquence sur la bande sélectionée. AUTO-SCAN: Maintenez le bouton TUNE de gauche ou de droite pour scanner automatiquement les fréquences. VOLUME: Utilisez la touche -/VOL pour baisser le volume ou la touche +/VOL pour augmenter le volume. BANDES METEO : Cette radio alerte météo permet de recevoir 7 fréquences radio (WB) : Fréquence 1: 162.400MHz Fréquence 2: 162.425MHz Fréquence 3: 162.450MHz Fréquence 4: 162.475MHz Fréquence 5: 162.500MHz Fréquence 6: 162.525MHz Fréquence 7: 162.550MHz Bandes (AM, FM, WB) Volume Fréquence ALERTES: Lorsque la bande WB est sélectionnée, la radio reçoit automatiquement les alertes. VEILLE : Lorsque la bande WB est sélectionnée, maintenez la touche MODE pendant 3 secondes pour activer la veille. Si une alerte est reçue alors que la radio est en veille, le rétro éclairage va clignoter. Appuyez alors pendant 2 secondes sur la touche MODE afin d’arrêter le clignotement du rétro-éclairage sans influencer sur la réception de la fréquence météo. Manivelle Antenne télescopique Sortie Audio Témoin de charge Mini USB DC IN / OUT ANTENNE: Etendez complètement l’antenne télescopique et orientez la vers une fenêtre afin de réceptionner le meilleur signal et éviter les interférences. Languette de protection ON/OFF: Pressez et relâchez le bouton POWER pour allumer ou éteindre la radio REGLAGE DE L’HEURE: Lorsque la radio est éteinte, maintenez la touche MODE pendant 5 secondes afin d’entrer dans le menu des réglages. FORMAT 12/24-HEURE: 12h ou 24h va clignoter. Utilisez la touche TUNE pour changer le format. Appuyez ensuite sur la touche MODE pour régler l’heure. HEURE: Le chiffre des heures va clignoter. Utilisez le bouton TUNE de gauche pour faire diminuer le chiffre, et le bouton TUNE de droite pour l’augmenter. Lorsque l’heure est réglée, appuyez sur la touche MODE pour régler les minutes ECLAIRAGE: ON/OFF: Appuyez sur la touche LIGHT pour allumer ou éteindre la lumière. NOTE: Une légère ombre au-dessus et en-dessous du faisceau est normal lors d’un éclairage par LED. CHARGE: Lorsque le symbole de pile faible apparaît, chargez la radio à l’aide du panneau solaire, de la manivelle ou de la sortie USB. Eteignez la radio avant la charge. La LED rouge allumée indique que l’appareil est en charge. Une lumière verte indique que la charge est terminée (la lumière ne s’allumera pas si l’appareil n’est pas en charge) BATTERIE FAIBLE : Un symbole de pile faible va apparaître en haut, au centre de l’écran lorsque les piles sont faibles (la fonction radio ne fonctionnera pas). PANNEAU SOLAIRE: Placez l’appareil à l’extérieur, le panneau solaire orienté directement vers le soleil. En plein soleil, l’appareil sera pleinement chargé en 10-12 heures. MANIVELLE : Etendez la manivelle située au dos de la radio. Tournez la fermement dans le sens des aiguilles d’une montre au rythme de 130 tours/minutes. Des rotations durant 1 minute vous permettra une alimentation durant 30 minutes. La lumière rouge allumée indiquera que le rythme de rotation est approprié. USB: Cet appareil est équipé d’une entrée/sortie mini USB pour charger la radio elle-même, mais aussi d’autres appareils grâce à la manivelle. Pour charger la radio, connectez le câble mini USB dans la fiche appropriée, puis connectez à l’alimentation USB. NOTE: Le voltage devrait être de 5.0V maximum lors d’une charge par USB. CHARGE DU TELEPHONE: Connectez le téléphone portable à la fiche mini USB à l’aide d’un adaptateur approprié (non inclus) et utilisez la manivelle pour charger le téléphone. NOTE: Le temps de charge va dépendre du taux d’épuisement de la batterie du téléphone. Il est conseillé d’éteindre la radio durant la charge. Ouvrir l’appareil en annule la garantie. Ne tentez pas de réparer vousmême l’appareil. Ouvrez et fermez toujours l’antenne dans son intégralité. Ne jamais forcer sur l’antenne. Ne pas laissez l’appareil dans un véhicule en plein soleil. La radio n’est pas étanche. N’utilisez pas la manivelle lorsqu’il n’y a aucune pile ou lorsque la languette de protection est en place N’écoutez pas la radio lorsque celle-ci est connectée à l’USB. Les réceptions pourraient en être affectées. Utilisez des fréquences basses afin de minimiser les perturbations si un adaptateur doit être utilisé. ACCESSOIRES (non inclus): Merci de vous rapprocher de votre revendeur pour toute demande d’accessoires. Accessoires en option: Ecouteurs USD0.25 Prise USB SD0.25 Câble de charge USD0.18 Kit de charge pour téléphone USD0.16/0.16/0.3 Pour acheter des accessoires, merci vous rendre sur le lien suivant : www.lacrosseclock.com/810-106 Ecouteurs Câble de charge Téléphone mobile (non inclus) Témoin de charge Adaptateurs pour téléphone portable Câble d’alimentation USB Participez à la protection de l’environnement et déposez toutes piles usagées dans une décharge autorisée. GARANTIE: Cordon de charge (non inclus) Adaptateur téléphone (non inclus) RESET: Si l’affichage reste vierge, chargez la batterie puis appuyez une fois sur la touche RESET. La touche RESET est un petit bouton situé dans un creux, près de l’antenne et de la manivelle. Touche Reset Languette retirée SPECIFICITES: Dimensions: 5.5 in L x 2.5 in H x 2.375 in D (13.97 cm L x 6.35 cm H x 6.032 cm D) Bandes: Bande météo (7 fréquences): -6dB AM 82dB FM Batterie Rechargeable: 10dB 88-108 MHz LIR123/600MAH Panneau Solaire Température de fonctionnement : 5.5v/40MA Température de stockage: 14 °F - 130°F (-10 °C – 54 °C) 162.4000 162.5500MHz 540-1700KHz 32 °F - 130°F (0 °C – 54 °C) MAINTENANCE ET SOIN Evitez les températures extrêmes, les vibrations et les chocs. Nettoyez avec un chiffon doux. Ne pas utiliser de solvants, qui pourraient laisser des traces sur l’appareil. Ne pas immerger l’appareil. Garantie de 1 an. La Crosse McCormick, LLC assure que si le produit s’avère être défectueux auprès du client final dans la limite de 1 an (date de facture), La Crosse McCormick, LLC, La Crosse McCormick, LLC prendra à sa charge, sans frais, la réparation ou le remplacement (aucun remboursement ne sera effectué). CONDITIONS: 1.Renvoyez le produit accompagné de la facture originale, dans la limite de garantie à: La Crosse McCormick Warranty Department 2817 Losey Blvd S La Crosse WI 54601 2. Cette garantie est caduque si le/les défauts sont causés par l'abus, la mauvaise utilisation, la négligence ou des réparations non autorisées. 3. Toute la responsabilité pour des dommages fortuits ou consécutifs est spécifiquement exclue. Quelques Etats ne permettent pas l'exclusion ou la limitation de dommages fortuits ou consécutifs, donc la susdite limitation ou l'exclusion ne peuvent pas vous être appliquée. Cette garantie vous donne accès à des droits spécifiques, mais également aussi à d’autres droits, qui peuvent varier selon votre Etat. Limitation de Responsabilité et Solutions La Crosse McCormick, LLC n’aura aucune responsabilité dans un éventuel manque à gagner, une non utilisation ou une perte d’avantages prévus, ou tout autre dommages, accidentels, conséquentiels ou fortuits découlants de l’utilisation, propre ou impropre de cet appareil si provenant du contrat, la négligence, le délit ou conformément à n'importe quelle garantie, même si La Crosse McCormick, LLC a été informé de la possibilité de tels dommages. La responsabilité de La Crosse McCormick, pour des dommages n'excédera en aucun cas la somme payée pour ce produit. PROCEDURE DE RETOUR : Merci de suivre la procédure ci-dessous afin que l’appareil soit acheminé au service correspondant. Le non suivi de cette procédure peut allonger les délais de traitement et entrainer une perte du produit. 1. PREUVE D’ACHAT: Joindre la preuve d’achat. 2. RADIO: Y joindre votre 810-106 Radio AM/FM avec fréquences météo 3. EMBALLAGE: Protégez avec soin votre appareil afin d’éviter tout dommage du au transport. Utilisez si possible le carton d’origine. 4. DESCRIPTION DU PROBLEME: Joindre à votre envoi un courrier détaillant le problème rencontré. 5. VOS COORDONNEES: N’oubliez pas de préciser clairement vos noms, prénoms, adresse postale et numéro de téléphone où l’on peut vous joindre. 6. EXPEDITION: Expédiez le colis en joignant bien les documents listés cidessus, en port payé avec assurance et numéro de suivi (afin d’éviter toute perte). Le fabricant ne pourra être tenu pour responsable d’un colis non reçu, si celui-ci n’a pas été correctement assuré. Adresse d’expédition: La Crosse McCormick Warranty Department 2817 Losey Blvd S La Crosse WI 54601 Support: www.lacrosseclock.com/810-106 7. REPARATION/ECHANGE: La radio sera réparée ou échangée dès réception si celle-ci est sous garantie. 8. DUREE DE TRAITEMENT: De 2 à 4 semaines. Contact Support Technique: 1-608-782-1610 Enregister votre produit : www.lacrosseclock.com/register