1
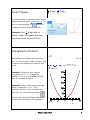
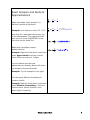
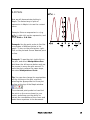
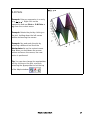
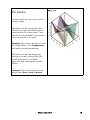
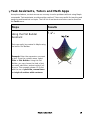
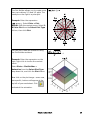
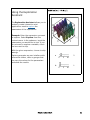
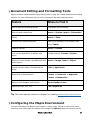
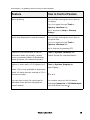
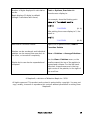
Maple Quick Start
Introduction
In this introductory course, you will become familiar with and comfortable in the Maple
environment. You will learn how to use context menus, task assistants, and palettes to
perform powerful analyses and create high-impact graphics with only a minimal
knowledge of commands. You will also learn how to create technical reports that
capture the knowledge behind an analysis directly in the Maple document. This course
will give you the tools you need to get started quickly, and a solid foundation upon
which to build your future Maple explorations.
To try this material on your own, start with an empty Maple document. Perform the
steps found in the left column of each table below. The results of each step are
displayed in the right column for your reference.
Note for non-Windows or international users: The keystrokes given in this
document are for Windows using a QWERTY keyboard. If you are using a different
platform or keyboard, see Help> Quick Help for the list of the most common keystrokes
or the 2-D math shortcut keys help page.
Talking to Maple
In this section, you will learn the basics of asking Maple a question and getting a result.
Steps
Results
Using [ENTER]
When you launch Maple you start with a
blank document, with menus and toolbars
at the top, palettes on the side. At the
cursor, you can start typing math. Press
[ENTER] to see the result.
Example: Type "1+2 [ENTER]".
Notice that the result appears on the next
line.
3
(2.1)
Using [Alt][ENTER]
In the example above, we obtained a
result by pressing [ENTER] after our
input.
You can also get Maple to return the
result on the same line as your question
by typing [Alt][ENTER] (hold down the
alt key, then press the enter key).
=
Example: Type "x+5-2" then [Alt]
[ENTER].
Context Menus
You can use Maple's context menus to
perform a wide variety of operations.
Example: Place your cursor on the last
result, and right-click. The context menu
offers several operations to choose from
according to the expression that you are
using. To integrate this expression, select
Integrate, then x.
Example: To plot the result of the
integration, right-click on the result, and
then select Plots > 2-D Plot.
The context menus are self-documenting.
The text above the arrow shows what
operation has been performed.
=
=
integrate w.r.t. x
integrate w.r.t. x
=
Smart Popups
It is also possible to generate plots and to
apply commands using Smart Popups. To
turn on smart popups, the
button in
the Maple toolbar must be selected.
Example: Enter
and hit
[Enter]. Hover the mouse over the
output and then choose 2D Plot.
Changing the Problem
Mathematics in a Maple document are
live. You can go back, make changes, and
re-execute the problem to obtain a new
result.
Example: Go back to your original
calculation of "1 + 2", change the
number "1" to a "3" and press [ENTER].
Note the change in output.
Example: In the context menu example,
above, change the "x" to ""10 x" ".
Highlight the entire line, including the
plot, then click the execute button,
,
found at the top of the Maple worksheet.
All selected calculations are updated.
5
=
(2.2)
integrate w.r.t. x
Tip: Clicking on the "execute all" button,
, recalculates the entire document.
Entering Math
There are a number of methods to enter math into Maple. You can enter math using a
combination of palettes, keyboard shortcuts, context menus and commands. Most
operations can be entered in more than one way, so you can pick the method you are
most comfortable with.
Steps
Results
Exact Answers and Numeric
Approximations
=
5
6
=
Example: On a new line, enter 1/2 + 1/3.
5
6
Note that the / automatically moves you
to the denominator. The right-arrow will
take you out. Press [Alt][ENTER] to see
the result on the same line.
=
Maple also calculates numeric
approximations.
=
Maple calculates exact answers (i.e.
fractions remain as fractions).
Example: Right-click the above result and
select Approximate from the context
menu. Select accuracy of 5 digits.
If your problem uses decimal
approximations already, Maple will return
the answer in the same format.
Example: Try the example on the right.
You can apply different formatting to
numeric results.
Example: Right-click the above result and
select Numeric Formatting... from the
context menu. Select Scientific, then
press Apply Formatting.
at 5 digits
0.83333
Palettes
Maple has over 1000 palette symbols
within the palette menus. You can also
use Maple's expression palette to input
expressions. The expression palette
contains fill-in-the-blank templates for
common operations.
Example: Use the Expression Palette, find
the integral of
. Open the
expression palette (click on Expression
on the left-hand side of your Maple
document) and click the indefinite integral
button. An indefinite integral template will
appear in your worksheet. Fill in the
place-holders (use [TAB] to move to the
next placeholder). When done, press
[ENTER] to evaluate.
Note: Use ^ to create a superscript, and
right-arrow to get out again.
Example: Use the expression palette to
find the limit of a function.
Tip: Put frequently used palette entries
on the Favorites Palette. Right-click on the
palette button and select Add to
Favorites Palette.
Tip: Maple has many different palettes for
entering expressions. To see all of the
available palettes, right-click on the
palette dock and select Arrange
Palettes.
(3.1)
=0
Symbol Completion
The symbol completion mechanism
provides an alternative to palettes for
entering symbols.
(3.2)
Type the first few characters of the
symbol name, and press [Ctrl][Space].
Choose the symbol you want from the list.
Example: Try entering
. To enter
[Ctrl][Space].
Case-Sensitivity
=
Maple is case-sensitive.
Example: Enter "
".
Example: Enter "
".
Compare the results.
=
Implicit Multiplication
Maple understands implicit multiplication.
=
Example: Type " 3 x " for "3 times x".
To multiply two variables, use a space.
" x y " means "x times y", but " xy "
means the
=
variable whose name is "xy".
Example: Type "x [space] y + xy ".
=
If you choose to Differentiate using the
context menu, you will see that x, y, and
xy are treated as three separate variables
due to the way they were entered.
You should be careful using implicit
multiplication in Maple to avoid confusion
with function calls. To us,
looks
like a function call, and
looks like
implied multiplication. Maple understands
both of these as function calls.
Example: Enter
=
=
=
using no space,
a space, and an explicit multiplication
sign. Ask Maple to calculate each result so
you can see the differences.
When multiplying with brackets you can
use a space to achieve implicit
multiplication, but it is usually safest to
explicitly use the multiplication symbol.
Maple also automatically inserts a space
between side-by-side closing and opening
=
Mathematical Notation
solve DE
Maple understands familiar mathematical
notation.
For example, Maple understands that
is a differential equation in
.
Example: Enter the equation listed above
(using the single quote key for the prime
notation). To verify that it is in fact a
differential equation, select Solve DE
from the context menu.
Label References
Maple uses label references.
(3.3)
Whenever you use [ENTER] to get a
response, the result is automatically given
a label reference. To refer to a previous
result in a computation, use [Ctrl]+[L]
and enter the label reference number.
Example: Multiply the result
(from above) by x, using labels.
To reference an equation from another
document, use Insert > Reference...
Variable Assignment
(3.4)
In order to assign a value to a variable
name, the colon-equals operator is used.
Example: To assign the value "5*x" to
the variable name "costA", the
assignment statement, := (colon
equals) is used. After a value has been
assigned to "costA", it can be used in
subsequent calculations.
(3.5)
(3.6)
(3.7)
Note: Anything you want Maple to
evaluate (e.g.. assignment statements),
must be entered in Math mode. Anything
entered in Text mode will be nonexecutable.
Tip: Find the list of keyboard shortcuts for your platform. Click Help > Quick Help
menu, and select Math Editor Shortcuts.
Combining Text and Math
In Maple you can combine math and text in the same paragraph to help formulate
mathematical sentences.
Steps
Results
Example: Start by entering a simple
computation.
=
The integral
=
The integral
is equal to
Place your cursor at the end of the output, The integral
press [F5], and complete the rest of the
sentence.
is equal to
Go back to the start of your computation
(place the cursor to the left of your
expression), press [F5] to change from
math input to text input, and start typing
text.
You can also input text in place of the
equals sign (=). Click on the equals sign
and replace it with some additional text.
Modify some of the terms in the problem,
highlight the entire sentence and press
the
The integral
is equal to
, as you can
button to re-execute the
computation.
, as you can plainly see.
plainly see.
Tip: Pressing [F5] allows you to easily toggle between math input and text input.
Tip: In math mode, the cursor is slanted and has a dotted box around it. In text mode,
the cursor appears as a vertical bar.
Tip: To check what mode you are in, look at the top left of the toolbar. In text mode it
will look like
. In math mode it will look like
can also use these buttons to change modes as an alternative to pressing [F5].
. You
Plotting
Maple can produce 2-D and 3-D plots of equations and expressions.
Steps
Results
2-D Plots
Now we will demonstrate plotting in
Maple. The fastest way to plot an
expression in Maple is to use the context
menu.
Example: Enter an expression in x (e.g.
), right-click on the expression, and
select Plots > 2-D Plot.
Example: Use the point probe to find the
coordinates of different points in the
graph. To turn on the point probe, rightclick on the plot and choose Nearest point
on line.
Example: To pan the plot, right-click on
the plot, and select Manipulator>Pan.
Hold down the left mouse button and use
the mouse to move the plot around. To
scale the plot, perform the same steps,
but select Manipulator>Scale.
Tip: You can also change the manipulator
tool by clicking on the plot, and then
selecting the appropriate tool from plot
toolbar at the top of the Maple window:
.
The enhanced point probe tool can find
the point on the curve closest to your
cursor, and allows you the ability to
extract the coordinates of the cursor and
paste them anywhere in the document.
Combining Plots
You can easily add another plot on the
same set of axes.
Example: Enter another equation in x (e.
g.
), highlight the new expression
with your mouse, hold down the [Ctrl] key
and drag it onto the plot.
Annotating Plots
You can add additional information to
plots by using the drawing tools. Lines,
arrows, text, 2D math, and shapes are
available.
Example: Click on the plot, then click on
the button on the
toolbar. Use the text tool (T) to enter
labels for the curves. Use [F5] to toggle
between text and math, and standard
Maple math editor entry keystrokes.
3-D Plots
Example: Enter an expression in x and y
(e.g.
). Right-click on the
expression and use Plots > 3-D Plots >
x,y from the context menu.
Example: Rotate the plot by clicking on
the plot, holding down the left mouse
button and moving the mouse.
Example: Pan and scale the plot by
selecting a different tool from the
Manipulator list on the context menu.
Now when you hold down the mouse
button and move the mouse, the new
action is performed.
Tip: You can also change the manipulator
tool by clicking on the plot, and then
selecting the appropriate tool at the top
of the Maple window:
Plot Options
You can modify the look of your plot in a
variety of ways.
Plot options can be changed by rightclicking on the plot and modifying the
options within the contest menu. Note
that the choices available in the context
menu are specific to 3-D plots.
Example: Right-click on the plot to obtain
the context menu. Click Transparency
and modify the plot transparency.
Plot options can also be changed by
clicking on the plot, selecting the Plot
toolbar at the top of your Maple
worksheet, and selecting the relevant
options.
Example: Click on the image, from the
toolbar select Plot > Axes > Boxed.
Task Assistants, Tutors and Math Apps
As explored above, context menus are one way to solve problems without using Maple
commands. Task assistants provide another method. Tutors are useful for teaching and
exploring mathematical concepts. The full list of assistants and tutors can be found on
the Tools menu.
Steps
Using the Plot Builder
Assistant
Plots can easily be created in Maple using
the builtin Plot Builder.
Example: Enter the expression you want
to plot. From the context menu, select
Plots > Plot Builder. Using the Plot
Builder, you can choose the kind of plot
you want, add titles, and set options, all
at once. This example shows a 3-D plot
with the use of plot title, normal axes
and style of surface with contours.
Results
The Plot Builder allows you to create more
than just ordinary 2-D and 3-D plots. The
example on the right is a polar plot.
Example: Enter the expression
. Select Plots > Plot
Builder from the context menu. Select 2D Polar Plot from the Select Plot Type
list box, then click Plot.
You can also create an animation using
the Plot Builder assistant.
Example: Enter the expression on the
right, right-click to invoke the context
menu.
Select Plots > Plot Builder >
Animation from the Select Plot Type
drop-down list, and click the Plot button.
Now click on the plot image - some new,
plot-specific, buttons will appear at the
top left of your worksheet. Click
and watch the animation.
Using the Exploration
Assistant
The Exploration Assistant allows you to
instantly create interactive miniapplications used to explore the
parameters of the expressions
Example: Enter the expression you want
to explore. Select Explore from the
context menu. In the submenu, input the
parameters you would like to test. If you
do not want to explore a variable, check
the box next to skip.
With the given expression, choose to skip
x and y.
Explore generates an user interface with
interactive sliders, dials or gauges that
can vary the values for the parameters
and show the results.
2
a
0
5
10
0
5
10
1
b
Using Tutors in Maple
Maple provides several tutors which are
useful for teaching and exploring
mathematical concepts in the subjects of:
Calculus - Single-Variable
Calculus - Multi-Variable
Complex Variables
Differential Equations
Linear Algebra
Numerical Analysis
Precalculus
Statistics
Vector Calculus
Example: From the menu, select Tools >
Tutors > Calculus - Single Variable >
Integration Methods. Enter a function
and follow the example through by
applying the correct rule at each step and
using the "Get Hint" button for help.
Math Apps
Drum Vibrations
Math Apps and other interactive
applications provide demonstrations that
illustrate various mathematical and
scientific concepts. The MathApp Guide
provides an overview of all of the
available applications in many different
fields including Discrete Math,
Engineering, Finance, Statistics, and
more.
Example: From the menu, select Tools >
MathApps To open a MathApp, simply
click on its icon.
Tip: You can also view Math Apps online using the online Maple Cloud.
Entering Commands
While many operations in Maple can be done through the use of context menus and
other interactive tools, Maple also has a rich programming language.
Steps
Results
Entering Maple Commands
Many commands are grouped together in
packages. You can type the long name, or
enter a with() command prior to using a
command from that particular package.
Example: Create a Matrix, M, and apply
the command
to find the
determinant of M.
(7.1)
(7.2)
Note: If you do not provide the package
name, Maple does not know the definition
of this function, and so simply returns the
unevaluated expression.
(7.3)
You can avoid having to type the longform of each command by pre-loading the
desired package. You can use a colon at
the end of the command to suppress
output.
(7.4)
(7.5)
Example: Load the LinearAlgebra
package first using a colon. Try again
without the colon to see the difference.
Example: Now calculate the Determinant
of M using the short-form of the
command.
Command completion is very useful when
typing out long command names.
Example: Type Gau, then press [Ctrl]+
[Space] to see a list of possible
completions. Use the arrow key to select
the desired command and press [Enter],
Document Editing and Formatting Tools
Maple contains numerous word processing tools to help you create professional-looking
reports. For your reference, here is a list of some of the more common ones.
Feature
Where to Find It
Built-in title and headings styles
Drop-down list on toolbar
Sections and subsections
Insert > Section, Insert > Subsection
Tables
Insert > Table
Ability to edit table properties
Right-click anywhere in the table, then
select Table>
Drawing canvas
Insert > Canvas
Font control and ability to define new
styles
Toolbar buttons, Format > Styles...
Ability to insert images, spreadsheets and
other objects
Insert > Image, Insert > Object
A spell-checker aware of mathematical
terms
Tools > Spellcheck
Hyperlinks and bookmarks
Format > Convert to > Hyperlink
Format > Bookmarks...
Ability to add headers and footers
View>Header Footer
Export to HTML, PDF, etc.
File > Export As
Tip: The user manual contains a chapter on creating mathematical documents.
Configuring the Maple Environment
You can customize the Maple environment in many ways. Below is a list of the most
common ones. Note that any option set through the Options menu can be set just for
this session, or globally (every time you start Maple).
Feature
How to Control Feature
Start-up dialog
Turn it off by clearing the check box on
the dialog.
Turn it on again through Tools >
Options, Interface tab.
See it anytime by Help > Startup
Dialog...
Quick Help displayed on new documents
Turn it off by clearing the check box on
the quick help.
Turn it on again through Tools >
Options, Interface tab.
See it anytime by pressing [F1].
Option for new documents to start in
Document mode (no prompt, context
menu commands hidden) or Worksheet
mode (prompts, all commands shown).
Tools > Options, Interface tab
Option to enter math in 2-D (default) or 1D
Tools > Options, Display tab
(Note: Choice only available in worksheet
mode. All math must be entered in 2-D in
document mode.)
You can also control the input type for
individual lines, without changing the
overall default.
Default format for new worksheets...
Input Display...
vs. x^2
Use context menu on the line above.
Selecting Convert to > 2-D Math Input
turns the above line into
Number of digits displayed in calculation
results.
Tools > Options, Precision tab
Round screen display to..
Maple displays 10 digits by default
(though it calculates with more).
For example, show the floating point
3.141592654
(9.1)
After setting the screen display to 5, the
result is:
3.141592654
Add item to Favorites Palette.
Palettes can be reordered, and individual
palettes can be moved from one dock to
the other, or turned off completely.
Palette docks can also be expanded and
collapsed.
(9.2)
Right-click on palette button, Add to
Favorites Palette
View > Palettes > Arrange Palettes...
Use the View> Palettes menu, or the
small arrows at the top of the palette to
expand and collapse. For the left-handside dock, these arrows are in the topright corner of the palette, to the right of
the scroll bar.
© Maplesoft, a division of Waterloo Maple Inc. 2015.
All rights reserved. This product and content is protected by copyright. You may not
copy, modify, transmit or reproduce this content without permission in writing from
Maplesoft.