1
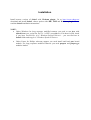
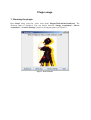
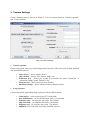
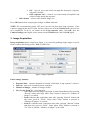
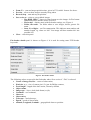
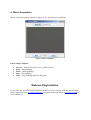
Logo design: Armella Leung, www.armella.fr.to
Arkadiusz Kalicki, Lech Mankiewicz
Webcam plugin for SalsaJ
User manual
Contents
Contents...................................................................................................................................... 1
Installation.................................................................................................................................. 2
Plugin usage ............................................................................................................................... 3
1. Running the plugin ......................................................................................................... 3
2. Camera Settings.............................................................................................................. 4
3. Image Acquisition .......................................................................................................... 5
4. Movie Acquisition.......................................................................................................... 7
Webcam Plugin Hotline ............................................................................................................. 7
Localisation ................................................................................................................................ 8
This project has been funded with support from the European Commission.
This publication reflects the views only of the author, and the
Commission cannot be held responsible for any use which may be made of the
information contained therein.
Installation
Install newest version of SalsaJ with Webcam plugin. Go to http://www.euhou.net/
download and install SalsaJ, choose packet with JRE, JMF and Webcam plugin. Please
read the SalsaJ installation instructions.
NOTE:
• Under Windows for long exposure modified cameras you need to run java with
AllowIO.exe (see: salsaj.bat, 0x378 – is LPT1 port address). If it doesn’t work, check
if you have PortTalk.sys in C:\Windows\System32\Drivers – you can find one in
SalsaJ folder and copy to C:\Windows\System32\Drivers.
•
Under Linux for Philips webcams support you need install and load pwc kernel
module. For long exposure modified cameras you need parport and parport_pc
modules loaded.
Plugin usage
1. Running the plugin
Run SalsaJ using salsaj.bat, select from menu Plugins/Webcam/WebcamPanel. The
Webcam Panel is displayed. You can choose between “Image Acquisition”, “Movie
Acquisition”, “Camera Settings” panels or closing this panel (see Figure 1).
Figure 1. Webcam Panel.
2. Camera Settings
Camera Settings panel is shown on Figure 2. You can choose between “Normal exposure”
and “Long exposure”.
Figure 2. Camera Settings.
•
Normal exposure
Choose this option when you want taking normal exposures. This will work for both modified
and unmodified cameras.
o Video device – choose capture device.
o Video format – choose video format, image size.
o Framerate [f/s] – frames per second. It overwrites the option “framerate“ in
“Advanced settings” panel. Default 15 f/p.
o Show preview – show camera preview window.
o Advanced settings – shows advanced camera functions panel.
•
Long exposure
Choose this option when taking long exposures with modified camera.
o
o
o
o
o
o
Control port – select control port, LPT1 by default.
Port initialization – set port initialization value, 15 by default.
Exposure start – set exposure start value, 0 by default.
Amp ON mask – set amplifier ON mask, 4 by default.
Exposure end – set exposure stop value, 7 by default.
Amplifier, this works only for proper modified cameras,
ON - select if you want switch on amplifier during the exposure,
selected by default.
OFF (exposure ON) – select if you want switch off amplifier and
switch on only during the exposure.
o Video format – choose video format, image size.
Press OK button when accepting the changes or Close when not.
NOTE: We recommend not using LPT port if you do not plan using long exposures. If the
camera is plugged into the LPT port, but you want to use it in the Normal mode, the port has
to be initialized. To do so, set camera to the Long exposure mode, click OK, open the
Camera settings panel again, set the camera to the Normal mode, and click OK again.
3. Image Acquisition
Image acquisition panel is shown on Figure 3. It is used for grabbing single images or series
from a camera and storing as Fits, BMP or JPEG files.
Figure 3. Image Acquisition.
Panel settings, buttons:
•
•
•
•
Exposure time – exposure duration in seconds, valid when “Long exposure” selected.
Interval – interval in seconds between exposures.
Number of images – number of images to take.
Now, From, From To – series duration.
o When Now selected image acquisition is started immediately after pressing
“Record” button and stops when “Stop” button is pressed or “Number of
images” is reached.
o From indicates that acquisition starts after pressing “Record” button and
after time given in “From”. Stops when “Stop” button is pressed or
“Number of images” is reached.
o From To indicates that acquisition starts after pressing “Record” button
and after time given in “From”. Stops when “Stop” button is pressed or
“To” time is reached, “Number of images” is not valid.
•
•
•
•
•
From, To – start and stop acquisition time, given in UT, Iso8601 format. See above.
Preview – select to show images currently being taken.
Record, Stop – start and stop acquisition.
Save series to – select to save grabbed images.
o Fits, BMP, JPEG – choose in what format save the images. In Fits format
additionally above header values are saved.
o Fits header – display panel with fits header settings, see: Figure 4.
o Folder, file name – set folder where to save images, choose generic file
name.
o Start, No of digits – set files enumeration. This indicates start number and
number length, e.g. when set “001” first image will have number 001 last
possible 999.
Close – close this panel.
Fits header details panel is shown on Figure 4. It is used for setting some FITS header
keywords.
Figure 4. Fits header details.
The following values are stored in the fits header when “Save series to” “Fits” is selected:
• Center of image, Ra, Dec – center of observation,
• Pixel size, x, y – size of camera pixel, 5.6 µm for Philips cameras,
• Focal length – length of the lens in mm, 58 mm by default,
• Object name,
• Image type – object, dark (dark frame) or flat,
• Comment – user comment,
• Observer,
• Observatory,
• Telescope – used telescope,
• Epoch – epoch of observation,
• Altitude, Longitude, Latitude – geographical observer position.
4. Movie Acquisition
Movie acquisition panel is shown on Figure 5. It is used for movie grabbing.
Figure 5. Movie Acquisition.
Panel settings, buttons:
•
•
•
•
•
Save As – choose file where to save grabbed movie.
Start – start grabbing.
Pause – pause grabbing.
Stop – stop grabbing.
Close – stop grabbing and close this panel.
Webcam Plugin Hotline
If you have any questions concerning the operation of your webcam with the help of SalsaJ,
please contact us at the [email protected] or contact us through Skype (www.skype.com) at
lech_mankewicz.
Localization
You may define names of Webcam Plugin commands in your language by creating and
editing file WebcamPlugin_xx.properties, where xx = it for Italy, gr for Greece etc. The file
WebcamPlugin.properties defines command names in English.