1
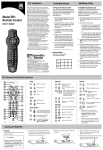
Explorer® HDTV Setup Wizard
The Explorer HDTV Setup Wizard is an on-screen
program that helps you select the best picture format and
size for viewing programs on your standard or wide-screen
HDTV. The Setup Wizard is currently available on select
®
Explorer Digital Home Communications Terminal (DHCT)
models.
•
•
Throughout these instructions, use the remote
control arrow keys (▲, ▼, ◄, ►) and
, ,
keys to navigate through the menus and options,
unless indicated otherwise.
You may want to have available the User manual
that came with your HDTV for reference.
C O N N E C T T H E DHCT T O T H E HDTV
1. Connect the Y, Pb, Pr
ports on the back of the
DHCT to one of the video
ports on your HDTV. Make
note of the video input port
you connect to on the
Y, Pb, Pr Ports
HDTV.
For example: Video 6.
Note: The DVI port on the back of the DHCT is
reserved for future use, and currently not active.
2. Verify the DHCT is plugged in and turned ON.
3. Turn ON the HDTV.
4. Press the Input or TV/Video key on the HDTV remote
or on the HDTV and scroll to the video input you chose
for the connection. For example: Video 6.
5. Turn OFF the DHCT.
6. Next, set up your standard screen HDTV using the
instructions in the next column, or setup your widescreen HDTV using the instructions on the next page.
S E T U P S T A N D A R D HDTV
1. Verify the DHCT is turned OFF.
2. Press the INFO and GUIDE keys
on the front panel of the DHCT
simultaneously to access the
Setup Wizard through the DHCT.
when you see “This is
3. Press
the Y, Pb, Pr output…” on the
Output Selection Screen to
identify the DHCT/HDTV
connection.
Standard Screen
HDTV
(4:3 Aspect Ratio)
4. Press
when you see “If your TV has a standard 4:3
screen...” on the screen to identify the screen size.
5. Set the picture format. The recommended setting for a
standard HDTV is option B, which saves the 1080i and
480i picture modes. If you are an advanced HDTV user,
you may want to choose option C, which provides more
customizing options.
• Press
and notice the example fills the entire
screen. The screen shows the saved settings.
A. Press EXIT to end the setup.
B. Press POWER to turn ON the DHCT.
to choose a custom setup. Next, go to
• Or press
the Customize the Standard-HDTV Picture.
C U S T O M I Z E T H E S T A N D A R D HDTV P I C T U R E
If you chose option C, the Wizard offers options for you to
select the best picture format and size for viewing
programs on your HDTV.
to acknowledge that the HDTV monitor is in
1. Press
Normal display mode.
2. Press
to start the Picture Scan setup.
3. Press
to cycle through the picture format options.
Follow the Setup Wizard directions to save the format
that looks best on your HDTV. If your HDTV does not
support one of the format options you will see a black
screen.
4. End the setup.
A. Press EXIT.
B. Press EXIT again.
C. Press POWER. The DHCT turns on.
V I E W HD A N D N O N -HD C H A N N E L S
Some channels are high
definition (HD) and some
are not. To maximize
viewing of non-HD channels
you can toggle between an
HD scan rate (either 1080i
or 720p) and a standard
definition scan rate (either
480i or 480p).
1. Press Settings to
access the Quick
Settings menu.
2. Scroll to Picture Format.
3. Press ◄ or ► to view
the scan rates selected
during the setup
process. Then, select
the picture format of your
choice.
(480i or 480p fills the screen
S E T U P W I D E -S C R E E N HDTV
V I E W HD A N D N O N -HD C H A N N E L S
1. Verify the DHCT is turned
OFF.
2. Press the INFO and GUIDE
keys on the front panel of the
DHCT simultaneously to
access the Setup Wizard
through the DHCT.
Some channels are high definition (HD) and some are not.
To optimize viewing of non-HD channels you can stretch
or zoom the size of the picture through the DHCT.
1. Press Settings to
access the Quick
Settings menu.
2. Scroll to Picture Size.
3. Press ◄ or ► to view
the Stretch and Zoom
options. Select the
picture size of your
choice. If your remote
control has a # key,
you can press it to
toggle between the
Normal, Stretch, and
Zoom settings.
Wide Screen HDTV
(16:9 Aspect Ratio)
when you see “This is the Y, Pb, Pr output…”
3. Press
on the Output Selection Screen to identify the
DHCT/HDTV connection.
when you see “If your TV has a 16:9 screen...”
4. Press
on the screen to identify the screen size.
5. Set the picture format. The recommended setting for a
wide-screen HDTV is option A, which saves the 1080i
picture mode. If you are an advanced HDTV user, you
may want to choose option C, which provides more
customizing options.
• Press
for programming to appear in the 1080i
format for your TV all the time.
to choose a custom setup. Next, go to
• Or press
the Customize the Wide-Screen Picture
C U S T O M I Z E T H E W I D E -S C R E E N P I C T U R E
If you chose option C, the Wizard offers options for you to
select the best picture format and size for viewing
programs on your HDTV.
1. Press
to acknowledge that the HDTV monitor is in
Normal display mode.
2. Press
to start the Picture Scan setup.
3. Press
to cycle through the picture format options.
Follow the Setup Wizard directions to save the format
that looks best on your HDTV. If your HDTV does not
support one of the format options you will see a black
screen.
4. End the setup.
A. Press EXIT.
B. Press EXIT again.
C. Press POWER. The DHCT turns on.
2
CHANGE BORDER COLOR
Tune to an HD channel, then to a
non-HD channel. On some channels, the setup may be
displaying a border either on the right and left sides of the
screen, or on the top and bottom of the screen.
1. Press Settings twice to access the General Settings
menu.
2. Scroll to Set:TV Borders.
3. Press ► to access the Light, Med, and Dark options.
4. Scroll through the options and select the border color of
your choice.
5. Press
Explorer HDTV Setup Wizard
to accept the changes.
4003114 Rev A
Frequently Asked Questions
About HDTV
A R E L O C A L TV S T AT I O N S B R O A D C A S T I N G I N HDTV?
Many local TV stations are transmitting digital signals. However, transmitting a digital signal does not
mean transmitting an HDTV signal. Some stations are using the new bandwidth to broadcast several
standard-definition channels. Most stations however, once they begin broadcasting in digital are offering
HD content from their parent station (i.e. CBS, ABC, NBC, Fox, WB, UPN, or PBS).
W H Y A R E S O M E HDTV S 4: 3 A S P E C T R AT I O A N D O T H E R S 16:9?
The aspect ratios differ because the television industry manufactures both standard and wide-screen
HDTVs, to appeal to consumer viewing preferences.
•
•
On wide-screen HDTVs, the programming is displayed on the full screen.
On standard HDTVs, the programming is displayed in letter-box format in the middle of the screen.
(There are bars surrounding the picture.)
W H AT A R E T H E D I F F E R E N C E S B E T W E E N S T A N D A R D TV S A N D HDTV S ?
•
•
•
•
4003114 Rev A
The HDTV is 1/3 wider than a traditional TV. The HDTV aspect ratio is 16:9 (compared to 4:3 for
SDTV).
HDTV uses a much finer resolution to create the TV picture—1125 lines for HDTV compared to 525
lines used in SDTV. This means that the resolution for HDTV can be up to 1920x1080 pixels,
compared with 720x480 for SDTV.
In the USA, HDTV is always broadcast with digital signals. SDTV is currently broadcast in both digital
and analog. (However, HDTV and digital SDTV do not use the same digital signal.)
Generally all HDTV-ready monitors or integrated HDTV sets are capable of supporting an SDTV 480i
or 480p signal. Not all HDTV monitors support both 720p and 1080i HDTV signals. For instance,
some plasma displays only support 720p.
Explorer HDTV Setup Wizard
3
Closed Captioning
TURN IT ON AND OFF
All TVs support closed captioning through the RF and baseband inputs. When your HDTV-to-DHCT
connection is through the Y, Pr, Pb port, closed captioning is controlled by the Explorer DHCT.
1. Press Settings twice to access the General Settings menu.
2. Scroll to Audio:Volume Ctrl.
3. To control the audio volume through the DHCT, select the Variable setting. This setting
enables you to have closed captioning turned on or off while listening to the programming audio,
or to have closed captioning on while the DHCT audio is muted.
A. While watching TV, press Settings to access the Quick Settings menu.
B. Scroll to Caption Off/On/On with Mute.
C. Press ► to access the options.
D. Scroll through the options and press Select to set your choice.
4. To control the audio volume through the TV, select the Fixed setting. This setting enables
you to have closed captioning turned on or off while listening to the programming audio.
A. While watching TV, press Settings to access the Quick Settings menu.
B. Scroll to Caption Off/On.
C. Press ► to access the options.
D. Scroll through the options and press Select to set your choice.
CHOOSE A SOURCE
1.
2.
3.
4.
Press Settings twice to access the General Settings menu.
Scroll to CC:Source.
Press ► to access the STD (standard) and digital source options.
Scroll through the options and select the recommended sources: Std CC1 and Digital 1.
CHANGE THE LOOK
If the closed-captioning source does not support the enhanced text appearance and other attributes,
the text color and size will not change after making the following adjustments.
1. Press Settings twice to access the General Settings menu.
2. Scroll to CC:Background.
A. Press ► to access the background shading and color options.
B. Scroll through the options and select your choice.
3. Scroll to CC:Characters.
A. Press ► to access the character shading, color, and style options.
B. Scroll through the options and select your choice.
4. Scroll to CC:Options.
A. Press ► to access the text size and caption style options.
B. Scroll through the options and select your choices.
R E C O R D HD P R O G R A M S
If the program contains closed caption information, it will be recorded by your VCR. When the tape is
played back, turn on the closed captioning feature on your TV to view the captions. Note: An HD program
records to your VCR in SD (standard definition) format.
Scientific-Atlanta, the Scientific-Atlanta logo, and Explorer are
registered trademarks of Scientific-Atlanta, Inc.
Other trademarks listed herein are the property of their
respective owners.
©2003 Scientific-Atlanta, Inc.
All rights reserved. Printed in USA.
February 2003
4003114 Rev A