1
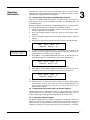
Model PS9009 TC Programmable
Electrophoresis Power Supply
CAT. NOS. 31067-242
10556-017
Table of Contents
1. Introduction ................................................................................................. 1
1.1
1.2
Notice to Customer ................................................................................... 1
Warnings .................................................................................................. 1
2. Overview ....................................................................................................... 2
2.1
2.2
Description................................................................................................ 2
Set-Up ...................................................................................................... 2
3. Operating Instructions ............................................................................ 4
3.1
3.2
3.3
3.4
3.5
3.6
3.7
3.8
3.9
Programming and Operating a One Time Single Step Program .............. 4
Programming and Operating a Sequential Program .................................... 5
Programming and Operating the Low Current Program............................... 5
Temperature Control Program.................................................................... 5
Setting Safe Operating Limits ................................................................... 6
Relationships Between Volts, Milliamps, Watts
and Chamber Resistance ......................................................................... 7
Running Multiple Chambers ..................................................................... 7
Using Automatic Crossover ...................................................................... 8
Integration................................................................................................. 8
4. Troubleshooting Guide ........................................................................... 9
4.1
4.2
4.3
Display Messages...................................................................................... 9
4.1.1 Start Up Message ......................................................................... 9
4.1.2 End of Run Display ........................................................................ 9
Fault Detection Messages ........................................................................ 9
4.2.1 No Load Detection Message ........................................................ 9
4.2.2 Ground Leakage Message ......................................................... 10
4.2.3 Power Fault Message ................................................................. 10
4.2.4 Memory Lost Message ............................................................... 10
4.2.5 Power Restart Message ............................................................. 10
General Troubleshooting ........................................................................ 11
5. Related Products ..................................................................................... 12
6. Additional Information .......................................................................... 13
6.1
6.2
6.3
6.4
Care and Handling ................................................................................... 13
Specifications........................................................................................... 13
Warranty ................................................................................................. 14
Declaration of Conformity and CE Mark ................................................. 14
Figure:
1.
Model PS9009 TC Programmable Electrophoresis
Power Supply..................................................................................................... 3
GEL-MIX®, HORIZON®, TECH-LINE , and the Life Technologies logo are marks of Life Technologies, Inc.
SM
i
Introduction
1.1
!
1
Notice to Customer
This product is authorized for laboratory research use only. The product has not
been qualified or found safe and effective for any human or animal diagnostic or
therapeutic application. Uses for other than the labeled intended use may be a
violation of applicable law.
1.2
Warnings
1.
DANGER! HIGH VOLTAGE! This power supply has been designed for use as
a source of DC power for electrophoresis. It is capable of generating lethal
currents. This unit should always be operated with extreme caution. Careless
handling could result in electrical shock.
2. Never operate damaged equipment. Do not use the unit without the cover in
place or with any possible short circuit. If the power supply emits smoke or
blows the main fuses, turn off the power supply and disconnect the AC line and
power cord.
3. Do not operate with connecting cables that have exposed live wires.
4. Always turn off the power supply before connecting or removing the power
cords or moving an electrophoresis apparatus.
5. Handle one power cord at a time, with one hand only, when connecting or
removing DC power cords at the power output terminals.
6. Do not immerse this unit in water.
7. Do not operate the unit in a damp, humid atmosphere or in a fashion where
condensed moisture may short out electrical components.
8. Do not connect the output to earth ground.
9. The AC power cord has a three-pronged plug which must be connected to a
grounded line voltage receptacle. Do not use a two-wire receptacle with an
adapter. This could create a serious electrical hazard for persons using the
unit.
10. Use the correct voltage AC power outlet for the power supply. Be sure to
always plug a 110 VAC power supply into a 110-V line, and use a 240-V line
with a 240 VAC unit.
1
2
Overview
2.1
Description
The Model PS9009 TC Programmable Electrophoresis Power Supply is intended to
be used with electrophoretic devices that operate below 3000 V and up to 300 W,
and/or 300 mA DC. The unit includes two sets of output sockets which operate in
parallel to provide output in constant voltage, constant milliamps, or constant power
(see figure 1). This power supply has the ability to restart itself in the event of a
power failure.
2.2
Set-Up
Unpacking the Unit. Unpack and inspect the power supply unit carefully for any
damage. Do not use the unit if it is damaged. If damage is found, save the packing
material and report the problem to Life Technologies’ Customer Service.
Location. Make sure the unit is set up in a location where it is protected from
physical damage, moisture, corrosive agents, and extreme temperatures. Make
sure the fan at the rear is not obstructed; leave about 20-cm of space behind the
unit. The unit should be readily accessible for safe operation.
Connection with the AC Mains. Connect the unit to the AC mains carrying the
appropriate specified voltage (V) in accordance with the rating label affixed to the
back of the unit. Ensure that both the main receptacle and the power supply plug
have the proper three-wire (grounded or earthed) connections.
2
Overview
2
5
2
3
4
7
8
6
3000V 250mA 250W P23
99999VHR 99999min S#
PROBE
DANGER
HIGH VOLTAGE
LIFE
TECHN O LO G IES
21
22
23
No.
1
2
3
4
5
6
7
8
9
10
11
12
13
14
15
16
17
18
19
20
21
22
23
V
mA
1
2
11
oC
W
VHR
3
13
7
6
5
4
15
14
12
18
DESCRIPTION
AC Mains Power ON/OFF Switch
Voltage Output Display
Current Output Display
Power Output Display
Volt/Hour Display
Timer Display
Program Number
STEP Number
Resume Switch
Start/Stop Switch
Start LED
Stop LED
Volt Selector
mA Selector
Watt or °C Selector
VHR Selector
MIN Selector
Program Selector
Previous Step Selector
Next Step Selector
High Voltage Output Jacks
Numeric Keypad
Temperature Probe Output
0
9
9
19
17
16
8
20
1
10
FUNCTION
Turns on the main power
Displays actual or set Volts
Displays actual or set mA
Displays actual or set Watts
Displays actual or set VHR
Displays actual or set MIN
Displays actual or preset program
Displays actual or preset step
Resumes timer and VHR values
Starts or stops High Voltage Output
Green LED indicates High Voltage on
Red LED indicates High Voltage off
Permits entry of volt set point
Permits entry of current set point
Permits entry of Watt or temperature set point
Permits the entry of Volt/Hour end point
Permits the entry of Time end point
Permits the entry of program number
Previous selection of steps
Next selection of steps
RED=POSITIVE; BLACK=NEGATIVE
Permits entry of all parameters
Connection of the external surface probe
Figure 1. Model PS9009 TC Programmable Electrophoresis Power Supply.
3
Operating Instructions
3
Note: The Low Current Program
(P28) can not be used for DNA
sequencing.
The touch key pads on the front of the Model PS9009 TC Programable
Electrophoresis Power Supply (figure 1) are used to program and run the unit. The
power supply can be operated in any of three different modes: Constant Voltage,
Constant Current, or Constant Power with automatic crossover. The power supply
can also be run with temperature regulation. The power supply stores up to 24
different programs which are arranged into three different types. Programs coded
P01 to P08 and P11 to P18 are one time single step programs. Programs coded
P21 to P27 are multiple step programs and can have up to 10 steps. The program
coded P28 is designed for low current operation. This is a multiple step program for
operation < 1 mA.
3.1
Programming and Operating a Single Step Program
There are 16 available single step programs, coded P01 to P08 and P11 to P18,
that can be set. These programs include automatic shutoff and are identified by S#
on the display panel. This symbol indicates that for each program there is only a
single programmed step. Each program is maintained in the memory of the power
supply.
Electrophoresing a vertical polyacrylamide sequencing gel at 60 W (constant power)
for 3 h.
1.
2.
Switch the AC Mains Power ON/OFF Switch to the ON position. An alarm
sounds to signify the start up of power.
Press the Start/Stop keypad to silence the alarm. The last program used is
displayed.
0000 V 000 mA 000 W P01
00000 VHR 0000 min S#
3.
4.
5.
Note: A value for both the VHR
and minutes must be entered for
the power supply to operate.
Press the Program keypad and enter the program number using the numerical
keypad.
To enter the setting parameter, press the keypad of the parameter to be
changed, and then using the numerical keypad, enter the desired value.
Values which are out of limits are not accepted.
Enter 3000 V, 300 mA, 60 W (entered 060), 99999 VHR and 180 min (entered
0180). The V, mA and VHR functions are set at maximum so they are not
limiting factors. After each value has been entered, the display remains for 5 s
and then changes to display all zeros. Press any keypad to return to the
program that is being entered.
3000 V 300 mA 060 W P01
99999 VHR 0180 min S#
6. Press the Start/Stop keypad to start electrophoresis.
The Model PS9009 TC Power Supply has automatic crossover with the limiting
parameter being indicated by the blinking display.
4
Operating
Instructions
Electrophoresis stops at the end of the programmed time or can be manually
stopped by pressing the Start/Stop keypad. Press the Start/Stop keypad to resume
electrophoresis at the point where it was stopped.
3.2
Programming and Operating a Multiple Step Program
There are 7 available multiple step programs, coded P21 to P27, that can be set.
Each program can have up to 10 individual steps which are identified by S0 to S9
on the display panel.
3
Running a program to electrophorese an SDS-PAGE gel first at a constant current
of 15 mA for 30 min and then at a constant current of 30 mA for 90 min.
1.
2.
3.
4.
Switch the AC Mains Power ON/OFF Switch to the ON position. An alarm
sounds to signify the start up of power.
Press the Start/Stop keypad to silence the alarm. The last program used is
displayed.
Press the Program keypad and enter the program number using the numerical
keypad.
Using the next and previous keypads select the step to be entered (S0 to S9).
0000 V 000 mA 000 W P21
00000 VHR 0000 min S0
Note: A value for both the VHR
and minutes must b entered for
the power supply to operate.
5.
6.
To enter the setting parameters, press the keypad of the parameter to be
changed, and then using the numerical keypad, enter the desired value.
Values which are out of limits are not accepted.
Enter 3000 V, 15 mA, 300 W, 99999 VHR and 15 min on step S0. The V, W,
and VHR functions are set at maximum so they are not limiting factors.
3000 V 015 mA 300 W P21
99999 VHR 0015 min S0
7.
8.
Press the Next keypad to switch to the next step to be entered.
Enter 3000 V, 30 mA, 300 W, 99999 VHR, and 90 min on step S1. The V, W,
and VHR functions are set at maximum so they are not limiting factors.
3000 V 030 mA 300 W P21
99999 VHR 0090 min S1
9. Press the Start/Stop keypad to start electrophoresis.
10. At the end of the 15 min first step in the program, the power supply switches
automatically to the next step. At the end of the last programmed step, the
power supply automatically shuts off the voltage and current to the
electrophoretic chamber.
3.3
Programming and Operating the Low Current Program
Program coded P28 is a dedicated low current (<1 mA) program that is operated
and programmed in the same fashion as the other multiple step programs. It is not
used for sequencing or other applications requiring the use of high current.
3.4
Temperature Control Program
The Model PS9009 TC Power Supply is designed for automatic temperature
regulation as well as that for Voltage, Current and Power. The optional temperature
probe maintains constant temperature during electrophoresis by reducing or
stopping the voltage and current output when the set temperature is surpassed.
5
Operating
Instructions
Once the temperature drops below the set point, both voltage and current output is
resumed at the preset levels. The use of the temperature regulation mode prevents
the activation of the power (Watt) regulation mode.
1.
2.
3.
Note: The temperature control option
can be used with any of the programs
stored in the memory of the Model
PS9009 TC Power Supply.
4.
Switch the AC Mains Power ON/OFF switch to the ON position. An alarm
sounds to signify the start up of power.
Press the Start/Stop keypad to silence the alarm. The last program used is
displayed.
Press the Program keypad and enter the program number using the numerical
keypad.
Program the desired parameters for electrophoresis. Instead of programming
Watts, press the W/°C keypad a second time. The display shows _ _ _ °C
instead of _ _ _ W. Enter the desired upper temperature limit for the gel. The
range goes from 00° to 99° C. For example 40°C would be entered as 040.
0000 V 000 mA 040°C
00000 MinR 0000 MinT
P01
S#
The display MinR is a timer that is dedicated for increments of minutes while the
Model PS9009 TC does not supply current or voltage. This timer works only when
the voltage and current are turned off in the temperature regulation mode. The main
timer (MinT) remains operational at all times during the operation of the power
supply and provides the automatic termination of the voltage and current output.
After the electrophoresis has automatically stopped, it may be necessary to
continue electrophoresis for the time that the voltage was discontinued.
3.5
Setting Safe Operating Limits
Electrophoretic chambers are generally designed for a relatively specific purpose.
For example, submarine chambers use agarose gels to separate DNA or RNA
fragments, while a DNA sequencing chamber is almost always used to separate
DNA in a denaturing polyacrylamide gel. In each case, the voltage, milliamp, and
wattage requirements are well defined within a reasonable range of values. In cases
such as these, the user can safely assume that the manufacturer has designed the
chamber to withstand the voltage and heat energy necessary to perform the
electrophoretic separation when standard protocols are followed.
Some types of electrophoretic chambers are specifically designed to be
multipurpose devices. For example, a vertical slab gel chamber could be used for
anything from DNA sequencing to isoelectric focusing, depending on the gel type
and buffer system used. Choosing safe operating limits for a chamber of this type
requires a higher degree of caution. Chamber manufacturers normally rate their
product for maximum voltage and/or maximum wattage. Whenever possible, contact
the manufacturer and request this information.
Whether you use special purpose or multipurpose chambers, the maximum
operating temperature the chambers will withstand is a critical aspect of safe
operation. Most electrophoretic chambers (with a few notable exceptions) are made
of acrylic and plastic and should operate below a temperature of 35°C. If there is a
lack of information about the capabilities of the chamber being used, regular
monitoring of the operating temperature is recommended. This should be
accomplished without coming into physical contact with the chamber when voltage
is applied.
The following procedure illustrates how normal operating conditions can be
determined and how this information can be used to choose safe operating limits for
agarose gel electrophoresis in a submarine chamber at a constant voltage of
125 V.
6
Operating
Instructions
1.
2.
3.
Note: When operating in constant
current or constant power, and
setting a limit for voltage, select a
value which is greater than the
actual value by 10% or 25 V,
whichever is greater.
Adjust the operating limits to 125 V, 300 mA, 300 W.
Start electrophoresis and note the mA and W values when the voltage has
reached 125 V and begins to blink.
Adjust the mA and W settings so that they exceed the actual values by 10% or
10 mA and 5 W, whichever is greater. Thus, the SET and ACTUAL values may
look like this:
SET
= 0125 V 055 mA 011 W
ACTUAL = 0125 V 045 mA 006 W
3
In the procedure listed above, we first determined the actual output wattage and
milliamps for operation at 125 V and then chose operating limits that were at a
slightly higher level than those indicated for mA and W. This approach ensures that
the maximum output from the power supply will never exceed the normal operating
conditions by more than 10%.
Some users prefer to set up the chamber, switch the power supply’s output ON, and
adjust the operating limits before the samples are actually loaded. Once the user
has confirmed that the chamber and the power supply are functioning properly and
determined the safe operating limits, the power supply’s output is switched OFF,
and the samples are loaded. Since the power supply will remember the settings of
the operating limits, the output can be switched back ON without further
adjustments.
3.6
Relationships Between Volts, Milliamps, Watts and Chamber
Resistance
Three fundamental concepts form the basis for understanding the relationship
between volts, milliamps and chamber resistance. When combined with the power
formula they also define watts.
1.
A movement of free electrons from atom to atom forms an electric current
which is measured in milliamps (mA) or amps (A).
2. Electrostatic lines of force between two different charges produce a pressure
that can move electrons (measured in volts).
3. All substances oppose the movement of electrons to some extent and are said
to have resistance (measured in ohms).
These three factors are always present in any operating electric circuit. It is possible
to incorporate them into one inclusive statement:
Ohm’s Law
The value of the current that will flow in any circuit will be
directly proportional to the value of the voltage applied and
inversely proportional to the value of the resistance.
or
amps = volts / resistance
combined with The power formula:
volts ! amps = watts
(where 1 amp = 1,000 mA)
Together, these two formulas define the relationship between volts, milliamps, watts
and chamber resistance.
3.7
Running Multiple Chambers
This power supply is equipped with two sets of 4-mm output connectors which are
connected in parallel because:
1.
2.
The voltage is applied equally to all branch paths in a parallel circuit.
The current flow in the branch paths of a parallel circuit is determined by the
resistance of the individual paths.
7
Operating
Instructions
3.
The sum of the currents entering the branch paths of a parallel circuit is equal
to the sum of the currents leaving the branch paths of a parallel circuit.
A practical example of this is described as follows:
The power supply is connected to two identical horizontal submarine
electrophoresis chambers (cells A and B). The power supply output is adjusted to
100 V, at constant voltage, and the current display indicates 60 mA. By applying the
three rules for parallel circuits, we can determine the following information:
1.
2.
The voltage applied to both Cell “A” and Cell “B” is 100 volts (Rule 1).
The sum of the currents flowing through Cell “A” and Cell “B” is equal to
60 mA (Rule 3).
Switch OFF the power supply and momentarily disconnect Cell “B”. Switch the
power supply back ON and note how the output current reading drops to 35 mA.
From this, the following information can be derived.
1.
2.
3.8
The current flow through Cell “B” is equal to 60 mA - 35 mA [a net value of
25 mA (Rule 3)].
The reason Cell “A” and Cell “B” have different current readings is due to the
difference in resistance between Cells “A” and “B” (Rule 2).
Using Automatic Crossover
Certain electrophoretic techniques require the careful adjustment of operating limits
and the utilization of the automatic crossover feature of this power supply.
Automatic crossover involves a transition from one mode of operation ( e.g.,
constant current) to another mode of operation such as constant voltage.
Semi-dry electroblotting exemplifies the utility of this feature. Semi-dry transfer
chambers contain two closely spaced parallel electrode plates. A “sandwich”
consisting of buffer-saturated filter paper sheets on the outside and a gel and a
charged transfer membrane on the inside is assembled and placed between the
electrode plates. Typical protocols suggest that the transfer should be carried out at
a constant current. As the transfer process progresses, the buffer in the two filter
paper layers heats up and begins to break down. This breakdown leads to an
increase in the overall resistance between the two plates. In the constant current
mode, the increase in resistance leads to a voltage increase. Left unchecked, the
increasing voltage can eventually lead to arcing which would damage the electrode
plates, the gel and the transfer membrane.
To eliminate the arcing problem, the voltage should be set at an operating limit
which is below the threshold needed for the arc. As the voltage increases, it will
eventually reach the predetermined operating limit. At this point, the power supply
will automatically cross over from the constant current mode to the constant voltage
mode of operation. As the transfer is completed, the current will gradually diminish.
3.9
Integration
The conductivity of the buffer in the electrophoresis chamber can change during the
course of a run and result in changes in the voltage, current or wattage being
applied. Integration of the output over a given time period takes such changes into
account by monitoring volt-hours or milliamp-hours or watt-hours. The vh integration
method is used most frequently since the rate of migration of molecules through
gels is proportional to the voltage that is being applied.
The way this feature can be used is described as follows. If we run an experiment at
constant voltage, at an output of 110 V for 3 h, we will accrue 330 vh. We know this
is true since the voltage was held constant for 3 h. During the course of this same
experiment, the output current varied from a maximum of 50 mA to a minimum of 25
mA. Now suppose we wish to repeat the experiment at constant current, but we
want the same effect as 3 h at a constant voltage of 110 V. At constant current, we
know the output voltage must vary since the current varied when we performed the
experiment at constant voltage. If we select a vh limit of 330 vh, the power supply
automatically stops when the total for the vh equals 330, regardless of the
fluctuations in the voltage.
8
Troubleshooting Guide
4.1
4
Display Messages
4.1.1 Start Up Message
GIBCO BRL
press STOP to resume
This is the start up message when the power supply is first turned on. An alarm will
also sound. Press the start/stop keypad to display the last used program.
4.1.2 End of Electrophoresis Display
regulation END
press STOP to resume
Power output has stopped at the end of the last programmed step. Change the step
or program to continue.
4.2
Fault Detection Messages
WARNING! This notice and the messages below alert you to potentially dangerous
situations.
CAUTION! This notice means serious damage may occur to your power supply or
chamber.
4.2.1 No Load Detection Message
LOAD fault
press STOP to resume
The LOAD Fault Detection message and the continuous tone alarm indicate that the
circuit between the power supply and the electrophoresis apparatus is not closed.
Check that all of the leads are connected properly and press the start/stop keypad
to resume.
An open connection could be caused by any of the following conditions:
1.
2.
3.
4.
a broken electrode within the electrophoretic chamber,
a broken wire within the connecting cord,
insufficient buffer levels in the electrophoretic chamber, or
electrochemical energy stored within the electrophoretic chamber.
9
Troubleshooting
Guide
4.2.2 Ground Leakage Message
LEAKAGE fault
press STOP to resume
The LEAKAGE Fault Detection message indicates that some of the current output is
flowing to earth ground. This situation can be hazardous. Switch the AC Mains
Power ON/OFF Switch to the OFF position. Check the leads and connections and
make sure that no buffer is leaking from the electrophoresis chamber onto the
bench before proceeding. Contact the TECH-LINESM if the problem persists.
4.2.3 Power Fault Message
POWER fault
press STOP to resume
The POWER Fault Detection message indicates that there is a POWER CIRCUIT
FAILURE. This may be caused by internal excess current in the power supply.
Reset the power supply by switching off the AC Mains Power ON/OFF Switch to the
OFF position and then ON again. Contact the TECH-LINE if the problem persists.
4.2.4 Memory Lost Message
MEMORY lost
press STOP to resume
The Memory Lost message indicates that the permanent memory has been lost due
to a circuit failure or a problem in the software. Reset the power supply by switching
off the AC Mains Power ON/OFF Switch to the OFF position and then ON again.
Contact the TECH-LINE if the problem persists.
4.2.5 Power Restart Message
POWER IS COMING ON
press STOP to resume
The Power Restart message indicates that there has been a power failure of the AC
Mains. The automatic restart of the unit will occur in 10 s at which time the audible
alarm will stop. The power supply will restart with the preset values.
10
Troubleshooting
Guide
4.3
4
General Troubleshooting
Many procedural and operational problems can be solved by carefully following the instructions in this manual. Some
suggestions for equipment and procedural troubleshooting are given below. Should these suggestions not resolve the
problem, or if you have questions regarding procedures, call the TECH-LINE (numbers listed on the back cover of this
manual). If you need to return the unit for repair, contact the Customer Service Department or your local distributor for
shipping instructions. Include a full description of the problem.
Problem
Comments
Display fails to illuminate when the
power supply is turned on
Make sure that the AC Mains power cord is plugged into a functioning outlet.
Check the AC Mains fuse on the back of the power supply. Replace if blown.
Desired MODE not flashing
Increase the output setting for the MODE that is limiting until the desired MODE is flashing.
Two different MODES are blinking
alternatively
Settings for both parameters are too close to actual output.
Under constant power MODE (W),
output displays are not stable
Increase the set value for the MODE that is not limiting.
Load and gel resistance are changing. Disregard slight fluctuations. Display voltage and current
will stabilize as gel equilibrates.
Increase or decrease W set value by 1 or 2 Watts to stabilize.
When using the temperature control
MODE, the separation is not complete
When the temperature limit is reached, the power supply shuts off both voltage and current output.
Check the MinR display and then electrophorese the gel for the total time displayed on this timer.
Make sure that the correct voltage limiting value was set.
Temperature Display shows symbols instead
of temperature
Make sure that the temperature probe is properly connected to power supply.
Voltage is shut off during electrophoresis
Increase the temperature limit value.
Decrease the electrophoresis parameters.
Display actual temperature is not stable
Make sure that the probe in in complete contact with the glass plates.
11
5
Related Products
Product
12
Cat. No.
Model PS 3002 Electrophoresis Power Supply
Model 4001 Electrophoresis Power Supply
Model 4001P Programmable Electrophoresis Power Supply
Model S2 Sequencing Gel Electrophoresis System
Model SA-32 Sequencing Gel Electrophoresis System
Model SA-60 Sequencing Gel Electrophoresis System
Model SA-88 Sequencing Gel Electrophoresis System
Model V15•17 Vertical Gel Electrophoresis System
GEL-MIX® 6 6% Sequencing Gel System
GEL-MIX 8 8% Sequencing Gel System
dsDNA Cycle Sequencing System (100 reactions)
HORIZON® 11•14 Horizontal Gel Electrophoresis Apparatus
HORIZON 20•25 Horizontal Gel Electrophoresis Apparatus
HORIZON 58 Horizontal Gel Electrophoresis Apparatus
Temperature Probe
31067-234
31067-069
31067-119
21105-010
31096-019
31096-035
31096-050
21080-015
15543-010
15545-015
18196-014
11068-012
21069-018
41060-013
31067-291
Replacement Parts:
Fuse, T 4.0 A, 250 V
Fuse, T 2.0 A, 250 V
31067-275
31067-283
Additional Information
5.1
6
Care and Handling
This power supply uses all solid-state components and should require no
maintenance or recalibration under normal use. If the unit must be returned for
repair, contact Life Technologies’ Customer Service Department for shipping
instructions. Please include a full description of the problem. As with any laboratory
instrument, adequate care ensures consistent and reliable performance.
After each use, wash all components gently with water and nonabrasive soap or
detergent, and rinse well in deionized water. Wipe dry with a soft cloth or paper
towel, or allow to air dry. Do not allow water to enter the case. To remove grease
and oils, use a light application of hexane, kerosene, or aliphatic naphtha. Never
use abrasive cleaners, window sprays, or rough cloths to clean the components, as
these can cause surface damage.
Additional cautions:
• Do not autoclave or dry-heat sterilize the apparatus or components.
• Do not expose the apparatus or components to phenol, acetone, benzene,
halogenated hydrocarbon solvents, or undiluted laboratory alcohols.
• Avoid prolonged exposure of the apparatus or components to UV light.
5.2
Specifications
Net Weight: . . . . . . . . . . . . . . . . . . . . . . . . . . . . . . . . . . . . . . . . . . . . . . . . . . . . 3.5 kg (7.7 lb.)
Shipping Weight: . . . . . . . . . . . . . . . . . . . . . . . . . . . . . . . . . . . . . . . . . . . . . . .6.0 kg (13.2 lb.)
Dimensions (D ! W ! H) . . . . . . . . . . . . . . . . . . . . . . . 33 ! 27 ! 11 cm (12.9 ! 10.6 ! 4.3 in.)
Installation Category . . . . . . . . . . . . . . . . . . . . . . . . . . . . . . . . . . . . . . . . . . . . . . . . . . .Type 2
Power Requirement: . . . . . . . . . . . . . . . . . . . . . . . . . . . . . . . 110/220 VAC, 50/60 Hz, 750 W
Mains fuse rating:
110 ± 10 vrms operation . . . . . . . . . . . . . . . . . . . . . . . . . . . . . . . . . . . . . . . . .T 4.0 A/250 V
220 ± 20 vrms operation . . . . . . . . . . . . . . . . . . . . . . . . . . . . . . . . . . . . . . . . .T 2.0 A/250 V
Maximum Voltage: . . . . . . . . . . . . . . . . . . . . . . . . . . . . . . . . . . . . . . . . . . . . . . . . . . . . 3,000 V
Maximum Power: . . . . . . . . . . . . . . . . . . . . . . . . . . . . . . . . . . . . . . . . . . . . . . . . . . . . . . 300 W
Maximum Current: . . . . . . . . . . . . . . . . . . . . . . . . . . . . . . . . . . . . . . . . . . . . . . . . . . . . 300 mA
Regulation: . . . . . . . . . . . . . . . . . . . . . . . . . . . . . . . . . . . . . . . . . . . . . . . . . . . . . . . . . . . . <1%
Accuracy: . . . . . . . . . . . . . . . . . . . . . . . . . . . . . . . . . . . . . . . ± 1.5% full scale for each display
Number of Output Terminals: . . . . . . . . . . . . . Two recessed sets of 4-mm output connectors
Safety Interlock: . . . . . . . . . . . . . . . . Load sensing shut-down-on-disconnect. Key activation
necessary to begin voltage generation. In the event of shutdown due to power interruption, automatic restart is provided.
Timer: . . . . . . . . . . . . . . . . . . . . . . . . . . . . . . . . . . . . . . . . . . . . . . . . . . . . . . . . 0 to 99999 min
Ground Leakage: . . . . . . . . Leakage of 500 µA will interrupt the generation of high voltage.
Integration: . . . . . . . . . . . . . . . . . . . . . . . . . . . . . . . . . . . . . . . . . . . . . . . . . . . . . . . .99999 V-h
Programmability: . . . . . . . . . . . . . . . . . . . . . . .8 programs each with 10 steps, 16 single step
programs, and 1 low current program with 10 steps
13
Additional
Information
5.3
Warranty
Life Technologies, Inc. warrants apparatus of its manufacture against defects in
materials and workmanship, under normal service, for one year from the date of
receipt by the purchaser. This warranty excludes damages resulting from shipping,
misuse, carelessness, or neglect. Life Technologies’ liability under the warranty is
limited to the repair of such defects or the replacement of the product, at its option,
and is subject to receipt of reasonable proof by the customer that the defect is
embraced within the terms of the warranty. All claims made under this warranty
must be presented to Life Technologies within one year following the date of
delivery of the product to the customer.
This warranty is in lieu of any other warranties or guarantees, expressed or
implied, arising by law or otherwise. Life Technologies makes no other
warranty, expressed or implied, including warranties of merchantability or
fitness for a particular purpose. Under no circumstances shall Life
Technologies be liable for damages either consequential, compensatory,
incidental or special, sounding in negligence, strict liability, breach of
warranty or any other theory, arising out of the use of the product listed
herein.
Life Technologies reserves the right to make improvements in design, construction,
and appearance without notice.
5.4
Declaration of Conformity and CE Mark
Note: The information outlined in this section applies only to customers located in
the European Union (EU). The EU is currently comprised of 15 member countries.
This laboratory apparatus is identified with the CE mark. This mark indicates that
the product complies to the following EU Directives and Standards:
Application of Council Directive(s):
73/23/EEC
Low Voltage Directive
89/336/EEC
Electromagnetic Compatibility
Standards:
EN 61010-1:1993
EN 50081-1:1992
EN 50082-1:1992
Product Safety
Emissions
Immunity
EU Representative:
Life Technologies Ltd.
EU Address:
3 Fountain Dr.
Inchinnan Business Park
Paisley, PA49RF Scotland
A copy of the Declaration of Conformity certificate is available upon request.
14
Part No.
Lot No.
50892
KJNP01-0898