1
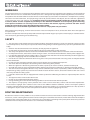
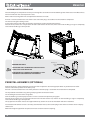
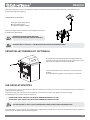
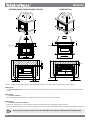
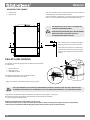
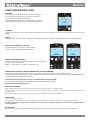
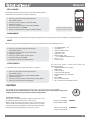
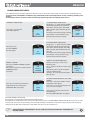
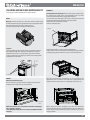
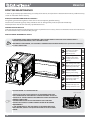
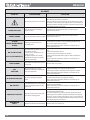
Pellet inserts user manual IC mini, mini crystal, p80 English/Inglese 1 2 We thank you for having chosen our company; our product is a great heating solution developed from the most advanced technology with top quality machining and modern design, aimed at making you enjoy the fantastic sensation that the heat of a flame gives, in complete safety. Extraflame S. p. A. ENGLISH.....................................................................................................................................................................................................................................4 Warnings................................................................................................................................................................................... 4 Safety......................................................................................................................................................................................... 4 Routine Maintenance........................................................................................................................................................... 4 Safety devices......................................................................................................................................................................... 5 Installation............................................................................................................................................................................. 5 Installations allowed....................................................................................................................................................................................................... 6 Installations not allowed............................................................................................................................................................................................. 6 Connection to the smoke evacuation system.................................................................................................................................................... 6 Smoke channel or fittings.............................................................................................................................................................................................. 6 Chimney or individual flue.............................................................................................................................................................................................. 7 Chimney cap................................................................................................................................................................................................................................ 8 Connection to external air inlets............................................................................................................................................................................ 9 Insulation, finishings, covering and safety recommendations......................................................................................................... 9 COMFORT MINI/p80/mini CRYSTAL USED INSTALLATION.................................................................................................... 9 Assembly with sliding base............................................................................................................................................................................................10 Pedestal assembly (optional).........................................................................................................................................10 Front pellet feeding kit (optional)..............................................................................................................................11 Air circulation pipes...........................................................................................................................................................11 Comfort Mini/Comfort Mini Crystal.......................................................................................................................................................................12 Comfort p80..............................................................................................................................................................................................................................12 Insert extraction.................................................................................................................................................................................................................13 Mounting the frames.........................................................................................................................................................................................................14 Pellets and feeding............................................................................................................................................................14 THE REMOTE CONTROL ...........................................................................................................................................................15 General features..................................................................................................................................................................................................................16 CONFIGURATION OF REMOTE CONTROL.........................................................................................................................................................................16 Menu Structure.....................................................................................................................................................................................................................17 Basic instructions..............................................................................................................................................................17 COMMISSIONING settings....................................................................................................................................................18 Adjusting time, day, month and year......................................................................................................................................................................18 Adjusting language...........................................................................................................................................................................................................18 Functioning and logic......................................................................................................................................................19 Room probe and STAND BY function:.......................................................................................................................................................................20 Stove functioning with additional external thermostat (optional)...........................................................20 Installation and activation of ROOM PROBE (optional)......................................................................................21 User menu...............................................................................................................................................................................21 Index Pellet feed adjustment...................................................................................................................................................................................................21 V1- fan............................................................................................................................................................................................................................................22 Stand - by.....................................................................................................................................................................................................................................22 Keys locked...............................................................................................................................................................................................................................23 Room probe...............................................................................................................................................................................................................................23 Stove status..............................................................................................................................................................................................................................23 Chrono.....................................................................................................................................................................................23 Programming example......................................................................................................................................................................................................24 Cleaning under user's responsibility.........................................................................................................................25 Routine maintenance ........................................................................................................................................................26 Displays...................................................................................................................................................................................27 ALARMS .....................................................................................................................................................................................28 WARRANTY CONDITIONS........................................................................................................................................................29 3 ENGLISH Warnings The instruction manual is an integral part of the product: make sure that it always accompanies the appliance, even if transferred to other owners or user or is transferred to another place. If it is damaged or lost,request another copy from the area technician. This product must be destined for the use for which it has been expressly realised. The manufacturer is exempt from any liability, contractual and extracontractual, for injury/damage caused to persons/animals and objects, due to installation, adjustment and maintenance errors and improper use. Installation must be performed by qualified staff and/or technical after-sales assistance, which assumes complete responsibility for the definitive installation and consequent good functioning of the product installed. It is necessary to bear in mind all laws and national, regional, provincial and town council Standards present in the country the appliance has been installed. Extraflame S.p.A. cannot be held responsible for the failure to comply with such precautions. After removing the packaging, ensure that the content is intact and complete. If not so, contact the dealer where the appliance was purchased. All electric components that make up the product must be replaced with original spare parts exclusively by an authorised aftersales centre, thus guaranteeing correct functioning. Safety The stove must not be used by persons (including children) with reduced physical, sensorial and mental capacities or who are unskilled persons, unless they are supervised and trained regarding use of the appliance by a person responsible for their safety. Children must be controlled to ensure that they do not play with the appliance. Do not touch the stove when you are barefoot or when parts of the body are wet or humid. The safety and adjustment devices must not be modified without the authorisation or indications of the manufacturer. Do not pull, disconnect, twist electric cables leaving the stove, even if disconnected from the electric power supply mains. It is advised to position the power supply cable in a way that it does not come into contact with hot parts of the appliance. The power supply plug must be accessible after installation. Do not close or reduce the dimensions of the airing vents in the place of installation. The airing vents are indispensable for correct combustion. Do not leave the packaging elements within reach of children or unassisted disabled persons. The hearth door must always be closed during normal functioning of the product. When the appliance is functioning and hot to the touch, especially all external surfaces, attention must be paid Check for the presence of any obstructions before switching the appliance on following a prolonged standstill period. The stove has been designed to function in any climatic condition (also critical). In particularly adverse conditions (strong wind, freezing) safety systems may intervene that switch the stove off. If this occurs, contact the technical after-sales service and always disable the safety system. If the flue should catch fire, be equipped with suitable systems for suffocating the flames or request help from the fire service. This appliance must not be used to burn waste Do not use any inflammable liquids for ignition During the filling phase do not allow the bag of pellets to come into contact with the product The majolicas are top quality artisan products and as such can have micro-dots, crackles and chromatic imperfections. These features highlight their valuable nature. Due to their different dilation coefficient, enamel and majolica produce crackling,. which demonstrate their effective authenticity. To clean the majolicas, it is recommended to use a soft, dry cloth. If a detergent or liquid is used, the latter could penetrate inside the crackles, highlighting the same. Routine Maintenance Based on the Decree 22 January 2008 n°37 art.2, routine maintenance means interventions aimed at reducing degradation from normal use, as well as dealing with accidental events entailing the need of first interventions, which however do not modify the structure of the system upon which one is intervening or its intended use according to the prescriptions foreseen by technical standards in force and by the manufacturer's use and maintenance booklet. 4 ENGLISH SAFETY DEVICES Key: * = present, - = not present Circuit board: intervenes directly by sending the product into alarm conditions until complete cooling, in the case of: breakage of flue gas motor, pellet feed motor breakage, black out (if more than 10 seconds), no ignition STOVES Safety devices * Glossary CLOSED HEARTH APPLIANCE Heat generator which opening is only allowed through the loading of the fuel during use. BIOMASS Biological material, excluding the material incorporated in geological formations and transformed into fossils. BIOFUEL Fuel produced directly or indirectly by biomass. Insert blocking micro switch: if the end run micro switch warns that the insert is not blocked, electric energy does not pass to power it - Electronic pressure switch: in the event of inadequate depression, it takes the machine to alarm conditions * CHIMNEY Vertical pipe with the aim of collecting and expelling the fuel products coming from only one appliance, at a convenient height from the ground. * SMOKE CHANNEL OR FITTING Pipe or connecting element between heat generator appliance and chimney to evacuate combustion products. * INSULATION Group of set-ups and materials used to prevent the transmission of heat through a wall that separates rooms with different temperatures. F 2.5 A 250 V fuse (stoves): protects the machine from violent current drops 85°C calibrated mechanical bulb with manual rearm: intervenes by blocking fuel feed whenever the pellet tank t° reaches the limit of 85°C. Rearm must be performed by qualified staff and/or the manufacturer's technical after-sales assistance. Pellet feed-box temperature control probe: if the tank over-heats, the machine automatically modulates to return * to normal temperature values (* in the models envisioned) Mechanical air pressure switch: blocks the pellet in the event of insufficient depression (in the models envisioned) * Installation The installation must be in compliance with: UNI 10683 (2005) heat generators fed with wood and other solid fuels: installation. The chimneys must be in compliance with: UNI 9731 (1990) chimneys: classification based on thermal resistance. EN 13384-1 (2006) Thermal and fluid dynamic calculation methods. UNI 7129 point 4.3.3 Fire Department dispositions, local rules and prescriptions. UNI 1443 (2005) chimneys: general requisites. UNI 1457 (2004) chimneys: clay/ceramic flue liners. National, regional, provincial and town council regulations It is necessary to bear in mind all laws and national, regional, provincial and town council Standards present in the country the appliance has been installed. CHIMNEY CAP Device positioned at chimney peak to ease the dispersion of combustion products into the atmosphere. CONDENSATE Liquid products that form when the combustion gas temperature is lower or equal to the water dew point. HEAT GENERATORS Appliance which allows to produce thermal energy (heat) through the rapid transformation, via combustion, of the chemical energy of the same fuel. GATE VALVE Mechanism for modifying the combustion gas dynamic resistance. COMBUSTION PRODUCT EVACUATION SYSTEMS Flue gas exhaust system independent from the appliance constituted by a fitting or smoke channel, chimney or individual flue and chimney cap. FORCED DRAUGHT Air circulation by means of the fan activated by electric motor. NATURAL DRAUGHT Draught which is determined in a chimney/flue for effect of the volume mass difference existing between smoke (hot) and surrounding atmosphere air, without any mechanical intake aid installed inside it or at its peak. 5 ENGLISH RADIATION AREA Area immediately near the hearth in which the heat caused by combustion is diffused, where no combustion materials must be present. REFLUX AREA Area where leaking of the combustion products is verified, from the appliance towards the installation room. The installation must be preceded by checking the chimneys, flues or unload terminals positioning of appliances similarly to: Installation prohibitions. Legal distances. Limitations disposed by local administrative regulations or particular authority prescriptions. Conventional limitations deriving from condominium regulations, constraints or contracts. Installations allowed Only appliances working in a sealed manner respect to the room or which do not place the room in depression respect to the external environment, can exist or be installed in the room where the heat generator will be installed. Appliances for cooking food and relative hoods without extractor are only allowed in kitchens. Installations not allowed In the room where the heat generator will be installed the following must not pre-exist or be installed: hoods with extractor collective type ventilation pipes. Should these appliances be in rooms adjacent, communicating with the installation room, the simultaneous use of the heat generator is forbidden, where a risk exists of one of the two rooms being placed in depression respect to the other. Connection to the smoke evacuation system UNI 10683 (2005) Standard Smoke channel or fittings To mount the smoke channels, non-flammable elements will have to be used, ideal for resisting combustion products and their eventual condensing. The use of flexible metal and asbestos cement pipes to connect the appliances to the flue is forbidden, even for preexisting smoke channels. There must be continuity between the smoke channel and the flue so that the flue does not lean on the generator. The smoke channels must not cross rooms where the installation of the combustion appliances is not allowed. The mounting of the smoke channels must be carried out in order to guarantee smoke seal for the appliance functioning conditions, limit the forming of condensate and avoid it being transported towards the appliance. The mounting of horizontal routes must be avoided. For appliances where ceiling or wall non-coaxial discharges with respect to the appliance combustion product outlet have to be reached, the direction changes will have to realised using open bends not greater than 45° (see figures below). For the heat generator appliances equipped with electric fan 6 for expelling combustion products, the instructions below must be followed: Insulating product < 45° < 45° Flue pipe Inspection The horizontal routes will have to have a minimum upward slope of 3% The length of the horizontal route must be minimal and, however, not longer than 3 metres The number of direction changes including the one for effect of using the "T" element must not be more than 4. In any case, the smoke channels must seal the combustion and condensate products and be insulated if they pass outside the installation room. The use of counterslope elements is forbidden. The smoke channel must allow the recovery of soot or be brushable. The smoke channel must have constant section. Any section changes are only allowed at the flue coupling. It is forbidden to have other air supply channels and pipes for plant engineering, especially if over-sized, transit inside the smoke channels. The mounting of manual draught adjustment devices on forced draught appliances is forbidden. ENGLISH Chimney or individual flue The chimney or individual flue must respond to the following requisites: seal the combustion products, be waterproof and adequately insulated in line with the use conditions; be realised with materials which resist the normal mechanical stress, heat, action of the combustion products and any condensate; have mainly vertical progress with deviations from the axis not higher than 45°; be adequately distanced from fuel or flammable materials through air space or opportune insulation; have preferably circular internal section: the square or rectangular sections must have round corners with a radius not lower than 20 mm; have constant internal section, free and independent; have rectangular section with max. ratio between the sides of 1.5. It is recommended that the smoke pipe be equipped with a collection chamber for solid materials and any condensate situated under the smoke channel inlet, so that it can be easily opened and inspected from airtight door. REFERENCES A B C Inflammable objects 200 mm 1,500 mm 200 mm Non-inflammable objects 100 mm 750 mm 100 mm Minimum 80 cm2 S= floor protection Flue Air inlets C B A Inspection S Chimney cap <3m 3-5% Inspection Flue Inspection 7 ENGLISH <3m External pipe that is isolated 45° 45° Inspection Inspection Appliance connection to the flue and combustion products evacuation The flue must receive the discharge from only one heat generator. Direct discharge towards closed spaces is forbidden, even with clear sky. The direct discharge of the combustion products must be at roof and the smoke pipe must have the features provided in the "Chimney or individual flue" section. Chimney cap The chimney cap must comply with the following requisites: have an internal section equivalent to that of the chimney; have useful outlet section not lower than double the chimney internal section; be built in order to avoid rain, snow, foreign bodies penetrating the chimney and so that, in the event of winds in any direction and inclination, the discharge of the combustion products is assured. be positioned in a way to guarantee an adequate dispersion and dilution of the combustion products and, however, outside the reflux area in which the formation of counterpressures occurs. Such area has different dimensions and configuration depending on the covering inclination angle. It is therefore necessary to adopt the minimum heights indicated in the figure layouts below. The chimney cap must not have mechanical intake means. SLOPING ROOF FLAT ROOF >A <A 50 cm >50 cm 50 cm <5m >5m <5m H min Z β Z=REFLUX AREA 8 ENGLISH Connection to external air inlets The appliance must be able to use the necessary air to guarantee regular functioning through external air inlet. The air inlets must comply with the following requisites: have a total free section of at least 80 cm². must be protected by grates, metal net or suitable protections as long as they do not reduce the minimum section stated in the previous point and positioned in order to avoid them being obstructed. If the combustion agent air is withdrawn directly from outside through a pipe, a downward bend must be mounted outside or a protection against the wind and no grates or similar must be positioned, (it is recommended that the air vent always communicates directly with the installation room even if the air is withdrawn from outside through a pipe). The air flow can also be obtained from an adjacent room, as long as the flow takes place freely through permanent openings communicating with the outside. The adjacent room, with respect to the installation room, must not be put in depression with respect to the external environment by means of reverse draught caused by the presence of another used appliance or intake device in such room. The permanent openings in the adjacent room must comply with the above-described requisites. The adjacent room cannot be set up as garage, storage for combustion material or activity with danger of fire. Insulation, finishings, covering and safety recommendations The coverings, independently from the materials from which they are made, must constitute a self-supporting construction with respect to the heating block and not be in contact with it. The cross members and finishings in wood or combustion materials must be positioned outside the hearth radiation area or adequately insulated. If coverings in combustion material or sensitive to heat exist in the space above the generator, an insulating and non combustible protection diaphragm must be inserted. Elements in combustible or inflammable material like wooden furniture, curtains, etc. directly exposed to the hearth radiation, must be positioned at a safe distance. The appliance installation must guarantee easy access for cleaning the appliance itself, discharge gas pipe and flue. CHIMNEY CAPS, DISTANCES AND POSITIONING Roof inclination Distance between the ridge and the chimney Minimum chimney height (measured from outlet) β A (m) H (m) < 1,85 > 1,85 < 1,50 > 1,50 < 1,30 > 1,30 < 1,20 > 1,20 0.50 m over the ridge 1,00 m from roof 0.50 m over the ridge 1,30 m from roof 0.50 m over the ridge 2,00 m from roof 0.50 m over the ridge 2.60 m from roof 15° 30° 45° 60° COMFORT MINI/p80/mini CRYSTAL USED INSTALLATION The insert is supplied with an iron sliding base that allows to install it in a pre-existing flue. This sliding base allows the easy extraction of the insert both for pellet feeding inside the feed-box and for any maintenance or cleaning at the end of the season. If there is no pre-existing flue, one can be built using the insert-holder pedestal (optional kit); in fact, the latter fixes the insert to the floor. C B Component description: A. Primary air intake pipe B.Flue exhaust pipe C.Adaptation frame D.Sliding base and rails E.Socket A E D 9 ENGLISH Assembly with sliding base Take the sliding base and position it in the pre-existing flue. Use chalk to mark the blocking holes of the base on the flue surface. Drill 8 mm holes for the steel expansion inserts. Make a hole measuring 60 mm in correspondence with the air intake. Envision a current socket on the rear of the insert so that the plug is accessible once installation is completed. Fix the base using the locking screws. Create a flue exhaust and socket connection respecting the points described previously. Take the insert, incline it in a way that the wheels insert into the relative rails, make it run until the flue gas auger is completely inserted into the flue gas conveyor box. Primary air vent: Primary air intake pipe The air vent must be made outside the flue as it must not suck heated air. Performing this connection incorrectly can jeopardise functioning of the product. Pedestal assembly (optional) Position the base in the desired point and use the feet to adjust the desired height (the bolts are positioned in the four external sides of the pedestal in the lower part). Envision a current socket on the rear of the pedestal so that the plug is accessible once installation is completed. Fix the pedestal to the floor using strong steel plugs with a diameter of 8 mm. Fix the sliding base to the frame using bolts. Connect the flue gas exhaust pipe and the air vent as stated in the previous paragraph. Take the insert, incline it in a way that the wheels insert into the relative rails, make it run until the flue gas auger is completely inserted into the flue gas conveyor box. Finally open the fire door and use the supplied Allen key to turn the screw at the bottom left corner clockwise. To understand whether the insert is correctly attached to the base, connect the plug to the socket and make sure the display switches on. Mount the hopper support for the pellet and insert it into the relevant coupling. 10 ENGLISH Note: If our pedestal is used, a slot must be created in the flue that allows to check the pellet level in the feed-box, thus preventing escape during filling. B Component description: A.Height-adjustable pedestal B.Lateral feed hopper C.Adjustable hopper support C Adjust the height and the inclination of the hopper on the basis of the flue that will be built. The hopper support can be mounted exclusively on the right side of the insert. A The insert must lie at least 1 cm above the fire surface in covering marble. Front pellet feeding kit (optional) The optional pellet feeding kit allows to feed pellets from the front inside the tank without having to extract the insert (operation that requires machine switch-off ). Further information on the accessories is available on the website: www.extraflame.it/support, in the category "accessories". Air circulation pipes It is necessary to create air recirculation inside the structure that covers the insert for correct functioning. This prevents the appliance from over-heating. To guarantee this, just realise one or more openings in the lower part and in the upper part of the covering. The following measurements must be respected: Lower part (cold air inlet) with total minimum surface 550 cm². Upper part (hot air outlet) with total minimum surface 500 cm². This ventilation system is totally independent from the air intake for combustion!! To protect from any over-heating, the Comfort P80 is supplied with a probe that analyses the temperature inside the structure and intervenes by reducing the functioning power. 11 ENGLISH Comfort Mini/Comfort Mini Crystal Comfort p80 H H Minimum 5 cm Minimum 5 cm 5 cm 5 cm 5 cm 5 cm 5 cm 5 cm It is just as important to guarantee the minimum distance of 5 cm on both sides as shown in the figures above. Reference A Hot convection air: The heat accumulated inside the covering must be vented to prevent excessive overheating of the insert. Reference B Forced ventilation: The tangential fan distributes the heat developed by the insert into the environment. Reference C Air inlet from the environment: To allow air recirculation an air inlet point must be envisioned, which is preferably positioned in the lower part of the structure in order to favour convection. The air must be withdrawn from the machine's working environment. The flue outlet pipe must always maintain a minimum distance of 50 mm from inflammable parts. 12 ENGLISH For correct functioning of the insert, during construction of the flue the measurements between the insert and internal walls of the flue must be respected (figure below). From the clearance measurements of the stove given in the technical features, it is necessary to consider at least 50 mm of air in the upper part and on the 2 sides. P80 MINI - CRYSTAL A 86 mm A 50 mm B B C C Insert blocking and releasing safety device Open the fire door and use the supplied Allen key to turn the screw at the bottom left corner clockwise. To understand whether the insert is correctly attached to the base, connect the plug to the socket and make sure it works with the supplied remote control. Insert extraction The extraction of the insert allows to load pellets inside the feed-box and to perform routine maintenance, (cleaning the ash pipe at the end of the year) or extraordinary maintenance (replacement of mechanical parts if the product should break). Follow this procedure to extract the insert: Open the fire door and use the supplied Allen key to turn the screw at the bottom left corner anticlockwise. Using the relevant fire irons, pull the machine towards yourself until it blocks automatically. 13 ENGLISH Mounting the frames Front frame Side frames N.B. Any wooden beams situated above the insert must be protected with non-inflammable material. Frame assembly is important as it allows correct recirculation of the air and consequently optimal product functioning. The insert must lie at least 1 cm above the surface in covering marble. Maintenance operations must be performed when the insert is off, with the plug disconnected from the socket. The 2 side frames are fixed to the upper frame by means of 2 screws each side. The remaining holes on the side frames allow to fix the entire frame to the sides of the machine by means of self-drilling screws. Pellets and feeding The pellets used must comply with the features described by the Standard: Ö-norm M 7135 DIN plus 51731 UNI CEN/TS 14961 Extraflame recommends the use of pellets with a 6 mm diameter with its products. Open the tank lid and load the pellets using a scoop. THE USE OF EXPIRED PELLETS OR ANY OTHER MATERIAL DAMAGES THE FUNCTIONS OF YOUR STOVE AND CAN DETERMINE THE INVALIDITY OF THE WARRANTY AND THE ANNEXED RESPONSIBILITY OF THE MANUFACTURER. To guarantee combustion without problems, the pellets must be kept in a dry place. We recommend the use of pellets with diameter of 6mm with our products. See the images for feeding pellets. Open the tank lid and load the pellets using a scoop. In the event of the inserts, only load when the machine is off and cold, by extracting it from the compartment. In the event of installation with feeding kit (optional) the machine must not be extracted. 14 ENGLISH THE REMOTE CONTROL The display changes in relation to the status of the stove or the menu shown. In the rest status the display shows the following items: Display TIME: The current time is stated. The regulation of the same is found inside the weekly programmer (see SET CLOCK menu). 20:00 ROOM TEMPERATURE: Indicates the room temperature. HEATING POWER: indicates the functioning power. It is set by the user during stove functioning. 21° P-4 Stove status: Indicates the stove status. J After a determined amount of time, the display switches off to save battery consumption. It switches back on after any key is pressed. WORK The keyboard Button 3 – ON/OFF When the key is pressed for two seconds it allows the stove to be ignited and switched off. If the stove is in alarm conditions, therefore blocked, the button allows the release and successive passage to the OFF status. During programming of the user parameters it allows to escape and go back to the previous menu. Button 4 - SET THERMOSTAT access Buttons 1 and 2 allow to adjust room temperature. Button 5 - SET POWER access Buttons 1 and 2 allow to regulate the functioning power from a minimum of 1 to a maximum of 5; this value is given on the upper display. Button 6 - to go back Button 7 - access to menu Allows to enter and set the user parameters. Display icons key It indicates functioning of the fumes motor. Off = fumes motor not working On = fumes motor working It indicates functioning of the tangential fan Off = not working On = working Additional external thermostat input status Off = open contact On = closed contact It indicates weekly programming functioning Indicator on = Weekly programming on Indicator off = Weekly programming off STBY Indicates the stby function Off = Stby deactivated On = Stby activated Indicates the presence of an alarm. On: indicates the presence of an alarm Off: indicates the absence of alarms It indicates functioning of the pellet feed motor. Off = pellet feed motor deactivated On = pellet feed motor active. Indicates the room T°. status On = Room T° lower than desired setting Off=room T°higher that set-point set Feed box probe Off = normal functioning On = anomaly Indicates the stove modulation On = the stove is working at the set power Off = the power at which the stove is working is different to the power set, the stove is modulating (for various reasons) 15 ENGLISH General features The user interface is provided with a backlit LCD display. The backlighting lasts about 4 seconds. Display backlighting time can be set. Press keys 1 and 7 simultaneously to access. After having accessed, use keys 1 or 2 to select the time in seconds from 0 to 9. Direct controls for ignition/switch-off, power change, room temperature. Weekly programming setting The insert emits an acoustic "Beep" signal every time the keys are pressed. CONFIGURATION OF REMOTE CONTROL J The remote control operates in 2 ways: via radio via cable (when connecting the cable, no configuration is necessary) THE REMOTE CONTROL IS ALREADY CONFIGURED WITH THE UNIT 0". SHOULD THERE BE ANOTHER IC MINI - CRYSTAL OR P80, TO AVOID INTERFERENCE, A NEW CONFIGURATION MUST BE DONE MODIFYING ONE OF THE TWO INSERTS. The coding procedure is the following: 1. Cut power from the insert. 2. Press keys 1 and 2 simultaneously. 3. By means of buttons 1 or 2 or selecting the UNIT (from 0 to 7) (the unit selected must be different than the other insert) 4. Power the insert. An acoustic signal "Beep" will be emitted within 10 seconds, keep the key 3 pressed to confirm. The remote control will indicate "unit xx loaded". The insert is ready and correctly configured. If the communication between remote control and chimney is very disturbed or imprecise, the remote control can be connected directly to the appliance via cable as illustrated in the figure below. Comfort Mini / Comfort Mini Crystal Comfort P80 Type and replacement of batteries The batteries are housed in the lower part of the remote control. To replace them, remove the battery holder (as indicated in the figure at the back of the remote control), remove or insert the battery according to the symbol on the remote control and on the battery itself. Two 1.5 V AA batteries are required for operation. Dimensions 61 x 150 x 120 (B x H x P) mm. The batteries used contain metals harmful for the environment. They must therefore be disposed of separately in appropriate containers. Some radio frequency appliances (e.g. mobile phones etc...) could interrupt the communication between the remote control and the stove. 16 ENGLISH Menu Structure J Set Clock Keys1 & 2: to set - enable data and parameters. Key 3: to confirm parameter and exit. Key 4: to adjust thermostat setting Key 5: to adjust power setting Key 6: to go back in menu. Key 7: to go forward in menu. Day 7 1-2 2 Set Chrono Enable chrono 7 7 1-2 2 User Confirm with key 1 IT,EN,FR,DE,ES 7 2 Stove status 2 Technic set 7 FAN v1 7 Stand - by 1-2 7 7 Keys locked Set prg1 1-2 Minutes 1-2 7 Date 1-2 7 Month 1-2 7 Year 1-2 Repeat the same passages for the other 3 time periods 1-2 7 Monday - Sunday 1-2 1-2 7 Stop prog 1 1-2 1-2 7 Start prog 1 1-2 7 Pellet 7 7 Hours 1-2 1-2 2 Language 7 Remote control probe 1-2 7 reset off - on Basic instructions The following recommendations must be followed the first times the stove is ignited: It is possible that slight odours are produced due to the drying of the paints and silicones used. Do not remain in the environment for long periods. Do not touch the surfaces as they could still be unstable. Air the room well several times. The hardening of the surfaces is terminated after several heating processes. This appliance must not be used to burn waste. Before igniting the stove, the following points must be verified: the feed-box must be full of pellets the combustion chamber must be clean The burn pot must be completely free and clean check the hermetic closure of the fire door and the ash drawer make sure the power supply cable is connected correctly the bipolar switch in the rear right part must be positioned on 1 It is forbidden to use the appliance without the divider and/or glass protection. (See figure at the site) jeopardises the safety of the product and leads to the immediate voiding of the warranty period. In the case of wear or deterioration request after-sales assistance for replacement of the part (replacement that is not under guarantee as the component is subject to wear). divider GLASS PROTECTION 17 ENGLISH COMMISSIONING settings Once the power cable at the back of the stove has been connected, move the switch to (I). The stove switch powers the stove board. The stove remains off and a first screen appears on the panel reading OFF . Fill the feed box with pellets • Open the feed box lid and load the pellets using a scoop. • Pay attention not to drop pellets laterally or inside the stove. For further information, see the previous chapter "pellets and feeding" The lid of the pellet container must always be closed. It must only be opened during the fuel feeding phase. The bags of pellets must be kept at least 1.5 metres from the stove. It is recommended that the feed-box is always half full. Make sure the appliance is off before filling the pellet tank. Adjusting time, day, month and year Controls procedure Adjusting language Controls procedure Press key 7 for a few seconds, until the Set clock appears. Confirm using key 7. Use key 1 or 3 to assign the day. Press key 7 to confirm and continue. Use the same procedure (7 to advance 1 and 2 to set) to adjust the hour, minutes, day, month and year. Press key 3 several times to confirm and exit the Menu. Press key 7 for a few seconds, until the text Set clock appears. Press key 2 twice until set Language. Confirm using key 7. Select the language using key 3. Press key 3 several times to confirm and exit the Menu. Set clock Day ITALIAN English Mon, Tue, Wed, ...Sun Language German Hours 0...23 Minutes 00...59 French Date 1...31 Spanish Month 1...12 Year 00...99 DO NOT USE ANY INFLAMMABLE LIQUIDS FOR IGNITION! DO NOT ALLOW THE BAG OF PELLETS TO COME INTO CONTACT WITH THE BOILING HOT STOVE DURING THE FILLING PHASE! In the event of continuous no ignition, contact an authorised technician. No ignition alarm J 18 First ignition could even fail as the auger is empty and is not always able to load the burn pot with the required amount of pellets on time to regularly start the flame. If the problem occurs after only a few months working, check that routine cleaning stated in the stove booklet, has been carried out correctly. ENGLISH Functioning and logic Ignition Once the points listed previously have been checked, press key 1 for three seconds to ignite the stove. 15 minutes are available for the ignition phase. After ignition and having reached the control temperature, the stove interrupts the ignition phase and passes to STARTING. 20:00 21° P-4 Start Starting During the starting phase, the stove stabilises combustion, increasing it progressively, to then start ventilation and pass on to WORK. Work During the work phase, the stove reaches the set power and works to reach the set room temperature. See following item. Adjusting thermostat setting The room temperature can be set with button 4 (access) 1 and 2 (adjustment), from 07 to 40°C. 21° Set Function 5 Set Power Adjusting power setting The power setting has 5 functioning levels, by means of button 5, (access) 1 and 2 (adjustment). Power 1 = minimum level - Power 5 = maximum level. WORKING WITH REMOTE CONTROL ROOM PROBE (AS PER STANDARD) The appliance controls room temperature by means of the room probe integrated in the remote control. Having reached the set temperature, it will automatically go to the minimum or switch off activating the Stand by function, reducing pellet consumption to a minimum. In the factory the STBY function is always set at OFF (STBY indicator light off) For its activation and logic, follow the indications on the following page, chapter: Room probe and Stand by function. Burn pot cleaning While working, the stove has an internal counter which cleans the burn pot after a set amount of time. This phase will be shown on the display, it will bring the stove to a lower power level and will increase the flue gas motor for a programmed amount of time. When the cleaning phase is finished, the stove will continue work going back to the selected power level. Switch-off Press key 1 for three seconds. When the operation has been performed, the appliance automatically enters the switch- off phase, blocking the supply of pellets. The flue exhaust motor and the hot air ventilation motor will remain on until the temperature of the stove has dropped below the factory parameters. Re-ignition The stove can only be re-ignited if the flue gas temperature has lowered and the preset timer has been reset to zero. 19 ENGLISH Room probe and STAND BY function: The Stby function is used if immediate stove switch-off is required when the set temperature has been reached. In the factory the STBY function is always set at OFF (STBY indicator light off) Stby function set at OFF (FACTORY SETTING) If the Stby function is not active (OFF), if the stove reaches the room temperature set, it will go to minimum, modulating and displaying modulation. When the room temperature is lower by 2°C than the setting, the stove will start to work again at the power set on the display, showing work. Stby function set at On When the STBY function is activated (ON), the stove, upon reaching the set room temperature and exceeding it by 2°C, will switch off after a delay set in the factory, displaying STAND - BY. When the room temperature is 2°C less than the setting, the stove will start to work again at the set power displaying WORK. Follow these instructions to activate STBY: Press key 7 for a few seconds, until Set clock appears. Press key 2 several times to reach set user. Confirm using key 7. Press key 7 several times to reach Stand by. By means of key 2 select on. Press key 3 several times to confirm and exit the Menu. The STAND-BY function is activated. J The first ignition must always be performed manually. From then on it will be managed automatically with the room probe. Stove functioning with additional external thermostat (optional) The appliance can check the room temperature using an additional external thermostat (optional). After ignition (pressing key 1 or via chrono mode), the stove will work to reach the setting displaying Work (closed contact). When the room temperature has been reached (open contact) the stove will go to minimum, displaying modulation. To install and enable it: A mechanical or digital thermostat is required. Switch the appliance off by removing the insert and cutting power. Remove the plug from the socket. Referring to the figure to the side, connect the two thermostat wires (potential free contact- no 220 V!) on the relative terminals at the back of the machine one red and the other black (with the label STBY). Power the stove. Press key 4, and by means of key 1 set the temperature at LOW. The stove is now configured correctly. It will work controlling the additional external thermostat. Additional external thermostat (optional) and STAND BY function: The Stby function is used if immediate stove switch-off is required when temperature has been reached. 20 ENGLISH Stby function set at OFF (FACTORY SETTING) If the Stby function is not active (OFF), if the stove reaches the room temperature set, it will go to minimum, modulating and displaying modulation. When the room temperature is lower by 2°C than the setting, the stove will start to work again at the power set on the display, showing work. Stby function set at On With the stby function set at ON: when the additional thermostat has a request (closed contact) the stove switches-on automatically and works to reach the temperature set, showing work. When the additional external thermostat detects that the temperature has been reached (open contact), the stove switches off after a delay pre-set in the factory, displaying stand by ext. Follow these instructions to activate STBY: Press key 7 for a few seconds, until the text Set clock appears. Press key 2 several times to reach set user. Confirm using key 7. Press key 2 several times to reach stand by. By means of key 2 select on Press key 3 several times to confirm and exit the Menu. J The first ignition must always be performed manually. From then on it will be managed automatically with the room probe. The STBY function can be set at ON or OFF using the procedure that will be described. Installation and activation of ROOM PROBE (optional) It is also possible to install an optional room thermostat directly on the stove. Contact an authorised technician to install and activate it. Note: Only one probe at a time can be used! Activate just one configuration: 1. Remote control probe; 2. Room probe (optional NTC); 3. Room thermostat (optional) User menu Pellet feed adjustment The following menu allows the adjustment of pellet feed as a percentage. If the stove has functioning problems owing to the quantity of pellets, adjust pellet feeding directly from the control board. The problems correlated to the amount of fuel can be divided into 2 categories: No fuel: the stove can never develop a suitable flame, tending to remain very low even at high powers. at minimum power the stove tends to almost switch off taking the stove into “NO PELLETS” alarm conditions. when the stove displays the “no pellets” alarm, there may be non-burned pellets inside the burn pot. Excess fuel: the stove develops a very high flame even at low power. the panoramic glass is very dirty, obscuring it almost totally. the burn pot tends to become encrusted, blocking the holes for air intake due to the excessive pellet feed, as it is only burned partially. The regulation to be performed is a percentage. Therefore a modification of this parameter will lead to a proportional variation of all stove feeding speeds. Feeding is from -30% to +20%. 21 ENGLISH Follow the procedure on the display to perform this adjustment: J First ignition could even fail as the auger is empty and is not always able to load the burn pot with the required amount of pellets on time to regularly start the flame. J Press key 7 for a few seconds, until Set clock appears. Press key 2 several times to reach set user. Confirm using key 7. Pellet is displayed. By means of the keys 1 and 2 the feeding can be increased (2) or decreased (1) during the WORK phase. Press key 3 several times to confirm and exit the Menu. If the problem occurs after only a few months working, check that routine cleaning stated in the stove booklet, has been carried out correctly. V1- fan The menu allows to adjust the speed percentage of the tangential fan. Follow these instructions to perform the adjustment: Press key 7 for a few seconds, until the text Set clock appears. Press key 2 several times to reach set user. Confirm using key 7. Press key 7 several times to reach V1 - FAN. By means of the keys 1 and 2 the speed of the tangential fan can be increased (2) or decreased (1) by +/-10%. Press key 3 several times to confirm and exit the Menu. +/-10% Stand - by The Stby function is used if immediate stove switch-off is required. By activating STAND-BY in the standard configuration (remote control integated with the room probe), when the stove reaches the set temperature + 2°C (settable) it switches off, to switch back on when it drops 2°C below the set temperature (settable). The STBY function can be set at ON or OFF using the procedure that will be described. In the factory the STBY function is always set at OFF. Its functioning is compatible with: REMOTE CONTROL ROOM PROBE (AS PER STANDARD) Room Probe (optional) Additional thermostat (optional) Follow these instructions to activate STBY: 22 Press key 7 for a few seconds, until Set clock appears. Press key 2 several times to reach set user. Confirm using key 7. Press key 2 several times to reach stand by. By means of key 2 select on Press key 6 several times to confirm and exit the Menu. ENGLISH Keys locked The function allows to lock the display keys (like mobile phones). Follow these instructions to activate key locking: Press key 7 for a few seconds, until the text set clock appears. Press key 2 several times to reach set user. Confirm using key 7. Press key 2 several times to reach keys locked. By means of key 2 select on Press key 6 several times to confirm and exit the Menu. To activate or deactivate the key lock, press key 6 for 5 seconds. Room probe The function allows to select between the probe integrated in the remote control and the additional room probe (optional). Reset Allows to reset all values modifiable by the user to the default values. The modified data are: Press key 7 for a few seconds, until the text set clock appears. Press key 2 several times to reach set user. Confirm using key 7. Press key 2 several times to reach reset. By means of key 2 select on Press key 6 to confirm and exit the Menu. Stove status It is possible to know the status of the stove at any time. Press key 7 for a few seconds, until the text Set clock appears. Press key 2 several times to reach stove status. Confirm using key 7. Press key 2 several times to scroll the stove status Menu. Press key 6 several times to exit the Menu. SET TEMPERATURE = 35°C SET POWER = 5 ENABLE CHRONO = OFF START PRG1=OFF STOP PRG1 = OFF MONDAY PRG1 = OFF .......all chrono parameters OFF PELLET = 00% STAND BY = OFF The values will appear in order that concern the following variables: Temperature of the flue gas Auger time Flue gas speed Status passage minutes Temperature of the feed box Flow Real power Inlet air temperature "ON" - mechanical pressure switch Chrono The chrono allows to program 4 time spans within a day to use every day of the week. The switch-on and switch-off time can be set in every time span. along with the days of use of the programmed time span and the desired temperature. Recommendations The ignition and switch-off times must be within the arc of one day, from 0 to 24 and not over several days: Before using the chrono function, set the current day and time. Therefore check that the points listed in the “Set clock” sub-chapter have been followed, so that the chrono function works. Aside from programming it, activate it as well. Example: Switch-on time 07:00 Switch-off time 18:00 CORRECT Switch-on time 22:00 Switch-off time 05:00 INCORRECT 23 ENGLISH Programming example Let's suppose that the weekly programmer function is to be used and 4 time periods are to be used in the following way: 1st time period: from 08:00 to 12:00 every day of the week, with room temperature at 19°C, excluding Saturday and Sunday 2nd time period: from 15:00 to 22:00 only Saturday and Sunday with room temperature at 21°C Controls procedure: Press key 7, until the text SET CLOCK appears. Set clock Press key 2 once, the SET CHRONO text will appear. Enable chrono Press key 7, ENABLE CHRONO and OFF will appear. Press key 2 to activate or deactivate the CHRONO function. Select ON. Press key 7 to confirm and continue programming. The scrolling text START PRG1 OFF will appear. Set crono ON Enable chrono Off Start prg1 1st time period switch-on Using keys 1 - 2, enter the time “08:00”, which corresponds to the switch-on time of the 1st time span. The START PRG1 text will appear followed by the time set. To confirm and continue programming, press button 7. Press button 6 to go back to the previous parameter. 1st time period switch-off Using keys 1 - 2, enter the time “12:00”, which corresponds to the switch-off time of the 1st time period. The Stop PRG1 text will appear followed by the time set. To confirm and continue programming, press button 7. Press button 6 to go back to the previous parameter. Enable 1st time period days To do this, use keys 1 and 2 in the following way: Key 7 - allows to scroll the various days, the text. With the day of the week will appear, with the condition OFF Use key 1 or 2 to enable-disable (ON/ OFF) all days. Setting temperature of first time period Press key 7, the text SET PRG1 and the temperature will appear. Press key 1 or 2 to set the temperature of 19° as in the example. Press key 7 to confirm and continue programming. The text START PRG2 OFF will appear. 08:00 Start prg1 12:00 Stop prg1 On Monday.. prg1 22° Set prg1 2nd time period switch-on At this point, the second time period must be programmed. The sequence to be followed is the same and is repeated as for the 1st time period switch-on. On this occasion it is only necessary to enter the time, for example start at 15:00 and Stop at 22:00 and to activate the days Saturday and Sunday by setting them at "ON". The temperature in SET PRG2 must be set as for example 21°C. J 24 When the weekly programmer is active, a box of the relative icon will appear on the control board. ENGLISH Cleaning under user's responsibility MONTHLY DAILY Cleaning the heat exchanger:The heat exchangers chamber must be cleaned every month as the soot deposited on the rear of the cast iron hearth wall blocks the regular flow of fumes. To access the heat exchangers, remove the central piece from the hearth wall, following the operations described below: Remove the burn pot from its location Turn the lockbolt by 180°. Some images could be offset from the original model. Burn pot: remove the burn pot from the relevant compartment and free the holes using the appropriate fire irons supplied, remove the ash from the burn pot using a suction device. Suck the ash deposited in the brazier compartment. Lockbolt Scrapers: Cleaning of the heat exchangers allows to guarantee constant heat output through time. This type of maintenance must be performed at least once a day. To do this, just use the relevant scrapers positioned in the upper part of the stove, moving them up and down several times. Hold the extractable cast iron and pull it downwards. Finally, slide it from the combustion chamber by pulling it towards yourself, paying attention to the 2 lateral cast iron hooks below. Scrapers WEEKLY Cleaning ash collector trays: The ash collector trays (indicated in the figure below) must be emptied when required using a suction device. Once the heat exchanger compartment can be accessed use the supplied fire irons to remove and scrape the soot deposited and only then use the suction device to completely remove the ash. Ash collector trays Make sure that the ash is completely cold before emptying it into a suitable container. * The “Chimney sweep” bin is an accessory available from the company. When cleaning has been completed, re-position the extractable cast iron with the opposite movement used to remove it. When the hearth wall has been positioned, turn the lockbolt to take it to its original position. 25 ENGLISH Routine maintenance In order to guarantee proper functioning and safety of the device, the operations indicated below must be performed every season or more often when necessary. DOOR, ASH DRAWER AND BURN POT GASKETS The gaskets guarantee the tightness of the stove and its consequent good functioning. These must be checked regularly: if they should be worn or damaged they must be replaced immediately. These operations must be carried out by a qualified technician. Connection to the flue Suck and clean the pipe that leads to the flue yearly or anytime that it is necessary. If there are horizontal tracts the residues must be removed before they can obstruct flue passage. NON-CLEANING jeopardises safety. If the power supply cable is damaged, it must be replaced by the after-sales service or by a similarly qualified person, so as to avoid al risks. For correct functioning, the stove must undergo routine maintenance by a qualified technician, at least once a year. D C E F A Fumes motor (disassembly and cleaning and fumes pipe), new silicone in envisioned points B Inspection of gaskets and door (replace them and apply silicone where required) C Combustion chamber (total cleaning of the entire chamber) and cleaning the ignition plug holder tube. D Feed box (complete emptying and cleaning). E Room air fan disassembly and removal of dust and debris of any pellets F Check air intake pipe and cleaning of the flow sensor B A B No flow alarm - all clean check up J 26 Should the alarm "clean check up" be triggered, make sure that the bottom of the burn pot is free of residues or scales. The holes at the bottom must be completely free to guarantee correct combustion. The above indicated "pellet feed regulation" function can be used to adjust combustion based on the described requirements. If the alarm persists and the above listed conditions have been checked, contact the qualified after-sales assistance centre. BURN POT BOTTOM ENGLISH Displays Display off Start Pellet feeding Reason Solution Stove off - The start phase is in progress - The feeding of the pellet during the ignition phase is in progress Ignition The ignition phase is in progress - Start-up The start phase is in progress - Work The normal work phase is in progress - The stove is modulating - Modulation The automatic burn pot cleaning is BURN POT CLEANING in progress. Final cleaning The automatic burn pot cleaning (not in 1st power) is performed at pre-established intervals of continued working. When the stove is switched-off, final cleaning is in progress. The final cleaning phase lasts about 10 minutes. Stove off due to temperature reached and in stand-by for reignition. To deactivate the STAND-BY function see the specific chapter. Stand by ext Stove off due to an external thermostat, waiting for re-ignition To deactivate the STAND-BY function see the specific chapter. Cooling stand-by A new ignition is attempted when the stove has just been switchedoff When the stove switches off, it is necessary to wait until complete fumes motor switch off and then clean the burn pot. The stove can only be re-ignited when these operations have been performed. Cooling stdbyblack out The stove is cooling due to black out On completion of the cooling phase, it will re-ignite automatically. Low Room thermostat set at minimum value. In this way the stove only works at 1st power independently from the power set. To escape this function just raise the room temperature using button 4 and then key 2. Stand by Hot Set room thermostat set at maximum value. The stove works at set start, without ever modulating. To escape this function just lower the set temperature using key 4 and then key 1. 27 ENGLISH ALARMS DISPLAY Fumes failure Fumes probe EXPLANATION Indicates the presence of an alarm. On: indicates the presence of an alarm Off: indicates the absence of alarms Flashing: indicates the deactivation of the depression sensor. The alarm can be reset by pressing key 3 for 3 seconds only if the fumes motor has stopped and if 15 minutes have passed from displaying the same alarm. Fault correlated to the flue gas exhaust motor. The restoration operations must be carried out by an authorised technician. Fault correlated to the fumes probe. The restoration operations must be carried out by an authorised technician. Alarm The flue gas temperature has Fumes overtemper- exceeded 310°C ature No flow alarm all clean check up Depr alarm No Ignition Black-Out No Ign. The combustion chamber or burn pot bottom are dirty. The door or the ash drawer is not closed correctly. The depression sensor is faulty. The flue exhaust pipe is blocked. Incorrect installation The mechanical depression sensor has tripped The pellet feed-box is empty. Pellet feed calibration inadequate. Incorrect installation No current during the ignition phase. No pellets In the work phase, the t° of the flue gases has dropped below factory parameters Cooling stand-by Attempt to release the alarm with stove still in cooling mode. Debimeter Fault Component disconnected or faulty 28 SOLUTION Check pellet flow (see “Pellet feed adjustment”). Check that the machine is clean, including the flue route. Do not rest cloths on the machine. Other restoration operations must be carried out by an authorised technician. Make sure the burn pot is clean. The holes must be completely free. Check hermetic door closure. Check hermetic closure of the ash drawer. Check cleanliness of the fumes pipe and the combustion chamber. Other restoration operations must be carried out by an authorised technician. Contact after-sales centre Check for the presence of pellets in the feed-box. Adjust pellet flow (see “Pellet feed adjustment”). Check the procedures described in the “Ignition” chapter. Other restoration operations must be carried out by an authorised technician. Take the stove to off conditions using key 1 and repeat the procedure described in the "Ignition" chapter. Other restoration operations must be carried out by an authorised technician. Check for the presence of pellets in the feed-box. Regulate the pellet flow. Other restoration operations must be carried out by an authorised technician. Every time the stove displays one of the alarms listed above it will switch-off automatically. The stove will block any release attempt during this phase, showing the alarm itself and ATTE alternately on the display. The alarm can be reset by pressing key 1 for 3 seconds only if the fumes motor has stopped and if 15 minutes have passed from displaying the same alarm. Contact after-sales assistance ENGLISH WARRANTY CONDITIONS EXTRAFLAME S.p.A., with offices in via dell’Artigianato 12 Montecchio Precalcino (VI), guarantees this product for 2 (two) YEARS from purchase date for manufacturer and material faults. The warranty becomes void in case the defect of conformity is not filed with the dealer within two months from date of its finding. The responsibility of EXTRAFLAME S.p.A. is limited to the supply of the appliance, which must be perfectly installed, following the indications contained in the appropriate manuals and books provided with the purchased product and in compliance with the laws in force. Installation must be performed by qualified staff, under the responsibility of the person entrusting him, who will assume complete responsibility for the definitive installation and consequent good functioning of the product installed. EXTRAFLAME S.p.A. cannot be held responsible for the failure to comply with such precautions. WARNING It is essential to carry out the functioning inspection of the product before its completion with the relative masonry finishings (counterhood, external coating, pilasters, wall painting, etc). EXTRAFLAME S.p.A. does not assume any responsibility for any damages and consequent restore expenses of the above finishings even if the same occur following the replacement of malfunctioning particulars. The warranty is validated on the condition that: The installation and relative connections of the plant have been carried out by professionally authorised staff in total compliance with the Standard in force (M.D. n.37 dated 22 January 2008), in compliance with the Standards in force, both national and regional, as well as these instructions. Testing has been carried out by a qualified technician, who assumes the entire responsibility to have verified that the plant has been realised in compliance with the Standard in force, by professionally qualified staff, in compliance with the Standards in force and to have checked the good functioning of the installed product. Once this has been verified, the After-Sales Centre will supply all the information for its correct use, filling in and delivering a copy of the document which certifies the warranty, undersigned by the client. EXTRAFLAME S.p.A. assures that all its products are manufactured with top quality materials and with manufacturing techniques which guarantee total efficiency. If during normal use of the product, defective or badly working particulars should be detected, the replacement of such particulars will be free of charge, ex dealer who made the sale. TERRITORIAL EXTENSION OF THE WARRANTY: Italian territory VALIDITY The warranty is considered valid on the condition that: 1. The purchaser forwards theinspection report and warranty validation (copy 2) filled-in completely, within 8 days from the date of validation of the warranty. The purchase date must be validated by the possession of a valid fiscal document issued by the dealer. 2. The appliance is used as prescribed in the instructions manual provided with all products. 3. The boiler is installed, in compliance with the Standards in force with regard to the prescriptions contained in the installation, use and maintenance manual relating to the product, by qualified staff in possession of the legal requisites (M.D. n.37 dated 22 January 2008); 4. The client is in possession of the documentation which certifies its eligibility, filled-in in all its parts: A. INSTALLATION REPORT: filled-in by the installer B. INSPECTION REPORT AND VALIDATION OF THE WARRANTY: Filled out by the client, dealer and a qualified technical assistance centre. 5. The warranty document, filled-in and accompanied by the purchase fiscal document issued by the dealer, must be kept and shown to the authorised technician in the event of intervention. The warranty is not considered valid in the following cases 1. The warranty conditions described above have not been respected. 2. Installation has not been performed with respect to the Standards in force regarding the provisions described in the manual/ book provided with the appliance. 3. Negligence of the customer due to lack of or incorrect maintenance of the product. 4. Presence of electric and/or hydraulic plants that do not comply with the standards in force. 5. Damages deriving from atmospheric, chemical, electro-chemical agents, improper use of the product, modifications and tampering with the product, inefficacy and/or unsuitability of the flue and/or other causes not deriving from the manufacture of the product. 29 ENGLISH 6. Combustion of materials not compliant with the types and quantities indicated in the manual/book supplied 7. All damages caused by transport. It is therefore recommended to carefully check the goods on receipt, immediately informing the dealer of any damage, making a note on the transport document and on the carrier's copy. EXTRAFLAME S.p.A. is not liable for any damage that can, directly or indirectly, affect persons, objects and pets as a consequence of failure to comply with the prescriptions indicated in this manual/book. All particulars subject to normal wear are not covered by warranty: This category includes: The gaskets, all ceramic or toughened glass, coverings and cast iron or Ironker grids, the painted, chrome or gold-plated details, the majolica, the handles and the electric cables. Colour variations, crackles and slight size differences f the majolica parts are not a reason for claims, as they are natural features of the materials themselves. Parts in refractory material Masonry work The system particulars for the production of domestic hot water not supplied by EXTRAFLAME S.p.A. (water products only). The heat exchanger is excluded from the warranty unless an adequate anti-condensate circuit is realised, which guarantees a minimum return temperature of the appliance of at least 55°C (only water products). Further clauses: The warranty also excludes any calibration or regulation interventions of the product in relation to the type of fuel or the type of installation. The warranty is not extended if particulars are replaced. No compensation will be paid for the time the product is inefficient. This warranty is valid only for the purchaser and cannot be transferred. Recommended inspection (with payment): EXTRAFLAME S.p.A. recommends that the functional inspection of the product is performed by a qualified Technical After-Sales Centre, which will supply all information for correct use. WARRANTY INTERVENTIONS The request for intervention must be sent to the dealer or after sales assistance Centre. The warranty intervention envisions the repair of the appliance without any charge, as provided by the law in force. LIABILITY EXTRAFLAME S.p.A. does not grant any compensation for direct or indirect damage caused or depending on the product. LAW COURT The Vicenza Law Court is elected as the competent court for any disputes. 30 31 EXTRAFLAME S.p.A. Via Dell’Artigianato, 12 36030 - MONTECCHIO PRECALCINO (VI) - ITALY +39.0445.865911 - +39.0445.865912 - [email protected] - www.lanordica-extraflame.com Extraflame reserves the right to vary the features and data shown in this booklet at any time and without prior notice, in order to improve its products. This manual cannot be considered as a contract for third parties. This document is available at www.extraflame.it/support 32 004275903 Manuale Utente Inserti a pellet Ic Mini - Mini Crystal - P80 - 001